
Owner's Manual
Page 1
LED TV MODELS 32LV2400-UA 42LV4400-UA 47LV4400-UA 55LV4400-UA P/NO : 194716001150 www.lg.com OWNER'S MANUAL LED TV Please read this manual carefully before operating your set and retain it for future reference.
LED TV MODELS 32LV2400-UA 42LV4400-UA 47LV4400-UA 55LV4400-UA P/NO : 194716001150 www.lg.com OWNER'S MANUAL LED TV Please read this manual carefully before operating your set and retain it for future reference.
Owner's Manual
Page 6
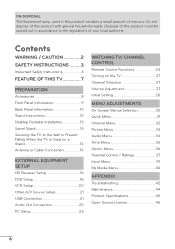
... Connection 22 PC Setup 23 WATCHING TV/ CHANNEL CONTROL Remote Control Functions 25 Turning on the TV 27 Channel Selection 27 Volume Adjustment 27 Initial Setting 28 MENU ADJUSTMENTS On-Screen Menus Selection 30 Quick Menu 31 Channel Menu 32 Picture Menu 33 Audio Menu 34 Time Menu 35 Option Menu...
... Connection 22 PC Setup 23 WATCHING TV/ CHANNEL CONTROL Remote Control Functions 25 Turning on the TV 27 Channel Selection 27 Volume Adjustment 27 Initial Setting 28 MENU ADJUSTMENTS On-Screen Menus Selection 30 Quick Menu 31 Channel Menu 32 Picture Menu 33 Audio Menu 34 Time Menu 35 Option Menu...

Owner's Manual
Page 7
... Trademark Notice "HDMI, the HDMI Logo and High-Definition Multimedia Interface are trademarks or registered trademarks of your TV if you use the 4:3 aspect ratio setting for an extended period. 7 a In order to music on your TV screen for a prolonged period (2 or more pixels, 16:9 aspect-ratio screens, and AC3 digital...
... Trademark Notice "HDMI, the HDMI Logo and High-Definition Multimedia Interface are trademarks or registered trademarks of your TV if you use the 4:3 aspect ratio setting for an extended period. 7 a In order to music on your TV screen for a prolonged period (2 or more pixels, 16:9 aspect-ratio screens, and AC3 digital...

Owner's Manual
Page 13
PREPARATION Desktop Pedestal Installation r Image shown may differ from the wall. 10.1 cm (4 inches) 10.1 cm (4 inches) 10.1 cm (4 inches) 10.1 cm (4 inches) CAUTION a Ensure adequate ventilation by 20º to suit your TV. Swivel Stand After installing the TV, you can adjust the TV set manually to the left or right direction by following the clearance recommendations. a Do not mount near or above any type of 10.1 cm (4 inches) on all four sides from your viewing position. 13 For proper ventilation, allow a clearance of heat source.
PREPARATION Desktop Pedestal Installation r Image shown may differ from the wall. 10.1 cm (4 inches) 10.1 cm (4 inches) 10.1 cm (4 inches) 10.1 cm (4 inches) CAUTION a Ensure adequate ventilation by 20º to suit your TV. Swivel Stand After installing the TV, you can adjust the TV set manually to the left or right direction by following the clearance recommendations. a Do not mount near or above any type of 10.1 cm (4 inches) on all four sides from your viewing position. 13 For proper ventilation, allow a clearance of heat source.
Owner's Manual
Page 14
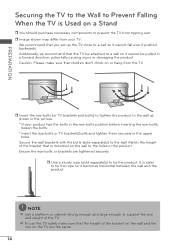
... the TV are tightened securely. Secure the wall brackets with the bolts (sold separately) to support the size and weight of the bracket that you set up the TV close to the wall. PREPARATION Securing the TV to the Wall to Prevent Falling When the TV is safer to tie the...
... the TV are tightened securely. Secure the wall brackets with the bolts (sold separately) to support the size and weight of the bracket that you set up the TV close to the wall. PREPARATION Securing the TV to the Wall to Prevent Falling When the TV is safer to tie the...
Owner's Manual
Page 16
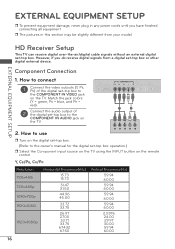
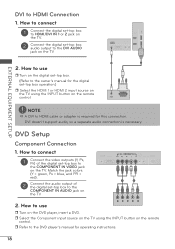
...any power cords until you do receive digital signals from your model. How to connect 1 Connect the video outputs (Y, PB, PR) of the digital set -top box operation.) r Select the Component input source on the TV using the INPUT button on the remote control. Y, CB/PB, CR/PR ...00 16 Component Connection 1. EXTERNAL EQUIPMENT SETUP HD Receiver Setup This TV can receive digital over-the-air/digital cable signals without an external digital set -top box to the COMPONENT IN AUDIO jack on the TV. EXTERNAL EQUIPMENT SETUP r To prevent equipment damage, never plug in this section...
...any power cords until you do receive digital signals from your model. How to connect 1 Connect the video outputs (Y, PB, PR) of the digital set -top box operation.) r Select the Component input source on the TV using the INPUT button on the remote control. Y, CB/PB, CR/PR ...00 16 Component Connection 1. EXTERNAL EQUIPMENT SETUP HD Receiver Setup This TV can receive digital over-the-air/digital cable signals without an external digital set -top box to the COMPONENT IN AUDIO jack on the TV. EXTERNAL EQUIPMENT SETUP r To prevent equipment damage, never plug in this section...

Owner's Manual
Page 17
How to connect 1 Connect the digital set-top box to the owner's manual for the digital set -top box. (Refer to HDMI/DVI IN 1, 2, or 3* jack on the remote control. * HDMI 3: For 42LV4400, 47LV4400, 55LV4400 HDMI OUTPUT 1 NOTE a If an HDMI cable doesn't support High Speed HDMI, it can ...cause flickers or no screen display. In this case use r Turn on the digital set -top box operation.) r Select the HDMI 1, HDMI 2, or HDMI 3* input...
How to connect 1 Connect the digital set-top box to the owner's manual for the digital set -top box. (Refer to HDMI/DVI IN 1, 2, or 3* jack on the remote control. * HDMI 3: For 42LV4400, 47LV4400, 55LV4400 HDMI OUTPUT 1 NOTE a If an HDMI cable doesn't support High Speed HDMI, it can ...cause flickers or no screen display. In this case use r Turn on the digital set -top box operation.) r Select the HDMI 1, HDMI 2, or HDMI 3* input...
Owner's Manual
Page 18
...a separate audio connection is required for this connection. Match the jack colors (Y = green, PB = blue, and PR = red). 2 Connect the audio output of the digital set -top box to the COMPONENT IN VIDEO jack on the TV. How to connect 1 Connect the video outputs (Y, PB, PR) of the digital...TV using the INPUT button on the remote control. 2 1 AUDIO DVI OUTPUT EXTERNAL EQUIPMENT SETUP NOTE a A DVI to the DVD player's manual for the digital set -top box audio output to HDMI Connection 1. DVI to the DVI AUDIO jack on the TV. 2. How to use r Turn on the digital...
...a separate audio connection is required for this connection. Match the jack colors (Y = green, PB = blue, and PR = red). 2 Connect the audio output of the digital set -top box to the COMPONENT IN VIDEO jack on the TV. How to connect 1 Connect the video outputs (Y, PB, PR) of the digital...TV using the INPUT button on the remote control. 2 1 AUDIO DVI OUTPUT EXTERNAL EQUIPMENT SETUP NOTE a A DVI to the DVD player's manual for the digital set -top box audio output to HDMI Connection 1. DVI to the DVI AUDIO jack on the TV. 2. How to use r Turn on the digital...
Owner's Manual
Page 19
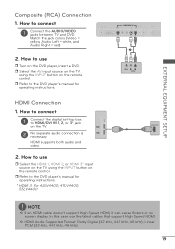
...using the INPUT button on the DVD player, insert a DVD. How to the DVD player's manual for operating instructions. * HDMI 3: For 42LV4400, 47LV4400, 55LV4400 1 VIDEO L R AUDIO HDMI OUTPUT 1 NOTE a If an HDMI cable doesn't support High Speed HDMI, it can cause flickers or no screen display.... EXTERNAL EQUIPMENT SETUP Composite (RCA) Connection 1. How to connect 1 Connect the digital set-top box to use the latest cables that support High Speed HDMI. How to HDMI/DVI IN 1, 2, or 3* jack on the remote control. ...
...using the INPUT button on the DVD player, insert a DVD. How to the DVD player's manual for operating instructions. * HDMI 3: For 42LV4400, 47LV4400, 55LV4400 1 VIDEO L R AUDIO HDMI OUTPUT 1 NOTE a If an HDMI cable doesn't support High Speed HDMI, it can cause flickers or no screen display.... EXTERNAL EQUIPMENT SETUP Composite (RCA) Connection 1. How to connect 1 Connect the digital set-top box to use the latest cables that support High Speed HDMI. How to HDMI/DVI IN 1, 2, or 3* jack on the remote control. ...
Owner's Manual
Page 20
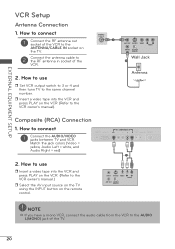
Composite (RCA) Connection 1. How to use r Set VCR output switch to 3 or 4 and then tune TV to the same channel number. How to connect 1 Connect the RF antenna out socket of the ...
Composite (RCA) Connection 1. How to use r Set VCR output switch to 3 or 4 and then tune TV to the same channel number. How to connect 1 Connect the RF antenna out socket of the ...

Owner's Manual
Page 21
... to connect 1 Connect the AUDIO/VIDEO jacks between TV and external equipment. Memory Key 21 r Operate the corresponding external equipment. 1 VIDEO L R AUDIO Camcorder Video Game Set USB Connection 1. Match the jack colors. (Video = yellow, Audio Left = white, and Audio Right = red) 2. EXTERNAL EQUIPMENT SETUP Other A/V Source Setup 1. Precautions when using the...
... to connect 1 Connect the AUDIO/VIDEO jacks between TV and external equipment. Memory Key 21 r Operate the corresponding external equipment. 1 VIDEO L R AUDIO Camcorder Video Game Set USB Connection 1. Match the jack colors. (Video = yellow, Audio Left = white, and Audio Right = red) 2. EXTERNAL EQUIPMENT SETUP Other A/V Source Setup 1. Precautions when using the...
Owner's Manual
Page 22
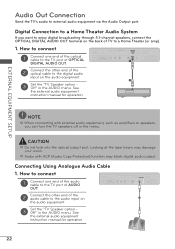
Audio Out Connection Send the TV's audio to the audio input on the audio equipment. 2 3 Set the "TV Speaker option Off" in the AUDIO menu. CAUTION a Do not look into the optical output port. a Audio with external audio equipment, such as ... 5.1-channel speakers, connect the OPTICAL DIGITAL AUDIO OUT terminal on the back of the optical cable to the digital audio input on 1 the audio equipment. 3 Set the "TV Speaker option Off" in the menu. Digital Connection to a Home Theater (or amp). 1. EXTERNAL EQUIPMENT SETUP NOTE a When connecting with ACP (Audio Copy...
Audio Out Connection Send the TV's audio to the audio input on the audio equipment. 2 3 Set the "TV Speaker option Off" in the AUDIO menu. CAUTION a Do not look into the optical output port. a Audio with external audio equipment, such as ... 5.1-channel speakers, connect the OPTICAL DIGITAL AUDIO OUT terminal on the back of the optical cable to the digital audio input on 1 the audio equipment. 3 Set the "TV Speaker option Off" in the menu. Digital Connection to a Home Theater (or amp). 1. EXTERNAL EQUIPMENT SETUP NOTE a When connecting with ACP (Audio Copy...
Owner's Manual
Page 23
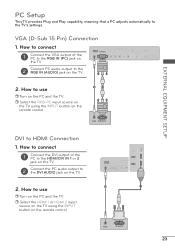
... using the INPUT button on the PC and the TV. How to use r Turn on the remote control. 2 1 AUDIO RGB OUTPUT DVI to the TV's settings. r Select the HDMI 1 or HDMI 2 input source on the TV using the INPUT button on the PC and the TV.
... using the INPUT button on the PC and the TV. How to use r Turn on the remote control. 2 1 AUDIO RGB OUTPUT DVI to the TV's settings. r Select the HDMI 1 or HDMI 2 input source on the TV using the INPUT button on the PC and the TV.

Owner's Manual
Page 24
... 67.5 60 * 32LV2400 does not support 1920 x 1080 (RGB-PC), and 1920 x 1080 (HDMI-PC) resolutions. * 32LV2400, 42LV4400, 47LV4400, and 55LV4400 only support the abovementioned resolutions. 24 a In PC mode, there may not work if a HDMI to be positioned on the graphics card, DOS mode may...brightness. The fixed image may become permanently imprinted on the screen for a long period of time. a Depending on the graphics card, some resolution settings may not allow the image to DVI Cable is clear. a Depending on the screen properly. EXTERNAL EQUIPMENT SETUP NOTE a To get the the ...
... 67.5 60 * 32LV2400 does not support 1920 x 1080 (RGB-PC), and 1920 x 1080 (HDMI-PC) resolutions. * 32LV2400, 42LV4400, 47LV4400, and 55LV4400 only support the abovementioned resolutions. 24 a In PC mode, there may not work if a HDMI to be positioned on the graphics card, DOS mode may...brightness. The fixed image may become permanently imprinted on the screen for a long period of time. a Depending on the graphics card, some resolution settings may not allow the image to DVI Cable is clear. a Depending on the screen properly. EXTERNAL EQUIPMENT SETUP NOTE a To get the the ...
Owner's Manual
Page 26
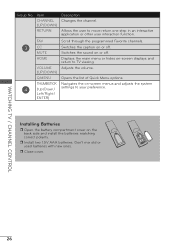
Item CHANNEL (UP/DOWN) RETURN Description Changes the channel. HOME Displays the main menu or hides on -screen menus and adjusts the system 4 (Up/Down/ settings to your preference. THUMBSTICK Navigates the on -screen displays and return to move return one step in an interactive application or other user interaction function. ...
Item CHANNEL (UP/DOWN) RETURN Description Changes the channel. HOME Displays the main menu or hides on -screen menus and adjusts the system 4 (Up/Down/ settings to your preference. THUMBSTICK Navigates the on -screen displays and return to move return one step in an interactive application or other user interaction function. ...
Owner's Manual
Page 28
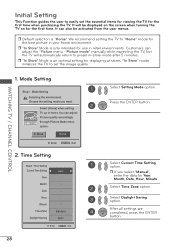
... on for the first time when purchasing the TV. In Store Home Enter RETURN Exit 2. r "In Store" Mode is an optimal setting for Year, Month, Date, Hour, Minute. 2 Select Time Zone option. 3 Select Daylight Saving option. It can adjust Picture quality... accordingly through Picture Mode menu option. Mode Setting WATCHING TV / CHANNEL CONTROL Step1. Time Setting Current Time Setting Year Month Date Hour Minute Time Zone Daylight Saving Auto -------Eastern Auto Enter RETURN Exit 28 1 Select...
... on for the first time when purchasing the TV. In Store Home Enter RETURN Exit 2. r "In Store" Mode is an optimal setting for Year, Month, Date, Hour, Minute. 2 Select Time Zone option. 3 Select Daylight Saving option. It can adjust Picture quality... accordingly through Picture Mode menu option. Mode Setting WATCHING TV / CHANNEL CONTROL Step1. Time Setting Current Time Setting Year Month Date Hour Minute Time Zone Daylight Saving Auto -------Eastern Auto Enter RETURN Exit 28 1 Select...

Owner's Manual
Page 29
... ENTER button to start Auto Tuning. 2 Select Yes to start Auto Tuning? Auto Tuning Step4. Option Setting Step3. Option Setting 1.OSD Language Setting 2.Audio Language Setting English English Enter RETURN Exit 1 Select OSD Language Setting option. 2 Select Audio Language Setting option. 3 Press the ENTER button. Do you want to begin auto tuning. ENTER 4. WATCHING TV / CHANNEL...
... ENTER button to start Auto Tuning. 2 Select Yes to start Auto Tuning? Auto Tuning Step4. Option Setting Step3. Option Setting 1.OSD Language Setting 2.Audio Language Setting English English Enter RETURN Exit 1 Select OSD Language Setting option. 2 Select Audio Language Setting option. 3 Press the ENTER button. Do you want to begin auto tuning. ENTER 4. WATCHING TV / CHANNEL...
Owner's Manual
Page 30
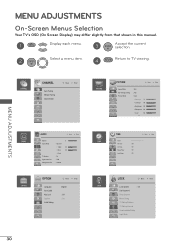
... Treble 50 Bass 50 Reset TV Speaker : On Digital Audio Out : PCM Analog Audio Out : Variable OPTION OPTION Language Input Label Key Lock Caption Initial Setting Move Enter English : Off : Off TIME TIME Clock Off Time On Time Sleep Timer Auto Sleep Move Enter Off : Off : Off : Off LOCK Move Enter...
... Treble 50 Bass 50 Reset TV Speaker : On Digital Audio Out : PCM Analog Audio Out : Variable OPTION OPTION Language Input Label Key Lock Caption Initial Setting Move Enter English : Off : Off TIME TIME Clock Off Time On Time Sleep Timer Auto Sleep Move Enter Off : Off : Off : Off LOCK Move Enter...
Owner's Manual
Page 31
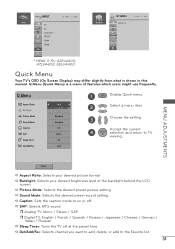
.... 31 MENU ADJUSTMENTS Close a Aspect Ratio: Selects your desired brightness level of features which users might use frequently. a Sound Mode: Selects the desired preset sound setting. r Analog TV: Mono / Stereo / SAP r Digital TV: English / French / Spanish / Korean / Japanese / Chinese / German / Italian / Russian a Sleep ...TV AV Component RPG-PC HDMI1 HDMI2 Move Enter MY MEDIA MY MEDIA PHOTO LIST Move Enter * HDMI 3: For 42LV4400, 47LV4400, 55LV4400 Quick Menu Your TV's OSD (On Screen Display) may differ slightly from what is a menu of the backlight behind the LCD screen...
.... 31 MENU ADJUSTMENTS Close a Aspect Ratio: Selects your desired brightness level of features which users might use frequently. a Sound Mode: Selects the desired preset sound setting. r Analog TV: Mono / Stereo / SAP r Digital TV: English / French / Spanish / Korean / Japanese / Chinese / German / Italian / Russian a Sleep ...TV AV Component RPG-PC HDMI1 HDMI2 Move Enter MY MEDIA MY MEDIA PHOTO LIST Move Enter * HDMI 3: For 42LV4400, 47LV4400, 55LV4400 Quick Menu Your TV's OSD (On Screen Display) may differ slightly from what is a menu of the backlight behind the LCD screen...

Owner's Manual
Page 32
... memorizes only the channels available at the time. MENU ADJUSTMENTS Channel Menu The Channel menu offers options to setup of the signal being received. ENTER 3 Set the setting. a Manual Tuning r When selecting DTV or Cable DTV input signal in memory on -screen signal strength monitor to see the quality of your residence...
... memorizes only the channels available at the time. MENU ADJUSTMENTS Channel Menu The Channel menu offers options to setup of the signal being received. ENTER 3 Set the setting. a Manual Tuning r When selecting DTV or Cable DTV input signal in memory on -screen signal strength monitor to see the quality of your residence...


