Specification (English)
Page 2
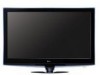
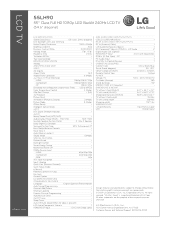
LCD TV 55LH90 55" Class Full HD 1080p LED Backlit 240Hz LCD TV (54.6" diagonal) LGusa.com LCD SPECIFICATION Screen Size (Class) 55" Class (54.6" diagonal) LED Backlight with Deep Color) RGB In (D-Sub 15pin) - Component 1080p/1080i/720p - RGB 60p A/V Input Navigation • Input Labeling • Quick View (Previous Channel) • Quick Setup Guide • e-Manual.../24p - Non-metric weights and messurements are the property of LG Corp. All other trademarks are approximate. © 2009 LG Electronics U.S.A., Inc., Englewood Cliffs, NJ. PC 1 PC Audio...
LCD TV 55LH90 55" Class Full HD 1080p LED Backlit 240Hz LCD TV (54.6" diagonal) LGusa.com LCD SPECIFICATION Screen Size (Class) 55" Class (54.6" diagonal) LED Backlight with Deep Color) RGB In (D-Sub 15pin) - Component 1080p/1080i/720p - RGB 60p A/V Input Navigation • Input Labeling • Quick View (Previous Channel) • Quick Setup Guide • e-Manual.../24p - Non-metric weights and messurements are the property of LG Corp. All other trademarks are approximate. © 2009 LG Electronics U.S.A., Inc., Englewood Cliffs, NJ. PC 1 PC Audio...

Owner's Manual (English)
Page 1
Model: Serial: This product qualifies for future reference. LCD TV OWNER'S MANUAL 42LH90 47LH90 55LH90 Please read this manual carefully before operating your set and retain it below should you ever need service. Record it for ENERGY STAR in the "factory default (Home Use)" ... to qualify for ENERGY STAR. 1-800-243-0000 USA, Consumer User 1-888-865-3026 USA, Commercial User 1-888-542-2623 CANADA LG Customer Information Center P/NO : SAC33601906 (0905-REV01) www.lgusa.com / www.lg.ca The model and serial number of the TV is located on the back and one side of the...
Model: Serial: This product qualifies for future reference. LCD TV OWNER'S MANUAL 42LH90 47LH90 55LH90 Please read this manual carefully before operating your set and retain it below should you ever need service. Record it for ENERGY STAR in the "factory default (Home Use)" ... to qualify for ENERGY STAR. 1-800-243-0000 USA, Consumer User 1-888-865-3026 USA, Commercial User 1-888-542-2623 CANADA LG Customer Information Center P/NO : SAC33601906 (0905-REV01) www.lgusa.com / www.lg.ca The model and serial number of the TV is located on the back and one side of the...
Owner's Manual (English)
Page 4
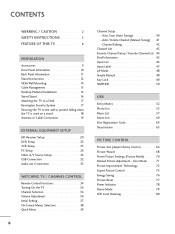
...CAUTION concerning the Power Cord: It is not disconnected from physical or mechanical abuse, such as this unit is connected to install the TV by the hanging power and signal cables on shelves above the unit). 17 GROUNDING Ensure that appliance and has no additional outlets or ...exact replacement part by SWITCH. Do not connect too many appliances to fall into the product, and do not expose this owner's manual to be connected to unplug the TV. 4 15 WARNING - Pay particular attention to rain, moisture or other liquids. The plug must be certain. on the power ...
...CAUTION concerning the Power Cord: It is not disconnected from physical or mechanical abuse, such as this unit is connected to install the TV by the hanging power and signal cables on shelves above the unit). 17 GROUNDING Ensure that appliance and has no additional outlets or ...exact replacement part by SWITCH. Do not connect too many appliances to fall into the product, and do not expose this owner's manual to be connected to unplug the TV. 4 15 WARNING - Pay particular attention to rain, moisture or other liquids. The plug must be certain. on the power ...
Owner's Manual (English)
Page 6
...Reset 77 Power Indicator 78 Demo Mode 79 LED Local Dimming 80 CONTENTS WARNING / CAUTION 2 SAFETY INSTRUCTIONS 3 FEATURE OF THIS TV 8 PREPARATION Accessories 9 Front Panel Information 10 Back Panel Information 11 Stand Instructions 12 VESA Wall Mounting 14 Cable Management 15 ...TV 36 Channel Selection 36 Volume Adjustment 36 Initial Setting 37 On-Screen Menus Selection 38 Quick Menu 39 6 Channel Setup - Channel Editing 42 Channel List 43 Favorite Channel Setup / Favorite Channel List . . 44 Brief Information 45 Input List 46 Input Label 47 AV Mode 48 Simple Manual...
...Reset 77 Power Indicator 78 Demo Mode 79 LED Local Dimming 80 CONTENTS WARNING / CAUTION 2 SAFETY INSTRUCTIONS 3 FEATURE OF THIS TV 8 PREPARATION Accessories 9 Front Panel Information 10 Back Panel Information 11 Stand Instructions 12 VESA Wall Mounting 14 Cable Management 15 ...TV 36 Channel Selection 36 Volume Adjustment 36 Initial Setting 37 On-Screen Menus Selection 38 Quick Menu 39 6 Channel Setup - Channel Editing 42 Channel List 43 Favorite Channel Setup / Favorite Channel List . . 44 Brief Information 45 Input List 46 Input Label 47 AV Mode 48 Simple Manual...
Owner's Manual (English)
Page 7
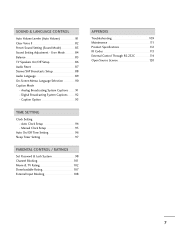
...91 Digital Broadcasting System Captions 92 - Auto Clock Setup 94 Manual Clock Setup 95 Auto On/Off Time Setting 96 Sleep Timer Setting 97 PARENTAL CONTROL / RATINGS Set Password & Lock System 98 Channel Blocking 101 Movie & TV Rating 102 Downloadable Rating 107 External Input Blocking 108 APPENDIX ... 111 Product Specifications 112 IR Codes 113 External Control Through RS-232C 114 Open Source License 120 7 User Mode 84 Balance 85 TV Speakers On/Off Setup 86 Audio Reset 87 Stereo/SAP Broadcasts Setup 88 Audio Language 89 On-Screen Menus Language Selection 90 Caption ...
...91 Digital Broadcasting System Captions 92 - Auto Clock Setup 94 Manual Clock Setup 95 Auto On/Off Time Setting 96 Sleep Timer Setting 97 PARENTAL CONTROL / RATINGS Set Password & Lock System 98 Channel Blocking 101 Movie & TV Rating 102 Downloadable Rating 107 External Input Blocking 108 APPENDIX ... 111 Product Specifications 112 IR Codes 113 External Control Through RS-232C 114 Open Source License 120 7 User Mode 84 Balance 85 TV Speakers On/Off Setup 86 Audio Reset 87 Stereo/SAP Broadcasts Setup 88 Audio Language 89 On-Screen Menus Language Selection 90 Caption ...

Owner's Manual (English)
Page 9
... * Do not wipe roughly. MENU E INFO ENTER RETURN 1.5V 1.5V Owner's Manual (For 42/47LH90) x 4 Screws for stand assembly (Refer to P.12) CD Manual (For 42LH90) Remote Control, Batteries Screw for stand fixing (Refer to P.17) ...Protection Cover Power Cord Not included with all models Polishing Cloth * Wipe spots on the exterior only with ferrite cores to maintain standards compliance. 9 PREPARATION PREPARATION ACCESSORIES Ensure that the following accessories are included with your TV...
... * Do not wipe roughly. MENU E INFO ENTER RETURN 1.5V 1.5V Owner's Manual (For 42/47LH90) x 4 Screws for stand assembly (Refer to P.12) CD Manual (For 42LH90) Remote Control, Batteries Screw for stand fixing (Refer to P.17) ...Protection Cover Power Cord Not included with all models Polishing Cloth * Wipe spots on the exterior only with ferrite cores to maintain standards compliance. 9 PREPARATION PREPARATION ACCESSORIES Ensure that the following accessories are included with your TV...
Owner's Manual (English)
Page 14
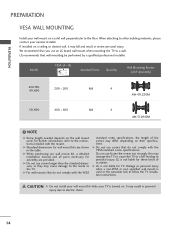
... standard dimension, as they may damage the TV or cause the TV to a wall. Do not use an LG brand wall mount when mounting the TV to a fall and result in severe personal injury. G When purchasing our wall mount kit, a detailed installation manual and all parts necessary for wall mount kits... by a qualified professional installer. Model VESA (A * B) A B Standard Screw Quantity Wall Mounting Bracket (sold separately) 42LH90, 47LH90 200 * 200 M6 4 AW-47LG30M 55LH90 400 * 400 M6 4 AW-55LH40M ! PREPARATION PREPARATION VESA WALL MOUNTING Install your nearest installer.
... standard dimension, as they may damage the TV or cause the TV to a wall. Do not use an LG brand wall mount when mounting the TV to a fall and result in severe personal injury. G When purchasing our wall mount kit, a detailed installation manual and all parts necessary for wall mount kits... by a qualified professional installer. Model VESA (A * B) A B Standard Screw Quantity Wall Mounting Bracket (sold separately) 42LH90, 47LH90 200 * 200 M6 4 AW-47LG30M 55LH90 400 * 400 M6 4 AW-55LH40M ! PREPARATION PREPARATION VESA WALL MOUNTING Install your nearest installer.
Owner's Manual (English)
Page 16
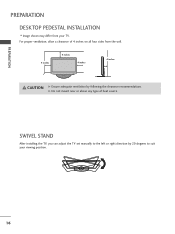
For proper ventilation, allow a clearance of heat source. SWIVEL STAND After installing the TV, you can adjust the TV set manually to suit your TV. G Do not mount near or above any type of 4 inches on all four sides from your viewing position. 16 PREPARATION PREPARATION DESKTOP PEDESTAL INSTALLATION I Image shown may differ from the wall. 4 inches 4 inches 4 inches 4 inches CAUTION G Ensure adequate ventilation by 20 degrees to the left or right direction by following the clearance recommendations.
For proper ventilation, allow a clearance of heat source. SWIVEL STAND After installing the TV, you can adjust the TV set manually to suit your TV. G Do not mount near or above any type of 4 inches on all four sides from your viewing position. 16 PREPARATION PREPARATION DESKTOP PEDESTAL INSTALLATION I Image shown may differ from the wall. 4 inches 4 inches 4 inches 4 inches CAUTION G Ensure adequate ventilation by 20 degrees to the left or right direction by following the clearance recommendations.
Owner's Manual (English)
Page 20
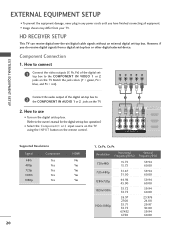
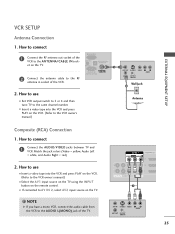
... set -top box operation.) I Select the Component1 or 2 input source on the TV using the INPUT button on the TV. 2. How to connect 1 Connect the video outputs (Y, PB, PR) of the digital set-top box to the owner's manual for the digital set -top box. (Refer to 2 the COMPONENT IN AUDIO 1... equipment damage, never plug in any power cords until you do receive digital signals from your TV. I Image shown may differ from a digital set -top box. Component Connection 1. HD RECEIVER SETUP This TV can receive digital over-the-air/digital cable signals without an external digital set -top box ...
... set -top box operation.) I Select the Component1 or 2 input source on the TV using the INPUT button on the TV. 2. How to connect 1 Connect the video outputs (Y, PB, PR) of the digital set-top box to the owner's manual for the digital set -top box. (Refer to 2 the COMPONENT IN AUDIO 1... equipment damage, never plug in any power cords until you do receive digital signals from your TV. I Image shown may differ from a digital set -top box. Component Connection 1. HD RECEIVER SETUP This TV can receive digital over-the-air/digital cable signals without an external digital set -top box ...
Owner's Manual (English)
Page 21
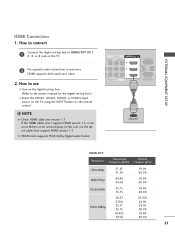
... How to connect 1 Connect the digital set -top box.) I Select the HDMI1, HDMI2, HDMI3, or HDMI4 input source on the TV using the INPUT button on the remote control. ! HDMI supports both audio and video. 2. G HDMI mode supports PCM, Dolby Digital ...976 24.00 29.97 30.00 59.94 60.00 21 In this case use I Turn on the TV. 2 No separate audio connection is necessary. If the HDMI cables don't support HDMI version 1.3, it can ...1, 2, 3, or 4 jack on the digital set-top box. (Refer to the owner's manual for the digital set -top box to use the latest cables that support HDMI version 1.3.
... How to connect 1 Connect the digital set -top box.) I Select the HDMI1, HDMI2, HDMI3, or HDMI4 input source on the TV using the INPUT button on the remote control. ! HDMI supports both audio and video. 2. G HDMI mode supports PCM, Dolby Digital ...976 24.00 29.97 30.00 59.94 60.00 21 In this case use I Turn on the TV. 2 No separate audio connection is necessary. If the HDMI cables don't support HDMI version 1.3, it can ...1, 2, 3, or 4 jack on the digital set-top box. (Refer to the owner's manual for the digital set -top box to use the latest cables that support HDMI version 1.3.
Owner's Manual (English)
Page 22
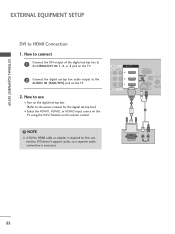
... DVI output of the digital set-top box to the HDMI/DVI IN 1, 2, or 3 jack on the TV. 2 Connect the digital set -top box.) I Turn on the digital set-top box. (Refer to the owner's manual for this connection. DVI OUTPUT L R AUDIO 22 DVI doesn't support audio, so a separate audio connection is... HDMI cable or adapter is necessary. EXTERNAL EQUIPMENT SETUP EXTERNAL EQUIPMENT SETUP DVI to use I Select the HDMI1, HDMI2, or HDMI3 input source on the TV using the INPUT button on the TV. 2. How to HDMI Connection 1.
... DVI output of the digital set-top box to the HDMI/DVI IN 1, 2, or 3 jack on the TV. 2 Connect the digital set -top box.) I Turn on the digital set-top box. (Refer to the owner's manual for this connection. DVI OUTPUT L R AUDIO 22 DVI doesn't support audio, so a separate audio connection is... HDMI cable or adapter is necessary. EXTERNAL EQUIPMENT SETUP EXTERNAL EQUIPMENT SETUP DVI to use I Select the HDMI1, HDMI2, or HDMI3 input source on the TV using the INPUT button on the TV. 2. How to HDMI Connection 1.
Owner's Manual (English)
Page 23
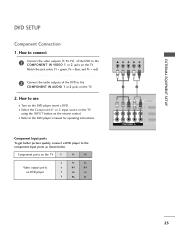
... 1. I Refer to use I Select the Component1 or 2 input source on the TV using the INPUT button on the remote control. Component ports on the TV Y PB PR Video output ports on the TV. 2. I Turn on the TV. How to the DVD player's manual for operating instructions. Component Input ports To get better picture quality, connect...
... 1. I Refer to use I Select the Component1 or 2 input source on the TV using the INPUT button on the remote control. Component ports on the TV Y PB PR Video output ports on the TV. 2. I Turn on the TV. How to the DVD player's manual for operating instructions. Component Input ports To get better picture quality, connect...
Owner's Manual (English)
Page 24
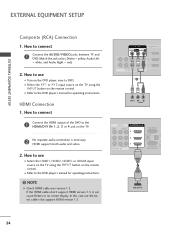
I Select the HDMI1, HDMI2, HDMI3, or HDMI4 input source on the TV using the INPUT button on the DVD player, insert a DVD. How to use I Refer to the DVD player's manual for operating instructions. ! How to the HDMI/DVI IN 1, 2, 3 or 4 jack on the remote control... the INPUT button on the TV. 2 No separate audio connection is necessary. If the HDMI cables don't support HDMI version 1.3, it can cause flickers or no screen display. How to the DVD player's manual for operating instructions. EXTERNAL EQUIPMENT SETUP EXTERNAL EQUIPMENT SETUP ( ) ( ) Composite (RCA) ...
I Select the HDMI1, HDMI2, HDMI3, or HDMI4 input source on the TV using the INPUT button on the DVD player, insert a DVD. How to use I Refer to the DVD player's manual for operating instructions. ! How to the HDMI/DVI IN 1, 2, 3 or 4 jack on the remote control... the INPUT button on the TV. 2 No separate audio connection is necessary. If the HDMI cables don't support HDMI version 1.3, it can cause flickers or no screen display. How to the DVD player's manual for operating instructions. EXTERNAL EQUIPMENT SETUP EXTERNAL EQUIPMENT SETUP ( ) ( ) Composite (RCA) ...
Owner's Manual (English)
Page 25
... of the VCR. 2. UDIO IN OPTICAL DIGITAL AUDIO OUT et on the remote control. I If connected to the VCR owner's manual.) I Insert a video tape into the VCR and press PLAY on the TV. ! How to the ANTENNA/CABLE IN sock- How to connect ( ) RGB IN (PC) 1 Connect the RF antenna out socket...
... of the VCR. 2. UDIO IN OPTICAL DIGITAL AUDIO OUT et on the remote control. I If connected to the VCR owner's manual.) I Insert a video tape into the VCR and press PLAY on the TV. ! How to the ANTENNA/CABLE IN sock- How to connect ( ) RGB IN (PC) 1 Connect the RF antenna out socket...
Owner's Manual (English)
Page 29
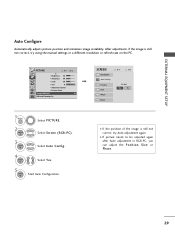
... 2 ENTER 3 ENTER Select PICTURE. Select Auto Config.. 4 ENTER Select Y e s. 5 ENTER Start Auto Configuration. After adjustment, if the image is still not correct, try using the manual settings or a different resolution or refresh rate on the PC. Position Size Phase Reset Move Prev.
... 2 ENTER 3 ENTER Select PICTURE. Select Auto Config.. 4 ENTER Select Y e s. 5 ENTER Start Auto Configuration. After adjustment, if the image is still not correct, try using the manual settings or a different resolution or refresh rate on the PC. Position Size Phase Reset Move Prev.
Owner's Manual (English)
Page 30
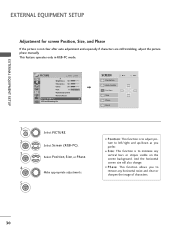
... Dimming :On SCREEN Resolution Auto Config. I S i z e: This function is not clear after auto adjustment and especially if characters are still trembling, adjust the picture phase manually. Select Screen (RGB-PC).
... Dimming :On SCREEN Resolution Auto Config. I S i z e: This function is not clear after auto adjustment and especially if characters are still trembling, adjust the picture phase manually. Select Screen (RGB-PC).
Owner's Manual (English)
Page 33
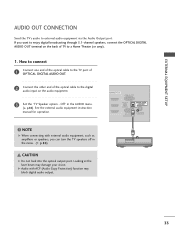
... IN OPTICAL DIGITAL AUDIO OUT (RGB/DVI) 1 ANTENNA/ RS-232C IN CABLE IN (CONTROL&SERVICE) 2 33 See the external audio equipment instruction manual for operation. ! G Audio with external audio equipment, such as amplifiers or speakers, you want to enjoy digital broadcasting through 5.1-channel speakers, connect ... OPTICAL DIGITAL AUDIO OUT terminal on the back of the optical cable to the digital audio input on the audio equipment. ( ) 3 Set the "TV Speaker option - Off " in the menu. (G p.86) CAUTION G Do not look into the optical output port. How to connect 1 Connect one...
... IN OPTICAL DIGITAL AUDIO OUT (RGB/DVI) 1 ANTENNA/ RS-232C IN CABLE IN (CONTROL&SERVICE) 2 33 See the external audio equipment instruction manual for operation. ! G Audio with external audio equipment, such as amplifiers or speakers, you want to enjoy digital broadcasting through 5.1-channel speakers, connect ... OPTICAL DIGITAL AUDIO OUT terminal on the back of the optical cable to the digital audio input on the audio equipment. ( ) 3 Set the "TV Speaker option - Off " in the menu. (G p.86) CAUTION G Do not look into the optical output port. How to connect 1 Connect one...
Owner's Manual (English)
Page 37
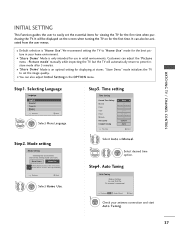
... from the user menus. To use this TV at stores. I Default selection is only intended for the best picture in the OPTION menu. Picture mode" manually while inspecting the TV, but the TV will be displayed on the screen when turning the TV on for the first time when purchasing the... TV. Selecting Language Language English Español Français Previous Next 1...
... from the user menus. To use this TV at stores. I Default selection is only intended for the best picture in the OPTION menu. Picture mode" manually while inspecting the TV, but the TV will be displayed on the screen when turning the TV on for the first time when purchasing the... TV. Selecting Language Language English Español Français Previous Next 1...
Owner's Manual (English)
Page 38
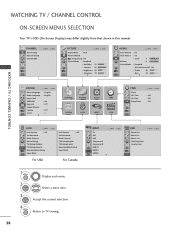
...; Level 3- + Balance 0L R Sound Mode : Standard • SRS TruSurround XT: Off • Treble 50 • Bass 50 E WATCHING TV / CHANNEL CONTROL OPTION Menu Language Audio Language Input Label SIMPLINK Key Lock Simple Manual Caption Set ID E Move Enter : English : English : On : Off : Off : 1 CHANNEL PICTURE AUDIO TIME OPTION LOCK INPUT USB TIME...
...; Level 3- + Balance 0L R Sound Mode : Standard • SRS TruSurround XT: Off • Treble 50 • Bass 50 E WATCHING TV / CHANNEL CONTROL OPTION Menu Language Audio Language Input Label SIMPLINK Key Lock Simple Manual Caption Set ID E Move Enter : English : English : On : Off : Off : 1 CHANNEL PICTURE AUDIO TIME OPTION LOCK INPUT USB TIME...
Owner's Manual (English)
Page 39
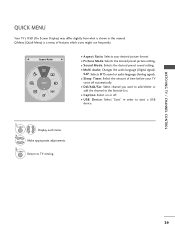
...might use frequently. I Multi Audio: Changes the audio language (Digital signal). I Aspect Ratio: Selects your TV turns off . F Aspect Ratio G A 16:9 I USB Device: Select "Eject" in this manual. SAP: Selects MTS sound or audio language (Analog signal). I Picture Mode: Selects the desired preset picture ... adjustments. 3 Q. I Del/Add/Fav: Select channel you want to add/delete or add the channel to TV viewing. 39 WATCHING TV / CHANNEL CONTROL QUICK MENU Your TV's OSD (On Screen Display) may differ slightly from what is a menu of time before your desired picture format...
...might use frequently. I Multi Audio: Changes the audio language (Digital signal). I Aspect Ratio: Selects your TV turns off . F Aspect Ratio G A 16:9 I USB Device: Select "Eject" in this manual. SAP: Selects MTS sound or audio language (Analog signal). I Picture Mode: Selects the desired preset picture ... adjustments. 3 Q. I Del/Add/Fav: Select channel you want to add/delete or add the channel to TV viewing. 39 WATCHING TV / CHANNEL CONTROL QUICK MENU Your TV's OSD (On Screen Display) may differ slightly from what is a menu of time before your desired picture format...


