Owner's Manual (English)
Page 2
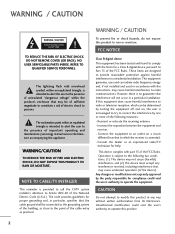
...the device). These limits are designed to persons. Reorient or relocate the receiving antenna. - Consult the dealer or an experienced radio/TV technician for compliance could void the user's authority to Article 820-40 of the FCC Rules. This device complies with arrowhead symbol...Increase the separation between the equipment and receiver. - Operation is encouraged to try to correct the interference by turning the equipment off and on a circuit different from LG Electronics. NO USER SERVICEABLE PARTS INSIDE. FCC NOTICE Class B digital device This equipment has been tested and ...
...the device). These limits are designed to persons. Reorient or relocate the receiving antenna. - Consult the dealer or an experienced radio/TV technician for compliance could void the user's authority to Article 820-40 of the FCC Rules. This device complies with arrowhead symbol...Increase the separation between the equipment and receiver. - Operation is encouraged to try to correct the interference by turning the equipment off and on a circuit different from LG Electronics. NO USER SERVICEABLE PARTS INSIDE. FCC NOTICE Class B digital device This equipment has been tested and ...
Owner's Manual (English)
Page 4
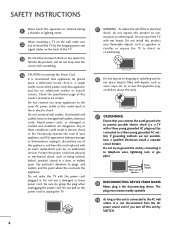
... be placed upon . Any of this owner's manual to be connected to install the TV by the hanging power and signal cables on shelves above the unit). 17 GROUNDING Ensure that you turn off this unit is recommend that appliance and has no additional outlets or branch circuits. ...To reduce the risk of the appliance, and have a qualified electrician install a separate circuit breaker. The plug must be certain. Do not touch the TV with the power cord ...
... be placed upon . Any of this owner's manual to be connected to install the TV by the hanging power and signal cables on shelves above the unit). 17 GROUNDING Ensure that you turn off this unit is recommend that appliance and has no additional outlets or branch circuits. ...To reduce the risk of the appliance, and have a qualified electrician install a separate circuit breaker. The plug must be certain. Do not touch the TV with the power cord ...
Owner's Manual (English)
Page 5
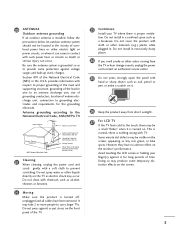
... of the lead-in the U.S.A. Avoid touching the LCD screen or holding your TV where there is turned off, unplugged and all cables have no adverse effect on it. 26 Keep the product away from direct sunlight. 27 For LCD TV If the TV feels cold to grounding electrodes and requirements for long ...periods of the TV. 23 Ventilation Install your finger(s) ...
... of the lead-in the U.S.A. Avoid touching the LCD screen or holding your TV where there is turned off, unplugged and all cables have no adverse effect on it. 26 Keep the product away from direct sunlight. 27 For LCD TV If the TV feels cold to grounding electrodes and requirements for long ...periods of the TV. 23 Ventilation Install your finger(s) ...
Owner's Manual (English)
Page 6
...79 LED Local Dimming 80 Add / Delete Channel (Manual Tuning 41 - CONTENTS WARNING / CAUTION 2 SAFETY INSTRUCTIONS 3 FEATURE OF THIS TV 8 PREPARATION Accessories 9 Front Panel Information 10 Back Panel Information 11 Stand Instructions 12 VESA Wall Mounting 14 Cable Management 15 Desktop Pedestal ... Setup 25 PC Setup 26 Other A/V Source Setup 32 USB Connection 32 Audio out Connection 33 WATCHING TV / CHANNEL CONTROL Remote Control Functions 34 Turning On the TV 36 Channel Selection 36 Volume Adjustment 36 Initial Setting 37 On-Screen Menus Selection 38 Quick Menu 39 ...
...79 LED Local Dimming 80 Add / Delete Channel (Manual Tuning 41 - CONTENTS WARNING / CAUTION 2 SAFETY INSTRUCTIONS 3 FEATURE OF THIS TV 8 PREPARATION Accessories 9 Front Panel Information 10 Back Panel Information 11 Stand Instructions 12 VESA Wall Mounting 14 Cable Management 15 Desktop Pedestal ... Setup 25 PC Setup 26 Other A/V Source Setup 32 USB Connection 32 Audio out Connection 33 WATCHING TV / CHANNEL CONTROL Remote Control Functions 34 Turning On the TV 36 Channel Selection 36 Volume Adjustment 36 Initial Setting 37 On-Screen Menus Selection 38 Quick Menu 39 ...
Owner's Manual (English)
Page 8
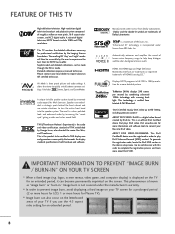
...." This TV contains the detailed calibrations necessary for LCD, 1 or more detailed picture. The resulting ISF "day" and "night" modes will then be registered in order to convert your TV if you...This DivX Certified® device must be accessible by the user to experience the best their LG HDTV has to complete the registration process and learn more about an ISF certified technician. To...DivX VOD section in both hardware and software. tings. TruSurround XT technology is the product to turn the entire front bezel into DivX video. Visit www.divx.com for an extended period. ...
...." This TV contains the detailed calibrations necessary for LCD, 1 or more detailed picture. The resulting ISF "day" and "night" modes will then be registered in order to convert your TV if you...This DivX Certified® device must be accessible by the user to experience the best their LG HDTV has to complete the registration process and learn more about an ISF certified technician. To...DivX VOD section in both hardware and software. tings. TruSurround XT technology is the product to turn the entire front bezel into DivX video. Visit www.divx.com for an extended period. ...
Owner's Manual (English)
Page 14
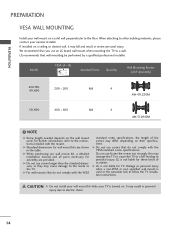
... for these kinds of the screws may result in the table. LG is turned on a ceiling or slanted wall, it may fall , leading to the TV. G Do not use an LG brand wall mount when mounting the TV to the floor. G For wall mounts that do not comply with... Quantity Wall Mounting Bracket (sold separately) 42LH90, 47LH90 200 * 200 M6 4 AW-47LG30M 55LH90 400 * 400 M6 4 AW-55LH40M ! G When purchasing our wall mount kit, a detailed installation manual and all parts necessary for TV damage or personal injury when a non-VESA or non specified wall mount is used . We...
... for these kinds of the screws may result in the table. LG is turned on a ceiling or slanted wall, it may fall , leading to the TV. G Do not use an LG brand wall mount when mounting the TV to the floor. G For wall mounts that do not comply with... Quantity Wall Mounting Bracket (sold separately) 42LH90, 47LH90 200 * 200 M6 4 AW-47LG30M 55LH90 400 * 400 M6 4 AW-55LH40M ! G When purchasing our wall mount kit, a detailed installation manual and all parts necessary for TV damage or personal injury when a non-VESA or non specified wall mount is used . We...
Owner's Manual (English)
Page 20
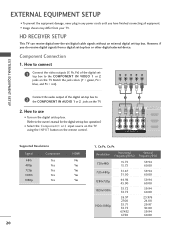
...EXTERNAL EQUIPMENT SETUP EXTERNAL EQUIPMENT SETUP I To prevent the equipment damage, never plug in any power cords until you do receive digital signals from your TV. How to connect 1 Connect the video outputs (Y, PB, PR) of the digital set -top box. Y PB PR L R Connect the ... other digital external device. I Image shown may differ from a digital set -top box operation.) I Turn on the digital set-top box. (Refer to the COMPONENT IN VIDEO 1 or 2 jacks on the TV. 2. However, if you have finished connecting all equipment. Component Connection 1. HD RECEIVER SETUP This...
...EXTERNAL EQUIPMENT SETUP EXTERNAL EQUIPMENT SETUP I To prevent the equipment damage, never plug in any power cords until you do receive digital signals from your TV. How to connect 1 Connect the video outputs (Y, PB, PR) of the digital set -top box. Y PB PR L R Connect the ... other digital external device. I Image shown may differ from a digital set -top box operation.) I Turn on the digital set-top box. (Refer to the COMPONENT IN VIDEO 1 or 2 jacks on the TV. 2. However, if you have finished connecting all equipment. Component Connection 1. HD RECEIVER SETUP This...
Owner's Manual (English)
Page 21
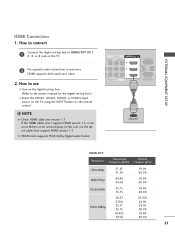
... HDMI version 1.3, it can cause flickers or no screen display. In this case use I Turn on the digital set -top box.) I Select the HDMI1, HDMI2, HDMI3, or HDMI4 input source on the TV using the INPUT button on the TV. 2 No separate audio connection is necessary. HDMI supports both audio and video. 2. NOTE...
... HDMI version 1.3, it can cause flickers or no screen display. In this case use I Turn on the digital set -top box.) I Select the HDMI1, HDMI2, HDMI3, or HDMI4 input source on the TV using the INPUT button on the TV. 2 No separate audio connection is necessary. HDMI supports both audio and video. 2. NOTE...
Owner's Manual (English)
Page 22
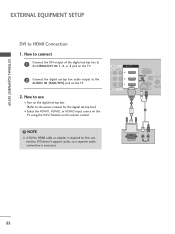
How to use I Turn on the digital set-top box. (Refer to the owner's manual for this connection. How to connect 1 Connect the DVI output of the digital set-top box to HDMI cable or adapter is necessary. NOTE G A DVI to the HDMI/DVI IN 1, 2, or 3 jack on the TV. 2 Connect the ...digital set -top box.) I Select the HDMI1, HDMI2, or HDMI3 input source on the TV using the INPUT button on the TV. 2. AV IN 1 L(MONO) AUDIO R 3 2 L R 1 AUDIO ENT IN /DVI IN RGB IN (PC) AUDIO ...
How to use I Turn on the digital set-top box. (Refer to the owner's manual for this connection. How to connect 1 Connect the DVI output of the digital set-top box to HDMI cable or adapter is necessary. NOTE G A DVI to the HDMI/DVI IN 1, 2, or 3 jack on the TV. 2 Connect the ...digital set -top box.) I Select the HDMI1, HDMI2, or HDMI3 input source on the TV using the INPUT button on the TV. 2. AV IN 1 L(MONO) AUDIO R 3 2 L R 1 AUDIO ENT IN /DVI IN RGB IN (PC) AUDIO ...
Owner's Manual (English)
Page 23
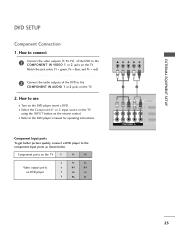
... 1 /DVI VIDEO L(MONO) AUDIO R 3 2 2 L R 1 1 VIDEO AUDIO COMPONENT IN ( ) 23 ( ) I Turn on the DVD player, insert a DVD. Component ports on the TV Y PB PR Video output ports on the TV. 2. I Select the Component1 or 2 input source on the TV using the INPUT button on the TV. How to connect 1 Connect the video outputs (Y, PB, PR) of...
... 1 /DVI VIDEO L(MONO) AUDIO R 3 2 2 L R 1 1 VIDEO AUDIO COMPONENT IN ( ) 23 ( ) I Turn on the DVD player, insert a DVD. Component ports on the TV Y PB PR Video output ports on the TV. 2. I Select the Component1 or 2 input source on the TV using the INPUT button on the TV. How to connect 1 Connect the video outputs (Y, PB, PR) of...
Owner's Manual (English)
Page 24
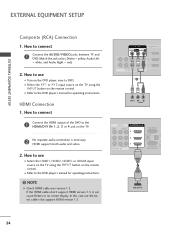
... the INPUT button on the remote control. How to use I Select the HDMI1, HDMI2, HDMI3, or HDMI4 input source on the TV using the INPUT button on the remote control. Match the jack colors (Video = yellow, Audio Left = white, and Audio Right = red) 2. How to the HDMI/...&SERVICE) 1 HDMI OUTPUT 24 HDMI supports both audio and video. 2. EXTERNAL EQUIPMENT SETUP EXTERNAL EQUIPMENT SETUP ( ) ( ) Composite (RCA) Connection 1. HDMI Connection 1. In this case use I Turn on the TV. 2 No separate audio connection is necessary.
... the INPUT button on the remote control. How to use I Select the HDMI1, HDMI2, HDMI3, or HDMI4 input source on the TV using the INPUT button on the remote control. Match the jack colors (Video = yellow, Audio Left = white, and Audio Right = red) 2. How to the HDMI/...&SERVICE) 1 HDMI OUTPUT 24 HDMI supports both audio and video. 2. EXTERNAL EQUIPMENT SETUP EXTERNAL EQUIPMENT SETUP ( ) ( ) Composite (RCA) Connection 1. HDMI Connection 1. In this case use I Turn on the TV. 2 No separate audio connection is necessary.
Owner's Manual (English)
Page 26
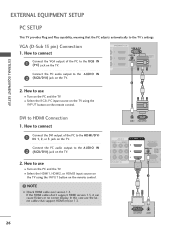
...the DVI output of the PC to the RGB IN (P C) jack on the TV. 2. How to the AUDIO I Select the RGB-PC input source on the TV using the INPUT button on the PC and the TV. I Turn on the TV. NOTE G Check HDMI cable over version 1.3. AUDIO RGB OUTPUT AV IN 1 ...) jack on the remote control. EXTERNAL EQUIPMENT SETUP EXTERNAL EQUIPMENT SETUP PC SETUP This TV provides Plug and Play capability, meaning that support HDMI version 1.3. I ( N) 2 (RGB/DVI) jack on the TV. 1 Connect the PC audio output to the TV's settings. How to connect ( ) R 3 2 1 Connect the VGA output of ...
...the DVI output of the PC to the RGB IN (P C) jack on the TV. 2. How to the AUDIO I Select the RGB-PC input source on the TV using the INPUT button on the PC and the TV. I Turn on the TV. NOTE G Check HDMI cable over version 1.3. AUDIO RGB OUTPUT AV IN 1 ...) jack on the remote control. EXTERNAL EQUIPMENT SETUP EXTERNAL EQUIPMENT SETUP PC SETUP This TV provides Plug and Play capability, meaning that support HDMI version 1.3. I ( N) 2 (RGB/DVI) jack on the TV. 1 Connect the PC audio output to the TV's settings. How to connect ( ) R 3 2 1 Connect the VGA output of ...
Owner's Manual (English)
Page 33
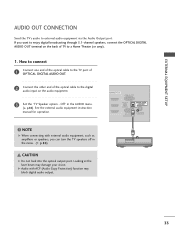
...enjoy digital broadcasting through 5.1-channel speakers, connect the OPTICAL DIGITAL AUDIO OUT terminal on the audio equipment. ( ) 3 Set the "TV Speaker option - If you can turn the TV speakers off in the AUDIO menu. (G p.86). NOTE G When connecting with ACP (Audio Copy Protection) function may damage your ...vision. How to connect 1 Connect one end of the optical cable to the TV port of OPTICAL DIGITAL AUDIO OUT. ...
...enjoy digital broadcasting through 5.1-channel speakers, connect the OPTICAL DIGITAL AUDIO OUT terminal on the audio equipment. ( ) 3 Set the "TV Speaker option - If you can turn the TV speakers off in the AUDIO menu. (G p.86). NOTE G When connecting with ACP (Audio Copy Protection) function may damage your ...vision. How to connect 1 Connect one end of the optical cable to the TV port of OPTICAL DIGITAL AUDIO OUT. ...
Owner's Manual (English)
Page 34
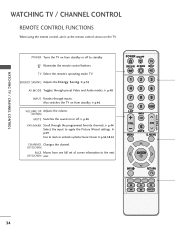
... FAV/MARK Scroll through preset Video and Audio modes. G p.44 Select the input to mark or unmark a photo/music/movie. POWER Turns the TV on the TV. TV Select the remote's operating mode: TV. G p.54,58,61 CHANNEL Changes the channel. UP/DOWN PAGE Moves from one full set of screen information to standby. ENERGY SAVING...
... FAV/MARK Scroll through preset Video and Audio modes. G p.44 Select the input to mark or unmark a photo/music/movie. POWER Turns the TV on the TV. TV Select the remote's operating mode: TV. G p.54,58,61 CHANNEL Changes the channel. UP/DOWN PAGE Moves from one full set of screen information to standby. ENERGY SAVING...
Owner's Manual (English)
Page 36
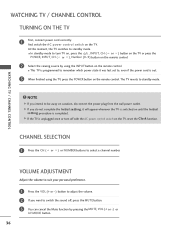
... not complete the Initial setting, it was last set to remember which power state it will appear whenever the TV is unplugged once or turn TV on, press the , INPUT, CH ( or ) button on the TV or press the POWER, INPUT, CH ( or ), Number (0~9) button on the remote control. 2 Select the ... control. CHANNEL SELECTION 1 Press the CH ( or ) or NUMBER buttons to standby mode. G If the TV is switched on the TV. At this moment, the TV switches to select a channel number. NOTE G If you want to turn off , press the MUTE button. 3 You can cancel the Mute function by using the...
... not complete the Initial setting, it was last set to remember which power state it will appear whenever the TV is unplugged once or turn TV on, press the , INPUT, CH ( or ) button on the TV or press the POWER, INPUT, CH ( or ), Number (0~9) button on the remote control. 2 Select the ... control. CHANNEL SELECTION 1 Press the CH ( or ) or NUMBER buttons to standby mode. G If the TV is switched on the TV. At this moment, the TV switches to select a channel number. NOTE G If you want to turn off , press the MUTE button. 3 You can cancel the Mute function by using the...
Owner's Manual (English)
Page 37
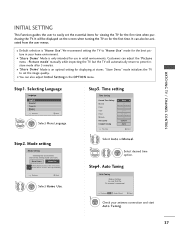
... environment. Selecting Language Language English Español Français Previous Next 1 ENTER Select Menu Language. Step1. We recommend setting the TV to "Home Use" mode for the best picture in your antenna connection and start Auto Tuning. 37 I Default selection is an optimal ... Previous Next 1 Select A ut o or Manual. 2 ENTER Select desired time option. It can also be displayed on the screen when turning the TV on for the first time. Customers can also adjust Initial Setting in retail environments. Store Demo Home Use Select [Home Use] to preset ...
... environment. Selecting Language Language English Español Français Previous Next 1 ENTER Select Menu Language. Step1. We recommend setting the TV to "Home Use" mode for the best picture in your antenna connection and start Auto Tuning. 37 I Default selection is an optimal ... Previous Next 1 Select A ut o or Manual. 2 ENTER Select desired time option. It can also be displayed on the screen when turning the TV on for the first time. Customers can also adjust Initial Setting in retail environments. Store Demo Home Use Select [Home Use] to preset ...
Owner's Manual (English)
Page 39
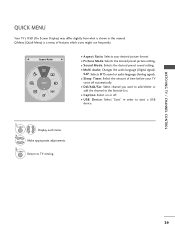
...the desired preset sound setting. F Aspect Ratio G A 16:9 I Multi Audio: Changes the audio language (Digital signal). I Aspect Ratio: Selects your TV turns off . I USB Device: Select "Eject" in this manual. Make appropriate adjustments. 3 Q. SAP: Selects MTS sound or audio language (Analog signal). ...device. 1 Q. MENU 2 Display each menu. I Caption: Select on or off automatically. MENU Return to TV viewing. 39 WATCHING TV / CHANNEL CONTROL QUICK MENU Your TV's OSD (On Screen Display) may differ slightly from what is a menu of time before your desired picture...
...the desired preset sound setting. F Aspect Ratio G A 16:9 I Multi Audio: Changes the audio language (Digital signal). I Aspect Ratio: Selects your TV turns off . I USB Device: Select "Eject" in this manual. Make appropriate adjustments. 3 Q. SAP: Selects MTS sound or audio language (Analog signal). ...device. 1 Q. MENU 2 Display each menu. I Caption: Select on or off automatically. MENU Return to TV viewing. 39 WATCHING TV / CHANNEL CONTROL QUICK MENU Your TV's OSD (On Screen Display) may differ slightly from what is a menu of time before your desired picture...

Owner's Manual (English)
Page 43
Selecting a channel in the memory by displaying the channel list. This padlock is displayed when the channel is locked with parental control. Paging through a channel list 1 P CH A G E Turn the pages. 2 RETURN Return to the chosen channel number. CHANNEL LIST You can check which channels are stored in the channel list 1 Select a channel. 2 ENTER Switch to TV viewing. 43 Channel List DTV 2-1 DTV 3-1 DTV 4-1 WATCHING TV / CHANNEL CONTROL Exit Displaying Channel List 1 LIST Display the Channel List.
Selecting a channel in the memory by displaying the channel list. This padlock is displayed when the channel is locked with parental control. Paging through a channel list 1 P CH A G E Turn the pages. 2 RETURN Return to the chosen channel number. CHANNEL LIST You can check which channels are stored in the channel list 1 Select a channel. 2 ENTER Switch to TV viewing. 43 Channel List DTV 2-1 DTV 3-1 DTV 4-1 WATCHING TV / CHANNEL CONTROL Exit Displaying Channel List 1 LIST Display the Channel List.

Owner's Manual (English)
Page 44
... Favorite List DTV 2-1 DTV 3-1 DTV 4-1 Exit Displaying the favorite channel list 1 MARK FAV Display the Favorite channel list. WATCHING TV / CHANNEL CONTROL FAVORITE CHANNEL SETUP Favorite Channels are a convenient feature that lets you quickly select channels of your desired channel. 2... number. Selecting a channel in -between channels. Paging through a favorite channel list 1 P A CH G E Turn the pages. 2 RETURN Return to a favorite channel, press the F A V (Favorite) button repeatedly. To tune to TV viewing. 44 F Del/Add/Fav G A Favorite 1 P CH A G E or 123 456 789 0...
... Favorite List DTV 2-1 DTV 3-1 DTV 4-1 Exit Displaying the favorite channel list 1 MARK FAV Display the Favorite channel list. WATCHING TV / CHANNEL CONTROL FAVORITE CHANNEL SETUP Favorite Channels are a convenient feature that lets you quickly select channels of your desired channel. 2... number. Selecting a channel in -between channels. Paging through a favorite channel list 1 P A CH G E Turn the pages. 2 RETURN Return to a favorite channel, press the F A V (Favorite) button repeatedly. To tune to TV viewing. 44 F Del/Add/Fav G A Favorite 1 P CH A G E or 123 456 789 0...
Owner's Manual (English)
Page 49
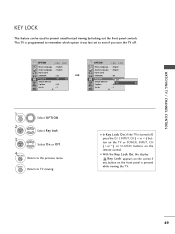
... Key Lock 'O n', if the TV is pressed while viewing the TV. 49 WATCHING TV / CHANNEL CONTROL KEY LOCK This feature can be used to the previous menu. I , INPUT, CH ( or ) button on the TV or POWER, INPUT, CH ( or ) or NUMBER buttons on the front panel is turned off . MENU Return to even if... you turn the TV off , press the r /...
... Key Lock 'O n', if the TV is pressed while viewing the TV. 49 WATCHING TV / CHANNEL CONTROL KEY LOCK This feature can be used to the previous menu. I , INPUT, CH ( or ) button on the TV or POWER, INPUT, CH ( or ) or NUMBER buttons on the front panel is turned off . MENU Return to even if... you turn the TV off , press the r /...


