Owner's Manual (English)
Page 6
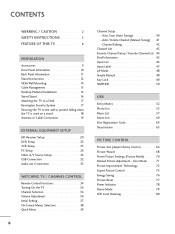
... Ratio) Control 66 Picture Wizard 68 Preset Picture Settings (Picture Mode 70 Manual Picture Adjustment - User Mode 71 Picture Improvement Technology 72 Expert Picture Control 73 Energy Saving 76 Picture Reset 77 Power Indicator 78 Demo Mode 79 LED Local Dimming 80 Auto Scan (Auto Tuning 40 - CONTENTS WARNING / CAUTION 2 SAFETY INSTRUCTIONS 3 FEATURE OF THIS TV 8 PREPARATION Accessories 9 Front...
... Ratio) Control 66 Picture Wizard 68 Preset Picture Settings (Picture Mode 70 Manual Picture Adjustment - User Mode 71 Picture Improvement Technology 72 Expert Picture Control 73 Energy Saving 76 Picture Reset 77 Power Indicator 78 Demo Mode 79 LED Local Dimming 80 Auto Scan (Auto Tuning 40 - CONTENTS WARNING / CAUTION 2 SAFETY INSTRUCTIONS 3 FEATURE OF THIS TV 8 PREPARATION Accessories 9 Front...
Owner's Manual (English)
Page 8
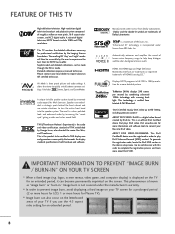
...VOD. tings. This is three preset picture and audio settings. Sophisticated and detailed calibrations can become permanently imprinted on your TV screen for a prolonged period (2 or more hours for LCD, 1 or more hours for more detailed picture. I When a fixed image (e.g. ...The resulting ISF "day" and "night" modes will then be made through the ISFccc mode. TruMotion 240Hz displays 240 scenes per second by the user to experience the best their LG...
...VOD. tings. This is three preset picture and audio settings. Sophisticated and detailed calibrations can become permanently imprinted on your TV screen for a prolonged period (2 or more hours for LCD, 1 or more hours for more detailed picture. I When a fixed image (e.g. ...The resulting ISF "day" and "night" modes will then be made through the ISFccc mode. TruMotion 240Hz displays 240 scenes per second by the user to experience the best their LG...
Owner's Manual (English)
Page 18
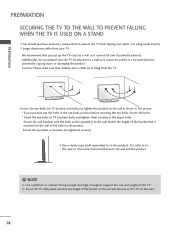
...backwards. Additionally, we recommend that is safer to the wall. I Insert the eye-bolts (or TV brackets and bolts) to tighten the product to the holes in the picture. * If your TV. Match the height of the TV. Ensure the eye-bolts or brackets are the same. 18 I Use a sturdy rope (sold ...separately) to tie the rope so it becomes horizontal between the wall and the product. ! G To use the TV safely make sure that you set up the TV close ...
...backwards. Additionally, we recommend that is safer to the wall. I Insert the eye-bolts (or TV brackets and bolts) to tighten the product to the holes in the picture. * If your TV. Match the height of the TV. Ensure the eye-bolts or brackets are the same. 18 I Use a sturdy rope (sold ...separately) to tie the rope so it becomes horizontal between the wall and the product. ! G To use the TV safely make sure that you set up the TV close ...
Owner's Manual (English)
Page 27
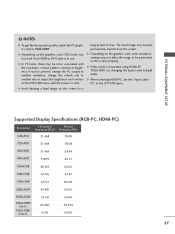
...fixed image may not allow the image to be noise associated with the resolution, vertical pattern, contrast or brightness. G When selecting HDMI-PC, set the "Input Label PC" in use. EXTERNAL EQUIPMENT SETUP ! G In PC mode, there may not work if an HDMI to another rate...DVI Cable is in the OPTION menu. G Depending on the graphics card, some resolution settings may become permanently imprinted on the screen properly. G Avoid keeping a fixed image on the PICTURE menu until the picture is truncated using HDMI-PC 1920x1080, try changing the aspect ratio to 1920x1080. G ...
...fixed image may not allow the image to be noise associated with the resolution, vertical pattern, contrast or brightness. G When selecting HDMI-PC, set the "Input Label PC" in use. EXTERNAL EQUIPMENT SETUP ! G In PC mode, there may not work if an HDMI to another rate...DVI Cable is in the OPTION menu. G Depending on the graphics card, some resolution settings may become permanently imprinted on the screen properly. G Avoid keeping a fixed image on the PICTURE menu until the picture is truncated using HDMI-PC 1920x1080, try changing the aspect ratio to 1920x1080. G ...
Owner's Manual (English)
Page 29
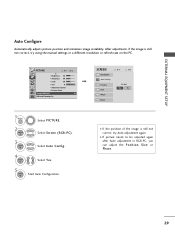
...be adjusted again after Auto adjustment in RGB-PC, you can adjust the Position, S i z e or P h a s e. 29 To Set Yes No 1 MENU 2 ENTER 3 ENTER Select PICTURE. Select Auto Config.. 4 ENTER Select Y e s. 5 ENTER Start Auto Configuration. Select Screen (RGB-PC). I If the position of the ...not correct, try Auto adjustment again. After adjustment, if the image is still not correct, try using the manual settings or a different resolution or refresh rate on the PC. PICTURE Move Enter E • Brightness 50 • Sharpness 50 • Color 50 • Tint 0R G •...
...be adjusted again after Auto adjustment in RGB-PC, you can adjust the Position, S i z e or P h a s e. 29 To Set Yes No 1 MENU 2 ENTER 3 ENTER Select PICTURE. Select Auto Config.. 4 ENTER Select Y e s. 5 ENTER Start Auto Configuration. Select Screen (RGB-PC). I If the position of the ...not correct, try Auto adjustment again. After adjustment, if the image is still not correct, try using the manual settings or a different resolution or refresh rate on the PC. PICTURE Move Enter E • Brightness 50 • Sharpness 50 • Color 50 • Tint 0R G •...

Owner's Manual (English)
Page 31
Position Size Phase Reset Move Prev. Select Y e s. 31 EXTERNAL EQUIPMENT SETUP Screen Reset (Reset to original factory values) Returns Position, S i z e, and Phase to the default factory settings. Select Reset. PICTURE Move Enter E • Brightness 50 • Sharpness 50 • Color 50 • Tint 0R G • Advanced Control • Picture Reset Screen (RGB-PC) LED Local Dimming :On SCREEN Resolution Auto config. Select Screen (RGB-PC). To Set Yes No 1 MENU 2 ENTER 3 ENTER 4 ENTER 5 ENTER Select PICTURE. This feature operates only in RGB-PC mode.
Position Size Phase Reset Move Prev. Select Y e s. 31 EXTERNAL EQUIPMENT SETUP Screen Reset (Reset to original factory values) Returns Position, S i z e, and Phase to the default factory settings. Select Reset. PICTURE Move Enter E • Brightness 50 • Sharpness 50 • Color 50 • Tint 0R G • Advanced Control • Picture Reset Screen (RGB-PC) LED Local Dimming :On SCREEN Resolution Auto config. Select Screen (RGB-PC). To Set Yes No 1 MENU 2 ENTER 3 ENTER 4 ENTER 5 ENTER Select PICTURE. This feature operates only in RGB-PC mode.
Owner's Manual (English)
Page 34
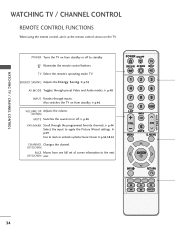
... P CH A G E MUTE MENU Q. ENERGY SAVING Adjusts the Energy Saving. G p.54,58,61 CHANNEL Changes the channel. POWER Turns the TV on from standby. G p.46 VOLUME UP Adjusts the volume. /DOWN MUTE Switches the sound on the TV. G p.69 Use to apply the Picture Wizard settings. G p.76 AV MODE Toggles through inputs. G p.44 Select the input...
... P CH A G E MUTE MENU Q. ENERGY SAVING Adjusts the Energy Saving. G p.54,58,61 CHANNEL Changes the channel. POWER Turns the TV on from standby. G p.46 VOLUME UP Adjusts the volume. /DOWN MUTE Switches the sound on the TV. G p.69 Use to apply the Picture Wizard settings. G p.76 AV MODE Toggles through inputs. G p.44 Select the input...
Owner's Manual (English)
Page 37
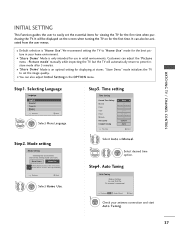
... 1 Select A ut o or Manual. 2 ENTER Select desired time option. I You can adjust the "Picture menu - Step4. I "Store Demo" Mode is "Home Use". "Store Demo" mode initializes the TV to set the essential items for viewing the TV for use this TV at stores. Store Demo Home Use Select [Home Use] to use in retail environments...
... 1 Select A ut o or Manual. 2 ENTER Select desired time option. I You can adjust the "Picture menu - Step4. I "Store Demo" Mode is "Home Use". "Store Demo" mode initializes the TV to set the essential items for viewing the TV for use this TV at stores. Store Demo Home Use Select [Home Use] to use in retail environments...
Owner's Manual (English)
Page 38
... : Standard • SRS TruSurround XT: Off • Treble 50 • Bass 50 E WATCHING TV / CHANNEL CONTROL OPTION Menu Language Audio Language Input Label SIMPLINK Key Lock Simple Manual Caption Set ID E Move Enter : English : English : On : Off : Off : 1 CHANNEL PICTURE AUDIO TIME OPTION LOCK INPUT USB TIME Clock Off Time On Time Sleep...
... : Standard • SRS TruSurround XT: Off • Treble 50 • Bass 50 E WATCHING TV / CHANNEL CONTROL OPTION Menu Language Audio Language Input Label SIMPLINK Key Lock Simple Manual Caption Set ID E Move Enter : English : English : On : Off : Off : 1 CHANNEL PICTURE AUDIO TIME OPTION LOCK INPUT USB TIME Clock Off Time On Time Sleep...
Owner's Manual (English)
Page 39
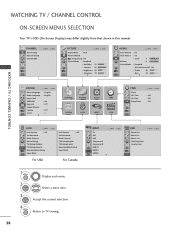
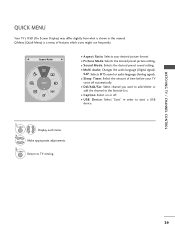
... Mode: Selects the desired preset sound setting. MENU Return to the Favorite List. WATCHING TV / CHANNEL CONTROL QUICK MENU Your TV's OSD (On Screen Display) may differ slightly from what is a menu of time before your desired picture format. I Sleep Timer: Select the... your TV turns off . MENU 2 Display each menu. F Aspect Ratio G A 16:9 I Caption: Select on or off automatically. I USB Device: Select "Eject" in this manual. Q.Menu (Quick Menu) is shown in order to eject a USB device. 1 Q. I Picture Mode: Selects the desired preset picture setting. SAP...
... Mode: Selects the desired preset sound setting. MENU Return to the Favorite List. WATCHING TV / CHANNEL CONTROL QUICK MENU Your TV's OSD (On Screen Display) may differ slightly from what is a menu of time before your desired picture format. I Sleep Timer: Select the... your TV turns off . MENU 2 Display each menu. F Aspect Ratio G A 16:9 I Caption: Select on or off automatically. I USB Device: Select "Eject" in this manual. Q.Menu (Quick Menu) is shown in order to eject a USB device. 1 Q. I Picture Mode: Selects the desired preset picture setting. SAP...

Owner's Manual (English)
Page 48
...the AV MODE button repeatedly to TV viewing. 48 Picture Mode" and "AUDIO menu - I If you want to previous selected value. Return to select the desired source. WATCHING TV / CHANNEL CONTROL AV MODE AV Mode toggles through preset Video and Audio settings. Select Simple Manual. 3 ...ENTER 4 RETURN Select the part of the manual you select " Cinema " in AV mode, the "Picture Mode" and "Sound Mode" return to see...
...the AV MODE button repeatedly to TV viewing. 48 Picture Mode" and "AUDIO menu - I If you want to previous selected value. Return to select the desired source. WATCHING TV / CHANNEL CONTROL AV MODE AV Mode toggles through preset Video and Audio settings. Select Simple Manual. 3 ...ENTER 4 RETURN Select the part of the manual you select " Cinema " in AV mode, the "Picture Mode" and "Sound Mode" return to see...
Owner's Manual (English)
Page 66
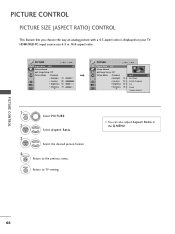
...; Sharpness 70 E PICTURE Move Enter Aspect Ratio : 16:9 Picture Wizard Energy Saving : Off Picture Mode : Standard • Backlight 70 • Contrast 90 • Brightness 50 • Sharpness 70 E 16:9 Just Scan Set By Program 4:3 Zoom Cinema Zoom 1 1 MENU Select PICTURE. 2 ENTER 3 ENTER Select Aspect Ratio. Select the desired picture format. 4 RETURN Return to TV viewing. PICTURE CONTROL 66
...; Sharpness 70 E PICTURE Move Enter Aspect Ratio : 16:9 Picture Wizard Energy Saving : Off Picture Mode : Standard • Backlight 70 • Contrast 90 • Brightness 50 • Sharpness 70 E 16:9 Just Scan Set By Program 4:3 Zoom Cinema Zoom 1 1 MENU Select PICTURE. 2 ENTER 3 ENTER Select Aspect Ratio. Select the desired picture format. 4 RETURN Return to TV viewing. PICTURE CONTROL 66

Owner's Manual (English)
Page 67
.... 4:3 Choose 4:3 when you want to enlarge the picture in correct proportion. b. Set By Program Selects the proper picture proportion to match the source's image. (4:3 4:3) Set By Program (16:9 16:9) Set By Program Cinema Zoom Choose Cinema Zoom when you want to view a picture with an original 4:3 aspect ratio. PICTURE CONTROL Just Scan Normally the edges of Zoom...
.... 4:3 Choose 4:3 when you want to enlarge the picture in correct proportion. b. Set By Program Selects the proper picture proportion to match the source's image. (4:3 4:3) Set By Program (16:9 16:9) Set By Program Cinema Zoom Choose Cinema Zoom when you want to view a picture with an original 4:3 aspect ratio. PICTURE CONTROL Just Scan Normally the edges of Zoom...

Owner's Manual (English)
Page 68
... • Brightness 50 • Sharpness 70 E 1 MENU Select PICTURE. 2 ENTER ENTER Select P i c t u r e W i z a r d. G White Level Set the screen above identical to the Recommended sample below . Color Set the screen above identical to the Recommended sample below . Use this ... E High Previous Next 3 ENTER Adjust Picture Wizard. Previous Next 6 ENTER Adjust C o l o r. PICTURE CONTROL E PICTURE CONTROL PICTURE WIZARD This feature lets you adjust the picture quality of the original image. Black Level Set the screen above identical to calibrate the ...
... • Brightness 50 • Sharpness 70 E 1 MENU Select PICTURE. 2 ENTER ENTER Select P i c t u r e W i z a r d. G White Level Set the screen above identical to the Recommended sample below . Color Set the screen above identical to the Recommended sample below . Use this ... E High Previous Next 3 ENTER Adjust Picture Wizard. Previous Next 6 ENTER Adjust C o l o r. PICTURE CONTROL E PICTURE CONTROL PICTURE WIZARD This feature lets you adjust the picture quality of the original image. Black Level Set the screen above identical to calibrate the ...
Owner's Manual (English)
Page 69
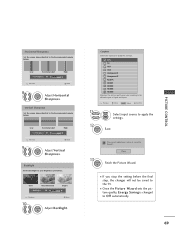
... the Recommended sample below . Low Recommended E • V Sharpness 50 E High Previous Next 9 ENTER Adjust V e r t i c a l S h a r p n e s s. DTV TV AV1 AV2 Component1 Component2 RGB-PC HDMI1 HDMI2 HDMI3 HDMI4 Warning: The picture quality may vary according to apply the settings. I Once the Picture Wizard sets the picture quality, Energy Saving is saved to the Recommended sample below . Vertical Sharpness...
... the Recommended sample below . Low Recommended E • V Sharpness 50 E High Previous Next 9 ENTER Adjust V e r t i c a l S h a r p n e s s. DTV TV AV1 AV2 Component1 Component2 RGB-PC HDMI1 HDMI2 HDMI3 HDMI4 Warning: The picture quality may vary according to apply the settings. I Once the Picture Wizard sets the picture quality, Energy Saving is saved to the Recommended sample below . Vertical Sharpness...
Owner's Manual (English)
Page 70
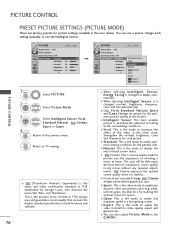
...ments. I You can use a preset, change Cinema at home. I Vivid: This is darkest. MENU Return to the previous menu. PICTURE CONTROL PRESET PICTURE SETTINGS (PICTURE MODE) There are preset for video quality expert and general user. I G a m e: This is the mode to realize fast ...guarantees screen quality that exceeds the display standard specification in detail for the optimum picture quality at the factory. Return to TV viewing. PICTURE Move Enter Aspect Ratio : 16:9 Picture Wizard Energy Saving : Off Picture Mode : Standard • Backlight 70 • Contrast 90 • ...
...ments. I You can use a preset, change Cinema at home. I Vivid: This is darkest. MENU Return to the previous menu. PICTURE CONTROL PRESET PICTURE SETTINGS (PICTURE MODE) There are preset for video quality expert and general user. I G a m e: This is the mode to realize fast ...guarantees screen quality that exceeds the display standard specification in detail for the optimum picture quality at the factory. Return to TV viewing. PICTURE Move Enter Aspect Ratio : 16:9 Picture Wizard Energy Saving : Off Picture Mode : Standard • Backlight 70 • Contrast 90 • ...
Owner's Manual (English)
Page 71
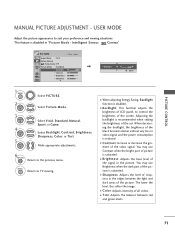
... brightness of crispness in "Picture Mode - I Sharpness: Adjusts the level of the set. Make appropriate adjustments. 6 RETURN Return to TV viewing. I When adjusting Energy Saving, Backlight function is saturated. Intelligent Sensor, C i n e m a". I T i n t: Adjusts the balance between the light and dark areas of LCD panel, to suit your preference and viewing situations. Select Vivid, Standard, Natural...
... brightness of crispness in "Picture Mode - I Sharpness: Adjusts the level of the set. Make appropriate adjustments. 6 RETURN Return to TV viewing. I When adjusting Energy Saving, Backlight function is saturated. Intelligent Sensor, C i n e m a". I T i n t: Adjusts the balance between the light and dark areas of LCD panel, to suit your preference and viewing situations. Select Vivid, Standard, Natural...
Owner's Manual (English)
Page 72
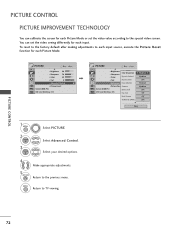
...Picture Mode or set the video seeing differently for each input. MENU Return to the previous menu. To reset to the factory default after making adjustments to the special video screen. PICTURE CONTROL PICTURE CONTROL PICTURE IMPROVEMENT TECHNOLOGY You can set... the video value according to each input source, execute the Picture Reset function for each Picture Mode. PICTURE... Dy0namRic Color G • Advanced CoNnotirsoe lReduction • Picture ResetGamma Screen (RGB-PC) LED Local Dimming : On Black...
...Picture Mode or set the video seeing differently for each input. MENU Return to the previous menu. To reset to the factory default after making adjustments to the special video screen. PICTURE CONTROL PICTURE CONTROL PICTURE IMPROVEMENT TECHNOLOGY You can set... the video value according to each input source, execute the Picture Reset function for each Picture Mode. PICTURE... Dy0namRic Color G • Advanced CoNnotirsoe lReduction • Picture ResetGamma Screen (RGB-PC) LED Local Dimming : On Black...

Owner's Manual (English)
Page 73
...previous menu. This may also be used be a professional to help optimize the TV performance in the environment the TV is in. PICTURE Move Enter Aspect Ratio : 16:9 Picture Wizard Energy Saving: Off Picture Mode : Expert1 Intelligent Sensor • Backlight 30 Vivid • Contrast 90 ... G Off Medium Low Off Low SD Standard Edge Enhancer High E Close 1 MENU 2 ENTER 3 ENTER 4 ENTER Select PICTURE. PICTURE CONTROL EXPERT PICTURE CONTROL By segmenting categories, Expert1 and Expert2 provide more categories which users can set as they see fit, offering the optimal...
...previous menu. This may also be used be a professional to help optimize the TV performance in the environment the TV is in. PICTURE Move Enter Aspect Ratio : 16:9 Picture Wizard Energy Saving: Off Picture Mode : Expert1 Intelligent Sensor • Backlight 30 Vivid • Contrast 90 ... G Off Medium Low Off Low SD Standard Edge Enhancer High E Close 1 MENU 2 ENTER 3 ENTER 4 ENTER Select PICTURE. PICTURE CONTROL EXPERT PICTURE CONTROL By segmenting categories, Expert1 and Expert2 provide more categories which users can set as they see fit, offering the optimal...
Owner's Manual (English)
Page 77
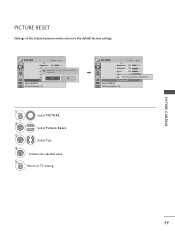
...; Sharpness 70 • Color 60 • Tint 0R G • Advancei d RCeosnetttrionlg video configuration... • Picture Reset Screen (RGB-PC) LED Local Dimming : On 1 MENU Select PICTURE. 2 ENTER Select Picture Reset. 3 ENTER Select Y e s. 4 ENTER Initialize the adjusted value. 5 MENU Return to the default factory settings. PICTURE RESET Settings of the selected picture modes return to TV viewing. PICTURE CONTROL 77
...; Sharpness 70 • Color 60 • Tint 0R G • Advancei d RCeosnetttrionlg video configuration... • Picture Reset Screen (RGB-PC) LED Local Dimming : On 1 MENU Select PICTURE. 2 ENTER Select Picture Reset. 3 ENTER Select Y e s. 4 ENTER Initialize the adjusted value. 5 MENU Return to the default factory settings. PICTURE RESET Settings of the selected picture modes return to TV viewing. PICTURE CONTROL 77


