Owner's Manual
Page 4
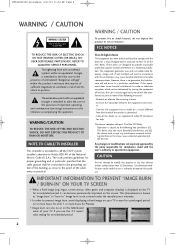
... generates, uses and can become permanently imprinted on , the user is encouraged to try to radio communications. Any changes or modifications not expressly approved by the party responsible for a Class B digital device, pursuant to operate this product IMPORTANT INFORMATION TO PREVENT "IMAGE BURN / BURN-IN" ON YOUR TV SCREEN I When a fixed image (e.g. logos, screen menus, video game, and computer display) is displayed on the...
... generates, uses and can become permanently imprinted on , the user is encouraged to try to radio communications. Any changes or modifications not expressly approved by the party responsible for a Class B digital device, pursuant to operate this product IMPORTANT INFORMATION TO PREVENT "IMAGE BURN / BURN-IN" ON YOUR TV SCREEN I When a fixed image (e.g. logos, screen menus, video game, and computer display) is displayed on the...
Owner's Manual
Page 5
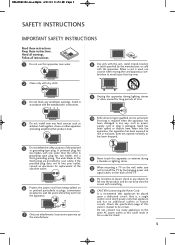
...specification page of this apparatus during lighting storms or when unused for replacement of the obsolete outlet. 6 Protect the power cord from being walked on the back of the TV. 13 Do not allow an impact shock or any objects to fall into the product, and do not drop onto the screen...'s instructions. 9 Unplug this owner's manual to qualified service personnel. supply cord or plug is , a single outlet circuit which powers only that produce heat. 5 Do not defeat the safety purpose of time. 4 Do not install near water. 8 Use only with the cart, stand, tripod, bracket, or...
...specification page of this apparatus during lighting storms or when unused for replacement of the obsolete outlet. 6 Protect the power cord from being walked on the back of the TV. 13 Do not allow an impact shock or any objects to fall into the product, and do not drop onto the screen...'s instructions. 9 Unplug this owner's manual to qualified service personnel. supply cord or plug is , a single outlet circuit which powers only that produce heat. 5 Do not defeat the safety purpose of time. 4 Do not install near water. 8 Use only with the cart, stand, tripod, bracket, or...

Owner's Manual
Page 7
... open the Owner's Manual file directly. NOTE When you want to prevent falling when the TV is used on a stand 17 Swivel Stand 17 Antenna or Cable Connection 18 EXTERNAL EQUIPMENT SETUP HD Receiver Setup 19 DVD Setup 20 VCR Setup 21 PC Setup 22 WATCHING TV Turning On TV 24 Channel Setup 25 Initial Setting 26 Quick Menu 27 Favorite Channel Setup / Favorite Channel List . . 28 On-Screen Menus Selection 29 USB Entry Modes 32 Photo List 33 Music List 39 APPENDIX Troubleshooting 42...
... open the Owner's Manual file directly. NOTE When you want to prevent falling when the TV is used on a stand 17 Swivel Stand 17 Antenna or Cable Connection 18 EXTERNAL EQUIPMENT SETUP HD Receiver Setup 19 DVD Setup 20 VCR Setup 21 PC Setup 22 WATCHING TV Turning On TV 24 Channel Setup 25 Initial Setting 26 Quick Menu 27 Favorite Channel Setup / Favorite Channel List . . 28 On-Screen Menus Selection 29 USB Entry Modes 32 Photo List 33 Music List 39 APPENDIX Troubleshooting 42...
Owner's Manual
Page 8
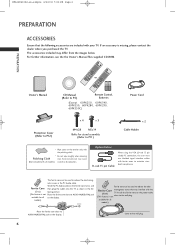
... FLASHBK INFO P A G E ENTER Q.MENU BACK EXIT 1.5V 1.5V FREEZE Owner's Manual CD Manual (Refer to P.5) Remote Control, Batteries (Except 60PK250, 60PK540, 60PK550, 60PK280, 60PK290, 60PK550C) Power Cord Protection Cover (Refer to P.12) x 4 x 3 M4x28 M5x14 Bolts for all models) scratch or discoloration. Option Extras D-sub 15 pin Cable When using the VGA (D-sub 15 pin cable) PC connection, the user must use shielded signal interface cables with ferrite cores...
... FLASHBK INFO P A G E ENTER Q.MENU BACK EXIT 1.5V 1.5V FREEZE Owner's Manual CD Manual (Refer to P.5) Remote Control, Batteries (Except 60PK250, 60PK540, 60PK550, 60PK280, 60PK290, 60PK550C) Power Cord Protection Cover (Refer to P.12) x 4 x 3 M4x28 M5x14 Bolts for all models) scratch or discoloration. Option Extras D-sub 15 pin Cable When using the VGA (D-sub 15 pin cable) PC connection, the user must use shielded signal interface cables with ferrite cores...

Owner's Manual
Page 11
... PC audio input. Connect cable signals to DVI cable (not included) 2 OPTICAL DIGITAL AUDIO OUT Optical digital audio output for software updates. 10 Power Cord Socket For operation with amps and home theater systems. Note: In standby mode, this port doesn't work. 3 RS-232C IN (CONTROL & SERVICE) PORT Used by third party devices. AUDIO IN (RGB) 4 1/8" headphone jack for audio. 7 AV (Audio/Video) IN Analog composite connection. Uses a D-sub 15 pin cable (VGA cable). Accepts DVI video using an adapter or HDMI to this jack. REMOTE CONTROL IN PORT 5 For a wired remote control. Supports...
... PC audio input. Connect cable signals to DVI cable (not included) 2 OPTICAL DIGITAL AUDIO OUT Optical digital audio output for software updates. 10 Power Cord Socket For operation with amps and home theater systems. Note: In standby mode, this port doesn't work. 3 RS-232C IN (CONTROL & SERVICE) PORT Used by third party devices. AUDIO IN (RGB) 4 1/8" headphone jack for audio. 7 AV (Audio/Video) IN Analog composite connection. Uses a D-sub 15 pin cable (VGA cable). Accepts DVI video using an adapter or HDMI to this jack. REMOTE CONTROL IN PORT 5 For a wired remote control. Supports...
Owner's Manual
Page 18
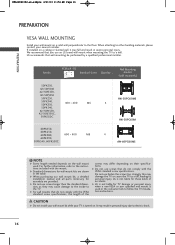
... the VESA standard screw specifications. CAUTION G Do not install your wall mount kit while your TV is used . G For wall mounts that wall mounting be performed by a qualified professional installer. G LG is not liable for wall mount kits are provided. G When purchasing our wall mount kit, a detailed installation manual and all parts necessary for TV damage or personal injury when a non-VESA or non specified wall mount is turned on their specifications. NOTE G Screw length needed depends...
... the VESA standard screw specifications. CAUTION G Do not install your wall mount kit while your TV is used . G For wall mounts that wall mounting be performed by a qualified professional installer. G LG is not liable for wall mount kits are provided. G When purchasing our wall mount kit, a detailed installation manual and all parts necessary for TV damage or personal injury when a non-VESA or non specified wall mount is turned on their specifications. NOTE G Screw length needed depends...
Owner's Manual
Page 21
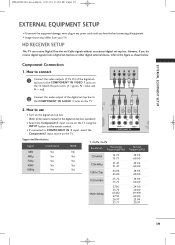
... TV using the INPUT button on the digital set -top box. operation) I Turn on the remote control. However, if you have finished connecting all equipment. Match the jack colors (Y = green, PB = blue, and PR = red). 1 2 2 Connect the audio output of the digital settop box to the COMPONENT IN VIDEO 1 jacks on the TV. 2 L R 1 VIDEO AUDIO COMPONENT IN ANTE CAB I Image shown may differ from a digital set-top box or other digital external device, refer to the figure as shown below. I Supported Resolutions Signal 480i...
... TV using the INPUT button on the digital set -top box. operation) I Turn on the remote control. However, if you have finished connecting all equipment. Match the jack colors (Y = green, PB = blue, and PR = red). 1 2 2 Connect the audio output of the digital settop box to the COMPONENT IN VIDEO 1 jacks on the TV. 2 L R 1 VIDEO AUDIO COMPONENT IN ANTE CAB I Image shown may differ from a digital set-top box or other digital external device, refer to the figure as shown below. I Supported Resolutions Signal 480i...

Owner's Manual
Page 25
... the screen. G The synchronization input form for a long period of time. G In PC mode, there may be positioned on the graphics card, some resolution settings may not work if a HDMI to be noise associated with the resolution, vertical pattern, contrast or brightness. G Avoid keeping a fixed image on the graphics card, DOS mode may not allow the image to DVI Cable is separate. Supported Display Specifications (RGB-PC, HDMI-PC) Resolution...
... the screen. G The synchronization input form for a long period of time. G In PC mode, there may be positioned on the graphics card, some resolution settings may not work if a HDMI to be noise associated with the resolution, vertical pattern, contrast or brightness. G Avoid keeping a fixed image on the graphics card, DOS mode may not allow the image to DVI Cable is separate. Supported Display Specifications (RGB-PC, HDMI-PC) Resolution...

Owner's Manual
Page 27
... AM Page 25 CHANNEL SETUP Auto Scan (Auto Tuning) Automatically finds all channels available through antenna or cable inputs, and stores them in the Lock Menu to allow a channel search. I The TV will ask for a password if parental control has been activated (Lock Menu). Yes No Processing Auto Tuning... 23% DTV Channel 8 DTV : 0 Found Channel(s) ATV : 0 Found Channel(s) Next(TV) Close 1 MENU 2 ENTER 3 ENTER Select CHANNEL. MENU Return to change depending on the channel list. Use the password you can store...
... AM Page 25 CHANNEL SETUP Auto Scan (Auto Tuning) Automatically finds all channels available through antenna or cable inputs, and stores them in the Lock Menu to allow a channel search. I The TV will ask for a password if parental control has been activated (Lock Menu). Yes No Processing Auto Tuning... 23% DTV Channel 8 DTV : 0 Found Channel(s) ATV : 0 Found Channel(s) Next(TV) Close 1 MENU 2 ENTER 3 ENTER Select CHANNEL. MENU Return to change depending on the channel list. Use the password you can store...
Owner's Manual
Page 28
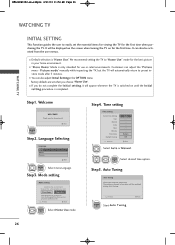
... AM Page 26 WATCHING TV WATCHING TV INITIAL SETTING This Function guides the user to "Home Use" mode for the best picture in your antenna connection. Previous Next 1 ENTER Select H o m e U s e mode. Picture mode" manually while inspecting the TV, but the TV will be activated from the user menus. Auto Tuning Auto Tuning Check your home environment. Store Demo Home Use Select [Home Use] to preset instore mode after 5 minutes. I Default selection is only intended for use this TV at...
... AM Page 26 WATCHING TV WATCHING TV INITIAL SETTING This Function guides the user to "Home Use" mode for the best picture in your antenna connection. Previous Next 1 ENTER Select H o m e U s e mode. Picture mode" manually while inspecting the TV, but the TV will be activated from the user menus. Auto Tuning Auto Tuning Check your home environment. Store Demo Home Use Select [Home Use] to preset instore mode after 5 minutes. I Default selection is only intended for use this TV at...

Owner's Manual
Page 29
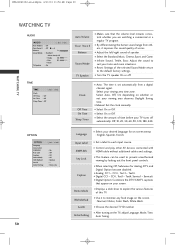
... off automatically. Q.Menu (Quick Menu) is shown in order to eject a USB device. I Sound Mode: Selects the factory preset sound for type of features which users might use frequently. I Eject USB: Select "Eject" in this manual. Q.Menu Aspect Ratio Picture Mode Sound Mode Caption Multi Audio Sleep Timer CH Del/Add/Fav Eject USB F 16:9 G Vivid Standard Off English Off Add Eject Close 1 Q.MENU Display each menu. 2 Make appropriate adjustments. 3 Q.MENU Return to the Favorite List. I Aspect Ratio: Selects your TV turns off . I Del/Add/Fav: Select channel you want to...
... off automatically. Q.Menu (Quick Menu) is shown in order to eject a USB device. I Sound Mode: Selects the factory preset sound for type of features which users might use frequently. I Eject USB: Select "Eject" in this manual. Q.Menu Aspect Ratio Picture Mode Sound Mode Caption Multi Audio Sleep Timer CH Del/Add/Fav Eject USB F 16:9 G Vivid Standard Off English Off Add Eject Close 1 Q.MENU Display each menu. 2 Make appropriate adjustments. 3 Q.MENU Return to the Favorite List. I Aspect Ratio: Selects your TV turns off . I Del/Add/Fav: Select channel you want to...

Owner's Manual
Page 31
...the channel list. I Select the desired picture format: 16:9, Just Scan, Set by program, 4:3, Zoom, Cinema Zoom. PICTURE PICTURE Move Aspect Ratio : 16:9 Picture Wizard Energy Saving : Off Picture Mode : Standard • Contrast 90 • Brightness 50 • Sharpness 60 • Color 60 • Tint E 0R Enter G Aspect Ratio I User can calibrate the screen for users. Picture Mode I Advanced Control: You can do manual channel selection and add or delete individual channels. I Select the Vivid, Standard, , Cinema, Sport, AutoPowerSave Game, Expert1, Expert2. Screen...
...the channel list. I Select the desired picture format: 16:9, Just Scan, Set by program, 4:3, Zoom, Cinema Zoom. PICTURE PICTURE Move Aspect Ratio : 16:9 Picture Wizard Energy Saving : Off Picture Mode : Standard • Contrast 90 • Brightness 50 • Sharpness 60 • Color 60 • Tint E 0R Enter G Aspect Ratio I User can calibrate the screen for users. Picture Mode I Advanced Control: You can do manual channel selection and add or delete individual channels. I Select the Vivid, Standard, , Cinema, Sport, AutoPowerSave Game, Expert1, Expert2. Screen...
Owner's Manual
Page 32
I Control and play other AV devices connected with HDMI cable without additional cables and settings. I Adjust the left/right sound of this TV. I Reset: Settings of the selected Sound Mode return to explain the various features of speaker. I Displays a slide show to the default factory settings. I Select On or Off. I Digital Option: Customize the DTV/CADTV captions that the volume level remains consistent whether you are watching a commercial or a regular TV program. I Turn the TV speaker On...
I Control and play other AV devices connected with HDMI cable without additional cables and settings. I Adjust the left/right sound of this TV. I Reset: Settings of the selected Sound Mode return to explain the various features of speaker. I Displays a slide show to the default factory settings. I Select On or Off. I Digital Option: Customize the DTV/CADTV captions that the volume level remains consistent whether you are watching a commercial or a regular TV program. I Turn the TV speaker On...

Owner's Manual
Page 34
... models ENTRY MODES When you can not add a new folder or delete the existing folder. 1 Connect the USB device to a USB storage device which requires an external power supply. G A USB storage device which is recognizable. G Only use only a USB storage device which has normal music files or image files. In case of a files name. Data management is not recognizable. USB connector holder MI IN 3 USB IN USB 2 Select Photo List...
... models ENTRY MODES When you can not add a new folder or delete the existing folder. 1 Connect the USB device to a USB storage device which requires an external power supply. G A USB storage device which is recognizable. G Only use only a USB storage device which has normal music files or image files. In case of a files name. Data management is not recognizable. USB connector holder MI IN 3 USB IN USB 2 Select Photo List...

Owner's Manual
Page 39
Make appropriate adjustments. 37 Set photo view. Slide Speed Fast Music Folder ... Prev. 1 ENTER 2 ENTER Show the Slide Speed or Music Folder. MFL62861002-en-simple 4/21/10 11:54 AM Page 37 USB Using the Photo List Option Slideshow BGM 1/17 Q.MENU Option Delete Close Choose option Set photo view. Exit 1 Q.MENU Show the PopUp menu. 2 ENTER Select Set Photo View, Set Video or Set Audio. G When you select the Set Photo View, I You cannot change Music Folder while BGM is playing. Set video. Set audio.
Make appropriate adjustments. 37 Set photo view. Slide Speed Fast Music Folder ... Prev. 1 ENTER 2 ENTER Show the Slide Speed or Music Folder. MFL62861002-en-simple 4/21/10 11:54 AM Page 37 USB Using the Photo List Option Slideshow BGM 1/17 Q.MENU Option Delete Close Choose option Set photo view. Exit 1 Q.MENU Show the PopUp menu. 2 ENTER Select Set Photo View, Set Video or Set Audio. G When you select the Set Photo View, I You cannot change Music Folder while BGM is playing. Set video. Set audio.

Owner's Manual
Page 40
... Color Temperature Noise Reduction Reset Vivid 100 50 70 80 0 W C 0 W C Medium Prev. 1 ENTER 2 ENTER Show the Picture Mode. G When you select the Set Video, Set video. Set audio. Sound Mode Auto Volume Clear Voice ll Balance Cinema Off Off 0 L R Prev. 1 ENTER 2 ENTER Show the Sound Mode, Auto Volume, Clear Voice II and Balance. MFL62861002-en-simple 4/21/10 11:54 AM Page 38 USB USB G When you select the Set Audio, I APS mode is not supported...
... Color Temperature Noise Reduction Reset Vivid 100 50 70 80 0 W C 0 W C Medium Prev. 1 ENTER 2 ENTER Show the Picture Mode. G When you select the Set Video, Set video. Set audio. Sound Mode Auto Volume Clear Voice ll Balance Cinema Off Off 0 L R Prev. 1 ENTER 2 ENTER Show the Sound Mode, Auto Volume, Clear Voice II and Balance. MFL62861002-en-simple 4/21/10 11:54 AM Page 38 USB USB G When you select the Set Audio, I APS mode is not supported...

Owner's Manual
Page 43
...:16 Up Folder USB Device Free Space 150MB Duration 04:12 05:30 Move PopUp Menu CH Move Page Q.MENU Option MARK Mark Exit 1 Q.MENU Show the Sound Mode. 2 Make appropriate adjustments. NOTE G When music is playing, is no user input to stop the screen saver. Sound Mode Auto Volume Clear Voice ll Balance Cinema Off Off 0 L R Exit I The play information box (as the play music files less than 16...
...:16 Up Folder USB Device Free Space 150MB Duration 04:12 05:30 Move PopUp Menu CH Move Page Q.MENU Option MARK Mark Exit 1 Q.MENU Show the Sound Mode. 2 Make appropriate adjustments. NOTE G When music is playing, is no user input to stop the screen saver. Sound Mode Auto Volume Clear Voice ll Balance Cinema Off Off 0 L R Exit I The play information box (as the play music files less than 16...
Owner's Manual
Page 44
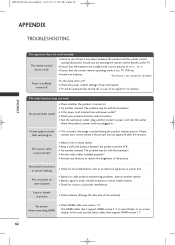
... sleep timer set : TV, VCR etc. I Adjust Color in pictures I Try another channel. No or poor color or poor picture I Check your service center, if the picture has not appeared after switching on . Horizontal/vertical bars or picture shaking I Check HDMI cable over version 1.3. No picture when connecting HDMI I Check for all models. MFL62861002-en-simple 4/21/10 11:54 AM Page 42 APPENDIX TROUBLESHOOTING APPENDIX The operation does not work . I Are the video cables installed...
... sleep timer set : TV, VCR etc. I Adjust Color in pictures I Try another channel. No or poor color or poor picture I Check your service center, if the picture has not appeared after switching on . Horizontal/vertical bars or picture shaking I Check HDMI cable over version 1.3. No picture when connecting HDMI I Check for all models. MFL62861002-en-simple 4/21/10 11:54 AM Page 42 APPENDIX TROUBLESHOOTING APPENDIX The operation does not work . I Are the video cables installed...

Owner's Manual
Page 45
I Reinstall the PC video card. 43 The problem may result in menu option. or single color I Try another channel. I Check USB cable over version 1.3. I Are the audio cables installed properly? No sound when connecting HDMI/USB I Adjust resolution, horizontal frequency, or vertical frequency. There is a problem in PC mode. (Only PC mode applied) The signal is out of the speakers Unusual sound from one of range I Check HDMI cable over version 2.0. Vertical bar or stripe...
I Reinstall the PC video card. 43 The problem may result in menu option. or single color I Try another channel. I Check USB cable over version 1.3. I Are the audio cables installed properly? No sound when connecting HDMI/USB I Adjust resolution, horizontal frequency, or vertical frequency. There is a problem in PC mode. (Only PC mode applied) The signal is out of the speakers Unusual sound from one of range I Check HDMI cable over version 2.0. Vertical bar or stripe...
Specification
Page 2
... AUDIO/Video Inputs/Outputs RF In (Antenna/Cable) AV In Component Video In (Y, Pb, Pr) + Audio Digital Audio Out (Optical) HDMI™/HDCP Input (V.1.3 w/Deep Color) RGB In (D-Sub 15pin) - Color • DTV Signal Strength Indicator • AUDIO Mono/Stereo/Dual (MTS/SAP) • Audio Output Power (Watts - PC PC Audio Input RS-232c In (Control/Service) USB 2.0 In (Service Only) Cabinet/Accessories Cabinet Color TruSlim Frame Swivel Stand (Degrees) VESA® Compliant (WxH) Remote Control Power Voltage, Hz On Mode (Average) Standby Mode...
... AUDIO/Video Inputs/Outputs RF In (Antenna/Cable) AV In Component Video In (Y, Pb, Pr) + Audio Digital Audio Out (Optical) HDMI™/HDCP Input (V.1.3 w/Deep Color) RGB In (D-Sub 15pin) - Color • DTV Signal Strength Indicator • AUDIO Mono/Stereo/Dual (MTS/SAP) • Audio Output Power (Watts - PC PC Audio Input RS-232c In (Control/Service) USB 2.0 In (Service Only) Cabinet/Accessories Cabinet Color TruSlim Frame Swivel Stand (Degrees) VESA® Compliant (WxH) Remote Control Power Voltage, Hz On Mode (Average) Standby Mode...


