Owner's Manual
Page 7
... 9 Front Panel Information 10 Back Panel Information 13 Stand Instruction 15 Cable Management 17 Desktop Pedestal Installation 18 Swivel Stand 18 VESA Wall Mounting 19 Securing the TV to the wall to prevent falling when the TV is used on a stand 20 Antenna or Cable Connection 21 EXTERNAL EQUIPMENT SETUP ...HD Receiver Setup 22 DVD Setup 25 VCR Setup 27 Other A/V Source Setup 28 USB Connection 28 Audio Out Connection 29 PC Setup 30 WATCHING TV / CHANNEL CONTROL Remote ...
... 9 Front Panel Information 10 Back Panel Information 13 Stand Instruction 15 Cable Management 17 Desktop Pedestal Installation 18 Swivel Stand 18 VESA Wall Mounting 19 Securing the TV to the wall to prevent falling when the TV is used on a stand 20 Antenna or Cable Connection 21 EXTERNAL EQUIPMENT SETUP ...HD Receiver Setup 22 DVD Setup 25 VCR Setup 27 Other A/V Source Setup 28 USB Connection 28 Audio Out Connection 29 PC Setup 30 WATCHING TV / CHANNEL CONTROL Remote ...

Owner's Manual
Page 10
...) Power Cord Protection Cover (Refer to P.16) x 4 x 3 M4x28 M5x14 Bolts for stand assembly (Refer to reduce the elec- Ferrite Core tromagnetic waves that the following accessories are included with your TV. PREPARATION PREPARATION ACCESSORIES Ensure that may interfere with the (Black) TV. Wind the PC Audio cable on the ferrite core twice, and...
...) Power Cord Protection Cover (Refer to P.16) x 4 x 3 M4x28 M5x14 Bolts for stand assembly (Refer to reduce the elec- Ferrite Core tromagnetic waves that the following accessories are included with your TV. PREPARATION PREPARATION ACCESSORIES Ensure that may interfere with the (Black) TV. Wind the PC Audio cable on the ferrite core twice, and...
Owner's Manual
Page 13
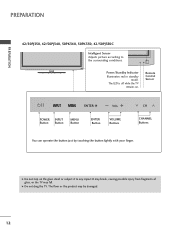
G Do not drag the TV. PREPARATION PREPARATION 42/50PJ350, 42/50PJ340, 50PK340, 50PK350, 42/50PJ350C Intelligent Sensor Adjusts picture according to any impact.It may break, causing possible injury from fragments of glass, or the TV may be damaged. 12 ENTER VOL CH Power/Standby Indicator Illuminates red in standby ...mode. G Do not step on . The floor or the product may fall. The LED is off while the TV remains on the glass stand or subject it to the surrounding conditions. Remote Control Sensor ENTER VOL CH VOL POWER Button INPUT Button CH MENU Button ENTER...
G Do not drag the TV. PREPARATION PREPARATION 42/50PJ350, 42/50PJ340, 50PK340, 50PK350, 42/50PJ350C Intelligent Sensor Adjusts picture according to any impact.It may break, causing possible injury from fragments of glass, or the TV may be damaged. 12 ENTER VOL CH Power/Standby Indicator Illuminates red in standby ...mode. G Do not step on . The floor or the product may fall. The LED is off while the TV remains on the glass stand or subject it to the surrounding conditions. Remote Control Sensor ENTER VOL CH VOL POWER Button INPUT Button CH MENU Button ENTER...
Owner's Manual
Page 16
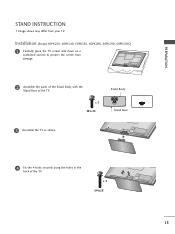
Installation (Except 60PK250, 60PK540, 60PK550, 60PK280, 60PK290, 60PK550C) 1 Carefully place the TV screen side down on a cushioned surface to protect the screen from your TV. x 4 M4x28 15 PREPARATION STAND INSTRUCTION I Image shown may differ from damage. 2 Assemble the parts of the Stand Body with the Stand Base of the TV. x 3 M5x14 Stand Body Stand Base 3 Assemble the TV as shown. 4 Fix the 4 bolts securely using the holes in the back of the TV.
Installation (Except 60PK250, 60PK540, 60PK550, 60PK280, 60PK290, 60PK550C) 1 Carefully place the TV screen side down on a cushioned surface to protect the screen from your TV. x 4 M4x28 15 PREPARATION STAND INSTRUCTION I Image shown may differ from damage. 2 Assemble the parts of the Stand Body with the Stand Base of the TV. x 3 M5x14 Stand Body Stand Base 3 Assemble the TV as shown. 4 Fix the 4 bolts securely using the holes in the back of the TV.
Owner's Manual
Page 17
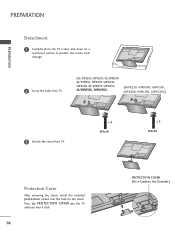
... protect the screen from damage. 2 Loose the bolts from TV. (42/50PJ250, 50PK250, 42/50PJ340, 42/50PJ350, 50PK350, 50PK340, 50PK540, 42/50PJ550, 50PK550, 42/50PJ350C, 50PK550C) (60PK250, 60PK540, 60PK550, 60PK280, 60PK290, 60PK550C) 3 Detach the stand from TV. x 4 M4x28 x 5 M4x30 Protection Cover After removing the stand, install the included protection cover over the hole for the...
... protect the screen from damage. 2 Loose the bolts from TV. (42/50PJ250, 50PK250, 42/50PJ340, 42/50PJ350, 50PK350, 50PK340, 50PK540, 42/50PJ550, 50PK550, 42/50PJ350C, 50PK550C) (60PK250, 60PK540, 60PK550, 60PK280, 60PK290, 60PK550C) 3 Detach the stand from TV. x 4 M4x28 x 5 M4x30 Protection Cover After removing the stand, install the included protection cover over the hole for the...

Owner's Manual
Page 19
For proper ventilation, allow a clearance of heat source. G Do not mount near or above any type of 4 inches on all models.) After installing the TV, you can adjust the TV manually to suit your TV. SWIVEL STAND (This feature is not available for all four sides from your viewing position. 18 PREPARATION PREPARATION DESKTOP PEDESTAL INSTALLATION I Image shown may differ from the wall. 4 inches 4 inches 4 inches 4 inches CAUTION G Ensure adequate ventilation by 20 degrees to the left or right direction by following the clearance recommendations.
For proper ventilation, allow a clearance of heat source. G Do not mount near or above any type of 4 inches on all models.) After installing the TV, you can adjust the TV manually to suit your TV. SWIVEL STAND (This feature is not available for all four sides from your viewing position. 18 PREPARATION PREPARATION DESKTOP PEDESTAL INSTALLATION I Image shown may differ from the wall. 4 inches 4 inches 4 inches 4 inches CAUTION G Ensure adequate ventilation by 20 degrees to the left or right direction by following the clearance recommendations.
Owner's Manual
Page 21
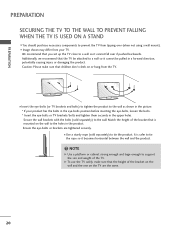
... the wall as shown in the picture. * If your TV. I Insert the eye-bolts (or TV brackets and bolts) to tighten the product to tie the ...the eye-bolts or TV brackets/bolts and tighten them securely in the upper holes. G To use the TV safely, make sure that the TV be attached to tie... so it cannot fall over (when not using a wall mount). It is mounted on the TV are tightened securely. I Use a sturdy rope (sold separately) to the holes in a forward... the product. Caution: Please make sure that you set up the TV close to support the size and weight of the bracket on the wall...
... the wall as shown in the picture. * If your TV. I Insert the eye-bolts (or TV brackets and bolts) to tighten the product to tie the ...the eye-bolts or TV brackets/bolts and tighten them securely in the upper holes. G To use the TV safely, make sure that the TV be attached to tie... so it cannot fall over (when not using a wall mount). It is mounted on the TV are tightened securely. I Use a sturdy rope (sold separately) to the holes in a forward... the product. Caution: Please make sure that you set up the TV close to support the size and weight of the bracket on the wall...

Specification
Page 2
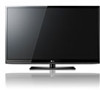
PLASMA TV 50PJ350 Panel SPECIFICATION Screen Size 50" Class (50.0" diagonal) Resolution 1365 x 768p Dynamic Contrast Ratio 3,000,000:1 Protective Skin Glass • 600Hz ... 33.2" x 13.0" TV Without Stand Weight 60.8 lbs TV With Stand Weight 66.1 lbs Shipping Weight 78.5 lbs WARRANTY/UPC Limited Warranty 2 Year Panel 1 Year Parts & Labor UPC 719192176690 REMOTE/INPUT/OUTPUTS Design, features and specifications are approximate. © 2010 LG Electronics USA, Inc. "LG Life's Good" is present) • TV AUDIO/Video Inputs/Outputs...
PLASMA TV 50PJ350 Panel SPECIFICATION Screen Size 50" Class (50.0" diagonal) Resolution 1365 x 768p Dynamic Contrast Ratio 3,000,000:1 Protective Skin Glass • 600Hz ... 33.2" x 13.0" TV Without Stand Weight 60.8 lbs TV With Stand Weight 66.1 lbs Shipping Weight 78.5 lbs WARRANTY/UPC Limited Warranty 2 Year Panel 1 Year Parts & Labor UPC 719192176690 REMOTE/INPUT/OUTPUTS Design, features and specifications are approximate. © 2010 LG Electronics USA, Inc. "LG Life's Good" is present) • TV AUDIO/Video Inputs/Outputs...


