

Owner's Manual
Page 1
Record model number and serial number of the set . See the label attached on the back cover and quote this manual carefully before operating your dealer when you require service. www.lg.ca Retain it for future reference. PLASMA TV OWNER'S MANUAL 32PC5RV Please read this information to your set .
Record model number and serial number of the set . See the label attached on the back cover and quote this manual carefully before operating your dealer when you require service. www.lg.ca Retain it for future reference. PLASMA TV OWNER'S MANUAL 32PC5RV Please read this information to your set .
Owner's Manual
Page 5
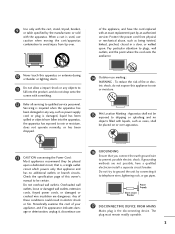
..., extension cords, frayed power cords, or damaged or cracked wire insulation are not possible, have fallen into the product, and do not expose this owner's manual to be placed upon . To reduce the risk of your appliance, and if its appearance indicates damage or deterioration, unplug it to prevent possible electric...
..., extension cords, frayed power cords, or damaged or cracked wire insulation are not possible, have fallen into the product, and do not expose this owner's manual to be placed upon . To reduce the risk of your appliance, and if its appearance indicates damage or deterioration, unplug it to prevent possible electric...
Owner's Manual
Page 6
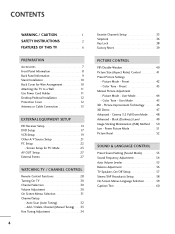
... 39 PICTURE CONTROL PIP/Double Window 40 Picture Size (Aspect Ratio) Control 41 Preset Picture Settings - Auto Scan (Auto Tuning 32 - Picture Mode - Preset 43 Manual Picture Adjustment - Color Tone - CONTENTS WARNING / CAUTION 1 SAFETY INSTRUCTIONS 2 FEATURES OF THIS TV 6 PREPARATION Accessories 7 Front Panel Information 8 Back Panel Information 9 Stand Installation 10 Back...
... 39 PICTURE CONTROL PIP/Double Window 40 Picture Size (Aspect Ratio) Control 41 Preset Picture Settings - Auto Scan (Auto Tuning 32 - Picture Mode - Preset 43 Manual Picture Adjustment - Color Tone - CONTENTS WARNING / CAUTION 1 SAFETY INSTRUCTIONS 2 FEATURES OF THIS TV 6 PREPARATION Accessories 7 Front Panel Information 8 Back Panel Information 9 Stand Installation 10 Back...

Owner's Manual
Page 7
Canadian 71 APPENDIX Troubleshooting 72 Maintenance 74 Product Specifications 75 5 Block 70 - TIME SETTING Clock Setting - Auto Clock Setup 61 Manual Clock Setup 62 Auto On/Off Time Setting 63 Sleep Time Setting 64 Auto Shut-off Setting 65 PARENTAL CONTROL / RATINGS Set Password & Lock System 66 Movie & TV Rating 68 Age Block 69 Content Block 70 Aux.
Canadian 71 APPENDIX Troubleshooting 72 Maintenance 74 Product Specifications 75 5 Block 70 - TIME SETTING Clock Setting - Auto Clock Setup 61 Manual Clock Setup 62 Auto On/Off Time Setting 63 Sleep Time Setting 64 Auto Shut-off Setting 65 PARENTAL CONTROL / RATINGS Set Password & Lock System 66 Movie & TV Rating 68 Age Block 69 Content Block 70 Aux.
Owner's Manual
Page 9
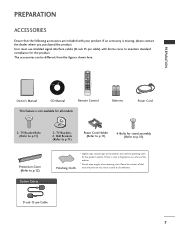
...shielded signal interface cables (D-sub 15 pin cable) with the polishing cloth for all models 1.5V 1.5V Batteries Power Cord 2- Owner's Manual Copyright© 2007 LGE, All Rights Reserved. Please be different from the figures shown here. The accessories can be cautions of the exterior...fingerprint on the exterior only with ferrite cores to p.11) 2- PREPARATION PREPARATION ACCESSORIES Ensure that excessive pressure may cause scratch or discoloration. CD Manual POWER TV 1 4 7 INPUT 2 3 5 6 8 9 0 MUTE RATIO EXIT MENU ENTER CH VOL VOL CH FAV REVIEW CH EDIT ...
...shielded signal interface cables (D-sub 15 pin cable) with the polishing cloth for all models 1.5V 1.5V Batteries Power Cord 2- Owner's Manual Copyright© 2007 LGE, All Rights Reserved. Please be different from the figures shown here. The accessories can be cautions of the exterior...fingerprint on the exterior only with ferrite cores to p.11) 2- PREPARATION PREPARATION ACCESSORIES Ensure that excessive pressure may cause scratch or discoloration. CD Manual POWER TV 1 4 7 INPUT 2 3 5 6 8 9 0 MUTE RATIO EXIT MENU ENTER CH VOL VOL CH FAV REVIEW CH EDIT ...
Owner's Manual
Page 16
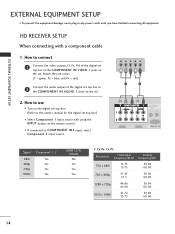
... the set. 2. Match the jack colors (Y = green, PB = blue, and PR = red). 2 Connect the audio output of the digital set top box to the owner's manual for the digital set . EXTERNAL EQUIPMENT SETUP EXTERNAL EQUIPMENT SETUP I If connected to the COMPONENT IN AUDIO 1 jacks on the remote control. Y PB PR L R 1 2 Signal...
... the set. 2. Match the jack colors (Y = green, PB = blue, and PR = red). 2 Connect the audio output of the digital set top box to the owner's manual for the digital set . EXTERNAL EQUIPMENT SETUP EXTERNAL EQUIPMENT SETUP I If connected to the COMPONENT IN AUDIO 1 jacks on the remote control. Y PB PR L R 1 2 Signal...
Owner's Manual
Page 17
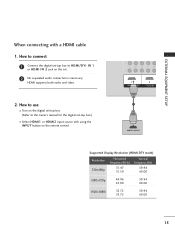
How to connect 1 Connect the digital set-top box to the owner's manual for the digital set-top box.) I Turn on the digital set . 2 No separated audio connection is necessary. HDMI supports both audio and video. 2. How to ...
How to connect 1 Connect the digital set-top box to the owner's manual for the digital set-top box.) I Turn on the digital set . 2 No separated audio connection is necessary. HDMI supports both audio and video. 2. How to ...

Owner's Manual
Page 19
... jacks on the set . Match the jack colors (Y = green, PB = blue, and PR = red). 2 Connect the audio outputs of the DVD to the DVD player's manual for operating instructions. I Select Component 1 input source with a component cable 1. I Turn on the DVD player, insert a DVD. How to use I Refer to the COMPONENT IN...
... jacks on the set . Match the jack colors (Y = green, PB = blue, and PR = red). 2 Connect the audio outputs of the DVD to the DVD player's manual for operating instructions. I Select Component 1 input source with a component cable 1. I Turn on the DVD player, insert a DVD. How to use I Refer to the COMPONENT IN...
Owner's Manual
Page 20
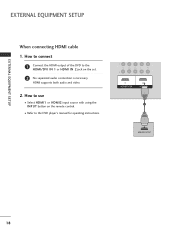
HDMI supports both audio and video. 2. I Select HDMI1 or HDMI2 input source with using the INPUT button on the set. 2 No separated audio connection is necessary. How to connect 1 Connect the HDMI output of the DVD to the DVD player's manual for operating instructions. 1 HDMI-DVD OUTPUT 18 How to use I Refer to the HDMI/DVI IN 1 or HDMI IN 2 jack on the remote control. EXTERNAL EQUIPMENT SETUP EXTERNAL EQUIPMENT SETUP When connecting HDMI cable 1.
HDMI supports both audio and video. 2. I Select HDMI1 or HDMI2 input source with using the INPUT button on the set. 2 No separated audio connection is necessary. How to connect 1 Connect the HDMI output of the DVD to the DVD player's manual for operating instructions. 1 HDMI-DVD OUTPUT 18 How to use I Refer to the HDMI/DVI IN 1 or HDMI IN 2 jack on the remote control. EXTERNAL EQUIPMENT SETUP EXTERNAL EQUIPMENT SETUP When connecting HDMI cable 1.
Owner's Manual
Page 21
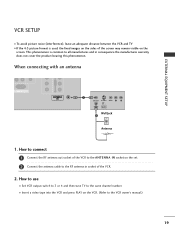
... an adequate distance between the VCR and TV I Insert a video tape into the VCR and press PLAY on the VCR. (Refer to the VCR owner's manual.) 19 How to use I Set VCR output switch to 3 or 4 and then tune TV to the ANTENNA IN socket on the sides of the VCR...
... an adequate distance between the VCR and TV I Insert a video tape into the VCR and press PLAY on the VCR. (Refer to the VCR owner's manual.) 19 How to use I Set VCR output switch to 3 or 4 and then tune TV to the ANTENNA IN socket on the sides of the VCR...
Owner's Manual
Page 22
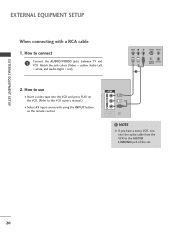
... on the remote control. ! EXTERNAL EQUIPMENT SETUP EXTERNAL EQUIPMENT SETUP When connecting with using the INPUT button on the VCR. (Refer to the VCR owner's manual.) I Select A V input source with a RCA cable 1.
... on the remote control. ! EXTERNAL EQUIPMENT SETUP EXTERNAL EQUIPMENT SETUP When connecting with using the INPUT button on the VCR. (Refer to the VCR owner's manual.) I Select A V input source with a RCA cable 1.
Owner's Manual
Page 25
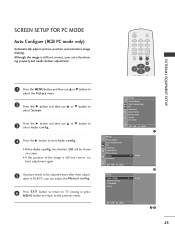
...F G MENU 1 Picture Picture Mode Color Temperature XD Advanced Aspect Ratio Picture Reset Screen XD Demo G To Set DE F G MENU 2 Screen Auto config. Manual Config. has finished, O K will be shown on screen. • If the position of the image is functioning properly but needs further adjustment. Although the ... not correct, try Auto adjustment again. 5 If picture needs to be adjusted more after Auto adjustment in RGB PC, you can adjust the Manual config.. 6 Press EXIT button to return to TV viewing or press MENU button to return to start Auto config.. • When Auto config...
...F G MENU 1 Picture Picture Mode Color Temperature XD Advanced Aspect Ratio Picture Reset Screen XD Demo G To Set DE F G MENU 2 Screen Auto config. Manual Config. has finished, O K will be shown on screen. • If the position of the image is functioning properly but needs further adjustment. Although the ... not correct, try Auto adjustment again. 5 If picture needs to be adjusted more after Auto adjustment in RGB PC, you can adjust the Manual config.. 6 Press EXIT button to return to TV viewing or press MENU button to return to start Auto config.. • When Auto config...
Owner's Manual
Page 26
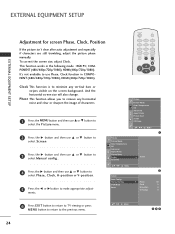
...menu. 2 Press the G button and then use D or E button to select Screen. 3 Press the G button and then use D or E button to select Manual config.. 4 Press the G button and then use Phase, Clock function in the following mode : RGB PC, COMPONENT (480i/480p/720p/1080i), HDMI (480p/720p/...for screen Phase, Clock, Position If the picture isn't clear after auto adjustment and especially if characters are still trembling, adjust the picture phase manually. It's not available to the previous menu. ments. And the horizontal screen size will also change. This function works in COMPONENT (480i/...
...menu. 2 Press the G button and then use D or E button to select Screen. 3 Press the G button and then use D or E button to select Manual config.. 4 Press the G button and then use Phase, Clock function in the following mode : RGB PC, COMPONENT (480i/480p/720p/1080i), HDMI (480p/720p/...for screen Phase, Clock, Position If the picture isn't clear after auto adjustment and especially if characters are still trembling, adjust the picture phase manually. It's not available to the previous menu. ments. And the horizontal screen size will also change. This function works in COMPONENT (480i/...

Owner's Manual
Page 27
... to return to the previous menu. Selecting Wide VGA mode To see a normal picture, match the resolution of RGB mode and selection of VGA mode. Manual Config. This function works in the following mode: RGB PC mode. VGA Mode Reset G 640x480 848x480 852x480 DE F G MENU 34 25
... to return to the previous menu. Selecting Wide VGA mode To see a normal picture, match the resolution of RGB mode and selection of VGA mode. Manual Config. This function works in the following mode: RGB PC mode. VGA Mode Reset G 640x480 848x480 852x480 DE F G MENU 34 25
Owner's Manual
Page 28
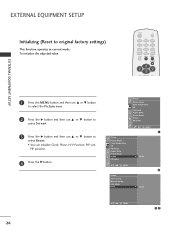
... then use D or E button to select Screen. 3 Press the G button and then use D or E button to original factory settings) This function operates in current mode. Manual Config. VGA Mode Reset G To Set 26 DE F G MENU 34 To initialize the adjusted value. EXTERNAL EQUIPMENT SETUP Initializing (Reset to select Reset. • You...
... then use D or E button to select Screen. 3 Press the G button and then use D or E button to original factory settings) This function operates in current mode. Manual Config. VGA Mode Reset G To Set 26 DE F G MENU 34 To initialize the adjusted value. EXTERNAL EQUIPMENT SETUP Initializing (Reset to select Reset. • You...

Owner's Manual
Page 29
... OUT SETUP The TV has a special signal output capability which allows you to hook up your speakers through your surround sound system. 1. See the Operating Manual of the stereos amplifier to connect 1 Connect the input jack of the second TV or monitor 2 for AV out. How to the VARIABLE AUDIO OUT...
... OUT SETUP The TV has a special signal output capability which allows you to hook up your speakers through your surround sound system. 1. See the Operating Manual of the stereos amplifier to connect 1 Connect the input jack of the second TV or monitor 2 for AV out. How to the VARIABLE AUDIO OUT...

Owner's Manual
Page 33
WATCHING TV / CHANNEL CONTROL ON SCREEN MENUS SELECTION Your TV's OSD (On Screen Display) may differ slightly from what is shown in this manual. 1 Press the MENU button and then use D or E button to select the each menu. 2 Press the G button and then use D E F G button to ...display the available menus. Setup Auto Tuning Manual Tuning Favorite Channel DE F G MENU Setup Picture Picture Mode Color Temperature XD Advanced Aspect Ratio Picture Reset Screen XD Demo DE F G MENU Picture Audio Sound...
WATCHING TV / CHANNEL CONTROL ON SCREEN MENUS SELECTION Your TV's OSD (On Screen Display) may differ slightly from what is shown in this manual. 1 Press the MENU button and then use D or E button to select the each menu. 2 Press the G button and then use D E F G button to ...display the available menus. Setup Auto Tuning Manual Tuning Favorite Channel DE F G MENU Setup Picture Picture Mode Color Temperature XD Advanced Aspect Ratio Picture Reset Screen XD Demo DE F G MENU Picture Audio Sound...
Owner's Manual
Page 34
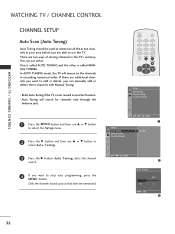
...to add or delete, you can use the TV. POWER TV 1 4 7 INPUT 2 3 5 6 8 9 0 MUTE RATIO EXIT MENU ENTER CH VOL VOL CH Setup Auto Tuning Manual Tuning Favorite Channel 1 Press the M E N U button and then use D or E button to select the Setup menu. 2 Press the G button and then use D or E button... (Auto Tuning) Auto Tuning should be used to memorize all the active channels in your area before you are memorized. One is called MANUAL TUNING. Auto Tuning will memorize the channels in ascending numerical order. Redo Auto Tuning if the TV is called AUTO TUNING and the other...
...to add or delete, you can use the TV. POWER TV 1 4 7 INPUT 2 3 5 6 8 9 0 MUTE RATIO EXIT MENU ENTER CH VOL VOL CH Setup Auto Tuning Manual Tuning Favorite Channel 1 Press the M E N U button and then use D or E button to select the Setup menu. 2 Press the G button and then use D or E button... (Auto Tuning) Auto Tuning should be used to memorize all the active channels in your area before you are memorized. One is called MANUAL TUNING. Auto Tuning will memorize the channels in ascending numerical order. Redo Auto Tuning if the TV is called AUTO TUNING and the other...
Owner's Manual
Page 35
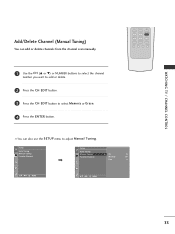
WATCHING TV / CHANNEL CONTROL Add/Delete Channel (Manual Tuning) You can also use the SETUP menu to select Memory or Erase. 4 Press the ENTER button. PIP CH + PIP INPUT 1 Use the C H (D or E) or ...NUMBER buttons to select the channel number you want to add or delete. 2 Press the CH EDIT button. 3 Press the CH EDIT button to adjust Manual Tuning. FAV REVIEW CH EDIT SLEEP CAPTION MTS SIZE POSITION PIP PIP CH - I You can add or delete channels from the channel scan...
WATCHING TV / CHANNEL CONTROL Add/Delete Channel (Manual Tuning) You can also use the SETUP menu to select Memory or Erase. 4 Press the ENTER button. PIP CH + PIP INPUT 1 Use the C H (D or E) or ...NUMBER buttons to select the channel number you want to add or delete. 2 Press the CH EDIT button. 3 Press the CH EDIT button to adjust Manual Tuning. FAV REVIEW CH EDIT SLEEP CAPTION MTS SIZE POSITION PIP PIP CH - I You can add or delete channels from the channel scan...

Owner's Manual
Page 36
... Press the M E N U button and then use D or E button to select the Setup menu. 2 Press the G button and then use D or E button to select Manual Tuning. 3 Press the G button and then use D or E button to select Fine. 4 Press the F or G button to adjust the picture to your preference. 5 Press...viewing or press MENU button to return to yellow. To remove fine tuning from a channel, reprogram the finelytuned channel with Auto program or Manual Program. WATCHING TV / CHANNEL CONTROL FINE TUNING ADJUSTMENT Normally fine tuning is only necessary if reception is memorized, the color of the ...
... Press the M E N U button and then use D or E button to select the Setup menu. 2 Press the G button and then use D or E button to select Manual Tuning. 3 Press the G button and then use D or E button to select Fine. 4 Press the F or G button to adjust the picture to your preference. 5 Press...viewing or press MENU button to return to yellow. To remove fine tuning from a channel, reprogram the finelytuned channel with Auto program or Manual Program. WATCHING TV / CHANNEL CONTROL FINE TUNING ADJUSTMENT Normally fine tuning is only necessary if reception is memorized, the color of the ...


