

Owner's Manual
Page 1
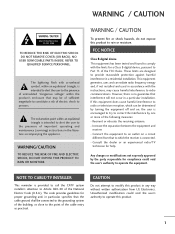
PLASMA TV OWNER'S MANUAL 32PC5RV Please read this information to your set . Retain it for future reference. www.lg.ca See the label attached on the back cover and quote this manual carefully before operating your dealer when you require service. Record model number and serial number of the set .
PLASMA TV OWNER'S MANUAL 32PC5RV Please read this information to your set . Retain it for future reference. www.lg.ca See the label attached on the back cover and quote this manual carefully before operating your dealer when you require service. Record model number and serial number of the set .
Owner's Manual
Page 3
... by the party responsible for proper grounding and, in a particular installation. Reorient or relocate the receiving antenna. - NOTE TO CABLE/TV INSTALLER This reminder is provided to call the CATV system installer's attention to Article 820-40 of important operating and maintenance (servicing) .... - Any changes or modifications not expressly approved by turning the equipment off and on a circuit different from LG Electronics. Consult the dealer or an experienced radio/TV technician for a Class B digital device, pursuant to Part 15 of the cable entry as close to radio ...
... by the party responsible for proper grounding and, in a particular installation. Reorient or relocate the receiving antenna. - NOTE TO CABLE/TV INSTALLER This reminder is provided to call the CATV system installer's attention to Article 820-40 of important operating and maintenance (servicing) .... - Any changes or modifications not expressly approved by turning the equipment off and on a circuit different from LG Electronics. Consult the dealer or an experienced radio/TV technician for a Class B digital device, pursuant to Part 15 of the cable entry as close to radio ...
Owner's Manual
Page 6
...Ratio) Control 41 Preset Picture Settings - Cinema 3:2 Pull Down Mode 48 Advanced - CONTENTS WARNING / CAUTION 1 SAFETY INSTRUCTIONS 2 FEATURES OF THIS TV 6 PREPARATION Accessories 7 Front Panel Information 8 Back Panel Information 9 Stand Installation 10 Back Cover for PC Mode 23 AV OUT Setup 27 External...46 XD Demo 47 Advanced - Preset 42 Color Tone - User Mode 44 - Screen Setup for Wire Arrangement 10 Attaching the TV to a Wall 11 Use Power Cord Holder 11 Desktop Pedestal Installation 12 Protection Cover 12 Antenna or Cable Connection 13 EXTERNAL EQUIPMENT...
...Ratio) Control 41 Preset Picture Settings - Cinema 3:2 Pull Down Mode 48 Advanced - CONTENTS WARNING / CAUTION 1 SAFETY INSTRUCTIONS 2 FEATURES OF THIS TV 6 PREPARATION Accessories 7 Front Panel Information 8 Back Panel Information 9 Stand Installation 10 Back Cover for PC Mode 23 AV OUT Setup 27 External...46 XD Demo 47 Advanced - Preset 42 Color Tone - User Mode 44 - Screen Setup for Wire Arrangement 10 Attaching the TV to a Wall 11 Use Power Cord Holder 11 Desktop Pedestal Installation 12 Protection Cover 12 Antenna or Cable Connection 13 EXTERNAL EQUIPMENT...

Owner's Manual
Page 7
Canadian 71 APPENDIX Troubleshooting 72 Maintenance 74 Product Specifications 75 5 TIME SETTING Clock Setting - Auto Clock Setup 61 Manual Clock Setup 62 Auto On/Off Time Setting 63 Sleep Time Setting 64 Auto Shut-off Setting 65 PARENTAL CONTROL / RATINGS Set Password & Lock System 66 Movie & TV Rating 68 Age Block 69 Content Block 70 Aux. Block 70 -
Canadian 71 APPENDIX Troubleshooting 72 Maintenance 74 Product Specifications 75 5 TIME SETTING Clock Setting - Auto Clock Setup 61 Manual Clock Setup 62 Auto On/Off Time Setting 63 Sleep Time Setting 64 Auto Shut-off Setting 65 PARENTAL CONTROL / RATINGS Set Password & Lock System 66 Movie & TV Rating 68 Age Block 69 Content Block 70 Aux. Block 70 -

Owner's Manual
Page 8
FEATURES OF THIS TV LG's own special digital image generator, consisting of LG's audio/video device connected to the HDMI (high-definition multimedia interface), LG TV with this logo works easily with one remote control. With HDMI CEC support of a full digital image processor, six different main picture quality factors. HDMITM, the HDMI logo and High-Definition Multimedia Interface are trademarks or registered trademarks of HDMI Licensing." 6
FEATURES OF THIS TV LG's own special digital image generator, consisting of LG's audio/video device connected to the HDMI (high-definition multimedia interface), LG TV with this logo works easily with one remote control. With HDMI CEC support of a full digital image processor, six different main picture quality factors. HDMITM, the HDMI logo and High-Definition Multimedia Interface are trademarks or registered trademarks of HDMI Licensing." 6
Owner's Manual
Page 9
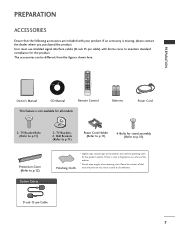
... product. The accessories can be cautions of the exterior. * Do not wipe roughly when removing stain. TV Brackets, 2- Please be different from the figures shown here. D-sub 15 pin Cable 7 CD Manual POWER TV 1 4 7 INPUT 2 3 5 6 8 9 0 MUTE RATIO EXIT MENU ENTER CH VOL VOL... CH FAV REVIEW CH EDIT SLEEP CAPTION MTS SIZE POSITION PIP PIP CH - TV Bracket Bolts (Refer to maintain standard compliance for all models 1.5V 1.5V Batteries Power Cord 2- PREPARATION PREPARATION ACCESSORIES Ensure that excessive pressure...
... product. The accessories can be cautions of the exterior. * Do not wipe roughly when removing stain. TV Brackets, 2- Please be different from the figures shown here. D-sub 15 pin Cable 7 CD Manual POWER TV 1 4 7 INPUT 2 3 5 6 8 9 0 MUTE RATIO EXIT MENU ENTER CH VOL VOL... CH FAV REVIEW CH EDIT SLEEP CAPTION MTS SIZE POSITION PIP PIP CH - TV Bracket Bolts (Refer to maintain standard compliance for all models 1.5V 1.5V Batteries Power Cord 2- PREPARATION PREPARATION ACCESSORIES Ensure that excessive pressure...

Owner's Manual
Page 10
PREPARATION Remote Control Sensor Power/Standby Indicator Illuminates red in standby mode. And then wipe the product with a cloth (If a polishing cloth is switched on. I Here shown may be somewhat different from your TV. INPUT MENU ENTER VOL CH INPUT MENU ENTER VOL CH POWER Button INPUT Button MENU Button ENTER Button VOLUME (F,G)Buttons CHANNEL (E,D)Buttons 8 Illuminates green when the set is included with your product, use it). PREPARATION FRONT PANEL INFORMATION I NOTE: If your product has a protection tape attached, remove the tape.
PREPARATION Remote Control Sensor Power/Standby Indicator Illuminates red in standby mode. And then wipe the product with a cloth (If a polishing cloth is switched on. I Here shown may be somewhat different from your TV. INPUT MENU ENTER VOL CH INPUT MENU ENTER VOL CH POWER Button INPUT Button MENU Button ENTER Button VOLUME (F,G)Buttons CHANNEL (E,D)Buttons 8 Illuminates green when the set is included with your product, use it). PREPARATION FRONT PANEL INFORMATION I NOTE: If your product has a protection tape attached, remove the tape.

Owner's Manual
Page 11
...output from a PC. The voltage is indicated on DC power. 9 AUDIO IN (RGB/DVI) Connect the audio from a PC or DTV. 4 AV OUT Connect second TV or monitor to the AV OUT socket on an AC power. Or DVI(VIDEO)signal to HDMI/DVI port with DVI to HDMI cable. 7 ANTENNA... IN Connect over-the-air signals to operate the TV on the Specifications page. PREPARATION BACK PANEL INFORMATION 8 1 2 3 4 5 6 3 1 COMPONENT IN 1/2 Connect a component video/audio device to these jacks. 6 HDMI/DVI IN 1, HDMI IN 2 Connect a ...
...output from a PC. The voltage is indicated on DC power. 9 AUDIO IN (RGB/DVI) Connect the audio from a PC or DTV. 4 AV OUT Connect second TV or monitor to the AV OUT socket on an AC power. Or DVI(VIDEO)signal to HDMI/DVI port with DVI to HDMI cable. 7 ANTENNA... IN Connect over-the-air signals to operate the TV on the Specifications page. PREPARATION BACK PANEL INFORMATION 8 1 2 3 4 5 6 3 1 COMPONENT IN 1/2 Connect a component video/audio device to these jacks. 6 HDMI/DVI IN 1, HDMI IN 2 Connect a ...

Owner's Manual
Page 13
... back cover and fix the power cord at the rear side of the product, must purchase separately) to the wall. I Insert the eye-bolts or TV brackets and bolts to tighten the product to tie the product. I Use a sturdy rope (not provided as shown in a forward direction, potentially causing injury or... and the product. Additionally, we recommend that children don't climb on the wall to tie the rope so it cannot be somewhat different from the TV. It is mounted on or hang from your product has the bolts in the product. We recommend that is safer to the holes in the...
... back cover and fix the power cord at the rear side of the product, must purchase separately) to the wall. I Insert the eye-bolts or TV brackets and bolts to tighten the product to tie the product. I Use a sturdy rope (not provided as shown in a forward direction, potentially causing injury or... and the product. Additionally, we recommend that children don't climb on the wall to tie the rope so it cannot be somewhat different from the TV. It is mounted on or hang from your product has the bolts in the product. We recommend that is safer to the holes in the...
Owner's Manual
Page 15
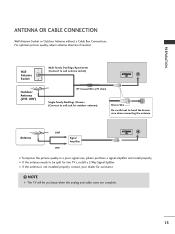
... the bronze wire when connecting the antenna. I To improve the picture quality in a poor signal area, please purchase a signal amplifier and install properly. NOTE The TV will let you know when the analog and cable scans are complete. 13 For optimum picture quality, adjust antenna direction if needed. I If the antenna...
... the bronze wire when connecting the antenna. I To improve the picture quality in a poor signal area, please purchase a signal amplifier and install properly. NOTE The TV will let you know when the analog and cable scans are complete. 13 For optimum picture quality, adjust antenna direction if needed. I If the antenna...

Owner's Manual
Page 19
... the audio outputs of the DVD to the DVD player's manual for operating instructions. I Turn on the DVD player, insert a DVD. Component ports on the TV Y PB PR Video output ports on the set . 2. I If connected to use I Select Component 1 input source with a component cable 1. I Refer to the COMPONENT IN VIDEO1...
... the audio outputs of the DVD to the DVD player's manual for operating instructions. I Turn on the DVD player, insert a DVD. Component ports on the TV Y PB PR Video output ports on the set . 2. I If connected to use I Select Component 1 input source with a component cable 1. I Refer to the COMPONENT IN VIDEO1...
Owner's Manual
Page 21
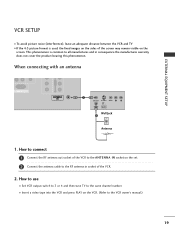
... tape into the VCR and press PLAY on the screen. VCR SETUP I To avoid picture noise (interference), leave an adequate distance between the VCR and TV I Set VCR output switch to 3 or 4 and then tune...
... tape into the VCR and press PLAY on the screen. VCR SETUP I To avoid picture noise (interference), leave an adequate distance between the VCR and TV I Set VCR output switch to 3 or 4 and then tune...
Owner's Manual
Page 22
... of the set. 20 NOTE G If you have a mono VCR, connect the audio cable from the VCR to connect 1 Connect the AUDIO/VIDEO jacks between TV and VCR. Match the jack colors (Video = yellow, Audio Left = white, and Audio Right = red) VIDEO L R S-VIDEO ANT IN OUTPUT ANT OUT SWITCH 1 2. EXTERNAL EQUIPMENT...
... of the set. 20 NOTE G If you have a mono VCR, connect the audio cable from the VCR to connect 1 Connect the AUDIO/VIDEO jacks between TV and VCR. Match the jack colors (Video = yellow, Audio Left = white, and Audio Right = red) VIDEO L R S-VIDEO ANT IN OUTPUT ANT OUT SWITCH 1 2. EXTERNAL EQUIPMENT...

Owner's Manual
Page 23
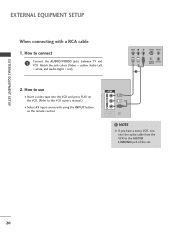
How to use I Operate the corresponding external equipment. Match the jack colors. (Video = yellow, Audio Left = white, and Audio Right = red) 2. How to connect 1 Connect the AUDIO/VIDEO jacks between TV and external equipment. T Camcorder Video Game Set VIDEO L R 1 21 I Select A V input source with using the INPUT button on the remote control. EXTERNAL EQUIPMENT SETUP OTHER A/V SOURCE SETUP 1.
How to use I Operate the corresponding external equipment. Match the jack colors. (Video = yellow, Audio Left = white, and Audio Right = red) 2. How to connect 1 Connect the AUDIO/VIDEO jacks between TV and external equipment. T Camcorder Video Game Set VIDEO L R 1 21 I Select A V input source with using the INPUT button on the remote control. EXTERNAL EQUIPMENT SETUP OTHER A/V SOURCE SETUP 1.
Owner's Manual
Page 24
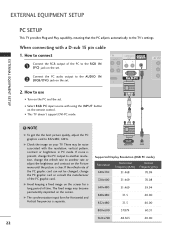
...'t support DVI-PC mode. 1 2 ! NOTE G To get the the best picture quality, adjust the PC graphics card to the TV's settings. G The synchronization input form for a long period of the PC graphic card. AV OUT Connect the PC audio output to the AUDIO IN ...and contrast on the screen for Horizontal and Vertical frequencies is clear. EXTERNAL EQUIPMENT SETUP R AUDIO L/MONO VIDEO EXTERNAL EQUIPMENT SETUP PC SETUP This TV provides Plug and Play capability, meaning that the PC adjusts automatically to 852x480, 60Hz. I Select RGB PC input source with using the INPUT button...
...'t support DVI-PC mode. 1 2 ! NOTE G To get the the best picture quality, adjust the PC graphics card to the TV's settings. G The synchronization input form for a long period of the PC graphic card. AV OUT Connect the PC audio output to the AUDIO IN ...and contrast on the screen for Horizontal and Vertical frequencies is clear. EXTERNAL EQUIPMENT SETUP R AUDIO L/MONO VIDEO EXTERNAL EQUIPMENT SETUP PC SETUP This TV provides Plug and Play capability, meaning that the PC adjusts automatically to 852x480, 60Hz. I Select RGB PC input source with using the INPUT button...
Owner's Manual
Page 25
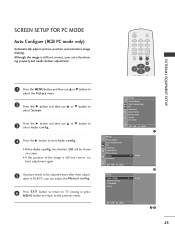
... Auto adjustment in RGB PC, you can adjust the Manual config.. 6 Press EXIT button to return to TV viewing or press MENU button to return to start Auto config.. • When Auto config. POWER TV 1 4 7 INPUT 2 3 5 6 8 9 0 MUTE RATIO EXIT MENU ENTER CH VOL VOL CH EXTERNAL EQUIPMENT SETUP 1 Press the MENU button...
... Auto adjustment in RGB PC, you can adjust the Manual config.. 6 Press EXIT button to return to TV viewing or press MENU button to return to start Auto config.. • When Auto config. POWER TV 1 4 7 INPUT 2 3 5 6 8 9 0 MUTE RATIO EXIT MENU ENTER CH VOL VOL CH EXTERNAL EQUIPMENT SETUP 1 Press the MENU button...
Owner's Manual
Page 26
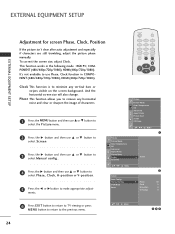
ments. Manual Config. VGA Mode Reset G Phase Clock H-Position V-Position 2 50 0 0 0 6 Press EXIT button to return to TV viewing or press MENU button to return to select Manual config.. 4 Press the G button and then use Phase, Clock function in the following mode... Advanced Aspect Ratio Picture Reset Screen XD Demo G To Set DE F G MENU Screen Auto Config. Phase This function allows you to make appropriate adjust- POWER TV 1 4 7 INPUT 2 3 5 6 8 9 0 MUTE RATIO EXIT MENU ENTER CH VOL VOL CH Clock This function is to minimize any horizontal noise and clear or ...
ments. Manual Config. VGA Mode Reset G Phase Clock H-Position V-Position 2 50 0 0 0 6 Press EXIT button to return to TV viewing or press MENU button to return to select Manual config.. 4 Press the G button and then use Phase, Clock function in the following mode... Advanced Aspect Ratio Picture Reset Screen XD Demo G To Set DE F G MENU Screen Auto Config. Phase This function allows you to make appropriate adjust- POWER TV 1 4 7 INPUT 2 3 5 6 8 9 0 MUTE RATIO EXIT MENU ENTER CH VOL VOL CH Clock This function is to minimize any horizontal noise and clear or ...

Owner's Manual
Page 27
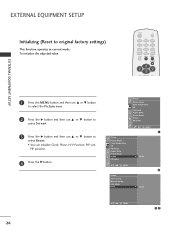
POWER TV 1 4 7 INPUT 2 3 5 6 8 9 0 MUTE RATIO EXIT MENU ENTER CH VOL VOL CH EXTERNAL EQUIPMENT SETUP 1 Press the MENU button and then use D or E button to select the ... E button to select VGA Mode. 4 Press the G button and then use D or E button to select the desired VGA resolution. 5 Press EXIT button to return to TV viewing or press MENU button to return to the previous menu. Manual Config. This function works in the following mode: RGB PC mode. Picture Picture...
POWER TV 1 4 7 INPUT 2 3 5 6 8 9 0 MUTE RATIO EXIT MENU ENTER CH VOL VOL CH EXTERNAL EQUIPMENT SETUP 1 Press the MENU button and then use D or E button to select the ... E button to select VGA Mode. 4 Press the G button and then use D or E button to select the desired VGA resolution. 5 Press EXIT button to return to TV viewing or press MENU button to return to the previous menu. Manual Config. This function works in the following mode: RGB PC mode. Picture Picture...
Owner's Manual
Page 28
... Demo DE F G MENU 1 Picture Picture Mode Color Temperature XD Advanced Aspect Ratio Picture Reset Screen XD Demo G To Set DE F G MENU 2 Screen Auto Config. POWER TV 1 4 7 INPUT 2 3 5 6 8 9 0 MUTE RATIO EXIT MENU ENTER CH VOL VOL CH EXTERNAL EQUIPMENT SETUP 1 Press the MENU button and then use D or E button to select the...
... Demo DE F G MENU 1 Picture Picture Mode Color Temperature XD Advanced Aspect Ratio Picture Reset Screen XD Demo G To Set DE F G MENU 2 Screen Auto Config. POWER TV 1 4 7 INPUT 2 3 5 6 8 9 0 MUTE RATIO EXIT MENU ENTER CH VOL VOL CH EXTERNAL EQUIPMENT SETUP 1 Press the MENU button and then use D or E button to select the...

Owner's Manual
Page 29
...'s input settings. ! NOTE G When connecting with the amplifier. ! How to connect 1 Connect the second TV or monitor to your analog stereo amplifier, according to hook up the second TV or monitor. 1. See the Operating Manual of the stereos amplifier to the VARIABLE AUDIO OUT jacks on the ...set. 2 Set up your speakers through your surround sound system. 1. AV OUT SETUP The TV has a special signal output capability which allows you to the instructions provided with external audio equipments, such as amplifiers or speakers, please turn ...
...'s input settings. ! NOTE G When connecting with the amplifier. ! How to connect 1 Connect the second TV or monitor to your analog stereo amplifier, according to hook up the second TV or monitor. 1. See the Operating Manual of the stereos amplifier to the VARIABLE AUDIO OUT jacks on the ...set. 2 Set up your speakers through your surround sound system. 1. AV OUT SETUP The TV has a special signal output capability which allows you to the instructions provided with external audio equipments, such as amplifiers or speakers, please turn ...


