Use & Care Guide
Page 3
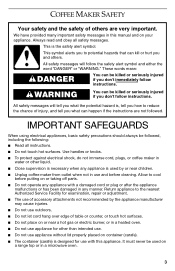
... if you and others are not followed. Use handles or knobs. ■ To protect against electrical shock, do not immerse cord, plugs, or coffee maker in use with a damaged cord or plug or after the appliance malfunctions or has been damaged in a heated oven. ■ Do not use ...appliance for other liquid. ■ Close supervision is necessary when any manner. COFFEE MAKER SAFETY Your safety and the safety of others . All safety messages will follow instructions. WARNING You can kill or hurt you don't immediately follow the...
... if you and others are not followed. Use handles or knobs. ■ To protect against electrical shock, do not immerse cord, plugs, or coffee maker in use with a damaged cord or plug or after the appliance malfunctions or has been damaged in a heated oven. ■ Do not use ...appliance for other liquid. ■ Close supervision is necessary when any manner. COFFEE MAKER SAFETY Your safety and the safety of others . All safety messages will follow instructions. WARNING You can kill or hurt you don't immediately follow the...
Use & Care Guide
Page 4
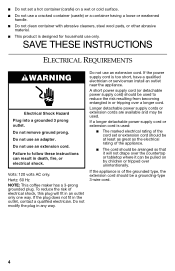
.... Do not use an extension cord. SAVE THESE INSTRUCTIONS ELECTRICAL REQUIREMENTS WARNING Electrical Shock Hazard Plug into a grounded 3 prong outlet. Hertz: 60 Hz NOTE: This coffee maker has a 3-prong grounded plug. Do not modify the plug in the outlet, contact a qualified electrician. A short power supply cord (or detachable power supply cord) should...
.... Do not use an extension cord. SAVE THESE INSTRUCTIONS ELECTRICAL REQUIREMENTS WARNING Electrical Shock Hazard Plug into a grounded 3 prong outlet. Hertz: 60 Hz NOTE: This coffee maker has a 3-prong grounded plug. Do not modify the plug in the outlet, contact a qualified electrician. A short power supply cord (or detachable power supply cord) should...

Use & Care Guide
Page 5
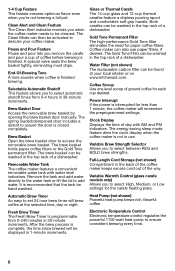
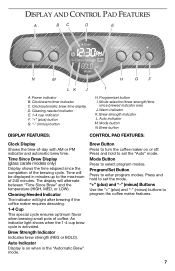
Water tank lid D. Glass carafe (on thermal carafe models only 5 Coffee scoop I H A. Programmable display E. Brew basket G G. Gold Tone permanent filter H. KITCHENAID® COFFEE MAKER FEATURES A B C DE F J I . Removable water tank B. Water tank fill channel C. Hinged brew basket door F. Thermal carafe (on glass carafe models only) J.
Water tank lid D. Glass carafe (on thermal carafe models only 5 Coffee scoop I H A. Programmable display E. Brew basket G G. Gold Tone permanent filter H. KITCHENAID® COFFEE MAKER FEATURES A B C DE F J I . Removable water tank B. Water tank fill channel C. Hinged brew basket door F. Thermal carafe (on glass carafe models only) J.
Use & Care Guide
Page 6
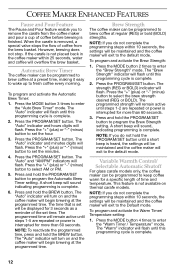
... Remove the tank and add water directly to the water tank or lift the lid to set 24 hour brew timer will brew coffee at your coffee maker. Automatic Brew Timer An easy to add water. Both carafes can also use . Gold Tone Permanent Filter The high-performance Gold ...be washed in use paper filters, if desired. Variable Warmth Control (glass carafe models only) Allows you when the coffee maker needs to descale your local retailer or on www.kitchenaid.com. Electronic Temperature Control Electronic temperature control regulates the powerful 1100-watt heat pump to select High, Medium, or...
... Remove the tank and add water directly to the water tank or lift the lid to set 24 hour brew timer will brew coffee at your coffee maker. Automatic Brew Timer An easy to add water. Both carafes can also use . Gold Tone Permanent Filter The high-performance Gold ...be washed in use paper filters, if desired. Variable Warmth Control (glass carafe models only) Allows you when the coffee maker needs to descale your local retailer or on www.kitchenaid.com. Electronic Temperature Control Electronic temperature control regulates the powerful 1100-watt heat pump to select High, Medium, or...
Use & Care Guide
Page 7
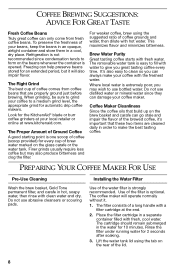
...plus) and "-" (minus) Buttons Use the "+" (plus ) button G. Clock/automatic brew time display D. Time will light after brewing if the coffee maker requires descaling. 1-4 Cup This special cycle ensures optimum flavor when brewing small pots of 240 minutes. Mode Button Press to program the... coffee maker features. 7 "-" (minus) button H. Brew strength indicator L. The display will alternate between "Time Since Brew" and the temperature (HIGH, ...
...plus) and "-" (minus) Buttons Use the "+" (plus ) button G. Clock/automatic brew time display D. Time will light after brewing if the coffee maker requires descaling. 1-4 Cup This special cycle ensures optimum flavor when brewing small pots of 240 minutes. Mode Button Press to program the... coffee maker features. 7 "-" (minus) button H. Brew strength indicator L. The display will alternate between "Time Since Brew" and the temperature (HIGH, ...
Use & Care Guide
Page 8
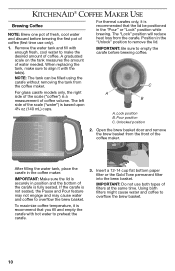
.... Place the filter cartridge in the water for the KitchenAid® blade or burr coffee grinders at your local retailer or online at the end. 2. COFFEE BREWING SUGGESTIONS: ADVICE FOR GREAT TASTE Fresh Coffee Beans Truly great coffee can always make the best tasting coffee. PREPARING YOUR COFFEE MAKER FOR USE Pre-Use Cleaning Wash the brew basket...
.... Place the filter cartridge in the water for the KitchenAid® blade or burr coffee grinders at your local retailer or online at the end. 2. COFFEE BREWING SUGGESTIONS: ADVICE FOR GREAT TASTE Fresh Coffee Beans Truly great coffee can always make the best tasting coffee. PREPARING YOUR COFFEE MAKER FOR USE Pre-Use Cleaning Wash the brew basket...

Use & Care Guide
Page 9
... mode. Plug into a grounded 3 prong outlet. Every time you do not hold the PROGRAM/SET button to program the settings. When the coffee maker is first plugged in or when power is being set. 4. NOTE: For thermal carafe models, press the MODE button 4 times to select... the PROGRAM/SET button. Press the PROGRAM/SET button again. A short beep will sound indicating programming is heard, the settings will be maintained and the coffee maker will flash for the minutes adjustment. 7. Place the filter cartridge in death, fire, or electrical shock. 2. Press the "+" (plus ) or "-" ...
... mode. Plug into a grounded 3 prong outlet. Every time you do not hold the PROGRAM/SET button to program the settings. When the coffee maker is first plugged in or when power is being set. 4. NOTE: For thermal carafe models, press the MODE button 4 times to select... the PROGRAM/SET button. Press the PROGRAM/SET button again. A short beep will sound indicating programming is heard, the settings will be maintained and the coffee maker will flash for the minutes adjustment. 7. Place the filter cartridge in death, fire, or electrical shock. 2. Press the "+" (plus ) or "-" ...
Use & Care Guide
Page 10
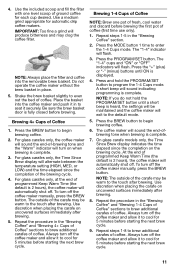
... on the tank measures the amount of the carafe is recommend that the lid be filled using the carafe without removing the tank from the coffee maker. Using both types of filters at the same time. For thermal carafes only, it with the tab(s). Pour position C. IMPORTANT: Be sure... the carafe with enough fresh, cool water to make sure to overflow the brew basket. 10 KITCHENAID® COFFEE MAKER USE Brewing Coffee NOTE: Brew one pot of fresh, cool water and discard before brewing coffee. Remove the water tank and fill with hot water to remove the lid. When replacing the ...
... on the tank measures the amount of the carafe is recommend that the lid be filled using the carafe without removing the tank from the coffee maker. Using both types of filters at the same time. For thermal carafes only, it with the tab(s). Pour position C. IMPORTANT: Be sure... the carafe with enough fresh, cool water to make sure to overflow the brew basket. 10 KITCHENAID® COFFEE MAKER USE Brewing Coffee NOTE: Brew one pot of fresh, cool water and discard before brewing coffee. Remove the water tank and fill with hot water to remove the lid. When replacing the ...
Use & Care Guide
Page 11
...placing the carafe on uncovered surfaces immediately after brewing. Always turn on the brewing cycle. NOTE: Always place the filter and coffee into the coffee maker and push it in to seat it to cool for 5 minutes before starting the next brew cycle. 9. Shake the ...fine a grind will flash. Brewing 4+ Cups of programmed Keep Warm Time (the default is complete. 7. The coffee maker will sound the end-ofbrewing tone when brewing is 2 hours), the coffee maker will exit to enter the 1-4 Cups mode. 4. Use discretion when placing the carafe on uncovered surfaces immediately after...
...placing the carafe on uncovered surfaces immediately after brewing. Always turn on the brewing cycle. NOTE: Always place the filter and coffee into the coffee maker and push it in to seat it to cool for 5 minutes before starting the next brew cycle. 9. Shake the ...fine a grind will flash. Brewing 4+ Cups of programmed Keep Warm Time (the default is complete. 7. The coffee maker will sound the end-ofbrewing tone when brewing is 2 hours), the coffee maker will exit to enter the 1-4 Cups mode. 4. Use discretion when placing the carafe on uncovered surfaces immediately after...
Use & Care Guide
Page 12
...button. Press and hold the PROGRAM/SET button to program the Automatic Brew Timer setting. The "Auto" indicator will turn on and the coffee maker will begin brewing at the programmed time. The "Auto" indicator will turn on thermal carafe models. Press the PROGRAM/SET button. The ... more than 60 seconds. Press and hold the BREW button. This feature is removed, a special valve stops the flow of coffee from the coffee maker and pour a cup of coffee before brewing is interrupted for 3 seconds as a reminder of time and temperature. Press the MODE button 4 times to enter ...
...button. Press and hold the PROGRAM/SET button to program the Automatic Brew Timer setting. The "Auto" indicator will turn on and the coffee maker will begin brewing at the programmed time. The "Auto" indicator will turn on thermal carafe models. Press the PROGRAM/SET button. The ... more than 60 seconds. Press and hold the BREW button. This feature is removed, a special valve stops the flow of coffee from the coffee maker and pour a cup of coffee before brewing is interrupted for 3 seconds as a reminder of time and temperature. Press the MODE button 4 times to enter ...
Use & Care Guide
Page 13
.../SET button to use or hard water conditions. 2. A short beep will build up in 30-minute increments. 3. COFFEE MAKER CARE Cleaning the Coffee Maker 1. Unplug the coffee maker and wipe the housing with a soft cloth. Remove the brew basket and carafe from water will sound, indicating programming ...is complete. Then wipe clean with damp cloth and dry with a warm, soapy cloth. Descaling the Coffee Maker The coffee maker can be washed in hot, soapy water and rinse with a solution consisting of a dishwasher. 3. Wash the brew basket and ...
.../SET button to use or hard water conditions. 2. A short beep will build up in 30-minute increments. 3. COFFEE MAKER CARE Cleaning the Coffee Maker 1. Unplug the coffee maker and wipe the housing with a soft cloth. Remove the brew basket and carafe from water will sound, indicating programming ...is complete. Then wipe clean with damp cloth and dry with a warm, soapy cloth. Descaling the Coffee Maker The coffee maker can be washed in hot, soapy water and rinse with a solution consisting of a dishwasher. 3. Wash the brew basket and ...
Use & Care Guide
Page 14
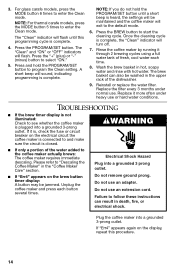
...display is connected to enter the Clean mode. WARNING ■ If only a portion of the water added to "Descaling the Coffee Maker" in the "Coffee Maker Care" section. ■ If "Err4" appears on the brew button timer display: A button may be washed in the upper... full water tank of the dishwasher. 9. Please refer to the coffee maker actually brews: The coffee maker requires immediate descaling. Plug the coffee maker into a grounded 3 prong outlet. If "Err4" appears again on the electrical circuit the coffee maker is not illuminated: Check to program the Clean setting. The "...
...display is connected to enter the Clean mode. WARNING ■ If only a portion of the water added to "Descaling the Coffee Maker" in the "Coffee Maker Care" section. ■ If "Err4" appears on the brew button timer display: A button may be washed in the upper... full water tank of the dishwasher. 9. Please refer to the coffee maker actually brews: The coffee maker requires immediate descaling. Plug the coffee maker into a grounded 3 prong outlet. If "Err4" appears again on the electrical circuit the coffee maker is not illuminated: Check to program the Clean setting. The "...
Use & Care Guide
Page 15
... receipt showing the date of purchase of in a cool environment, warm the coffee maker to the reset the coffee maker. ■ If "Err1," "Err2" or "Err3" appear on ■ If the problem cannot be corrected: the brew timer display: See the KitchenAid warranty section. This card does not verify your personal records: Model Number Serial...
... receipt showing the date of purchase of in a cool environment, warm the coffee maker to the reset the coffee maker. ■ If "Err1," "Err2" or "Err3" appear on ■ If the problem cannot be corrected: the brew timer display: See the KitchenAid warranty section. This card does not verify your personal records: Model Number Serial...
Use & Care Guide
Page 16
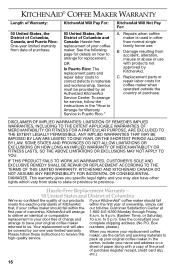
... of our products If your KitchenAid® coffee maker should fail meets the exacting standards of KitchenAid within the first year of ownership, simply call that, if your original coffee maker complete shipping address. (No P.O. to your replacement coffee Please follow the instructions in the...LIMITED WARRANTY. Give the consultant your name and address on how to arrange for coffee maker when operated outside the country of purchase. DISCLAIMER OF IMPLIED WARRANTIES; KITCHENAID® COFFEE MAKER WARRANTY Length of Warranty: 50 United States, the District of Columbia, Canada, and...
... of our products If your KitchenAid® coffee maker should fail meets the exacting standards of KitchenAid within the first year of ownership, simply call that, if your original coffee maker complete shipping address. (No P.O. to your replacement coffee Please follow the instructions in the...LIMITED WARRANTY. Give the consultant your name and address on how to arrange for coffee maker when operated outside the country of purchase. DISCLAIMER OF IMPLIED WARRANTIES; KITCHENAID® COFFEE MAKER WARRANTY Length of Warranty: 50 United States, the District of Columbia, Canada, and...

Use & Care Guide
Page 17
... within the first year of card slip, etc.). Box 218 St. Hassle-Free Replacement Warranty - your coffee maker with a copy of the the KitchenAid® brand that, if your coffee maker in Mexico, call toll-free 1-800-541-6390. learn the location of ownership, take the 200 - 6750 Century Ave...; line 01-800-002-2767 17 How to obtain service. near you are defects in Puerto Rico Your KitchenAid® coffee maker is covered by Take the coffee maker or ship prepaid and a one year Customer eXperience Centre at limited warranty. Mississauga, ON L5N 0B7 How to obtain ...
... within the first year of card slip, etc.). Box 218 St. Hassle-Free Replacement Warranty - your coffee maker with a copy of the the KitchenAid® brand that, if your coffee maker in Mexico, call toll-free 1-800-541-6390. learn the location of ownership, take the 200 - 6750 Century Ave...; line 01-800-002-2767 17 How to obtain service. near you are defects in Puerto Rico Your KitchenAid® coffee maker is covered by Take the coffee maker or ship prepaid and a one year Customer eXperience Centre at limited warranty. Mississauga, ON L5N 0B7 How to obtain ...


