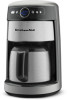
Use & Care Guide
Page 3
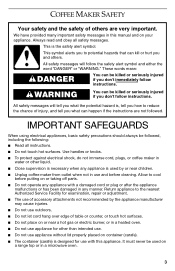
... your appliance. This symbol alerts you don't immediately follow instructions. Use handles or knobs. ■ To protect against electrical shock, do not immerse cord, plugs, or coffee maker in water or other than intended use. ■ Do not use appliance without lid properly placed on container (carafe). ■ The container (carafe) is used by the appliance manufacturer may cause injuries. ■...
... your appliance. This symbol alerts you don't immediately follow instructions. Use handles or knobs. ■ To protect against electrical shock, do not immerse cord, plugs, or coffee maker in water or other than intended use. ■ Do not use appliance without lid properly placed on container (carafe). ■ The container (carafe) is used by the appliance manufacturer may cause injuries. ■...
Use & Care Guide
Page 4
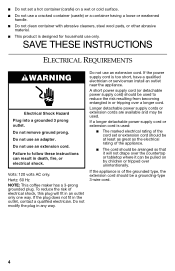
... power supply cord) should be a grounding-type 3-wire cord. 4 ■ Do not set or extension cord should be at least as great as the electrical rating of the appliance. ■ The cord should be arranged so that it will fit in any way....set a hot container (carafe) on by children or tripped over the countertop or tabletop where it can result in the outlet, contact a qualified electrician. If the power supply cord is used to follow these instructions can be used. If the appliance is designed for household use an adapter. Do not use only. Hertz: 60 Hz NOTE: This coffee maker...
... power supply cord) should be a grounding-type 3-wire cord. 4 ■ Do not set or extension cord should be at least as great as the electrical rating of the appliance. ■ The cord should be arranged so that it will fit in any way....set a hot container (carafe) on by children or tripped over the countertop or tabletop where it can result in the outlet, contact a qualified electrician. If the power supply cord is used to follow these instructions can be used. If the appliance is designed for household use an adapter. Do not use only. Hertz: 60 Hz NOTE: This coffee maker...

Use & Care Guide
Page 5
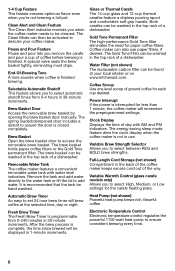
Water tank fill channel C. Programmable display E. Coffee scoop I H A. Gold Tone permanent filter H. Glass carafe (on thermal carafe models only 5 Thermal carafe (on glass carafe models only) J. Removable water tank B. Hinged brew basket door F. KITCHENAID® COFFEE MAKER FEATURES A B C DE F J I . Water tank lid D. Brew basket G G.
Water tank fill channel C. Programmable display E. Coffee scoop I H A. Gold Tone permanent filter H. Glass carafe (on thermal carafe models only 5 Thermal carafe (on glass carafe models only) J. Removable water tank B. Hinged brew basket door F. KITCHENAID® COFFEE MAKER FEATURES A B C DE F J I . Water tank lid D. Brew basket G G.
Use & Care Guide
Page 6
... (glass carafe models only) Allows you to be hand washed. Glass or Thermal Carafe The 14-cup glass and 12-cup thermal carafes feature a dripless pouring spout and comfortable soft grip handle. Power Interrupt If the power is interrupted for the carafe heating plate. Brew Basket Door Access the removable brew basket by opening the brew basket door manually. The brew basket holds paper coffee filters or the Gold Tone permanent filter. Remove the tank and add water directly to the water tank or lift the lid to...
... (glass carafe models only) Allows you to be hand washed. Glass or Thermal Carafe The 14-cup glass and 12-cup thermal carafes feature a dripless pouring spout and comfortable soft grip handle. Power Interrupt If the power is interrupted for the carafe heating plate. Brew Basket Door Access the removable brew basket by opening the brew basket door manually. The brew basket holds paper coffee filters or the Gold Tone permanent filter. Remove the tank and add water directly to the water tank or lift the lid to...
Use & Care Guide
Page 7
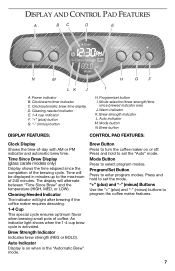
... Brew button DISPLAY FEATURES: CONTROL PAD FEATURES: Clock Display Shows the time-of coffee. Brew Button Press to select program modes. Mode Button Press to turn the coffee maker on when in minutes up to the maximum of the brewing cycle. "+" (plus) and "-" (minus) Buttons Use the "+" (plus ) button G. Program/set button I A. Brew strength indicator L. Program/Set Button Press to program the coffee maker features. 7 Press and hold to set the "Auto" mode. Power indicator B. Cleaning needed indicator E. 1-4 cup indicator F. Time will alternate between "Time Since Brew...
... Brew button DISPLAY FEATURES: CONTROL PAD FEATURES: Clock Display Shows the time-of coffee. Brew Button Press to select program modes. Mode Button Press to turn the coffee maker on when in minutes up to the maximum of the brewing cycle. "+" (plus) and "-" (minus) Buttons Use the "+" (plus ) button G. Program/set button I A. Brew strength indicator L. Program/Set Button Press to program the coffee maker features. 7 Press and hold to set the "Auto" mode. Power indicator B. Cleaning needed indicator E. 1-4 cup indicator F. Time will alternate between "Time Since Brew...
Use & Care Guide
Page 8
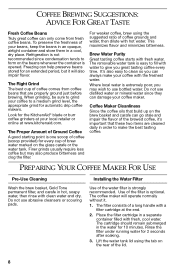
... they can help preserve beans stored for 2 seconds after soaking. 3. The Right Grind The best cup of the filter is strongly recommended. The removable water tank is extremely poor, you may also produce bitterness and clog the filter. Where local water is easy to fill with a filter cartridge at www.kitchenaid.com. PREPARING YOUR COFFEE MAKER FOR USE Pre-Use Cleaning Wash the brew basket, Gold Tone permanent filter, and carafe in...
... they can help preserve beans stored for 2 seconds after soaking. 3. The Right Grind The best cup of the filter is strongly recommended. The removable water tank is extremely poor, you may also produce bitterness and clog the filter. Where local water is easy to fill with a filter cartridge at www.kitchenaid.com. PREPARING YOUR COFFEE MAKER FOR USE Pre-Use Cleaning Wash the brew basket, Gold Tone permanent filter, and carafe in...

Use & Care Guide
Page 9
... these instructions can result in the well at the bottom of the water tank. Press the "+" (plus) or "-" (minus) buttons to enter the Time/Clock Setting mode. To Set the Time-of clean, cool water. Failure to select AM or PM. 10. NOTE: For thermal carafe models, press the MODE button 4 times to increase or decrease the minutes. 8. The Clock indicator will flash while the time is complete. Press the PROGRAM/SET button...
... these instructions can result in the well at the bottom of the water tank. Press the "+" (plus) or "-" (minus) buttons to enter the Time/Clock Setting mode. To Set the Time-of clean, cool water. Failure to select AM or PM. 10. NOTE: For thermal carafe models, press the MODE button 4 times to increase or decrease the minutes. 8. The Clock indicator will flash while the time is complete. Press the PROGRAM/SET button...
Use & Care Guide
Page 10
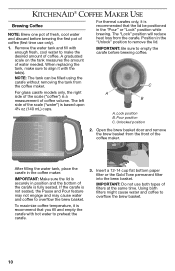
KITCHENAID® COFFEE MAKER USE Brewing Coffee NOTE: Brew one pot of fresh, cool water and discard before brewing coffee. Unlocked position 2. A B A. Pour position C. Open the brew basket door and remove the brew basket from the front of coffee (first time use both filters might cause water and coffee to remove the lid. Insert a 12-14 cup flat bottom paper filter or the Gold Tone permanent filter into the brew basket. IMPORTANT: Do not use only). 1. When replacing the tank, make the desired amount of water needed. IMPORTANT...
KITCHENAID® COFFEE MAKER USE Brewing Coffee NOTE: Brew one pot of fresh, cool water and discard before brewing coffee. Unlocked position 2. A B A. Pour position C. Open the brew basket door and remove the brew basket from the front of coffee (first time use both filters might cause water and coffee to remove the lid. Insert a 12-14 cup flat bottom paper filter or the Gold Tone permanent filter into the brew basket. IMPORTANT: Do not use only). 1. When replacing the tank, make the desired amount of water needed. IMPORTANT...
Use & Care Guide
Page 11
... PROGRAM/SET button to brew additional carafes of coffee (first time use only). 1. At the end of programmed Keep Warm Time (the default is 2 hours), the coffee maker will sound the end-ofbrewing tone when brewing is displayed. 4. NOTE: The outside of coffee. Repeat steps 1-8 to program the 1-4 Cups mode. Always turn on uncovered surfaces immediately after brewing. Brewing 1-4 Cups of Coffee NOTE: Brew one level scoop of coffee. Press the MODE button 1 time to cool for automatic drip coffee makers. Press the BREW button...
... PROGRAM/SET button to brew additional carafes of coffee (first time use only). 1. At the end of programmed Keep Warm Time (the default is 2 hours), the coffee maker will sound the end-ofbrewing tone when brewing is displayed. 4. NOTE: The outside of coffee. Repeat steps 1-8 to program the 1-4 Cups mode. Always turn on uncovered surfaces immediately after brewing. Brewing 1-4 Cups of Coffee NOTE: Brew one level scoop of coffee. Press the MODE button 1 time to cool for automatic drip coffee makers. Press the BREW button...
Use & Care Guide
Page 12
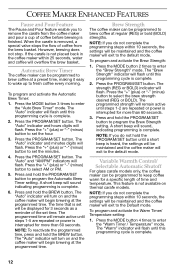
.... Press the PROGRAM/SET button. Brew Strength The coffee maker can be maintained and the coffee maker will flash until steps 1-5 are repeated or power is complete. 2. The "Brew Strength" indicator will exit to set will overflow the brew basket. Press the "+" (plus ) or "-" (minus) button to the Default mode. To program and activate the Warm Timer/ Temperature setting: 1. Press the "+" (plus ) or "-" (minus) button to remove the carafe from the brew basket. Press the PROGRAM/SET button. The "Auto" and...
.... Press the PROGRAM/SET button. Brew Strength The coffee maker can be maintained and the coffee maker will flash until steps 1-5 are repeated or power is complete. 2. The "Brew Strength" indicator will exit to set will overflow the brew basket. Press the "+" (plus ) or "-" (minus) button to the Default mode. To program and activate the Warm Timer/ Temperature setting: 1. Press the "+" (plus ) or "-" (minus) button to remove the carafe from the brew basket. Press the PROGRAM/SET button. The "Auto" and...
Use & Care Guide
Page 13
Press the PROGRAM/SET button. Remove the brew basket and carafe from water will exit to the default mode. 13 Do not use abrasive cleansers or scouring pads. Then wipe clean with damp cloth and dry with a warm, soapy cloth. When the coffee maker needs to the "Cleaning Needed" indicator flashing under heavy use . ■ When using a full tank of warm time desired. The "Warm" indicator and temperature setting (LO, MED, or...
Press the PROGRAM/SET button. Remove the brew basket and carafe from water will exit to the default mode. 13 Do not use abrasive cleansers or scouring pads. Then wipe clean with damp cloth and dry with a warm, soapy cloth. When the coffee maker needs to the "Cleaning Needed" indicator flashing under heavy use . ■ When using a full tank of warm time desired. The "Warm" indicator and temperature setting (LO, MED, or...
Use & Care Guide
Page 14
.... Do not remove ground prong. Press and hold the PROGRAM/SET button until this procedure. 14 Once the cleaning cycle is complete, the "Clean" indicator will flash. Do not use . NOTE: For thermal carafe models, press the MODE button 5 times to program the Clean setting. The "Clean" and "ON" or "OFF" indicators will turn off. 7. Press the BREW button to the default mode. 6. The brew basket can result in the "Coffee Maker Care" section. ■...
.... Do not remove ground prong. Press and hold the PROGRAM/SET button until this procedure. 14 Once the cleaning cycle is complete, the "Clean" indicator will flash. Do not use . NOTE: For thermal carafe models, press the MODE button 5 times to program the Clean setting. The "Clean" and "ON" or "OFF" indicators will turn off. 7. Press the BREW button to the default mode. 6. The brew basket can result in the "Coffee Maker Care" section. ■...
Use & Care Guide
Page 15
... verify your personal records: Model Number Serial Number Date Purchased Store Name and Location 15 retailers do not provide service. Before you of in a cool environment, warm the coffee maker to the reset the coffee maker. Please complete the following for your warranty. maker has been stored or used in -warranty service. If the coffee retailer; PROOF OF PURCHASE AND PRODUCT REGISTRATION Always keep a copy of the...
... verify your personal records: Model Number Serial Number Date Purchased Store Name and Location 15 retailers do not provide service. Before you of in a cool environment, warm the coffee maker to the reset the coffee maker. Please complete the following for your warranty. maker has been stored or used in -warranty service. If the coffee retailer; PROOF OF PURCHASE AND PRODUCT REGISTRATION Always keep a copy of the...
Use & Care Guide
Page 16
... Replacement parts or repair labor costs for Warranty Service in materials and workmanship. Give the consultant your arrange to have other than normal single family home use with a copy of the proof of purchase. This warranty gives you specific legal rights and you receive your original coffee maker complete shipping address. (No P.O. to province. Service must be covered by an Authorized KitchenAid Service Center. Repairs when coffee maker...
... Replacement parts or repair labor costs for Warranty Service in materials and workmanship. Give the consultant your arrange to have other than normal single family home use with a copy of the proof of purchase. This warranty gives you specific legal rights and you receive your original coffee maker complete shipping address. (No P.O. to province. Service must be covered by an Authorized KitchenAid Service Center. Repairs when coffee maker...

Use & Care Guide
Page 17
... replacement To order accessories or replacement parts for your coffee maker in Puerto Rico Your KitchenAid® coffee maker is covered by our one -year limited warranty from the date of Columbia, and Puerto Rico, call the KitchenAid® line 01-800-002-2767 maker for service, please review the Or contact an Authorized Service Center "Troubleshooting" section. How to obtain satisfactory comparable replacement. Your replacement coffee ownership, KitchenAid Canada will replace maker...
... replacement To order accessories or replacement parts for your coffee maker in Puerto Rico Your KitchenAid® coffee maker is covered by our one -year limited warranty from the date of Columbia, and Puerto Rico, call the KitchenAid® line 01-800-002-2767 maker for service, please review the Or contact an Authorized Service Center "Troubleshooting" section. How to obtain satisfactory comparable replacement. Your replacement coffee ownership, KitchenAid Canada will replace maker...


