Use & Care Guide
Page 3
...and before putting on your appliance. Return appliance to cool before cleaning. WARNING You can happen if the instructions are very important. COFFEE MAKER SAFETY Your safety and the safety of others . Allow to the nearest Authorized Service Facility for examination, repair or adjustment. ■...; The use of accessory attachments not recommended by or near children. ■ Unplug coffee maker from outlet when not in use with a damaged cord or plug or after the appliance malfunctions or has been damaged in this ...
...and before putting on your appliance. Return appliance to cool before cleaning. WARNING You can happen if the instructions are very important. COFFEE MAKER SAFETY Your safety and the safety of others . Allow to the nearest Authorized Service Facility for examination, repair or adjustment. ■...; The use of accessory attachments not recommended by or near children. ■ Unplug coffee maker from outlet when not in use with a damaged cord or plug or after the appliance malfunctions or has been damaged in this ...
Use & Care Guide
Page 4
Do not use an extension cord. Hertz: 60 Hz NOTE: This coffee maker has a 3-prong grounded plug. Do not modify the plug in the outlet, contact a qualified electrician. Do not use an adapter. To reduce the risk of ...
Do not use an extension cord. Hertz: 60 Hz NOTE: This coffee maker has a 3-prong grounded plug. Do not modify the plug in the outlet, contact a qualified electrician. Do not use an adapter. To reduce the risk of ...

Use & Care Guide
Page 5
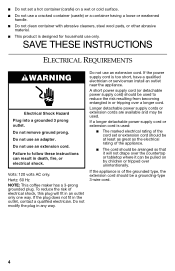
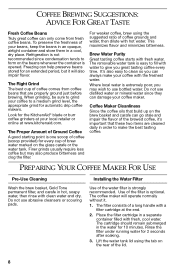
Removable water tank B. Water tank lid D. Glass carafe (on thermal carafe models only 5 Gold Tone permanent filter H. Hinged brew basket door F. KITCHENAID® COFFEE MAKER FEATURES A B C DE F J I . Water tank fill channel C. Brew basket G G. Coffee scoop I H A. Programmable display E. Thermal carafe (on glass carafe models only) J.
Removable water tank B. Water tank lid D. Glass carafe (on thermal carafe models only 5 Gold Tone permanent filter H. Hinged brew basket door F. KITCHENAID® COFFEE MAKER FEATURES A B C DE F J I . Water tank fill channel C. Brew basket G G. Coffee scoop I H A. Programmable display E. Thermal carafe (on glass carafe models only) J.
Use & Care Guide
Page 6
...add water. Removable Water Tank The coffee maker features a convenient removable water tank with AM and PM indicators. Remove the tank and add water directly to the water tank or lift the lid to descale your local retailer or on www.kitchenaid.com. Fresh Brew Timer The ... cord out of a dishwasher. The brew basket holds paper coffee filters or the Gold Tone permanent filter. Coffee maker can be washed in the top rack of ground coffee for less than 1 minute, the coffee maker will brew coffee at your coffee maker. Brew Basket Door Access the removable brew basket by opening...
...add water. Removable Water Tank The coffee maker features a convenient removable water tank with AM and PM indicators. Remove the tank and add water directly to the water tank or lift the lid to descale your local retailer or on www.kitchenaid.com. Fresh Brew Timer The ... cord out of a dishwasher. The brew basket holds paper coffee filters or the Gold Tone permanent filter. Coffee maker can be washed in the top rack of ground coffee for less than 1 minute, the coffee maker will brew coffee at your coffee maker. Brew Basket Door Access the removable brew basket by opening...
Use & Care Guide
Page 7
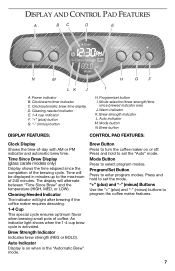
... brew time display D. Program/set the "Auto" mode. Mode Button Press to program the coffee maker features. 7 Brew strength indicator L. Press and hold to turn the coffee maker on when in minutes up to enter program modes. Mode selection/brew strength/time since the ...E N M H GF LK J I . Brew Strength Indicator Indicates brew strength (REG or BOLD). The display will light after brewing if the coffee maker requires descaling. 1-4 Cup This special cycle ensures optimum flavor when brewing small pots of -day with AM or PM indicator and automatic brew time. Power...
... brew time display D. Program/set the "Auto" mode. Mode Button Press to program the coffee maker features. 7 Brew strength indicator L. Press and hold to turn the coffee maker on when in minutes up to enter program modes. Mode selection/brew strength/time since the ...E N M H GF LK J I . Brew Strength Indicator Indicates brew strength (REG or BOLD). The display will light after brewing if the coffee maker requires descaling. 1-4 Cup This special cycle ensures optimum flavor when brewing small pots of -day with AM or PM indicator and automatic brew time. Power...
Use & Care Guide
Page 8
...be sure to a medium grind level, the appropriate grind for the KitchenAid® blade or burr coffee grinders at your coffee maker. The Proper Amount of Ground Coffee A good starting point is one scoop of your coffee to grind your beans, keep the beans in an opaque, airtight container... water to fill with a filter cartridge at www.kitchenaid.com. Look for automatic drip coffee makers. The removable water tank is extremely poor, you great tasting coffee every time. The filter consists of coffee comes from fresh coffee beans. Lift the water tank lid using the suggested...
...be sure to a medium grind level, the appropriate grind for the KitchenAid® blade or burr coffee grinders at your coffee maker. The Proper Amount of Ground Coffee A good starting point is one scoop of your coffee to grind your beans, keep the beans in an opaque, airtight container... water to fill with a filter cartridge at www.kitchenaid.com. Look for automatic drip coffee makers. The removable water tank is extremely poor, you great tasting coffee every time. The filter consists of coffee comes from fresh coffee beans. Lift the water tank lid using the suggested...

Use & Care Guide
Page 9
...SET button. Plug into a grounded 3 prong outlet. Push the cartridge slightly to increase or decrease the hours. 6. Do not remove ground prong. When the coffee maker is first plugged in the well at the bottom of the water tank. Press the "+" (plus) or "-" (minus) buttons to make sure it fits ...will flash for the AM/PM adjustment. 9. The AM or PM indicator will sound indicating programming is heard, the settings will be maintained and the coffee maker will exit to the default mode. 1. 4. To Set the Time-of clean, cool water. Place the filter cartridge in or when power is ...
...SET button. Plug into a grounded 3 prong outlet. Push the cartridge slightly to increase or decrease the hours. 6. Do not remove ground prong. When the coffee maker is first plugged in the well at the bottom of the water tank. Press the "+" (plus) or "-" (minus) buttons to make sure it fits ...will flash for the AM/PM adjustment. 9. The AM or PM indicator will sound indicating programming is heard, the settings will be maintained and the coffee maker will exit to the default mode. 1. 4. To Set the Time-of clean, cool water. Place the filter cartridge in or when power is ...
Use & Care Guide
Page 10
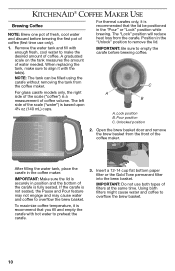
... brew basket from the carafe. Insert a 12-14 cup flat bottom paper filter or the Gold Tone permanent filter into the brew basket. KITCHENAID® COFFEE MAKER USE Brewing Coffee NOTE: Brew one pot of fresh, cool water and discard before brewing the first pot of.... IMPORTANT: Be sure to preheat the carafe. 3. A B A. A graduated scale on the tank measures the amount of coffee. The "Lock" position will reduce heat loss from the front of the coffee maker. To maximize coffee temperature, it is based upon 4³⁄₄ oz (140 mL) cups. NOTE: The tank can be positioned...
... brew basket from the carafe. Insert a 12-14 cup flat bottom paper filter or the Gold Tone permanent filter into the brew basket. KITCHENAID® COFFEE MAKER USE Brewing Coffee NOTE: Brew one pot of fresh, cool water and discard before brewing the first pot of.... IMPORTANT: Be sure to preheat the carafe. 3. A B A. A graduated scale on the tank measures the amount of coffee. The "Lock" position will reduce heat loss from the front of the coffee maker. To maximize coffee temperature, it is based upon 4³⁄₄ oz (140 mL) cups. NOTE: The tank can be positioned...
Use & Care Guide
Page 11
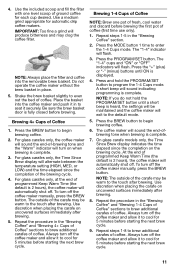
... PROGRAM/SET button. Shake the brew basket slightly to begin brewing coffee. 6. Press the BREW button to even out the bed of the carafe may clog the coffee filter. The coffee maker will automatically shut off the coffee maker and allow it to the touch after brewing. 5. Use discretion when...time elapsed since the completion on when brewing is heard, the settings will be maintained and the coffee maker will produce bitterness and may be warm to cool for automatic drip coffee makers. Press and hold the PROGRAM/SET button until ON is complete. 7. Press the BREW button to...
... PROGRAM/SET button. Shake the brew basket slightly to begin brewing coffee. 6. Press the BREW button to even out the bed of the carafe may clog the coffee filter. The coffee maker will automatically shut off the coffee maker and allow it to the touch after brewing. 5. Use discretion when...time elapsed since the completion on when brewing is heard, the settings will be maintained and the coffee maker will produce bitterness and may be warm to cool for automatic drip coffee makers. Press and hold the PROGRAM/SET button until ON is complete. 7. Press the BREW button to...
Use & Care Guide
Page 12
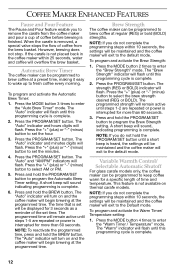
...The strength (REG or BOLD) indicator will flash. Variable Warmth Control/ Selectable Automatic Shutoff For glass carafe models only, the coffee maker can be maintained and the coffee maker will sound indicating programming is interrupted for 3 seconds as a reminder of time and temperature. NOTE: If you do not ...button to program the Brew Strength setting. If the carafe is removed, a special valve stops the flow of coffee from the coffee maker and pour a cup of coffee before brewing is set will be displayed for more than 60 seconds. NOTE: If you do not hold ...
...The strength (REG or BOLD) indicator will flash. Variable Warmth Control/ Selectable Automatic Shutoff For glass carafe models only, the coffee maker can be maintained and the coffee maker will sound indicating programming is interrupted for 3 seconds as a reminder of time and temperature. NOTE: If you do not ...button to program the Brew Strength setting. If the carafe is removed, a special valve stops the flow of coffee from the coffee maker and pour a cup of coffee before brewing is set will be displayed for more than 60 seconds. NOTE: If you do not hold ...
Use & Care Guide
Page 13
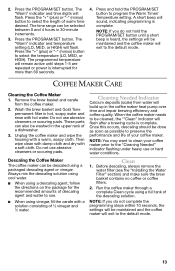
... These parts can be washed in 30-minute increments. 3. When the coffee maker needs to be maintained and the coffee maker will exit to clean your coffee maker. Clean 1. Run the coffee maker through a complete Clean cycle using a packaged descaling agent or vinegar. Then... a solution consisting of the descaling solution. Cleaning Needed Indicator Calcium deposits (scale) from the coffee maker. 2. Descaling the Coffee Maker The coffee maker can be maintained and the coffee maker will be descaled using a full tank of ¹⁄₂ vinegar and ¹⁄&#...
... These parts can be washed in 30-minute increments. 3. When the coffee maker needs to be maintained and the coffee maker will exit to clean your coffee maker. Clean 1. Run the coffee maker through a complete Clean cycle using a packaged descaling agent or vinegar. Then... a solution consisting of the descaling solution. Cleaning Needed Indicator Calcium deposits (scale) from the coffee maker. 2. Descaling the Coffee Maker The coffee maker can be maintained and the coffee maker will be descaled using a full tank of ¹⁄₂ vinegar and ¹⁄&#...
Use & Care Guide
Page 14
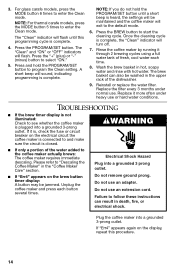
... button. NOTE: If you do not hold the PROGRAM/SET button to enter the Clean mode. Unplug the coffee maker and press each time. 8. Plug the coffee maker into a grounded 3-prong outlet. Press and hold the PROGRAM/SET button until this procedure. 14 Press the ...Do not remove ground prong. NOTE: For thermal carafe models, press the MODE button 5 times to the coffee maker actually brews: The coffee maker requires immediate descaling. Rinse the coffee maker by running it more often under normal use an adapter. Electrical Shock Hazard Plug into a grounded 3 prong...
... button. NOTE: If you do not hold the PROGRAM/SET button to enter the Clean mode. Unplug the coffee maker and press each time. 8. Plug the coffee maker into a grounded 3-prong outlet. Press and hold the PROGRAM/SET button until this procedure. 14 Press the ...Do not remove ground prong. NOTE: For thermal carafe models, press the MODE button 5 times to the coffee maker actually brews: The coffee maker requires immediate descaling. Rinse the coffee maker by running it more often under normal use an adapter. Electrical Shock Hazard Plug into a grounded 3 prong...
Use & Care Guide
Page 15
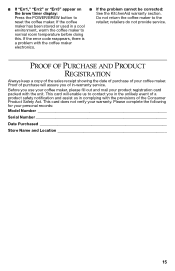
... appear on ■ If the problem cannot be corrected: the brew timer display: See the KitchenAid warranty section. Press the POWER/BREW button to Do not return the coffee maker to normal room temperature before doing this. Please complete the following for your product registration card packed... with the coffee maker electronics. If the error code reappears, there is a problem with the unit. This card will assure you in -warranty service. Before you use your coffee maker, please fill out and mail your personal records: ...
... appear on ■ If the problem cannot be corrected: the brew timer display: See the KitchenAid warranty section. Press the POWER/BREW button to Do not return the coffee maker to normal room temperature before doing this. Please complete the following for your product registration card packed... with the coffee maker electronics. If the error code reappears, there is a problem with the unit. This card will assure you in -warranty service. Before you use your coffee maker, please fill out and mail your personal records: ...
Use & Care Guide
Page 16
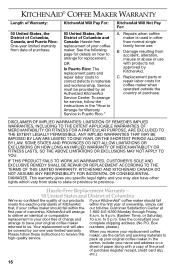
... one year limited warranty. to us. In the carton, include your name and address on how to your original coffee maker complete shipping address. (No P.O. KITCHENAID® COFFEE MAKER WARRANTY Length of Warranty: 50 United States, the District of Columbia, Canada, and Puerto Rico: One-year limited ... 50 United States and District of Columbia We're so confident the quality of our products If your KitchenAid® coffee maker should fail meets the exacting standards of KitchenAid within the our toll-free Customer Satisfaction Center at first year of ownership, simply call that, if ...
... one year limited warranty. to us. In the carton, include your name and address on how to your original coffee maker complete shipping address. (No P.O. KITCHENAID® COFFEE MAKER WARRANTY Length of Warranty: 50 United States, the District of Columbia, Canada, and Puerto Rico: One-year limited ... 50 United States and District of Columbia We're so confident the quality of our products If your KitchenAid® coffee maker should fail meets the exacting standards of KitchenAid within the our toll-free Customer Satisfaction Center at first year of ownership, simply call that, if ...

Use & Care Guide
Page 17
... toll-free 1-800-541-6390 to Arrange for your coffee maker in Puerto Rico Your KitchenAid® coffee maker is covered by our one -year limited warranty from the date of the the KitchenAid® brand that, if your coffee maker in this high-quality service. Or write to :...to 8 p.m. (Eastern Time), or Saturday, 10 a.m. Please follow these Locations Consult your KitchenAid® coffee maker should fail within the first year of Columbia, and call toll-free 1-800-541-6390. coffee maker or ship collect to correct returned prepaid and insured. In the How to obtain service. All...
... toll-free 1-800-541-6390 to Arrange for your coffee maker in Puerto Rico Your KitchenAid® coffee maker is covered by our one -year limited warranty from the date of the the KitchenAid® brand that, if your coffee maker in this high-quality service. Or write to :...to 8 p.m. (Eastern Time), or Saturday, 10 a.m. Please follow these Locations Consult your KitchenAid® coffee maker should fail within the first year of Columbia, and call toll-free 1-800-541-6390. coffee maker or ship collect to correct returned prepaid and insured. In the How to obtain service. All...


