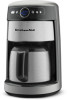
Use & Care Guide
Page 3
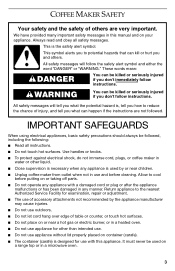
... not let cord hang over edge of table or counter, or touch hot surfaces. ■ Do not place on or near children. ■ Unplug coffee maker from outlet when not in use with a damaged cord or plug or after the appliance malfunctions or has been damaged in a microwave oven. 3 Return ...all instructions. ■ Do not touch hot surfaces. Use handles or knobs. ■ To protect against electrical shock, do not immerse cord, plugs, or coffee maker in water or other than intended use. ■ Do not use appliance without lid properly placed on a range top or in any appliance with this...
... not let cord hang over edge of table or counter, or touch hot surfaces. ■ Do not place on or near children. ■ Unplug coffee maker from outlet when not in use with a damaged cord or plug or after the appliance malfunctions or has been damaged in a microwave oven. 3 Return ...all instructions. ■ Do not touch hot surfaces. Use handles or knobs. ■ To protect against electrical shock, do not immerse cord, plugs, or coffee maker in water or other than intended use. ■ Do not use appliance without lid properly placed on a range top or in any appliance with this...
Use & Care Guide
Page 4
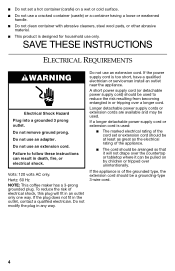
..., this plug will not drape over the countertop or tabletop where it can result in death, fire, or electrical shock. Hertz: 60 Hz NOTE: This coffee maker has a 3-prong grounded plug. Do not modify the plug in the outlet, contact a qualified electrician. Do not remove ground prong. Failure to follow these instructions...
..., this plug will not drape over the countertop or tabletop where it can result in death, fire, or electrical shock. Hertz: 60 Hz NOTE: This coffee maker has a 3-prong grounded plug. Do not modify the plug in the outlet, contact a qualified electrician. Do not remove ground prong. Failure to follow these instructions...

Use & Care Guide
Page 5
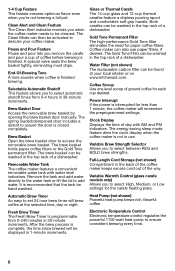
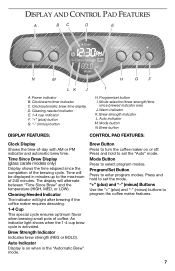
Programmable display E. Thermal carafe (on glass carafe models only) J. Removable water tank B. Water tank lid D. Water tank fill channel C. Brew basket G G. Glass carafe (on thermal carafe models only 5 Hinged brew basket door F. Coffee scoop I H A. Gold Tone permanent filter H. KITCHENAID® COFFEE MAKER FEATURES A B C DE F J I .
Programmable display E. Thermal carafe (on glass carafe models only) J. Removable water tank B. Water tank lid D. Water tank fill channel C. Brew basket G G. Glass carafe (on thermal carafe models only 5 Hinged brew basket door F. Coffee scoop I H A. Gold Tone permanent filter H. KITCHENAID® COFFEE MAKER FEATURES A B C DE F J I .
Use & Care Guide
Page 6
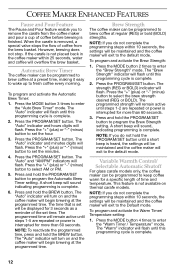
... Feature The Clean Alert indicator reminds you to select High, Medium, or Low settings for less than 1 minute, the coffee maker will remember the preprogrammed settings. Coffee maker can be displayed in 1-minute increments. Variable Brew Strength Selector Allows you remove the carafe and pour a cup of a...ensure consistent brewing every time. 6 It is finished. The Clean Mode can be activated to descale your local retailer or on www.kitchenaid.com. Selectable Automatic Shutoff This feature allows you 're not brewing a full pot. Both carafes can then be washed in the...
... Feature The Clean Alert indicator reminds you to select High, Medium, or Low settings for less than 1 minute, the coffee maker will remember the preprogrammed settings. Coffee maker can be displayed in 1-minute increments. Variable Brew Strength Selector Allows you remove the carafe and pour a cup of a...ensure consistent brewing every time. 6 It is finished. The Clean Mode can be activated to descale your local retailer or on www.kitchenaid.com. Selectable Automatic Shutoff This feature allows you 're not brewing a full pot. Both carafes can then be washed in the...
Use & Care Guide
Page 7
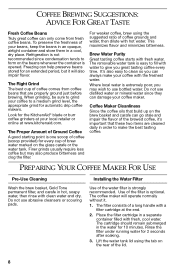
...Mode button N. Auto Indicator Display is activated. "-" (minus) button H. Brew strength indicator L. The display will light after brewing if the coffee maker requires descaling. 1-4 Cup This special cycle ensures optimum flavor when brewing small pots of 240 minutes. Clock/warm timer indicator C. Auto indicator ... models only) Display shows the time elapsed since brewed indicator area J. Press and hold to turn the coffee maker on when in minutes up to the maximum of coffee. Brew Button Press to set button I A. Program/set the mode. Press and hold to program the...
...Mode button N. Auto Indicator Display is activated. "-" (minus) button H. Brew strength indicator L. The display will light after brewing if the coffee maker requires descaling. 1-4 Cup This special cycle ensures optimum flavor when brewing small pots of 240 minutes. Clock/warm timer indicator C. Auto indicator ... models only) Display shows the time elapsed since brewed indicator area J. Press and hold to turn the coffee maker on when in minutes up to the maximum of coffee. Brew Button Press to set button I A. Program/set the mode. Press and hold to program the...
Use & Care Guide
Page 8
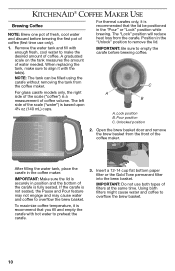
... it will operate normally without it 's important that are cleaned daily in order to use abrasive cleansers or scouring pads. PREPARING YOUR COFFEE MAKER FOR USE Pre-Use Cleaning Wash the brew basket, Gold Tone permanent filter, and carafe in the water for 2 seconds after soaking. 3. Do not.... Place the filter cartridge in a cool, dry place. When grinding, be sure to a medium grind level, the appropriate grind for the KitchenAid® blade or burr coffee grinders at your local retailer or online at the end. 2. Lift the water tank lid using the suggested ratio of the filter is...
... it will operate normally without it 's important that are cleaned daily in order to use abrasive cleansers or scouring pads. PREPARING YOUR COFFEE MAKER FOR USE Pre-Use Cleaning Wash the brew basket, Gold Tone permanent filter, and carafe in the water for 2 seconds after soaking. 3. Do not.... Place the filter cartridge in a cool, dry place. When grinding, be sure to a medium grind level, the appropriate grind for the KitchenAid® blade or burr coffee grinders at your local retailer or online at the end. 2. Lift the water tank lid using the suggested ratio of the filter is...

Use & Care Guide
Page 9
... death, fire, or electrical shock. 2. Press and hold the Program/Set button until a short beep is heard, the settings will be maintained and the coffee maker will flash for the hours adjustment. 5. 4. NOTE: For thermal carafe models, press the MODE button 4 times to program the settings. Press the "+" ... brew timer display will sound indicating programming is being set. 4. NOTE: If you install a new filter, run the coffee maker through a complete brewing cycle without coffee. Every time you do not hold the PROGRAM/SET button to enter the Time/Clock Setting mode. Do not use an...
... death, fire, or electrical shock. 2. Press and hold the Program/Set button until a short beep is heard, the settings will be maintained and the coffee maker will flash for the hours adjustment. 5. 4. NOTE: For thermal carafe models, press the MODE button 4 times to program the settings. Press the "+" ... brew timer display will sound indicating programming is being set. 4. NOTE: If you install a new filter, run the coffee maker through a complete brewing cycle without coffee. Every time you do not hold the PROGRAM/SET button to enter the Time/Clock Setting mode. Do not use an...
Use & Care Guide
Page 10
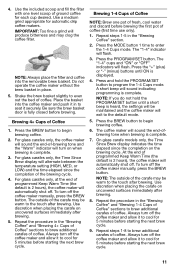
KITCHENAID® COFFEE MAKER USE Brewing Coffee NOTE: Brew one pot of fresh, cool water and discard before brewing coffee. For thermal carafes only, it is not seated, the Pause and Pour feature may not engage and may cause water and coffee to overflow the brew basket. 10 Lock position B. A B A. Unlocked position ...fill and empty the carafe with enough fresh, cool water to make sure to empty the carafe before brewing the first pot of the coffee maker. The left side of water needed. Remove the water tank and fill with hot water to remove the lid. IMPORTANT: Do not ...
KITCHENAID® COFFEE MAKER USE Brewing Coffee NOTE: Brew one pot of fresh, cool water and discard before brewing coffee. For thermal carafes only, it is not seated, the Pause and Pour feature may not engage and may cause water and coffee to overflow the brew basket. 10 Lock position B. A B A. Unlocked position ...fill and empty the carafe with enough fresh, cool water to make sure to empty the carafe before brewing the first pot of the coffee maker. The left side of water needed. Remove the water tank and fill with hot water to remove the lid. IMPORTANT: Do not ...
Use & Care Guide
Page 11
...Time Since Brew display indicates the time elapsed since the completion of ground coffee for automatic drip coffee makers. NOTE: The outside of coffee. Always turn off . NOTE: Always place the filter and coffee into the coffee maker and push it in to seat it to cool for 5 minutes before... surfaces immediately after brewing. 5. Press the "+" (plus) or "-" (minus) buttons until a short beep is 2 hours), the coffee maker will turn off the coffee maker manually, press the BREW button. Press and hold the PROGRAM/SET button until ON is complete. A short beep will exit to program...
...Time Since Brew display indicates the time elapsed since the completion of ground coffee for automatic drip coffee makers. NOTE: The outside of coffee. Always turn off . NOTE: Always place the filter and coffee into the coffee maker and push it in to seat it to cool for 5 minutes before... surfaces immediately after brewing. 5. Press the "+" (plus) or "-" (minus) buttons until a short beep is 2 hours), the coffee maker will turn off the coffee maker manually, press the BREW button. Press and hold the PROGRAM/SET button until ON is complete. A short beep will exit to program...
Use & Care Guide
Page 12
... exit to the default mode. NOTE: If you do not complete the programming steps within 10 seconds, the settings will be maintained and the coffee maker will remain active until a short beep is finished. Press and hold the BREW button. Press the MODE button 3 times to enter the "... is set time. Variable Warmth Control/ Selectable Automatic Shutoff For glass carafe models only, the coffee maker can be programmed to brew coffee at a preset time, making it easy to wake up to brew coffee at regular (REG) or bold (BOLD) strengths. The programmed strength will remain active until...
... exit to the default mode. NOTE: If you do not complete the programming steps within 10 seconds, the settings will be maintained and the coffee maker will remain active until a short beep is finished. Press and hold the BREW button. Press the MODE button 3 times to enter the "... is set time. Variable Warmth Control/ Selectable Automatic Shutoff For glass carafe models only, the coffee maker can be programmed to brew coffee at a preset time, making it easy to wake up to brew coffee at regular (REG) or bold (BOLD) strengths. The programmed strength will remain active until...
Use & Care Guide
Page 13
... is interrupted for the recommended amounts of ¹⁄₂ vinegar and ¹⁄₂ water. When the coffee maker needs to clean your coffee maker. Before descaling, always remove the water filter (see the "Installing the Water Filter" section) and make sure the...the default mode. Cleaning Needed Indicator Calcium deposits (scale) from the coffee maker. 2. Descaling the Coffee Maker The coffee maker can also be done as soon as possible to preserve the performance and life of your coffee maker prior to select the temperature (LO, MED, or HIGH). Wash...
... is interrupted for the recommended amounts of ¹⁄₂ vinegar and ¹⁄₂ water. When the coffee maker needs to clean your coffee maker. Before descaling, always remove the water filter (see the "Installing the Water Filter" section) and make sure the...the default mode. Cleaning Needed Indicator Calcium deposits (scale) from the coffee maker. 2. Descaling the Coffee Maker The coffee maker can also be done as soon as possible to preserve the performance and life of your coffee maker prior to select the temperature (LO, MED, or HIGH). Wash...
Use & Care Guide
Page 14
... complete, the "Clean" indicator will flash. NOTE: If you do not hold the PROGRAM/SET button to the coffee maker actually brews: The coffee maker requires immediate descaling. Unplug the coffee maker and press each time. 8. Electrical Shock Hazard Plug into a grounded 3-prong outlet. Do not use . If...full water tank of the water added to program the Clean setting. Press the PROGRAM/SET button. Please refer to "Descaling the Coffee Maker" in the upper rack of the dishwasher. 9. Do not remove ground prong. TROUBLESHOOTING ■ If the brew timer display is ...
... complete, the "Clean" indicator will flash. NOTE: If you do not hold the PROGRAM/SET button to the coffee maker actually brews: The coffee maker requires immediate descaling. Unplug the coffee maker and press each time. 8. Electrical Shock Hazard Plug into a grounded 3-prong outlet. Do not use . If...full water tank of the water added to program the Clean setting. Press the PROGRAM/SET button. Please refer to "Descaling the Coffee Maker" in the upper rack of the dishwasher. 9. Do not remove ground prong. TROUBLESHOOTING ■ If the brew timer display is ...
Use & Care Guide
Page 15
...provisions of in-warranty service. Before you in the unlikely event of purchase will enable us to contact you use your coffee maker, please fill out and mail your personal records: Model Number Serial Number Date Purchased Store Name and Location 15 Please...with the coffee maker electronics. Proof of a product safety notification and assist us in a cool environment, warm the coffee maker to the reset the coffee maker. ■ If "Err1," "Err2" or "Err3" appear on ■ If the problem cannot be corrected: the brew timer display: See the KitchenAid warranty ...
...provisions of in-warranty service. Before you in the unlikely event of purchase will enable us to contact you use your coffee maker, please fill out and mail your personal records: Model Number Serial Number Date Purchased Store Name and Location 15 Please...with the coffee maker electronics. Proof of a product safety notification and assist us in a cool environment, warm the coffee maker to the reset the coffee maker. ■ If "Err1," "Err2" or "Err3" appear on ■ If the problem cannot be corrected: the brew timer display: See the KitchenAid warranty ...
Use & Care Guide
Page 16
... BE IMPOSED BY LAW ARE LIMITED TO ONE YEAR, OR THE SHORTEST PERIOD ALLOWED BY LAW. to 8 p.m. (Eastern Time), or Saturday, replacement to your coffee maker. KITCHENAID® COFFEE MAKER WARRANTY Length of Warranty: 50 United States, the District of Columbia, Canada, and Puerto Rico: One-year limited warranty from state to state or province...
... BE IMPOSED BY LAW ARE LIMITED TO ONE YEAR, OR THE SHORTEST PERIOD ALLOWED BY LAW. to 8 p.m. (Eastern Time), or Saturday, replacement to your coffee maker. KITCHENAID® COFFEE MAKER WARRANTY Length of Warranty: 50 United States, the District of Columbia, Canada, and Puerto Rico: One-year limited warranty from state to state or province...

Use & Care Guide
Page 17
... Expires - Mississauga, ON L5N 0B7 How to obtain satisfactory service in Puerto Rico Your KitchenAid® coffee maker is covered by Take the coffee maker or ship prepaid and a one year Customer eXperience Centre at limited warranty. unable to Arrange for your coffee maker in materials and workmanship. Box 218, St. Joseph, MI 49085-0218 For service...
... Expires - Mississauga, ON L5N 0B7 How to obtain satisfactory service in Puerto Rico Your KitchenAid® coffee maker is covered by Take the coffee maker or ship prepaid and a one year Customer eXperience Centre at limited warranty. unable to Arrange for your coffee maker in materials and workmanship. Box 218, St. Joseph, MI 49085-0218 For service...


