Dimension Guide
Page 1
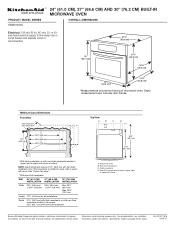
... to change without notice. or 20amp fused electrical supply. Non-flush receptacle located in upper right or upper left corner of microwave oven. A time-delay fuse or circuit breaker and separate circuit is located in upper right or upper left corner Because Whirlpool Corporation...¹⁄₄" (54.0 cm)* *Measurements include front facing of cutout. PRODUCT MODEL SERIES KBMS1454S ® 24" (61.0 CM), 27" (68.6 CM) AND 30" (76.2 CM) BUILT-IN MICROWAVE OVEN OVERALL DIMENSIONS Electrical: 120 volt, 60 Hz, AC only, 15- Minimum Cutout Dimensions Front View 21³⁄...
... to change without notice. or 20amp fused electrical supply. Non-flush receptacle located in upper right or upper left corner of microwave oven. A time-delay fuse or circuit breaker and separate circuit is located in upper right or upper left corner Because Whirlpool Corporation...¹⁄₄" (54.0 cm)* *Measurements include front facing of cutout. PRODUCT MODEL SERIES KBMS1454S ® 24" (61.0 CM), 27" (68.6 CM) AND 30" (76.2 CM) BUILT-IN MICROWAVE OVEN OVERALL DIMENSIONS Electrical: 120 volt, 60 Hz, AC only, 15- Minimum Cutout Dimensions Front View 21³⁄...

Installation Guide
Page 1
... 2 Tools and Parts 2 Location Requirements 2 Minimum Dimensions 3 Product Dimensions 4 Electrical Requirements 5 INSTALLATION INSTRUCTIONS 6 Install the Microwave Oven (24" [61.0 cm] Installation Only 6 Install the Microwave Oven (27" [68.6 cm] or 30" [76.2 cm] Installation Only 7 Complete Installation 8 ASSISTANCE 8 BUILT-IN MICROWAVE OVEN SAFETY Your safety and the safety of injury, and tell you what the potential hazard is...
... 2 Tools and Parts 2 Location Requirements 2 Minimum Dimensions 3 Product Dimensions 4 Electrical Requirements 5 INSTALLATION INSTRUCTIONS 6 Install the Microwave Oven (24" [61.0 cm] Installation Only 6 Install the Microwave Oven (27" [68.6 cm] or 30" [76.2 cm] Installation Only 7 Complete Installation 8 ASSISTANCE 8 BUILT-IN MICROWAVE OVEN SAFETY Your safety and the safety of injury, and tell you what the potential hazard is...

Installation Guide
Page 2
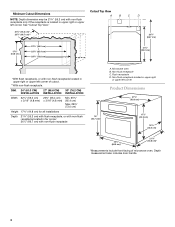
... 24" (61.0 cm) installation C 27" (68.6 cm) installation* A, C, D 30" (76.2 cm) installation A, B, C, E *Extension plate (B) will use. See chart below a non-vented cooktop. Check the opening size will determine which parts you will have to see which includes microwave oven ...and square. s Support for this installation. †®TORX is a registered trademark of the microwave oven. See "Minimum Dimensions" section. D E A. A C B Location Requirements The microwave oven may be located in a cabinet, and/or above a built-in "Minimum Dimensions" section. See...
... 24" (61.0 cm) installation C 27" (68.6 cm) installation* A, C, D 30" (76.2 cm) installation A, B, C, E *Extension plate (B) will use. See chart below a non-vented cooktop. Check the opening size will determine which parts you will have to see which includes microwave oven ...and square. s Support for this installation. †®TORX is a registered trademark of the microwave oven. See "Minimum Dimensions" section. D E A. A C B Location Requirements The microwave oven may be located in a cabinet, and/or above a built-in "Minimum Dimensions" section. See...
Installation Guide
Page 4
Non-flush receptacle C. Depth measurement also includes door handle. 4 DIM. 24" (61.0 CM) 27" (68.6 CM) 30" (76.2 CM) INSTALLATION INSTALLATION INSTALLATION Width 22¹⁄₄" (56.5 cm) ± 3/16" (4.8 mm) 25³⁄₄" (65.4 cm) ....0 cm) idth W 21³⁄₄" (55.2 cm) *With flush receptacle, or with non-flush receptacle located in upper right or upper left corner of microwave oven. Flush receptacle D. Minimum Cutout Dimensions Cutout Top View A B C D NOTE: Depth dimension may be 21³⁄₄" (55.2 cm) with non-flush receptacle...
Non-flush receptacle C. Depth measurement also includes door handle. 4 DIM. 24" (61.0 CM) 27" (68.6 CM) 30" (76.2 CM) INSTALLATION INSTALLATION INSTALLATION Width 22¹⁄₄" (56.5 cm) ± 3/16" (4.8 mm) 25³⁄₄" (65.4 cm) ....0 cm) idth W 21³⁄₄" (55.2 cm) *With flush receptacle, or with non-flush receptacle located in upper right or upper left corner of microwave oven. Flush receptacle D. Minimum Cutout Dimensions Cutout Top View A B C D NOTE: Depth dimension may be 21³⁄₄" (55.2 cm) with non-flush receptacle...
Installation Guide
Page 7
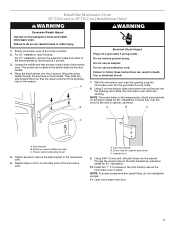
... over the 2 screws, fitting the screw heads through the screw holes on the bracket. Open microwave oven door. 7 Empty microwave oven of the keyholes rest on the other injury. 1. For 27" installation, remove the extension plate from each side of the wall or cabinet, as the door...drill, drill pilot holes into the opening, and center the microwave oven within the opening , plug the microwave oven into a grounded 3 prong outlet. Do not remove ground prong. Using 2 or more people to do not overtighten screws. 11. Install the Microwave Oven (27" [68.6 cm] or 30" [76.2 cm] ...
... over the 2 screws, fitting the screw heads through the screw holes on the bracket. Open microwave oven door. 7 Empty microwave oven of the keyholes rest on the other injury. 1. For 27" installation, remove the extension plate from each side of the wall or cabinet, as the door...drill, drill pilot holes into the opening, and center the microwave oven within the opening , plug the microwave oven into a grounded 3 prong outlet. Do not remove ground prong. Using 2 or more people to do not overtighten screws. 11. Install the Microwave Oven (27" [68.6 cm] or 30" [76.2 cm] ...
