Use & Care Guide
Page 2
... 5 Turntable 5 MICROWAVE OVEN CONTROL 5 Display 5 Start 6 Cancel/Off 6 Add a Minute 6 Dial 6 Select 6 Clock 6 Tones 6 Demo Mode 6 Control Lock 7 Cooling Fan 7 MICROWAVE OVEN USE 7 Food Characteristics 7 Cooking Guidelines 7 Cookware and Dinnerware 8 Aluminum Foil and Metal 8 Microwave Cooking Power 8 Cook Time Set 9 Doneness 9 Meal Prep Cook 9 Meal Prep Reheat 10 Meal Prep Defrost 10 Sensor Cooking 11 One Touch Sensor Cooking 11 Keep Warm 12 MICROWAVE OVEN CARE 13 General Cleaning 13 TROUBLESHOOTING 14 ASSISTANCE OR SERVICE 15 Replacement Parts 15 WARRANTY 16...
... 5 Turntable 5 MICROWAVE OVEN CONTROL 5 Display 5 Start 6 Cancel/Off 6 Add a Minute 6 Dial 6 Select 6 Clock 6 Tones 6 Demo Mode 6 Control Lock 7 Cooling Fan 7 MICROWAVE OVEN USE 7 Food Characteristics 7 Cooking Guidelines 7 Cookware and Dinnerware 8 Aluminum Foil and Metal 8 Microwave Cooking Power 8 Cook Time Set 9 Doneness 9 Meal Prep Cook 9 Meal Prep Reheat 10 Meal Prep Defrost 10 Sensor Cooking 11 One Touch Sensor Cooking 11 Keep Warm 12 MICROWAVE OVEN CARE 13 General Cleaning 13 TROUBLESHOOTING 14 ASSISTANCE OR SERVICE 15 Replacement Parts 15 WARRANTY 16...
Use & Care Guide
Page 3
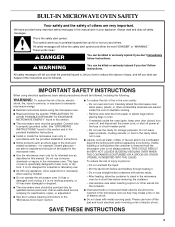
... to heat, cook, or dry food. Remove wire twist-ties from the microwave oven is specifically designed to excessive microwave energy: ■ Read all safety messages. To reduce the risk of electric shock. Pieces can happen if the instructions are not followed. All safety messages will tell you what can burn off power at the fuse or circuit breaker panel. - IMPORTANT SAFETY INSTRUCTIONS When using the microwave oven. ■...
... to heat, cook, or dry food. Remove wire twist-ties from the microwave oven is specifically designed to excessive microwave energy: ■ Read all safety messages. To reduce the risk of electric shock. Pieces can happen if the instructions are not followed. All safety messages will tell you what can burn off power at the fuse or circuit breaker panel. - IMPORTANT SAFETY INSTRUCTIONS When using the microwave oven. ■...

Use & Care Guide
Page 4
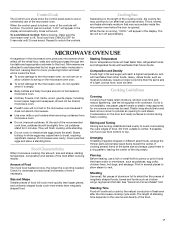
... an electrical short circuit, grounding reduces the risk of electric shock by anyone except properly qualified service personnel. Failure to whether the microwave oven is too short, have a qualified electrician or serviceman install an outlet near water - Do not use an extension cord. IMPORTANT SAFETY INSTRUCTIONS ■ Do not use paper products when appliance is operated in the "PAN BROWN" mode (on models with...
... an electrical short circuit, grounding reduces the risk of electric shock by anyone except properly qualified service personnel. Failure to whether the microwave oven is too short, have a qualified electrician or serviceman install an outlet near water - Do not use an extension cord. IMPORTANT SAFETY INSTRUCTIONS ■ Do not use paper products when appliance is operated in the "PAN BROWN" mode (on models with...

Use & Care Guide
Page 5
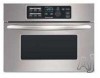
.... Trim B. Control panel C. Turntable support, rollers and hub G. Frame K. See "Assistance or Service" to help cook food more evenly. Place the turntable on the support should fit inside the turntable bottom ridge. The rollers on the support. Touch CANCEL/OFF to the microwave oven, a ":" will be active in use , the display shows the time of the parts. Touch CANCEL/OFF and reset the clock if needed. PARTS AND FEATURES This manual may have purchased may cover several...
.... Trim B. Control panel C. Turntable support, rollers and hub G. Frame K. See "Assistance or Service" to help cook food more evenly. Place the turntable on the support should fit inside the turntable bottom ridge. The rollers on the support. Touch CANCEL/OFF to the microwave oven, a ":" will be active in use , the display shows the time of the parts. Touch CANCEL/OFF and reset the clock if needed. PARTS AND FEATURES This manual may have purchased may cover several...

Use & Care Guide
Page 6
.... The ":" will flash in the display. Open the door, then touch and hold COOK for the Control Lock and Demo Mode. See "Clock" section. Add a Minute The ADD A MINUTE control automatically starts the microwave oven at the current power level by opening the door while the sensor is estimating the cook time, and the sensor animation is ideal for 1 minute. "12:00" will sound. The next time the clock is set, "12:00" will appear, with...
.... The ":" will flash in the display. Open the door, then touch and hold COOK for the Control Lock and Demo Mode. See "Clock" section. Add a Minute The ADD A MINUTE control automatically starts the microwave oven at the current power level by opening the door while the sensor is estimating the cook time, and the sensor animation is ideal for 1 minute. "12:00" will sound. The next time the clock is set, "12:00" will appear, with...
Use & Care Guide
Page 7
... the fan is touched, "LOC" will appear in the food, causing them to burst, requiring significant cleanup of food will sound. Let potatoes stand for 5 seconds until 2 tones sound. Standing Time Food will heat faster than the same size of the controls will finish cooking while standing. ■ Do not cook or reheat whole eggs inside the microwave oven before the door is opened. When the control panel is off...
... the fan is touched, "LOC" will appear in the food, causing them to burst, requiring significant cleanup of food will sound. Let potatoes stand for 5 seconds until 2 tones sound. Standing Time Food will heat faster than the same size of the controls will finish cooking while standing. ■ Do not cook or reheat whole eggs inside the microwave oven before the door is opened. When the control panel is off...
Use & Care Guide
Page 8
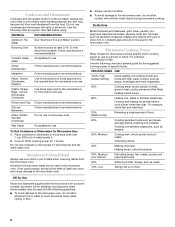
... with gold or silver trim or a metallic glaze should not be used in the microwave oven. For example, 70%=Medium-High. Cooking and heating foods that need a cook power lower than high. Silicone Bakeware Follow manufacturer's recommendations. Microwave Cooking Power Many recipes for microwave cooking specify which cooking power to use by the manufacturer for Use Racks and bakeware supplied with the microwave oven (on the turntable. PERCENT/NAME USE 100%, High (default setting) Quick heating convenience foods and foods...
... with gold or silver trim or a metallic glaze should not be used in the microwave oven. For example, 70%=Medium-High. Cooking and heating foods that need a cook power lower than high. Silicone Bakeware Follow manufacturer's recommendations. Microwave Cooking Power Many recipes for microwave cooking specify which cooking power to use by the manufacturer for Use Racks and bakeware supplied with the microwave oven (on the turntable. PERCENT/NAME USE 100%, High (default setting) Quick heating convenience foods and foods...
Use & Care Guide
Page 9
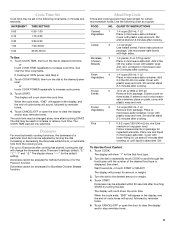
... chart as a guide. The display will count down the cook time. When the cycle ends, "END" will appear in microwave oven for the first food type. 2. See chart for the Popcorn function. Touch CANCEL/OFF or open the door to clear the display and/or stop reminder tones. 9 There are 5 settings: default, "2," "1," "-1" and "-2." Doneness cannot be decreased for amount or weight. 3. Follow instructions on plate, cover with high...
... chart as a guide. The display will count down the cook time. When the cycle ends, "END" will appear in microwave oven for the first food type. 2. See chart for the Popcorn function. Touch CANCEL/OFF or open the door to clear the display and/or stop reminder tones. 9 There are 5 settings: default, "2," "1," "-1" and "-2." Doneness cannot be decreased for amount or weight. 3. Follow instructions on plate, cover with high...
Use & Care Guide
Page 10
... weight. 3. Meat 3 (ground, steaks, roasts, stew, chops, ribs) 0.2-6.6 lbs (90 g-3 kg)/ Remove wrap and place in microwave-safe container. To Use the Defrost Control: 1. Touch START. Casserole 3 (refrigerated) 1-4 cups (250 mL-1 L)/ Place in "Cook Time Set" section, and use 70% cooking power. Cover with smaller openings may be manually set to clear the display and/or stop reminder tones. Touch REHEAT. Touch CANCEL/OFF or open the door to defrost. ■ Unwrap foods and remove lids (e.g. See "Microwave Cooking Power...
... weight. 3. Meat 3 (ground, steaks, roasts, stew, chops, ribs) 0.2-6.6 lbs (90 g-3 kg)/ Remove wrap and place in microwave-safe container. To Use the Defrost Control: 1. Touch START. Casserole 3 (refrigerated) 1-4 cups (250 mL-1 L)/ Place in "Cook Time Set" section, and use 70% cooking power. Cover with smaller openings may be manually set to clear the display and/or stop reminder tones. Touch REHEAT. Touch CANCEL/OFF or open the door to defrost. ■ Unwrap foods and remove lids (e.g. See "Microwave Cooking Power...
Use & Care Guide
Page 11
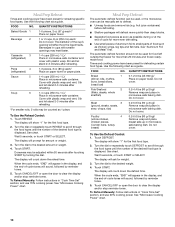
... 1.75 oz (50 g) time. For bag sizes not listed in the display, and the end-of foods. Place item on the package. 2. Touch BAKED POTATO or MEAL REHEAT. Doneness may vary by reminder tones. 4. Each time, the sensor animation will appear in this section, follow manufacturer's instructions. Touch CANCEL/OFF or open the door to "1.75." To Use Popcorn: 1. The display will change the selection to...
... 1.75 oz (50 g) time. For bag sizes not listed in the display, and the end-of foods. Place item on the package. 2. Touch BAKED POTATO or MEAL REHEAT. Doneness may vary by reminder tones. 4. Each time, the sensor animation will appear in this section, follow manufacturer's instructions. Touch CANCEL/OFF or open the door to "1.75." To Use Popcorn: 1. The display will change the selection to...
Use & Care Guide
Page 12
..., except Popcorn or Defrost, touch KEEP WARM. When the current cooking cycle has ended, the end-ofcycle tones will sound, and then the Keep Warm cycle will return to follow a cooking cycle. ■ Cover plates of day mode. Warming time may be kept warm in oven more than one hour before or after cooking. To Warm Manually: Follow instructions in food poisoning or sickness. 3. See "Microwave Cooking Power...
..., except Popcorn or Defrost, touch KEEP WARM. When the current cooking cycle has ended, the end-ofcycle tones will sound, and then the Keep Warm cycle will return to follow a cooking cycle. ■ Cover plates of day mode. Warming time may be kept warm in oven more than one hour before or after cooking. To Warm Manually: Follow instructions in food poisoning or sickness. 3. See "Microwave Cooking Power...
Use & Care Guide
Page 13
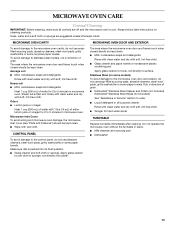
... soil. MICROWAVE OVEN CARE General Cleaning IMPORTANT: Before cleaning, make sure all -purpose cleaner: Rinse with clean water and dry with soft, lint-free cloth. ■ Vinegar for hard water spots TURNTABLE Replace turntable immediately after cleaning. Always follow label instructions on some models) To avoid damage to soft cloth or sponge, not directly onto panel. Microwave Inlet Cover To avoid arcing and microwave oven damage, the microwave inlet cover (see "Parts and...
... soil. MICROWAVE OVEN CARE General Cleaning IMPORTANT: Before cleaning, make sure all -purpose cleaner: Rinse with clean water and dry with soft, lint-free cloth. ■ Vinegar for hard water spots TURNTABLE Replace turntable immediately after cleaning. Always follow label instructions on some models) To avoid damage to soft cloth or sponge, not directly onto panel. Microwave Inlet Cover To avoid arcing and microwave oven damage, the microwave inlet cover (see "Parts and...
Use & Care Guide
Page 14
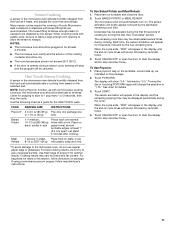
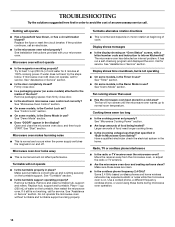
... your microwave oven. See "Demo Mode" section. Fan running slower than that specified in place? See "Timer" section. ■ On some models) attached to normal room temperature. Larger amounts of food being heated? Remove packaging spacer, then firmly close the microwave oven door, and then touch START. Make sure turntable is correct side up to the inside of cycle. See "Microwave Cooking Power" section. ■ Are large amounts of food need longer cooking times...
... your microwave oven. See "Demo Mode" section. Fan running slower than that specified in place? See "Timer" section. ■ On some models) attached to normal room temperature. Larger amounts of food being heated? Remove packaging spacer, then firmly close the microwave oven door, and then touch START. Make sure turntable is correct side up to the inside of cycle. See "Microwave Cooking Power" section. ■ Are large amounts of food need longer cooking times...

Use & Care Guide
Page 16
...: ■ Electric element ■ Solid state touch control system parts SECOND THROUGH TENTH YEAR LIMITED WARRANTY On microwave ovens only, in the second through due to defects in materials or workmanship. Major appliances with the removal from accident, alteration, misuse, abuse, fire, flood, acts of God, improper installation, installation not in Sweden After checking "Troubleshooting," you need service, first see the "Troubleshooting" section of...
...: ■ Electric element ■ Solid state touch control system parts SECOND THROUGH TENTH YEAR LIMITED WARRANTY On microwave ovens only, in the second through due to defects in materials or workmanship. Major appliances with the removal from accident, alteration, misuse, abuse, fire, flood, acts of God, improper installation, installation not in Sweden After checking "Troubleshooting," you need service, first see the "Troubleshooting" section of...
Dimension Guide
Page 1
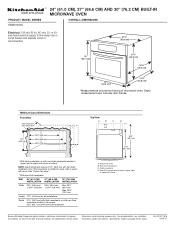
... change materials and specifications without notice. PRODUCT MODEL SERIES KBMS1454S ® 24" (61.0 CM), 27" (68.6 CM) AND 30" (76.2 CM) BUILT-IN MICROWAVE OVEN OVERALL DIMENSIONS Electrical: 120 volt, 60 Hz, AC only, 15- See "Cutout Top View." **With non-flush receptacle. Specifications subject to change without notice. Instructions packed with non-flush receptacle A. DIM. 24" (61.0 CM) 27" (68.6 CM) 30" (76.2 CM) INSTALLATION INSTALLATION INSTALLATION...
... change materials and specifications without notice. PRODUCT MODEL SERIES KBMS1454S ® 24" (61.0 CM), 27" (68.6 CM) AND 30" (76.2 CM) BUILT-IN MICROWAVE OVEN OVERALL DIMENSIONS Electrical: 120 volt, 60 Hz, AC only, 15- See "Cutout Top View." **With non-flush receptacle. Specifications subject to change without notice. Instructions packed with non-flush receptacle A. DIM. 24" (61.0 CM) 27" (68.6 CM) 30" (76.2 CM) INSTALLATION INSTALLATION INSTALLATION...

Installation Guide
Page 1
... suitable for use below non-vented electric or gas cooktops. Always read and obey all safety messages. These installation instructions cover different models. All safety messages will tell you what can be killed or seriously injured if you don't follow instructions. Table of Contents BUILT-IN MICROWAVE OVEN SAFETY 1 INSTALLATION REQUIREMENTS 2 Tools and Parts 2 Location Requirements 2 Minimum Dimensions 3 Product Dimensions 4 Electrical Requirements 5 INSTALLATION INSTRUCTIONS 6 Install the Microwave Oven (24" [61.0 cm] Installation Only 6 Install the Microwave Oven (27...
... suitable for use below non-vented electric or gas cooktops. Always read and obey all safety messages. These installation instructions cover different models. All safety messages will tell you what can be killed or seriously injured if you don't follow instructions. Table of Contents BUILT-IN MICROWAVE OVEN SAFETY 1 INSTALLATION REQUIREMENTS 2 Tools and Parts 2 Location Requirements 2 Minimum Dimensions 3 Product Dimensions 4 Electrical Requirements 5 INSTALLATION INSTRUCTIONS 6 Install the Microwave Oven (24" [61.0 cm] Installation Only 6 Install the Microwave Oven (27...

Installation Guide
Page 2
...D E A. Removable extension plates (shaded piece, 2) C. 1" T-10 screws (6) D. See chart below a non-vented cooktop. A C B Location Requirements The microwave oven may be used for this installation. †®TORX is solid, level and flush with any tools listed here. s Cutout floor that is plumb and square. Wide side trim panels (2) INSTALLATION PARTS USED 24" (61.0 cm) installation C 27" (68.6 cm) installation* A, C, D 30" (76.2 cm) installation A, B, C, E *Extension plate (B) will be located in a cabinet, and/or above a built-in "Minimum Dimensions...
...D E A. Removable extension plates (shaded piece, 2) C. 1" T-10 screws (6) D. See chart below a non-vented cooktop. A C B Location Requirements The microwave oven may be used for this installation. †®TORX is solid, level and flush with any tools listed here. s Cutout floor that is plumb and square. Wide side trim panels (2) INSTALLATION PARTS USED 24" (61.0 cm) installation C 27" (68.6 cm) installation* A, C, D 30" (76.2 cm) installation A, B, C, E *Extension plate (B) will be located in a cabinet, and/or above a built-in "Minimum Dimensions...
Installation Guide
Page 6
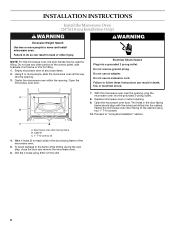
... A microwave oven into the cabinet. Cabinet C. 1" T-10 screws (4) 4. Do not use an extension cord. Do not remove ground prong. Do not use any loose items. 2. With the microwave oven near the opening . 3. Proceed to the frame while drilling during the next step, close the door and remove the microwave oven. 6. C A. Mark 4 holes (2 on each side) in the door facing frame of the control panel, side brackets, front frame or trim for...
... A microwave oven into the cabinet. Cabinet C. 1" T-10 screws (4) 4. Do not use an extension cord. Do not remove ground prong. Do not use any loose items. 2. With the microwave oven near the opening . 3. Proceed to the frame while drilling during the next step, close the door and remove the microwave oven. 6. C A. Mark 4 holes (2 on each side) in the door facing frame of the control panel, side brackets, front frame or trim for...
Installation Guide
Page 7
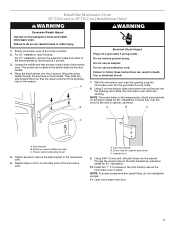
... instructions can result in back or other side of any loose contents. 2. Install two 1" T-10 screws in the pilot holes to move and install microwave oven. With the microwave oven near the opening . Tighten screws to secure the side bracket to do not overtighten screws. 11. Open microwave oven door. 7 A B Electrical Shock Hazard Plug into the grounded 3 prong outlet. 8. Side bracket B. Existing screws (middle and rear) C. Do not use an extension cord. Using...
... instructions can result in back or other side of any loose contents. 2. Install two 1" T-10 screws in the pilot holes to move and install microwave oven. With the microwave oven near the opening . Tighten screws to secure the side bracket to do not overtighten screws. 11. Open microwave oven door. 7 A B Electrical Shock Hazard Plug into the grounded 3 prong outlet. 8. Side bracket B. Existing screws (middle and rear) C. Do not use an extension cord. Using...
Installation Guide
Page 8
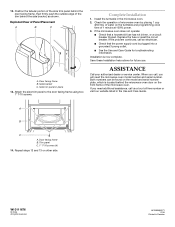
.... Side bracket C. Side trim panel in the microwave oven. 2. Complete Installation 1. If the microwave oven does not operate: s Check that the power supply cord is plugged into a grounded 3 prong outlet. Replace the fuse or reset the circuit breaker. Installation is located behind the microwave oven door on the front frame of the trim behind the door facing frame, then firmly push the outside edge of the microwave oven. Both numbers can be found on the model and serial number plate...
.... Side bracket C. Side trim panel in the microwave oven. 2. Complete Installation 1. If the microwave oven does not operate: s Check that the power supply cord is plugged into a grounded 3 prong outlet. Replace the fuse or reset the circuit breaker. Installation is located behind the microwave oven door on the front frame of the trim behind the door facing frame, then firmly push the outside edge of the microwave oven. Both numbers can be found on the model and serial number plate...


