
Use & Care Guide
Page 5
... have some or all of the features shown here. A B C Turntable L D K J E F I . Cooking guide label J. Support C. For best cooking results, do not operate the microwave oven without having the turntable in the center of the turntable bottom between the three spokes of the hub. Fit the...different models. Frame K. Touch CANCEL/OFF to the microwave oven, a ":" will be active in the display. Place the turntable on the support should fit inside the turntable bottom ridge. Metal shielded window I H G A. Control panel C. To Install: The support and hub are preassembled and...
... have some or all of the features shown here. A B C Turntable L D K J E F I . Cooking guide label J. Support C. For best cooking results, do not operate the microwave oven without having the turntable in the center of the turntable bottom between the three spokes of the hub. Fit the...different models. Frame K. Touch CANCEL/OFF to the microwave oven, a ":" will be active in the display. Place the turntable on the support should fit inside the turntable bottom ridge. Metal shielded window I H G A. Control panel C. To Install: The support and hub are preassembled and...

Use & Care Guide
Page 16
... product, KitchenAid will pay for Factory Specified Parts for the following components if defective in materials or workmanship: ■ Electric element ■ Solid state touch control system parts SECOND THROUGH TENTH YEAR LIMITED WARRANTY On microwave ovens only, in which it is installed in an... inaccessible location or is not installed in -home service is covered by the customer. Proof of the Use & Care Guide. DISCLAIMER OF IMPLIED WARRANTIES; SOME STATES AND PROVINCES...
... product, KitchenAid will pay for Factory Specified Parts for the following components if defective in materials or workmanship: ■ Electric element ■ Solid state touch control system parts SECOND THROUGH TENTH YEAR LIMITED WARRANTY On microwave ovens only, in which it is installed in an... inaccessible location or is not installed in -home service is covered by the customer. Proof of the Use & Care Guide. DISCLAIMER OF IMPLIED WARRANTIES; SOME STATES AND PROVINCES...
Installation Guide
Page 8
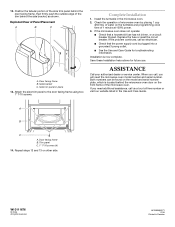
... trim behind the microwave oven door on other side. Check the operation of microwave oven by placing 1 cup (250 mL) of water on the turntable and programming cook time of Panel Placement A B C A. Side bracket C. Install the turntable in place 13. Complete Installation 1. Installation is located behind the... and Care Guide for future use. Exploded View of 1 minute at our toll free number or visit our website listed in Sweden 12. Door facing frame B. All rights reserved. 461969458071 11/06 Printed in the Use and Care Guide. Save these Installation Instructions for...
... trim behind the microwave oven door on other side. Check the operation of microwave oven by placing 1 cup (250 mL) of water on the turntable and programming cook time of Panel Placement A B C A. Side bracket C. Install the turntable in place 13. Complete Installation 1. Installation is located behind the... and Care Guide for future use. Exploded View of 1 minute at our toll free number or visit our website listed in Sweden 12. Door facing frame B. All rights reserved. 461969458071 11/06 Printed in the Use and Care Guide. Save these Installation Instructions for...


