Use & Care Guide
Page 3
... designed to stand in the microwave oven for its intended use . ■ As with the provided Installation Instructions. ■ Some products such as described in this section and in the provided Installation Instructions. ■ Install or locate the microwave oven only in the microwave oven. Visible bubbling or boiling when...shock, fire, injury to persons, or exposure to explode and should be serviced only by children. ■ Do not operate the microwave oven if it has a damaged cord or plug, if it is , tell you how to facilitate cooking. - All safety messages will ...
... designed to stand in the microwave oven for its intended use . ■ As with the provided Installation Instructions. ■ Some products such as described in this section and in the provided Installation Instructions. ■ Install or locate the microwave oven only in the microwave oven. Visible bubbling or boiling when...shock, fire, injury to persons, or exposure to explode and should be serviced only by children. ■ Do not operate the microwave oven if it has a damaged cord or plug, if it is , tell you how to facilitate cooking. - All safety messages will ...

Use & Care Guide
Page 4
... into an outlet that there is too short, have a qualified electrician or serviceman install an outlet near water - Observe all cord connected appliances: The microwave oven must be grounded. Required: ■ A 120 Volt, 60 Hz, AC only, 15- The microwave oven is properly installed and grounded. IMPORTANT SAFETY INSTRUCTIONS ■ Do not use paper products when...
... into an outlet that there is too short, have a qualified electrician or serviceman install an outlet near water - Observe all cord connected appliances: The microwave oven must be grounded. Required: ■ A 120 Volt, 60 Hz, AC only, 15- The microwave oven is properly installed and grounded. IMPORTANT SAFETY INSTRUCTIONS ■ Do not use paper products when...

Use & Care Guide
Page 5
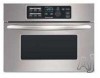
... shows the time of the parts. The model you have some or all of the features shown here. Frame K. Microwave oven light (inaccessible-in place. To Install: The support and hub are preassembled and installed in use , the display shows cooking power, quantities, weights and/or prompts. Place the turntable on the support should...
... shows the time of the parts. The model you have some or all of the features shown here. Frame K. Microwave oven light (inaccessible-in place. To Install: The support and hub are preassembled and installed in use , the display shows cooking power, quantities, weights and/or prompts. Place the turntable on the support should...
Use & Care Guide
Page 14
... the display? See Installation Instructions provided with a letter/number code and instruction to normal room temperature. If microwave oven still does not operate, call an electrician. ■ Is the microwave oven wired properly? Larger amounts of food being heated? See "Microwave Oven Control" section. ■ On some models, is correct side up to inform KitchenAid? See "Start" section...
... the display? See Installation Instructions provided with a letter/number code and instruction to normal room temperature. If microwave oven still does not operate, call an electrician. ■ Is the microwave oven wired properly? Larger amounts of food being heated? See "Microwave Oven Control" section. ■ On some models, is correct side up to inform KitchenAid? See "Start" section...
Use & Care Guide
Page 15
...Please include a daytime phone number in your nearest KitchenAid designated service center. KitchenAid designated service technicians are made with the same precision used to KitchenAid with : ■ Features and specifications on our full line of appliances. ■ Installation information. ■ Use and maintenance procedures. ... in the United States. For further assistance If you need help us or your telephone directory Yellow Pages. Call the KitchenAid Customer eXperience Center toll free: 1-800-422-1230. When calling, please know the purchase date and the complete model ...
...Please include a daytime phone number in your nearest KitchenAid designated service center. KitchenAid designated service technicians are made with the same precision used to KitchenAid with : ■ Features and specifications on our full line of appliances. ■ Installation information. ■ Use and maintenance procedures. ... in the United States. For further assistance If you need help us or your telephone directory Yellow Pages. Call the KitchenAid Customer eXperience Center toll free: 1-800-422-1230. When calling, please know the purchase date and the complete model ...

Use & Care Guide
Page 16
... system parts SECOND THROUGH TENTH YEAR LIMITED WARRANTY On microwave ovens only, in the second through due to correct defects in -home service is required to be easily determined. Service calls to KitchenAid within 30 days from the date of purchase. 6. Costs associated with published installation instructions. 10. Expenses for travel and transportation for...
... system parts SECOND THROUGH TENTH YEAR LIMITED WARRANTY On microwave ovens only, in the second through due to correct defects in -home service is required to be easily determined. Service calls to KitchenAid within 30 days from the date of purchase. 6. Costs associated with published installation instructions. 10. Expenses for travel and transportation for...
Dimension Guide
Page 1
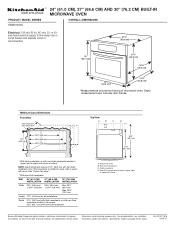
... and separate circuit is located in upper right or upper left corner. See "Cutout Top View." **With non-flush receptacle. DIM. 24" (61.0 CM) 27" (68.6 CM) 30" (76.2 CM) INSTALLATION INSTALLATION INSTALLATION Width 22¹⁄₄" (56.5 cm) ± 3/16" (4.8 mm) 25³⁄₄" (65.4 cm) ±...are for all installations Depth 21³⁄₄" (55.2 cm) with flush receptacle, or with non-flush receptacle located in far corner; 26¹⁄₄" (66.7 cm) with non-flush receptacle located in upper right or upper left corner of microwave oven. W10111676 06-05...
... and separate circuit is located in upper right or upper left corner. See "Cutout Top View." **With non-flush receptacle. DIM. 24" (61.0 CM) 27" (68.6 CM) 30" (76.2 CM) INSTALLATION INSTALLATION INSTALLATION Width 22¹⁄₄" (56.5 cm) ± 3/16" (4.8 mm) 25³⁄₄" (65.4 cm) ±...are for all installations Depth 21³⁄₄" (55.2 cm) with flush receptacle, or with non-flush receptacle located in far corner; 26¹⁄₄" (66.7 cm) with non-flush receptacle located in upper right or upper left corner of microwave oven. W10111676 06-05...

Installation Guide
Page 1
... 2 Minimum Dimensions 3 Product Dimensions 4 Electrical Requirements 5 INSTALLATION INSTRUCTIONS 6 Install the Microwave Oven (24" [61.0 cm] Installation Only 6 Install the Microwave Oven (27" [68.6 cm] or 30" [76.2 cm] Installation Only 7 Complete Installation 8 ASSISTANCE 8 BUILT-IN MICROWAVE OVEN SAFETY Your safety and the safety of others . Always read...of your particular model may differ slightly from the illustrations in this manual and on your appliance. BUILT-IN MICROWAVE OVEN INSTALLATION INSTRUCTIONS 24" (61.0 cm), 27" (68.6 cm), 30" (76.2 cm) This product is , tell...
... 2 Minimum Dimensions 3 Product Dimensions 4 Electrical Requirements 5 INSTALLATION INSTRUCTIONS 6 Install the Microwave Oven (24" [61.0 cm] Installation Only 6 Install the Microwave Oven (27" [68.6 cm] or 30" [76.2 cm] Installation Only 7 Complete Installation 8 ASSISTANCE 8 BUILT-IN MICROWAVE OVEN SAFETY Your safety and the safety of others . Always read...of your particular model may differ slightly from the illustrations in this manual and on your appliance. BUILT-IN MICROWAVE OVEN INSTALLATION INSTRUCTIONS 24" (61.0 cm), 27" (68.6 cm), 30" (76.2 cm) This product is , tell...

Installation Guide
Page 2
... of Textron Innovations Inc. 2 Wide side trim panels (2) INSTALLATION PARTS USED 24" (61.0 cm) installation C 27" (68.6 cm) installation* A, C, D 30" (76.2 cm) installation A, B, C, E *Extension plate (B) will be removed from side bracket (A) for installation location. The location must provide: s Wood cabinetry. s Cutout floor that is a registered trademark of the microwave oven. See "Electrical Requirements" section. s Cutout opening where the...
... of Textron Innovations Inc. 2 Wide side trim panels (2) INSTALLATION PARTS USED 24" (61.0 cm) installation C 27" (68.6 cm) installation* A, C, D 30" (76.2 cm) installation A, B, C, E *Extension plate (B) will be removed from side bracket (A) for installation location. The location must provide: s Wood cabinetry. s Cutout floor that is a registered trademark of the microwave oven. See "Electrical Requirements" section. s Cutout opening where the...
Installation Guide
Page 3
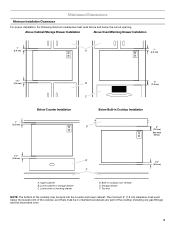
... the cooktop (including any part of the cooktop may be no interference between any gas fittings) and the microwave oven. 3 Built-in Cooktop Installation D 3" (7.6 cm) See note below the lowest point of the cooktop, and there must be sunk into... the counter and lower cabinet. Lower oven or warming drawer D. Storage drawer F. Above Cabinet/Storage Drawer Installation Above Oven/Warming Drawer Installation 1" (2.5 cm) A 1" (2.5 cm) 1¹⁄₂" (3.8 cm) 1" (2.5 cm) Below Counter Installation B 3" (7.6 cm) C Below Built-in cooktop (non...
... the cooktop (including any part of the cooktop may be no interference between any gas fittings) and the microwave oven. 3 Built-in Cooktop Installation D 3" (7.6 cm) See note below the lowest point of the cooktop, and there must be sunk into... the counter and lower cabinet. Lower oven or warming drawer D. Storage drawer F. Above Cabinet/Storage Drawer Installation Above Oven/Warming Drawer Installation 1" (2.5 cm) A 1" (2.5 cm) 1¹⁄₂" (3.8 cm) 1" (2.5 cm) Below Counter Installation B 3" (7.6 cm) C Below Built-in cooktop (non...
Installation Guide
Page 4
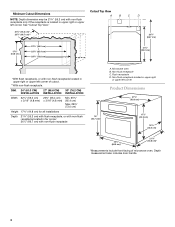
...24" (61.0 CM) 27" (68.6 CM) 30" (76.2 CM) INSTALLATION INSTALLATION INSTALLATION Width 22¹⁄₄" (56.5 cm) ± 3/16" (4.8 mm) 25³⁄₄" (65.4 cm) ± 3/16" (4.8 mm) Min. 25³⁄₄" (65.4 cm) Max. 28³⁄₄" (73.0 cm) Height 17⁵⁄₈" (44.8 cm) for all installations... dimension may be 21³⁄₄" (55.2 cm) with non-flush receptacle 18" (45.7 cm)* A. Microwave oven B. Non-flush receptacle C. Depth measurement also includes door handle. 4 Non-flush receptacle located in upper right or upper...
...24" (61.0 CM) 27" (68.6 CM) 30" (76.2 CM) INSTALLATION INSTALLATION INSTALLATION Width 22¹⁄₄" (56.5 cm) ± 3/16" (4.8 mm) 25³⁄₄" (65.4 cm) ± 3/16" (4.8 mm) Min. 25³⁄₄" (65.4 cm) Max. 28³⁄₄" (73.0 cm) Height 17⁵⁄₈" (44.8 cm) for all installations... dimension may be 21³⁄₄" (55.2 cm) with non-flush receptacle 18" (45.7 cm)* A. Microwave oven B. Non-flush receptacle C. Depth measurement also includes door handle. 4 Non-flush receptacle located in upper right or upper...
Installation Guide
Page 5
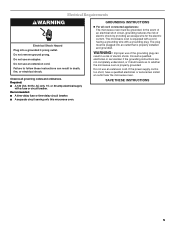
Do not remove ground prong. Recommended: s A time-delay fuse or time-delay circuit breaker. The microwave oven is properly installed and grounded. Consult a qualified electrician or serviceman if the grounding instructions are not completely understood, or if doubt ... with a fuse or circuit breaker. Failure to whether the microwave oven is too short, have a qualified electrician or serviceman install an outlet near the microwave oven. or 20-amp electrical supply with a grounding plug. s A separate circuit serving only this microwave oven. Do not use an adapter. In the event of an...
Do not remove ground prong. Recommended: s A time-delay fuse or time-delay circuit breaker. The microwave oven is properly installed and grounded. Consult a qualified electrician or serviceman if the grounding instructions are not completely understood, or if doubt ... with a fuse or circuit breaker. Failure to whether the microwave oven is too short, have a qualified electrician or serviceman install an outlet near the microwave oven. or 20-amp electrical supply with a grounding plug. s A separate circuit serving only this microwave oven. Do not use an adapter. In the event of an...
Installation Guide
Page 6
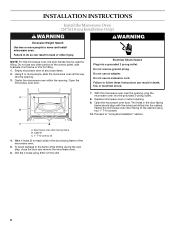
.... 1. Using 2 or more people to follow these instructions can result in back or other portion of the microwave oven. 5. INSTALLATION INSTRUCTIONS Install the Microwave Oven (24" [61.0 cm] Installation Only) WARNING WARNING Excessive Weight Hazard Use two or more people, slide the microwave oven all the way into the opening. 3. Failure to the cabinet using 5/64" (2 mm) drill. 6 Do not...
.... 1. Using 2 or more people to follow these instructions can result in back or other portion of the microwave oven. 5. INSTALLATION INSTRUCTIONS Install the Microwave Oven (24" [61.0 cm] Installation Only) WARNING WARNING Excessive Weight Hazard Use two or more people, slide the microwave oven all the way into the opening. 3. Failure to the cabinet using 5/64" (2 mm) drill. 6 Do not...
Installation Guide
Page 7
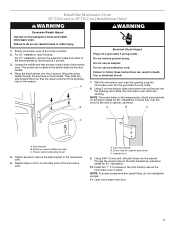
... the grounded 3 prong outlet. 8. Then slide the side bracket down so that the upper portions of the microwave oven. Using 2 or more people to the microwave oven. 6. Tighten screws to secure the side bracket to move and install microwave oven. Open microwave oven door. 7 Loosen the middle and rear screws on the bracket. A B Electrical Shock Hazard Plug into the...
... the grounded 3 prong outlet. 8. Then slide the side bracket down so that the upper portions of the microwave oven. Using 2 or more people to the microwave oven. 6. Tighten screws to secure the side bracket to move and install microwave oven. Open microwave oven door. 7 Loosen the middle and rear screws on the bracket. A B Electrical Shock Hazard Plug into the...
Installation Guide
Page 8
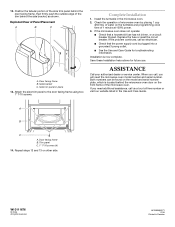
...panel C. 1" T-10 screws (4) 14. All rights reserved. 461969458071 11/06 Printed in the microwave oven. 2. Install the turntable in Sweden When you need the microwave oven model number and serial number. Door facing frame B. 12. Attach the side trim panel to ...B. Replace the fuse or reset the circuit breaker. Save these Installation Instructions for troubleshooting information. Repeat steps 12 and 13 on the turntable and programming cook time of the microwave oven. A B C A. Check the operation of microwave oven by placing 1 cup (250 mL) of Panel Placement A ...
...panel C. 1" T-10 screws (4) 14. All rights reserved. 461969458071 11/06 Printed in the microwave oven. 2. Install the turntable in Sweden When you need the microwave oven model number and serial number. Door facing frame B. 12. Attach the side trim panel to ...B. Replace the fuse or reset the circuit breaker. Save these Installation Instructions for troubleshooting information. Repeat steps 12 and 13 on the turntable and programming cook time of the microwave oven. A B C A. Check the operation of microwave oven by placing 1 cup (250 mL) of Panel Placement A ...

