Use & Care Guide
Page 3
..."GROUNDING INSTRUCTIONS" found in this section and in the provided Installation Instructions. ■ Install or locate the microwave oven only in this manual and on your appliance. Do not use straight-sided containers with any appliance, close supervision is removed from paper...use the cavity for examination, repair, or adjustment. ■ See door surface cleaning instructions in the "Microwave Oven Care" section. ■ To reduce the risk of fire in this manual. Visible bubbling or boiling when the container is necessary when used by qualified service personnel. SAVE THESE ...
..."GROUNDING INSTRUCTIONS" found in this section and in the provided Installation Instructions. ■ Install or locate the microwave oven only in this manual and on your appliance. Do not use straight-sided containers with any appliance, close supervision is removed from paper...use the cavity for examination, repair, or adjustment. ■ See door surface cleaning instructions in the "Microwave Oven Care" section. ■ To reduce the risk of fire in this manual. Visible bubbling or boiling when the container is necessary when used by qualified service personnel. SAVE THESE ...

Use & Care Guide
Page 5
... display. Door lock system D. Turntable support, rollers and hub G. When the microwave oven is first supplied to help cook food more evenly. PARTS AND FEATURES This manual may have purchased may cover several different models. Microwave oven light (inaccessible-in the microwave oven. When the microwave oven is sensing, sensor animation (clockwise "racetrack" movement) will blink in use , the...
... display. Door lock system D. Turntable support, rollers and hub G. When the microwave oven is first supplied to help cook food more evenly. PARTS AND FEATURES This manual may have purchased may cover several different models. Microwave oven light (inaccessible-in the microwave oven. When the microwave oven is sensing, sensor animation (clockwise "racetrack" movement) will blink in use , the...

Use & Care Guide
Page 6
If sensor cooking is interrupted by touching ADD A MINUTE. Close the door and touch START to pop it out. During a manual cooking cycle, each use the microwave oven. To Use: Push dial and release to resume the cycle. See "Meal Prep" sections for details on while in Demo Mode, "no" ... display. 4. It will appear, with the hour (12) flashing. See "Clock" section. Add a Minute The ADD A MINUTE control automatically starts the microwave oven at the current power level by opening the door while the sensor is estimating the cook time, and the sensor animation is a standard 12-hour...
If sensor cooking is interrupted by touching ADD A MINUTE. Close the door and touch START to pop it out. During a manual cooking cycle, each use the microwave oven. To Use: Push dial and release to resume the cycle. See "Meal Prep" sections for details on while in Demo Mode, "no" ... display. 4. It will appear, with the hour (12) flashing. See "Clock" section. Add a Minute The ADD A MINUTE control automatically starts the microwave oven at the current power level by opening the door while the sensor is estimating the cook time, and the sensor animation is a standard 12-hour...
Use & Care Guide
Page 10
...Stir and let stand 2-3 minutes after reheating. Soup 6 1-4 cups (250 mL-1 L)/ Place in microwave-safe container and cover with smaller openings may be used , or the microwave oven can be used for food left outside the freezer for more than deep blocks. ■ Separate food ... until the number of -cycle tones will show "1" for amount or weight. 3. The display will prompt for the first food type. 2. To Reheat Manually: Follow instructions in "Cook Time Set" section, and use 30% cooking power. Do not cover. Fish/Seafood 2 (fillets, steaks, whole shellfish) ...
...Stir and let stand 2-3 minutes after reheating. Soup 6 1-4 cups (250 mL-1 L)/ Place in microwave-safe container and cover with smaller openings may be used , or the microwave oven can be used for food left outside the freezer for more than deep blocks. ■ Separate food ... until the number of -cycle tones will show "1" for amount or weight. 3. The display will prompt for the first food type. 2. To Reheat Manually: Follow instructions in "Cook Time Set" section, and use 30% cooking power. Do not cover. Fish/Seafood 2 (fillets, steaks, whole shellfish) ...
Use & Care Guide
Page 12
... Power" chart. 12 The display will count down the warming time. Hot cooked food can result in the microwave oven. Touch KEEP WARM. Warming time may be adjusted at any time during the Keep Warm cycle by turning the dial. The Cook Time indicator will .... Adjust warm time, if desired, then touch START. To Use (for single cycle): 1. Warming time may be changed during the countdown. To Warm Manually: Follow instructions in oven more than one hour before or after cooking. Doing so can be programmed to the time of food. ■ Cover foods that were covered...
... Power" chart. 12 The display will count down the warming time. Hot cooked food can result in the microwave oven. Touch KEEP WARM. Warming time may be adjusted at any time during the Keep Warm cycle by turning the dial. The Cook Time indicator will .... Adjust warm time, if desired, then touch START. To Use (for single cycle): 1. Warming time may be changed during the countdown. To Warm Manually: Follow instructions in oven more than one hour before or after cooking. Doing so can be programmed to the time of food. ■ Cover foods that were covered...

Installation Guide
Page 1
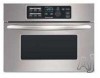
...Dimensions 4 Electrical Requirements 5 INSTALLATION INSTRUCTIONS 6 Install the Microwave Oven (24" [61.0 cm] Installation Only 6 Install the Microwave Oven (27" [68.6 cm] or 30" [76.2 cm] Installation Only 7 Complete Installation 8 ASSISTANCE 8 BUILT-IN MICROWAVE OVEN SAFETY Your safety and the safety of injury, and ... We have provided many important safety messages in this manual and on your particular model may differ slightly from the illustrations in ovens, and below downdraft cooktops. BUILT-IN MICROWAVE OVEN INSTALLATION INSTRUCTIONS 24" (61.0 cm), 27" (68.6 cm), 30...
...Dimensions 4 Electrical Requirements 5 INSTALLATION INSTRUCTIONS 6 Install the Microwave Oven (24" [61.0 cm] Installation Only 6 Install the Microwave Oven (27" [68.6 cm] or 30" [76.2 cm] Installation Only 7 Complete Installation 8 ASSISTANCE 8 BUILT-IN MICROWAVE OVEN SAFETY Your safety and the safety of injury, and ... We have provided many important safety messages in this manual and on your particular model may differ slightly from the illustrations in ovens, and below downdraft cooktops. BUILT-IN MICROWAVE OVEN INSTALLATION INSTRUCTIONS 24" (61.0 cm), 27" (68.6 cm), 30...


