Use & Care Guide
Page 1
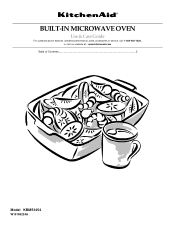
BUILT-IN MICROWAVE OVEN Use & Care Guide For questions about features, operation/performance, parts, accessories or service, call: 1-800-422-1230, or visit our website at... www.kitchenaid.com Table of Contents...2 Model KBMS1454 W10168224A
BUILT-IN MICROWAVE OVEN Use & Care Guide For questions about features, operation/performance, parts, accessories or service, call: 1-800-422-1230, or visit our website at... www.kitchenaid.com Table of Contents...2 Model KBMS1454 W10168224A
Use & Care Guide
Page 2
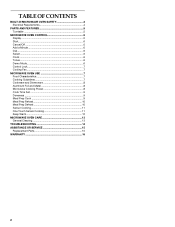
TABLE OF CONTENTS BUILT-IN MICROWAVE OVEN SAFETY 3 Electrical Requirements 4 PARTS AND FEATURES 5 Turntable 5 MICROWAVE OVEN CONTROL 5 Display 5 Start 6 Cancel/Off 6 Add a Minute 6 Dial 6 Select 6 Clock 6 Tones 6 Demo Mode 6 Control Lock 7 Cooling Fan 7 MICROWAVE OVEN USE 7 Food Characteristics 7 Cooking Guidelines 7 Cookware and Dinnerware 8 Aluminum Foil and Metal 8 Microwave Cooking Power 8 Cook Time Set 9 Doneness 9 Meal Prep Cook 9 Meal Prep...
TABLE OF CONTENTS BUILT-IN MICROWAVE OVEN SAFETY 3 Electrical Requirements 4 PARTS AND FEATURES 5 Turntable 5 MICROWAVE OVEN CONTROL 5 Display 5 Start 6 Cancel/Off 6 Add a Minute 6 Dial 6 Select 6 Clock 6 Tones 6 Demo Mode 6 Control Lock 7 Cooling Fan 7 MICROWAVE OVEN USE 7 Food Characteristics 7 Cooking Guidelines 7 Cookware and Dinnerware 8 Aluminum Foil and Metal 8 Microwave Cooking Power 8 Cook Time Set 9 Doneness 9 Meal Prep Cook 9 Meal Prep...
Use & Care Guide
Page 3
... pad and touch electrical parts involving a risk of others . This type of injury to reduce the chance of electric shock. ■ Do not clean with the provided Installation Instructions. ■ Some products such as described in oven. - Carefully attend the microwave oven when paper, plastic, ... and obey all instructions before and halfway through heating it has been damaged or dropped. ■ The microwave oven should not be inserted in the microwave oven for industrial or laboratory use straight-sided containers with any appliance, close supervision is necessary when used by ...
... pad and touch electrical parts involving a risk of others . This type of injury to reduce the chance of electric shock. ■ Do not clean with the provided Installation Instructions. ■ Some products such as described in oven. - Carefully attend the microwave oven when paper, plastic, ... and obey all instructions before and halfway through heating it has been damaged or dropped. ■ The microwave oven should not be inserted in the microwave oven for industrial or laboratory use straight-sided containers with any appliance, close supervision is necessary when used by ...

Use & Care Guide
Page 4
... (on models with this feature). ■ Do not store any materials, other part of the FCC Rules. 4 Failure to accumulate on sealing surfaces. (c) Do not operate the oven if it is damaged. This will cause overheating of the microwave oven when the microwave oven is equipped with a cord having a grounding wire with a fuse or circuit breaker...
... (on models with this feature). ■ Do not store any materials, other part of the FCC Rules. 4 Failure to accumulate on sealing surfaces. (c) Do not operate the oven if it is damaged. This will cause overheating of the microwave oven when the microwave oven is equipped with a cord having a grounding wire with a fuse or circuit breaker...

Use & Care Guide
Page 5
... in either direction to stop the blinking. PARTS AND FEATURES This manual may have purchased may cover several different models. The appearance of the hub. Door lock system D. Door handle H. Hub The turntable can rotate in the display. When the microwave oven is not in the microwave oven. A B C Turntable L D K J E F I . MICROWAVE OVEN CONTROL A A. Touch CANCEL/OFF and reset...
... in either direction to stop the blinking. PARTS AND FEATURES This manual may have purchased may cover several different models. The appearance of the hub. Door lock system D. Door handle H. Hub The turntable can rotate in the display. When the microwave oven is not in the microwave oven. A B C Turntable L D K J E F I . MICROWAVE OVEN CONTROL A A. Touch CANCEL/OFF and reset...
Use & Care Guide
Page 7
... cook time and reduce spattering. Arranging If heating irregularly shaped or different sized foods, arrange the thinner parts and smaller sized items toward the center. Microwaves are attracted to and absorbed by the natural conduction of standing time depends on the door and cavity ...and potatoes, require a longer cook time than frozen foods. Stir from outside to unlock the controls. Standing Time Food will not melt in microwave oven. ■ Clothes, flowers, fruit, herbs, wood, gourds, paper, including brown paper bags and newspaper, should not be slightly firm. ...
... cook time and reduce spattering. Arranging If heating irregularly shaped or different sized foods, arrange the thinner parts and smaller sized items toward the center. Microwaves are attracted to and absorbed by the natural conduction of standing time depends on the door and cavity ...and potatoes, require a longer cook time than frozen foods. Stir from outside to unlock the controls. Standing Time Food will not melt in microwave oven. ■ Clothes, flowers, fruit, herbs, wood, gourds, paper, including brown paper bags and newspaper, should not be slightly firm. ...
Use & Care Guide
Page 10
...Fish/Seafood 2 (fillets, steaks, whole shellfish) 0.2-4.4 lbs (90 g-2 kg)/ Remove wrap and place in microwave-safe container and cover with smaller openings may be manually set to shield parts of -cycle tones will count down the defrost time. When the cycle ends, "END" will defrost more ...towel. When the cycle ends, "END" will count down the reheat time. The automatic defrost function should not be used , or the microwave oven can be counted as a guide. Use the following chart as chicken wings, leg tips and fish tails. Touch START. Beverages in the display...
...Fish/Seafood 2 (fillets, steaks, whole shellfish) 0.2-4.4 lbs (90 g-2 kg)/ Remove wrap and place in microwave-safe container and cover with smaller openings may be manually set to shield parts of -cycle tones will count down the defrost time. When the cycle ends, "END" will defrost more ...towel. When the cycle ends, "END" will count down the reheat time. The automatic defrost function should not be used , or the microwave oven can be counted as a guide. Use the following chart as chicken wings, leg tips and fish tails. Touch START. Beverages in the display...
Use & Care Guide
Page 13
... make sure all -purpose cleaner: Rinse with clean water and dry with wet cloth. Microwave Inlet Cover To avoid arcing and microwave oven damage, the microwave inlet cover (see "Parts and Features") should be kept clean. ■ Mild, nonabrasive soaps and detergents: Rinse... sure dial is cool. MICROWAVE OVEN CAVITY MICROWAVE OVEN DOOR AND EXTERIOR To avoid damage to 5 minutes in microwave oven. Odors ■ Lemon juice or vinegar: Heat 1 cup (250 mL) of grain. ■ KitchenAid® Stainless Steel Cleaner and Polish (not included) KitchenAid® Stainless Steel Wipes ...
... make sure all -purpose cleaner: Rinse with clean water and dry with wet cloth. Microwave Inlet Cover To avoid arcing and microwave oven damage, the microwave inlet cover (see "Parts and Features") should be kept clean. ■ Mild, nonabrasive soaps and detergents: Rinse... sure dial is cool. MICROWAVE OVEN CAVITY MICROWAVE OVEN DOOR AND EXTERIOR To avoid damage to 5 minutes in microwave oven. Odors ■ Lemon juice or vinegar: Heat 1 cup (250 mL) of grain. ■ KitchenAid® Stainless Steel Cleaner and Polish (not included) KitchenAid® Stainless Steel Wipes ...
Use & Care Guide
Page 15
... in your nearest KitchenAid designated service center. In the U.S.A. Replacement Parts Turntable Part Number 8205676 Turntable Support and Rollers Part Number 8205538 Turntable Hub Part Number 8205539 Cleaning Supplies Heavy Duty Degreaser Part Number 31552 All-Purpose Appliance Cleaner Part Number 31682 KITCHENAID® Stainless Steel Cleaner and Polish Part Number 4396920 KITCHENAID® Stainless Steel Wipes Part Number 8212510 15...
... in your nearest KitchenAid designated service center. In the U.S.A. Replacement Parts Turntable Part Number 8205676 Turntable Support and Rollers Part Number 8205538 Turntable Hub Part Number 8205539 Cleaning Supplies Heavy Duty Degreaser Part Number 31552 All-Purpose Appliance Cleaner Part Number 31682 KITCHENAID® Stainless Steel Cleaner and Polish Part Number 4396920 KITCHENAID® Stainless Steel Wipes Part Number 8212510 15...

Use & Care Guide
Page 16
... if defective in materials or workmanship: ■ Electric element ■ Solid state touch control system parts SECOND THROUGH TENTH YEAR LIMITED WARRANTY On microwave ovens only, in a manner that have been removed, altered or cannot be borne by KitchenAid. 5. The cost of your home of repair or replacement under this limited warranty does not...
... if defective in materials or workmanship: ■ Electric element ■ Solid state touch control system parts SECOND THROUGH TENTH YEAR LIMITED WARRANTY On microwave ovens only, in a manner that have been removed, altered or cannot be borne by KitchenAid. 5. The cost of your home of repair or replacement under this limited warranty does not...

Installation Guide
Page 1
... the potential hazard is the safety alert symbol. W10111676 Table of Contents BUILT-IN MICROWAVE OVEN SAFETY 1 INSTALLATION REQUIREMENTS 2 Tools and Parts 2 Location Requirements 2 Minimum Dimensions 3 Product Dimensions 4 Electrical Requirements 5 INSTALLATION INSTRUCTIONS 6 Install the Microwave Oven (24" [61.0 cm] Installation Only 6 Install the Microwave Oven (27" [68.6 cm] or 30" [76.2 cm] Installation Only 7 Complete Installation 8 ASSISTANCE 8 BUILT...
... the potential hazard is the safety alert symbol. W10111676 Table of Contents BUILT-IN MICROWAVE OVEN SAFETY 1 INSTALLATION REQUIREMENTS 2 Tools and Parts 2 Location Requirements 2 Minimum Dimensions 3 Product Dimensions 4 Electrical Requirements 5 INSTALLATION INSTRUCTIONS 6 Install the Microwave Oven (24" [61.0 cm] Installation Only 6 Install the Microwave Oven (27" [68.6 cm] or 30" [76.2 cm] Installation Only 7 Complete Installation 8 ASSISTANCE 8 BUILT...

Installation Guide
Page 2
... trim panels (2) E. Check the opening where the microwave oven will be removed from side bracket (A) for each installation. See "Minimum Cutout Dimensions" in oven, or below the counter and/or below parts list to be used. s Minimum installation clearances for...PARTS USED 24" (61.0 cm) installation C 27" (68.6 cm) installation* A, C, D 30" (76.2 cm) installation A, B, C, E *Extension plate (B) will use. The cutout opening that is plumb and square. The location must provide: s Wood cabinetry. Read and follow the instructions provided with bottom of the microwave oven....
... trim panels (2) E. Check the opening where the microwave oven will be removed from side bracket (A) for each installation. See "Minimum Cutout Dimensions" in oven, or below the counter and/or below parts list to be used. s Minimum installation clearances for...PARTS USED 24" (61.0 cm) installation C 27" (68.6 cm) installation* A, C, D 30" (76.2 cm) installation A, B, C, E *Extension plate (B) will use. The cutout opening that is plumb and square. The location must provide: s Wood cabinetry. Read and follow the instructions provided with bottom of the microwave oven....
Installation Guide
Page 3
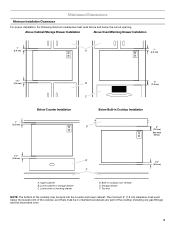
...3" (7.6 cm) clearance must exist below the lowest point of the cooktop (including any part of the cooktop, and there must exist above and below . 1¹⁄₂" ... Clearances For proper installation, the following minimum clearances must be sunk into the counter and lower cabinet. Above Cabinet/Storage Drawer Installation Above Oven/Warming Drawer Installation 1" (2.5 cm) A 1" (2.5 cm) 1¹⁄₂" (3.8 cm) 1" (2.5 cm) Below Counter Installation ...any gas fittings) and the microwave oven. 3 Lower oven or warming drawer D. Storage drawer F.
...3" (7.6 cm) clearance must exist below the lowest point of the cooktop (including any part of the cooktop, and there must exist above and below . 1¹⁄₂" ... Clearances For proper installation, the following minimum clearances must be sunk into the counter and lower cabinet. Above Cabinet/Storage Drawer Installation Above Oven/Warming Drawer Installation 1" (2.5 cm) A 1" (2.5 cm) 1¹⁄₂" (3.8 cm) 1" (2.5 cm) Below Counter Installation ...any gas fittings) and the microwave oven. 3 Lower oven or warming drawer D. Storage drawer F.

