Instructions
Page 2
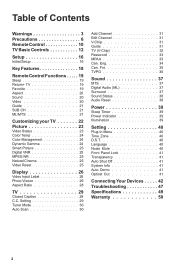
... 41 System Info 41 Auto Demo 41 Optical Out 41 Connecting Your Devices . . . . . 42 Troubleshooting 47 Specifications 49 Warranty 50 2 Table of Contents Warnings 3 Precautions 6 Remote Control 10 TV Basic Controls 12 Setup 16 Initial Setup 16 Key Features 18 Remote Control Functions . . . . . 19... Sleep 19 Return+ TV 19 Favorite 19 Aspect 20 Sound 20 Video 20 Guide 21 SUB CH 21 ML/MTS 21 Customizing your TV 22 Picture 23 Video Status 23 Color Temp 24 Color Management 24 Dynamic Gamma 24 Smart Picture 25 ...
... 41 System Info 41 Auto Demo 41 Optical Out 41 Connecting Your Devices . . . . . 42 Troubleshooting 47 Specifications 49 Warranty 50 2 Table of Contents Warnings 3 Precautions 6 Remote Control 10 TV Basic Controls 12 Setup 16 Initial Setup 16 Key Features 18 Remote Control Functions . . . . . 19... Sleep 19 Return+ TV 19 Favorite 19 Aspect 20 Sound 20 Video 20 Guide 21 SUB CH 21 ML/MTS 21 Customizing your TV 22 Picture 23 Video Status 23 Color Temp 24 Color Management 24 Dynamic Gamma 24 Smart Picture 25 ...
Instructions
Page 6
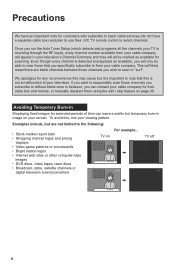
...following: • Stock-market report bars • Shopping channel logos and pricing displays • Video game patterns or scoreboards • Bright station logos • Internet web sites or other computer-style images • DVD ...discs, video tapes, laser discs • Broadcast, cable, satellite channels or digital television tuners/converters For example... To ...you will appear in image on your viewing pattern. We apologize for their JVC TV remote control to select channels.
...following: • Stock-market report bars • Shopping channel logos and pricing displays • Video game patterns or scoreboards • Bright station logos • Internet web sites or other computer-style images • DVD ...discs, video tapes, laser discs • Broadcast, cable, satellite channels or digital television tuners/converters For example... To ...you will appear in image on your viewing pattern. We apologize for their JVC TV remote control to select channels.

Instructions
Page 10
Choose how long the TV will stay on availability in stereo, mono or another language (SAP). (Depending on before turning off . Listen to the previously selected channel. See page 21. ...). See page 21. After pressing the remote 0 - 9 buttons, press TUNE. See page 21. 10 Change channels. Used to Video-1, 2, 3, 4 and 5. Lets you go back to a program in the program). Turns the TV on your TV screen. See page 19. Remote Control The following pages gives you a brief description of the image on or...
Choose how long the TV will stay on availability in stereo, mono or another language (SAP). (Depending on before turning off . Listen to the previously selected channel. See page 21. ...). See page 21. After pressing the remote 0 - 9 buttons, press TUNE. See page 21. 10 Change channels. Used to Video-1, 2, 3, 4 and 5. Lets you go back to a program in the program). Turns the TV on your TV screen. See page 19. Remote Control The following pages gives you a brief description of the image on or...
Instructions
Page 14
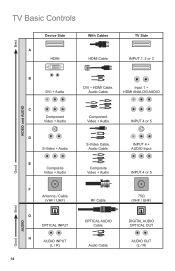
TV Basic Controls Best Device Side A HDMI With Cables HDMI Cable TV Side INPUT 1, 2 or 3 B DVI + Audio DVI - HDMI Cable, Audio Cable Input 1 + HDMI ANALOG AUDIO VIDEO and AUDIO C Component Video + Audio D S-Video + Audio E Composite Video + Audio Component Video + Audio S-Video Cable, Audio Cable Composite Video + Audio INPUT 4 or 5 INPUT 4 + AUDIO Input INPUT 4 or 5 Good Good Best AUDIO F Antenna / Cable (VHF / UHF) G OPTICAL INPUT H AUDIO INPUT (L / R) 14 RF Cable OPTICAL AUDIO Cable Audio Cable 75Ω (VHF / UHF) DIGITAL AUDIO OPTICAL OUT AUDIO OUT (L / R)
TV Basic Controls Best Device Side A HDMI With Cables HDMI Cable TV Side INPUT 1, 2 or 3 B DVI + Audio DVI - HDMI Cable, Audio Cable Input 1 + HDMI ANALOG AUDIO VIDEO and AUDIO C Component Video + Audio D S-Video + Audio E Composite Video + Audio Component Video + Audio S-Video Cable, Audio Cable Composite Video + Audio INPUT 4 or 5 INPUT 4 + AUDIO Input INPUT 4 or 5 Good Good Best AUDIO F Antenna / Cable (VHF / UHF) G OPTICAL INPUT H AUDIO INPUT (L / R) 14 RF Cable OPTICAL AUDIO Cable Audio Cable 75Ω (VHF / UHF) DIGITAL AUDIO OPTICAL OUT AUDIO OUT (L / R)
Instructions
Page 18
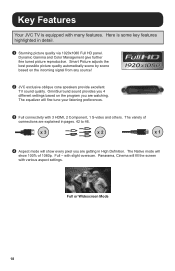
...variety of 1080p. The Native mode will show 100% of connections are watching. Full - with 3 HDMI, 2 Component, 1 S-video and others. OmniSurround sound provides you are explained in detail. 1 Stunning picture quality via 1920x1080 Full HD panel. Smart Picture adjusts the.... The equalizer will fill the screen with many features. Here is equipped with various aspect settings. Full or Widescreen Mode 18 Key Features Your JVC TV is some key features highlighted in pages. 42 to 46. x 3 x 2 x 1 4 Aspect mode will show every pixel you are getting in High...
...variety of 1080p. The Native mode will show 100% of connections are watching. Full - with 3 HDMI, 2 Component, 1 S-video and others. OmniSurround sound provides you are explained in detail. 1 Stunning picture quality via 1920x1080 Full HD panel. Smart Picture adjusts the.... The equalizer will fill the screen with many features. Here is equipped with various aspect settings. Full or Widescreen Mode 18 Key Features Your JVC TV is some key features highlighted in pages. 42 to 46. x 3 x 2 x 1 4 Aspect mode will show every pixel you are getting in High...
Instructions
Page 19
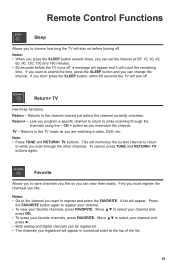
... memorize the channel. Notes: • When you press the SLEEP button several times, you are watching a video, DVD, etc. Return - Returns to register and press the FAVORITE. CH + button as you can change the interval. TV - Favorite Allows you to save channels you want to extend the time, press the SLEEP button...
... memorize the channel. Notes: • When you press the SLEEP button several times, you are watching a video, DVD, etc. Return - Returns to register and press the FAVORITE. CH + button as you can change the interval. TV - Favorite Allows you to save channels you want to extend the time, press the SLEEP button...

Instructions
Page 20
...; You can select the aspect mode by pressing the ASPECT button. • You can also access the aspect modes using the MENU button, then the - Video Allows you can choose the different sound modes by using the buttons on the side of sound modes. You can choose several types of the... TV, by pressing the SOUND button. • If you select User, you to choose different picture settings according to adjust the way the image appears on ...
...; You can select the aspect mode by pressing the ASPECT button. • You can also access the aspect modes using the MENU button, then the - Video Allows you can choose the different sound modes by using the buttons on the side of sound modes. You can choose several types of the... TV, by pressing the SOUND button. • If you select User, you to choose different picture settings according to adjust the way the image appears on ...
Instructions
Page 22
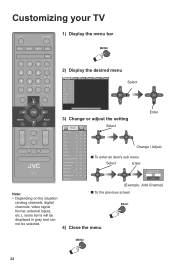
... the menu bar 2) Display the desired menu Picture Display TV Video Status Game Tint 0 - 50 - 100 Color 0 - 25 - 100 Picture 0 - 50 - 100 Bright 0 ... Color Management Off Dynamic Gamma On Smart Picture On Digital VNR High MPEG NR On Natural Cinema On Video Reset Select Change / Adjust ■ To enter an item's sub menu Select Enter Please insert scan...to Start (Example: Add Channel) Note: • Depending on the situation (analog channels, digital channels, video signal format, external inputs, etc.), some items will be displayed in gray and can not be selected....
... the menu bar 2) Display the desired menu Picture Display TV Video Status Game Tint 0 - 50 - 100 Color 0 - 25 - 100 Picture 0 - 50 - 100 Bright 0 ... Color Management Off Dynamic Gamma On Smart Picture On Digital VNR High MPEG NR On Natural Cinema On Video Reset Select Change / Adjust ■ To enter an item's sub menu Select Enter Please insert scan...to Start (Example: Add Channel) Note: • Depending on the situation (analog channels, digital channels, video signal format, external inputs, etc.), some items will be displayed in gray and can not be selected....
Instructions
Page 23
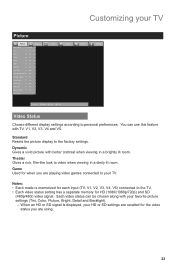
... in a dimly lit room. When an HD or SD signal is memorized for each input (TV, V1, V2, V3, V4, V5) connected to the factory settings. You can be chosen along with your TV Picture Picture Display TV Video Status Game Tint 0 - 50 - 100 Color 0 - 25 - 100 Picture 0 - 50 - 100 Bright 0... Gamma On Smart Picture On Digital VNR High MPEG NR On Natural Cinema On Video Reset Sound Power Setting :Select OK:Operate BACK :Back MENU:Exit Video Status Choose different display settings according to your TV. Notes: • Each mode is displayed, your HD or SD settings are...
... in a dimly lit room. When an HD or SD signal is memorized for each input (TV, V1, V2, V3, V4, V5) connected to the factory settings. You can be chosen along with your TV Picture Picture Display TV Video Status Game Tint 0 - 50 - 100 Color 0 - 25 - 100 Picture 0 - 50 - 100 Bright 0... Gamma On Smart Picture On Digital VNR High MPEG NR On Natural Cinema On Video Reset Sound Power Setting :Select OK:Operate BACK :Back MENU:Exit Video Status Choose different display settings according to your TV. Notes: • Each mode is displayed, your HD or SD settings are...
Instructions
Page 25
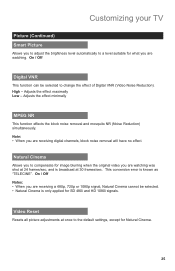
... are receiving a 480p, 720p or 1080p signal, Natural Cinema cannot be selected to change the effect of Digital VNR (Video Noise Reduction). Natural Cinema Allows you to compensate for Natural Cinema. 25 Note: • When you are watching. On / Off Notes: • When ... simultaneously. On / Off Digital VNR This function can be selected. • Natural Cinema is known as "TELECINE". Adjusts the effect maximally Low - Customizing your TV Picture (Continued) Smart Picture Allows you to adjust the brightness level automatically to a level suitable for SD 480i and HD 1080i signals.
... are receiving a 480p, 720p or 1080p signal, Natural Cinema cannot be selected to change the effect of Digital VNR (Video Noise Reduction). Natural Cinema Allows you to compensate for Natural Cinema. 25 Note: • When you are watching. On / Off Notes: • When ... simultaneously. On / Off Digital VNR This function can be selected. • Natural Cinema is known as "TELECINE". Adjusts the effect maximally Low - Customizing your TV Picture (Continued) Smart Picture Allows you to adjust the brightness level automatically to a level suitable for SD 480i and HD 1080i signals.

Instructions
Page 26
... Viewer allows you to enjoy your digital pictures stored on your TV Display Picture Display TV Video Input Label AIR TV Photo Viewer Aspect Ratio Cinema Zoom Sound Power Setting :Select OK:Operate BACK :Back MENU:Exit Video Input Label Allows you to label all the devices you have connected to ...the Photo Viewer terminal on the TV in high quality. 1) Choose Slide Show Interval of 5, 10 or 20 seconds by ...
... Viewer allows you to enjoy your digital pictures stored on your TV Display Picture Display TV Video Input Label AIR TV Photo Viewer Aspect Ratio Cinema Zoom Sound Power Setting :Select OK:Operate BACK :Back MENU:Exit Video Input Label Allows you to label all the devices you have connected to ...the Photo Viewer terminal on the TV in high quality. 1) Choose Slide Show Interval of 5, 10 or 20 seconds by ...
Instructions
Page 32
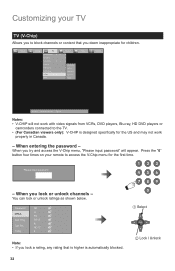
... block channels or content that is higher is designed specifically for the US and may not work with video signals from VCRs, DVD players, Blu-ray, HD DVD players or camcorders connected to the TV. • (For Canadian viewers only): V-CHIP is automatically blocked. 1 Select 2 Lock / Unlock 32 Password MPAA ... you lock a rating, any rating that you try and access the V-Chip menu, "Please input password" will not work properly in Canada. - Picture Display TV Closed Caption CC Setting Tuner Mode Autoscan Add Channel Edit Channel V-Chip Guide Sound ON Air Password MPAA Can. Can Fre.
... block channels or content that is higher is designed specifically for the US and may not work with video signals from VCRs, DVD players, Blu-ray, HD DVD players or camcorders connected to the TV. • (For Canadian viewers only): V-CHIP is automatically blocked. 1 Select 2 Lock / Unlock 32 Password MPAA ... you lock a rating, any rating that you try and access the V-Chip menu, "Please input password" will not work properly in Canada. - Picture Display TV Closed Caption CC Setting Tuner Mode Autoscan Add Channel Edit Channel V-Chip Guide Sound ON Air Password MPAA Can. Can Fre.
Instructions
Page 43
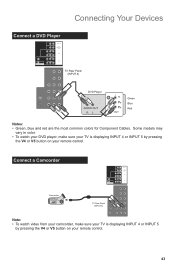
...remote control. Connect a Camcorder Camcorder L R L R AUDIO VIDEO L R COMPONENT Y PB PR AUDIO S-VIDEO DIGITAL AUDIO OPTICAL OUT VIDEO L R COMPONENT Y PB PR AUDIO OUT INPUT 1 HDMI ANALOG AUDIO INPUT 5 INPUT 4 LC34324-001A TV Rear Panel (INPUT 4) Note: • To watch your DVD...Connecting Your Devices Connect a DVD Player L R L R AUDIO VIDEO L R COMPONENT Y PB PR AUDIO S-VIDEO DIGITAL AUDIO OPTICAL OUT VIDEO L R COMPONENT Y PB PR AUDIO OUT INPUT 1 HDMI ANALOG AUDIO INPUT 5 INPUT 4 LC34324-001A TV Rear Panel (INPUT 4) DVD Player AUDIO OUT R L Y PB...
...remote control. Connect a Camcorder Camcorder L R L R AUDIO VIDEO L R COMPONENT Y PB PR AUDIO S-VIDEO DIGITAL AUDIO OPTICAL OUT VIDEO L R COMPONENT Y PB PR AUDIO OUT INPUT 1 HDMI ANALOG AUDIO INPUT 5 INPUT 4 LC34324-001A TV Rear Panel (INPUT 4) Note: • To watch your DVD...Connecting Your Devices Connect a DVD Player L R L R AUDIO VIDEO L R COMPONENT Y PB PR AUDIO S-VIDEO DIGITAL AUDIO OPTICAL OUT VIDEO L R COMPONENT Y PB PR AUDIO OUT INPUT 1 HDMI ANALOG AUDIO INPUT 5 INPUT 4 LC34324-001A TV Rear Panel (INPUT 4) DVD Player AUDIO OUT R L Y PB...
Instructions
Page 44
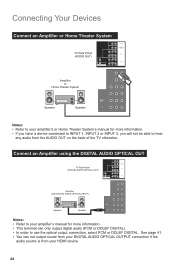
... PCM or DOLBY DIGITAL. Connecting Your Devices Connect an Amplifier or Home Theater System TV Rear Panel (AUDIO OUT) L R L R AUDIO VIDEO L R COMPONENT Y PB PR AUDIO S-VIDEO DIGITAL AUDIO OPTICAL OUT VIDEO L R COMPONENT Y PB PR AUDIO OUT INPUT 1 HDMI ANALOG AUDIO INPUT 5...to your HDMI device. 44 Connect an Amplifier using the DIGITAL AUDIO OPTICAL OUT TV Rear Panel (DIGITAL AUDIO OPTICAL OUT) L R L R AUDIO VIDEO L R COMPONENT Y PB PR AUDIO S-VIDEO DIGITAL AUDIO OPTICAL OUT VIDEO L R COMPONENT Y PB PR AUDIO OUT INPUT 1 HDMI ANALOG AUDIO INPUT 5...
... PCM or DOLBY DIGITAL. Connecting Your Devices Connect an Amplifier or Home Theater System TV Rear Panel (AUDIO OUT) L R L R AUDIO VIDEO L R COMPONENT Y PB PR AUDIO S-VIDEO DIGITAL AUDIO OPTICAL OUT VIDEO L R COMPONENT Y PB PR AUDIO OUT INPUT 1 HDMI ANALOG AUDIO INPUT 5...to your HDMI device. 44 Connect an Amplifier using the DIGITAL AUDIO OPTICAL OUT TV Rear Panel (DIGITAL AUDIO OPTICAL OUT) L R L R AUDIO VIDEO L R COMPONENT Y PB PR AUDIO S-VIDEO DIGITAL AUDIO OPTICAL OUT VIDEO L R COMPONENT Y PB PR AUDIO OUT INPUT 1 HDMI ANALOG AUDIO INPUT 5...
Instructions
Page 45
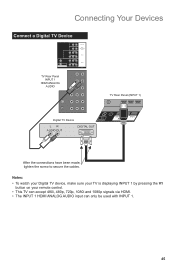
...Connecting Your Devices Connect a Digital TV Device L R L R AUDIO VIDEO L R COMPONENT Y PB PR AUDIO S-VIDEO DIGITAL AUDIO OPTICAL OUT VIDEO L R COMPONENT Y PB PR AUDIO OUT INPUT 1 HDMI ANALOG AUDIO INPUT 5 INPUT 4 LC34324-001A TV Rear Panel INPUT 1 HDMI ANALOG AUDIO TV Rear Panel (INPUT 1) Digital TV Device 75 Ω (VHF/...the screw to secure the cables. Notes: • To watch your Digital TV device, make sure your TV is displaying INPUT 1 by pressing the V1 button on your remote control. • This TV can accept 480i, 480p, 720p, 1080i and 1080p signals via HDMI. ...
...Connecting Your Devices Connect a Digital TV Device L R L R AUDIO VIDEO L R COMPONENT Y PB PR AUDIO S-VIDEO DIGITAL AUDIO OPTICAL OUT VIDEO L R COMPONENT Y PB PR AUDIO OUT INPUT 1 HDMI ANALOG AUDIO INPUT 5 INPUT 4 LC34324-001A TV Rear Panel INPUT 1 HDMI ANALOG AUDIO TV Rear Panel (INPUT 1) Digital TV Device 75 Ω (VHF/...the screw to secure the cables. Notes: • To watch your Digital TV device, make sure your TV is displaying INPUT 1 by pressing the V1 button on your remote control. • This TV can accept 480i, 480p, 720p, 1080i and 1080p signals via HDMI. ...
Instructions
Page 47
...8226; The tuner could be too far from an HDMI device connected to the TV. See page 24. • The Video Status mode may be able to hear any such appliances further away from the ...causing the problem. Check to see that external noise or interference is a problem, contact the JVC Service Center where you will not be turned to interference. See page 41. • Check ...such as a computer, another TV or VCR. See page 40. • The TV station may be interference from the wall outlet and wait a while before inserting it . 47 Troubleshooting Refer to the table ...
...8226; The tuner could be too far from an HDMI device connected to the TV. See page 24. • The Video Status mode may be able to hear any such appliances further away from the ...causing the problem. Check to see that external noise or interference is a problem, contact the JVC Service Center where you will not be turned to interference. See page 41. • Check ...such as a computer, another TV or VCR. See page 40. • The TV station may be interference from the wall outlet and wait a while before inserting it . 47 Troubleshooting Refer to the table ...
Instructions
Page 49
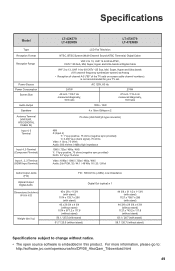
... (lbs / kg) LT-42X579 LT-42EM59 LT-47X579 LT-47EM59 LCD Flat Television NTSC, BTSC System (Multi-Channel Sound) ATSC Terrestrial, ...("95" of the TV set . AC 120V, 60 Hz 247W 274W 42 inch / 106.7 cm measured diagonally, 16:9 ratio 47 inch / 119.4 cm... Y: 1 Vp-p positive, 75 ohms (negative sync provided) PB/PR: 0.7 Vp-p 75 ohms Video: 1080p / 1080i / 720p / 480p / 480i Audio: 2ch PCM, 32 / 44.1 / 48... (with stand) 58.7 / 26.7 (without stand) Specifications subject to : http://software.jvc.com/opensource/lnx/DP/08_AtscQam_T/download.html 49 For more information, please go to change without ...
... (lbs / kg) LT-42X579 LT-42EM59 LT-47X579 LT-47EM59 LCD Flat Television NTSC, BTSC System (Multi-Channel Sound) ATSC Terrestrial, ...("95" of the TV set . AC 120V, 60 Hz 247W 274W 42 inch / 106.7 cm measured diagonally, 16:9 ratio 47 inch / 119.4 cm... Y: 1 Vp-p positive, 75 ohms (negative sync provided) PB/PR: 0.7 Vp-p 75 ohms Video: 1080p / 1080i / 720p / 480p / 480i Audio: 2ch PCM, 32 / 44.1 / 48... (with stand) 58.7 / 26.7 (without stand) Specifications subject to : http://software.jvc.com/opensource/lnx/DP/08_AtscQam_T/download.html 49 For more information, please go to change without ...


