
Instructions
Page 10
...the center of this is set to TV. The right and left buttons will turn the volume up or down towards the bottom of the remote control. If this manual. Please see pages 28 to 31 for... top right corner of the television. Move the switch to CATV only if you need to begin using JVC's Hyperscan feature, press and hold CH+ or CH-. If you first need to install the batteries (... sections of the remote can operate your new television right away. These buttons are also marked with JVC's onscreen menu system. MUTING CH GUIDE VOL OK VOL MENU BACK CH VCR CHANNEL VCR DVD Basic...
...the center of this is set to TV. The right and left buttons will turn the volume up or down towards the bottom of the remote control. If this manual. Please see pages 28 to 31 for... top right corner of the television. Move the switch to CATV only if you need to begin using JVC's Hyperscan feature, press and hold CH+ or CH-. If you first need to install the batteries (... sections of the remote can operate your new television right away. These buttons are also marked with JVC's onscreen menu system. MUTING CH GUIDE VOL OK VOL MENU BACK CH VCR CHANNEL VCR DVD Basic...
Instructions
Page 11
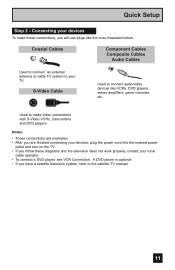
...operator. • To connect a DVD player, see VCR Connection. Connecting your TV. Coaxial Cables Component Cables Composite Cables Audio Cables Used to connect an external antenna or cable TV system to the satellite TV manual. 11 Notes: • These connections are examples. • After you are ...finished connecting your devices, plug the power cord into the nearest power outlet and turn on the TV. • If you follow these...
...operator. • To connect a DVD player, see VCR Connection. Connecting your TV. Coaxial Cables Component Cables Composite Cables Audio Cables Used to connect an external antenna or cable TV system to the satellite TV manual. 11 Notes: • These connections are examples. • After you are ...finished connecting your devices, plug the power cord into the nearest power outlet and turn on the TV. • If you follow these...

Instructions
Page 13
... or Antenna Output Two-Way Splitter IN (Attachment) OUT OUT Coaxial Cable (Attachment) INPUT 1 Y Pr Pb S-VIDEO VIDEO OVER R - AUDIO - L R INPUT TV Rear Panel DIO Green Blue Red Y PB PR OUT AUDIO OUT R L DVD Player (OPTIONAL) Note: • If this connection setup does not work for more...8226; Be careful not to avoid accidentally switching the cables. • You may vary colors. L S-VIDEO VIDEO OVER R - Please consult the user's manual for your DVD player for you, try the connection setup on page 14. 13 AUDIO - AUDIO - Diagram #1 IN OUT V LR VCR IN OUT...
... or Antenna Output Two-Way Splitter IN (Attachment) OUT OUT Coaxial Cable (Attachment) INPUT 1 Y Pr Pb S-VIDEO VIDEO OVER R - AUDIO - L R INPUT TV Rear Panel DIO Green Blue Red Y PB PR OUT AUDIO OUT R L DVD Player (OPTIONAL) Note: • If this connection setup does not work for more...8226; Be careful not to avoid accidentally switching the cables. • You may vary colors. L S-VIDEO VIDEO OVER R - Please consult the user's manual for your DVD player for you, try the connection setup on page 14. 13 AUDIO - AUDIO - Diagram #1 IN OUT V LR VCR IN OUT...

Instructions
Page 16
L Speaker Amplifier Speaker AUDIO MOOUNTITOR / REC OUT 1) Connect a white cable from the LEFT AUDIO OUTPUT on the back of the TV to the RIGHT AUDIO INPUT on the amplifier. 2) Connect a red cable from a DVI device connected to the AUDIO IN "FOR HDMI 1" connection. (See page 19).... 16 Quick Setup Connecting to the LEFT AUDIO INPUT on the amplifier. Notes: • Refer to your amplifier's manual for more information. • You can use AUDIO OUTPUT for your home theater system. • You can not output audio using the AUDIO OUTPUT under...
L Speaker Amplifier Speaker AUDIO MOOUNTITOR / REC OUT 1) Connect a white cable from the LEFT AUDIO OUTPUT on the back of the TV to the RIGHT AUDIO INPUT on the amplifier. 2) Connect a red cable from a DVI device connected to the AUDIO IN "FOR HDMI 1" connection. (See page 19).... 16 Quick Setup Connecting to the LEFT AUDIO INPUT on the amplifier. Notes: • Refer to your amplifier's manual for more information. • You can use AUDIO OUTPUT for your home theater system. • You can not output audio using the AUDIO OUTPUT under...

Instructions
Page 18
... can connect more information on connecting your speakers and other input connections on your TV. L INPUT 2 S-VIDEO VIDEO OVER R - AUDIO - L AV Receiver INPUT 1 Y Pr Pb S-VIDEO VIDEO OVER R - Notes: • Please refer to your AV Receiver instruction manual for each input device connected to your television. L R INPUT MONITOR OUT Y PB PR MONITOR...
... can connect more information on connecting your speakers and other input connections on your TV. L INPUT 2 S-VIDEO VIDEO OVER R - AUDIO - L AV Receiver INPUT 1 Y Pr Pb S-VIDEO VIDEO OVER R - Notes: • Please refer to your AV Receiver instruction manual for each input device connected to your television. L R INPUT MONITOR OUT Y PB PR MONITOR...
Instructions
Page 21
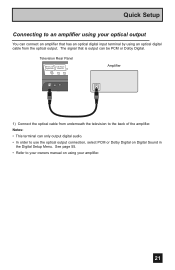
The signal that has an optical digital input terminal by using your owners manual on Digital Sound in the Digital Setup Menu. See page 55. • Refer to use the optical output connection, select PCM or Dolby Digital on ...
The signal that has an optical digital input terminal by using your owners manual on Digital Sound in the Digital Setup Menu. See page 55. • Refer to use the optical output connection, select PCM or Dolby Digital on ...
Instructions
Page 22
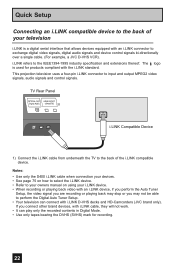
... i.LINK Compatible Device 1) Connect the i.LINK cable from underneath the TV to the back of your i.LINK device. • When recording ...digital video signals, digital audio signals and device control signals bi-directionally over a single cable. (For example, a JVC D-VHS VCR). Quick Setup Connecting an i.LINK compatible device to the back of the i.LINK compatible device. This .... • See page 75 on how to select the i.LINK device. • Refer to your owners manual on using your television i.LINK is used for recording. 22 i.LINK refers to input and output MPEG2 video signals...
... i.LINK Compatible Device 1) Connect the i.LINK cable from underneath the TV to the back of your i.LINK device. • When recording ...digital video signals, digital audio signals and device control signals bi-directionally over a single cable. (For example, a JVC D-VHS VCR). Quick Setup Connecting an i.LINK compatible device to the back of the i.LINK compatible device. This .... • See page 75 on how to select the i.LINK device. • Refer to your owners manual on using your television i.LINK is used for recording. 22 i.LINK refers to input and output MPEG2 video signals...

Instructions
Page 23
... the sound when the sound from a computer After starting the computer, press the INPUT button to the computer This TV can be seen. 23 AUDIO - L S-VIDEO Notes: • Refer to your computer manual for a detailed explanation of the connections concerning your computer. • Make sure that the connectors are facing the correct... INPUT-3 audio input terminal to , but the images from the computer can be used as a computer screen. Use a commercially available D-SUB cable to connect the TV's PC INPUT terminal to the computer's analog RGB output terminal.
... the sound when the sound from a computer After starting the computer, press the INPUT button to the computer This TV can be seen. 23 AUDIO - L S-VIDEO Notes: • Refer to your computer manual for a detailed explanation of the connections concerning your computer. • Make sure that the connectors are facing the correct... INPUT-3 audio input terminal to , but the images from the computer can be used as a computer screen. Use a commercially available D-SUB cable to connect the TV's PC INPUT terminal to the computer's analog RGB output terminal.
Instructions
Page 24
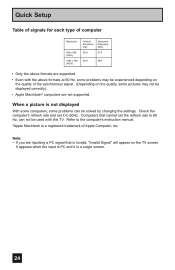
...is invalid, "Invalid Signal" will appear on the quality, some pictures may not be solved by changing the settings. Refer to the computer's instruction manual. *Apple Macintosh is PC and it to 60 Hz, can be displayed correctly). • Apple Macintosh* computers are not supported. Note: •...be used with the above formats at 60 Hz, some problems may be experienced depending on the quality of the synchronous signal. (Depending on the TV screen. When a picture is a single screen. 24 It appears when the input is a registered trademark of Apple Computer, Inc. Quick Setup...
...is invalid, "Invalid Signal" will appear on the quality, some pictures may not be solved by changing the settings. Refer to the computer's instruction manual. *Apple Macintosh is PC and it to 60 Hz, can be displayed correctly). • Apple Macintosh* computers are not supported. Note: •...be used with the above formats at 60 Hz, some problems may be experienced depending on the quality of the synchronous signal. (Depending on the TV screen. When a picture is a single screen. 24 It appears when the input is a registered trademark of Apple Computer, Inc. Quick Setup...

Instructions
Page 25
...(Español). We recommend you complete the interactive plug-in menu will work properly. Quick Setup Step 3 - You can choose "AUTO" or "MANUAL" for the first time the interactive plug-in items before . In this case use by letting you set clock) NEXT SELECT OPERATE MENU EXIT (To... be continued...) 25 Language After the "JVC INTERACTIVE PLUG IN MENU" has been displayed, the TV automatically switches to receive. The plug-in menu helps you to get your TV ready to the correct time so your television on before you press the Menu ...
...(Español). We recommend you complete the interactive plug-in menu will work properly. Quick Setup Step 3 - You can choose "AUTO" or "MANUAL" for the first time the interactive plug-in items before . In this case use by letting you set clock) NEXT SELECT OPERATE MENU EXIT (To... be continued...) 25 Language After the "JVC INTERACTIVE PLUG IN MENU" has been displayed, the TV automatically switches to receive. The plug-in menu helps you to get your TV ready to the correct time so your television on before you press the Menu ...

Instructions
Page 26
... Savings Time feature automatically adjusts your TV's clock for Daylight Savings. If you will have to D.S.T. (Daylight Savings Time) To turn D.S.T. ON or OFF To START CLOCK Note: • You will have to reset the clock after a power interruption. You may precisely set your clock manually (without using the XDS time signal...
... Savings Time feature automatically adjusts your TV's clock for Daylight Savings. If you will have to D.S.T. (Daylight Savings Time) To turn D.S.T. ON or OFF To START CLOCK Note: • You will have to reset the clock after a power interruption. You may precisely set your clock manually (without using the XDS time signal...

Instructions
Page 46
... Exit Press the OK button to cancel the settings, select cancel. 46 It is set automatically. Your television can perform Digital Auto Setting or Digital Manual Setting. When you are watching digital channels, you can access and display this information using the closed caption. When you are watching analog channels, you...
... Exit Press the OK button to cancel the settings, select cancel. 46 It is set automatically. Your television can perform Digital Auto Setting or Digital Manual Setting. When you are watching digital channels, you can access and display this information using the closed caption. When you are watching analog channels, you...
Instructions
Page 47
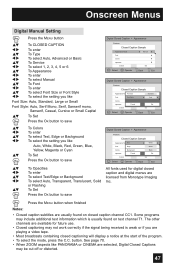
... to save Digital Closed Caption > Appearance Preview Closed Caption Sample Appearance Mode Font Colors Opacities Cancel Select Operate Manual Set BACK Back MENU Exit Digital Closed Caption > Appearance Preview Closed Caption Sample Appearance ModeFont Size ManualStandard Font Font...Magenta or Cyan To Set Press the OK button to save Digital Closed Caption > Appearance Preview Closed Caption Sample Appearance ModeText Manual White Font Edge White Colors Background Black Opacities Cancel Set Cancel Set Select BACK Operate Back MENU Exit π† &#...
... to save Digital Closed Caption > Appearance Preview Closed Caption Sample Appearance Mode Font Colors Opacities Cancel Select Operate Manual Set BACK Back MENU Exit Digital Closed Caption > Appearance Preview Closed Caption Sample Appearance ModeFont Size ManualStandard Font Font...Magenta or Cyan To Set Press the OK button to save Digital Closed Caption > Appearance Preview Closed Caption Sample Appearance ModeText Manual White Font Edge White Colors Background Black Opacities Cancel Set Cancel Set Select BACK Operate Back MENU Exit π† &#...

Instructions
Page 53
...HDMI 1, choose DIGITAL. See page 55. • When your input is used if you have a DTV or HDMI compatible component connected to your TV. π† √® Press the MENU button To DIGITAL-IN1 AUDIO To select ANALOG, DIGITAL or AUTO Press the Menu button when &#...select DIGITAL, select PCM on the audio input from the HDMI. • When you connect the HDMI device to your DTV or HDMI component's instruction manual for more information. • When you select AUTO, the television will select "ANALOG" or "DIGITAL" automatically, depending on Digital Sound menu. Onscreen...
...HDMI 1, choose DIGITAL. See page 55. • When your input is used if you have a DTV or HDMI compatible component connected to your TV. π† √® Press the MENU button To DIGITAL-IN1 AUDIO To select ANALOG, DIGITAL or AUTO Press the Menu button when &#...select DIGITAL, select PCM on the audio input from the HDMI. • When you connect the HDMI device to your DTV or HDMI component's instruction manual for more information. • When you select AUTO, the television will select "ANALOG" or "DIGITAL" automatically, depending on Digital Sound menu. Onscreen...
Instructions
Page 56
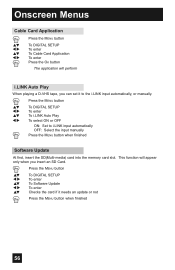
...;† √® To DIGITAL SETUP To enter To i.LINK Auto Play To select ON or OFF ON: Set to the i.LINK input automatically, or manually. Press the MENU button π† √® π† √® π† To DIGITAL SETUP To enter To Software Update To ...enter Checks the card if it to i.LINK input automatically OFF: Select the input manually Press the MENU button when finished Software Update At first, insert the SD(Multi-media) card into the memory card slot. This function will perform...
...;† √® To DIGITAL SETUP To enter To i.LINK Auto Play To select ON or OFF ON: Set to the i.LINK input automatically, or manually. Press the MENU button π† √® π† √® π† To DIGITAL SETUP To enter To Software Update To ...enter Checks the card if it to i.LINK input automatically OFF: Select the input manually Press the MENU button when finished Software Update At first, insert the SD(Multi-media) card into the memory card slot. This function will perform...

Instructions
Page 62
... THANK YOU !! Press the MENU button when finished Notes: • D.S.T. can choose to finish Press the MENU button when finished When you set the clock manually, choose MANUAL by pressing the √ or ® arrows. π† √® π† √® To TIME ZONE To select your time ... at 2:00 am on the first Sunday in menu. ON or OFF Press OK to AUTO, the Daylight Savings Time feature automatically adjusts your TV's clock for Daylight Savings. Onscreen Menus Set Clock The set clock function is set to ON in October. • You will have to ...
... THANK YOU !! Press the MENU button when finished Notes: • D.S.T. can choose to finish Press the MENU button when finished When you set the clock manually, choose MANUAL by pressing the √ or ® arrows. π† √® π† √® To TIME ZONE To select your time ... at 2:00 am on the first Sunday in menu. ON or OFF Press OK to AUTO, the Daylight Savings Time feature automatically adjusts your TV's clock for Daylight Savings. Onscreen Menus Set Clock The set clock function is set to ON in October. • You will have to ...


