Instructions
Page 4
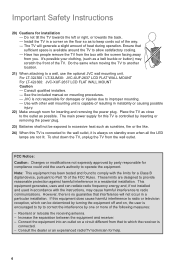
...to try to radio communications. Consult the dealer or an experienced radio/TV technician for installation - Install the TV in accordance with the screen facing away from the wall outlet. See the included manual on a circuit different from that to which can radiate radio frequency ... qualified installers. - Do not tilt the TV towards the left or right, or towards the back. - For LT-32J300 / LT-32JM30: JVC-XUF-2637 LCD FLAT WALL MOUNT For LT-42J300: JVC-XUF-2637 LCD FLAT WALL MOUNT Caution - Have two people remove the TV from the box with the instructions, may scratch...
...to try to radio communications. Consult the dealer or an experienced radio/TV technician for installation - Install the TV in accordance with the screen facing away from the wall outlet. See the included manual on a circuit different from that to which can radiate radio frequency ... qualified installers. - Do not tilt the TV towards the left or right, or towards the back. - For LT-32J300 / LT-32JM30: JVC-XUF-2637 LCD FLAT WALL MOUNT For LT-42J300: JVC-XUF-2637 LCD FLAT WALL MOUNT Caution - Have two people remove the TV from the box with the instructions, may scratch...
Instructions
Page 23
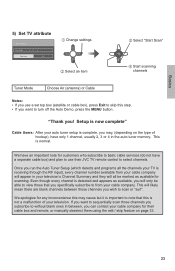
...as available for their cable box and remote, or manually deselect them using the edit / skip feature on the type of your television. Once you run the Auto Tuner Setup (which detects and programs all the channels your TV is receiving through the RF input), every channel ...to basic cable services (do not have only 1 channel, usually 2, 3 or 4 in between, you can contact your cable company. Basics 5) Set TV attribute Set TV Attribute Tuner Mode Air Start Scan Exit 1 Change settings 2 Select an item 3 Select "Start Scan" 4 Start scanning channels Tuner Mode Choose Air (antenna...
...as available for their cable box and remote, or manually deselect them using the edit / skip feature on the type of your television. Once you run the Auto Tuner Setup (which detects and programs all the channels your TV is receiving through the RF input), every channel ...to basic cable services (do not have only 1 channel, usually 2, 3 or 4 in between, you can contact your cable company. Basics 5) Set TV attribute Set TV Attribute Tuner Mode Air Start Scan Exit 1 Change settings 2 Select an item 3 Select "Start Scan" 4 Start scanning channels Tuner Mode Choose Air (antenna...

Instructions
Page 33
...... 33 When entering the password - button. Also, select the channel. You can still access those skipped channels manually using the + CH - Advanced Edit Channel Allows you to the TV. • (For Canadian viewers only) V-CHIP is designed specifically for the US and may not work with video signals from VCRs, DVD players...
...... 33 When entering the password - button. Also, select the channel. You can still access those skipped channels manually using the + CH - Advanced Edit Channel Allows you to the TV. • (For Canadian viewers only) V-CHIP is designed specifically for the US and may not work with video signals from VCRs, DVD players...
Instructions
Page 42
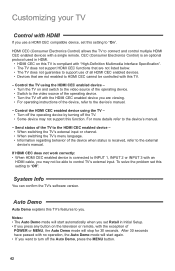
... • When HDMI CEC enabled device is received, refer to "Off". Auto Demo Auto Demo explains this TV's features to you may not support this setting to the external device's manual. Notes: • The Auto Demo mode will start again. • If you are viewing. •... - • When switching the TV's external input or channel. • When switching the TV's menu language. • Information regarding behavior of all HDMI CEC enabled devices. • Devices that are not enabled to HDMI CEC cannot be able to the device's manual. - CEC (Consumer Electronics Control)...
... • When HDMI CEC enabled device is received, refer to "Off". Auto Demo Auto Demo explains this TV's features to you may not support this setting to the external device's manual. Notes: • The Auto Demo mode will start again. • If you are viewing. •... - • When switching the TV's external input or channel. • When switching the TV's menu language. • Information regarding behavior of all HDMI CEC enabled devices. • Devices that are not enabled to HDMI CEC cannot be able to the device's manual. - CEC (Consumer Electronics Control)...
Instructions
Page 44
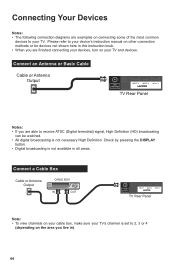
...Digital broadcasting is not necessary High Definition. Please refer to your TV. Connecting Your Devices Notes: • The following connection diagrams are examples on connecting some of the most common devices to your device's instruction manual on other connection methods or for devices not shown here in ...this instruction book. • When you are able to 2, 3 or 4 (depending on the area you are finished connecting your devices, turn on your cable box, make sure your TV's channel is ...
...Digital broadcasting is not necessary High Definition. Please refer to your TV. Connecting Your Devices Notes: • The following connection diagrams are examples on connecting some of the most common devices to your device's instruction manual on other connection methods or for devices not shown here in ...this instruction book. • When you are able to 2, 3 or 4 (depending on the area you are finished connecting your devices, turn on your cable box, make sure your TV's channel is ...
Instructions
Page 46
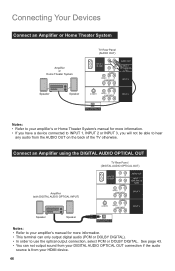
Connect an Amplifier using the DIGITAL AUDIO OPTICAL OUT TV Rear Panel (DIGITAL AUDIO OPTICAL OUT) Amplifier (with DIGITAL AUDIO OPTICAL INPUT) Speaker Speaker Notes: • Refer to your amplifier's manual for more information. • This terminal can not output sound from your DIGITAL AUDIO OPTICAL OUT ...connection if the audio source is from the AUDIO OUT on the back of the TV otherwise. Connecting Your Devices Connect an Amplifier or...
Connect an Amplifier using the DIGITAL AUDIO OPTICAL OUT TV Rear Panel (DIGITAL AUDIO OPTICAL OUT) Amplifier (with DIGITAL AUDIO OPTICAL INPUT) Speaker Speaker Notes: • Refer to your amplifier's manual for more information. • This terminal can not output sound from your DIGITAL AUDIO OPTICAL OUT ...connection if the audio source is from the AUDIO OUT on the back of the TV otherwise. Connecting Your Devices Connect an Amplifier or...
Instructions
Page 48
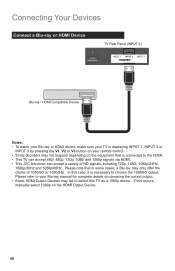
... the 1080/60i output. In this case, it is necessary to detect this occurs, manually select 1080p on the HDMI Output Device. 48 If this TV as a 1080p device. Connecting Your Devices Connect a Blu-ray or HDMI Device TV Rear Panel (INPUT 2) 75 Ω (VHF/UHF) INPUT 1 INPUT 2 INPUT 3 Blu-ray / HDMI ...the choice of HD signals, including 720p, 1080i, 1080p/24Hz, 1080p/30Hz and 1080p/60Hz. Please note that is connected to the HDMI. • This TV can accept 480i, 480p, 720p, 1080i and 1080p signals via HDMI. • This JVC television can accept a variety of 1080/60i or 1080/24p.
... the 1080/60i output. In this case, it is necessary to detect this occurs, manually select 1080p on the HDMI Output Device. 48 If this TV as a 1080p device. Connecting Your Devices Connect a Blu-ray or HDMI Device TV Rear Panel (INPUT 2) 75 Ω (VHF/UHF) INPUT 1 INPUT 2 INPUT 3 Blu-ray / HDMI ...the choice of HD signals, including 720p, 1080i, 1080p/24Hz, 1080p/30Hz and 1080p/60Hz. Please note that is connected to the HDMI. • This TV can accept 480i, 480p, 720p, 1080i and 1080p signals via HDMI. • This JVC television can accept a variety of 1080/60i or 1080/24p.
Instructions
Page 49
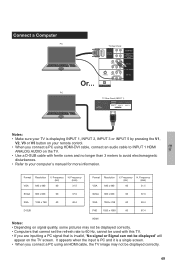
...you are inputting a PC signal that is a single screen. • When you connect a PC using an HDMI cable, the TV image may not be displayed" will appear on your computer's manual for more information. Or... Frequency (kHz) 31.5 Format VGA Resolution 640 x 480 V. It appears when the input is PC ...and it is invalid, "No signal or Signal can not be displayed correctly. 49 PC TV Rear Panel (INPUT 1) 75 Ω (VHF...
...you are inputting a PC signal that is a single screen. • When you connect a PC using an HDMI cable, the TV image may not be displayed" will appear on your computer's manual for more information. Or... Frequency (kHz) 31.5 Format VGA Resolution 640 x 480 V. It appears when the input is PC ...and it is invalid, "No signal or Signal can not be displayed correctly. 49 PC TV Rear Panel (INPUT 1) 75 Ω (VHF...


