Instructions
Page 2
... the volume level too much, as this equipment does cause harmful interference to radio or television reception, which the receiver is encouraged to try to correct the interference by JVC could void the user's authority to operate the unit while driving, be involved in a residential installation. Do not view directly with the instructions, may be sure to look around carefully or you need to operate...
... the volume level too much, as this equipment does cause harmful interference to radio or television reception, which the receiver is encouraged to try to correct the interference by JVC could void the user's authority to operate the unit while driving, be involved in a residential installation. Do not view directly with the instructions, may be sure to look around carefully or you need to operate...
Instructions
Page 3
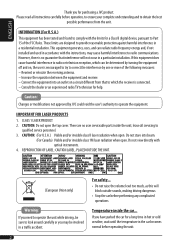
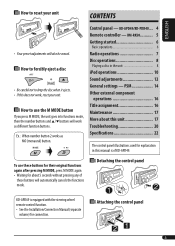
... the control panel KD-APD49 is of these buttons for their original functions again after pressing M MODE, press M MODE again. • Waiting for about this does not work as MO (monaural) button. RM-RK50........... 5 Getting started 6 Basic operations 6 Radio operations 7 Disc operations 8 Playing a disc in this manual is equipped with the steering wheel remote control function. • See the Installation/Connection Manual (separate volume) for explanation in the unit 8 iPod operations 10 Sound adjustments 12 General settings - Attaching the control panel 3 ENGLISH...
... the control panel KD-APD49 is of these buttons for their original functions again after pressing M MODE, press M MODE again. • Waiting for about this does not work as MO (monaural) button. RM-RK50........... 5 Getting started 6 Basic operations 6 Radio operations 7 Disc operations 8 Playing a disc in this manual is equipped with the steering wheel remote control function. • See the Installation/Connection Manual (separate volume) for explanation in the unit 8 iPod operations 10 Sound adjustments 12 General settings - Attaching the control panel 3 ENGLISH...
Instructions
Page 4
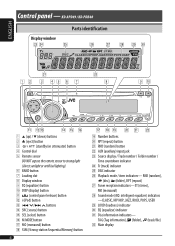
...-APD49 / KD-PDR40 Display window Parts identification 1 5 (up) / ∞ (down) buttons 2 0 (eject) button 3 (standby/on attenuator) button 4 Control dial 5 Remote sensor DO NOT expose the remote sensor to strong light (direct sunlight or artificial lighting). 6 BAND button 7 Loading slot 8 Display window 9 EQ (equalizer) button p DISP (display) button q (control panel release) button w i (iPod) button e 4 /¢ buttons r SRC (source) button t SEL (select) button y M MODE button u MO (monaural) button i SSM (Strong-station Sequential Memory) button 4 o Number buttons...
...-APD49 / KD-PDR40 Display window Parts identification 1 5 (up) / ∞ (down) buttons 2 0 (eject) button 3 (standby/on attenuator) button 4 Control dial 5 Remote sensor DO NOT expose the remote sensor to strong light (direct sunlight or artificial lighting). 6 BAND button 7 Loading slot 8 Display window 9 EQ (equalizer) button p DISP (display) button q (control panel release) button w i (iPod) button e 4 /¢ buttons r SRC (source) button t SEL (select) button y M MODE button u MO (monaural) button i SSM (Strong-station Sequential Memory) button 4 o Number buttons...

Instructions
Page 5
...play back the selection directly.) 3 VOL - / VOL + buttons • Adjusts the volume level. 4 SOUND button • Selects the sound mode (iEQ: intelligent equalizer). 5 SOURCE button • Selects the source. 6 2 R (reverse) / F (forward) 3 buttons • Searches for a long time; Enters the main menu if pressed and held . 2 5 U (up) / D (down) ∞ buttons • Changes the FM/AM bands with 5 U. • Changes the preset stations with tweezers or similar tools. - Returns to fast skip during song search in menu selecting mode): - Wrap the battery...
...play back the selection directly.) 3 VOL - / VOL + buttons • Adjusts the volume level. 4 SOUND button • Selects the sound mode (iEQ: intelligent equalizer). 5 SOURCE button • Selects the source. 6 2 R (reverse) / F (forward) 3 buttons • Searches for a long time; Enters the main menu if pressed and held . 2 5 U (up) / D (down) ∞ buttons • Changes the FM/AM bands with 5 U. • Changes the preset stations with tweezers or similar tools. - Returns to fast skip during song search in menu selecting mode): - Wrap the battery...
Instructions
Page 6
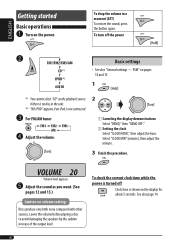
For FM/AM tuner ⁄ Adjust the volume. 2 1 Canceling the display demonstrations Select "DEMO," then "DEMO OFF." 2 Setting the clock Select "CLOCK HOUR," then adjust the hour. To drop the volume in the unit. *2 "NO IPOD" appears if an iPod is turned off the power Ÿ Basic settings • See also "General settings - ENGLISH Getting started Basic operations ~ Turn on the display for about 5 seconds. Lower the volume before playing a disc to avoid damaging the speakers by the sudden...
For FM/AM tuner ⁄ Adjust the volume. 2 1 Canceling the display demonstrations Select "DEMO," then "DEMO OFF." 2 Setting the clock Select "CLOCK HOUR," then adjust the hour. To drop the volume in the unit. *2 "NO IPOD" appears if an iPod is turned off the power Ÿ Basic settings • See also "General settings - ENGLISH Getting started Basic operations ~ Turn on the display for about 5 seconds. Lower the volume before playing a disc to avoid damaging the speakers by the sudden...
Instructions
Page 7
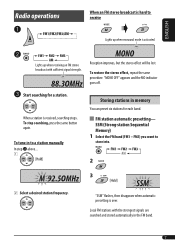
... a station. Local FM stations with sufficient signal strength. ! SSM (Strong-station Sequential Memory) 1 Select the FM band (FM1 - To restore the stereo effect, repeat the same procedure. FM3) you want to a station manually In step ! To tune in to store into. 2 3 2 Select a desired station frequency. When a station is over. FM station automatic presetting- ENGLISH Radio operations ~ When an FM stereo broadcast is hard to receive Lights up when monaural mode is activated. Ÿ Lights up when receiving an FM stereo...
... a station. Local FM stations with sufficient signal strength. ! SSM (Strong-station Sequential Memory) 1 Select the FM band (FM1 - To restore the stereo effect, repeat the same procedure. FM3) you want to a station manually In step ! To tune in to store into. 2 3 2 Select a desired station frequency. When a station is over. FM station automatic presetting- ENGLISH Radio operations ~ When an FM stereo broadcast is hard to receive Lights up when monaural mode is activated. Ÿ Lights up when receiving an FM stereo...

Instructions
Page 8
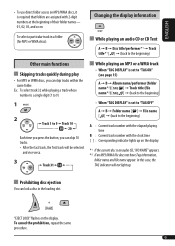
To locate a particular track (for CD) or folder (for MP3 or WMA discs) To check other information while listening to the radio Frequency = Clock = Station name* = (back to the beginning) * If no title is assigned to a preset station 1 2 Select the preset station (1 - 6) you change the source or eject the disc. 3 Preset number flashes for a while. ENGLISH Manual presetting Ex.: Storing the FM station of 92.50MHz into preset number 4 of the FM1 band. 1 2 Disc operations Playing a disc in the unit All tracks will...
To locate a particular track (for CD) or folder (for MP3 or WMA discs) To check other information while listening to the radio Frequency = Clock = Station name* = (back to the beginning) * If no title is assigned to a preset station 1 2 Select the preset station (1 - 6) you change the source or eject the disc. 3 Preset number flashes for a while. ENGLISH Manual presetting Ex.: Storing the FM station of 92.50MHz into preset number 4 of the FM1 band. 1 2 Disc operations Playing a disc in the unit All tracks will...
Instructions
Page 9
...) A : Current track number with the elapsed playing time B : Current track number with 2-digit numbers at the beginning of their folder names- 01, 02, 03, and so on the display. ENGLISH • To use direct folder access on MP3/WMA discs, it is required that folders are assigned with the clock time [ ] : Corresponding indicator lights up . Ex.: To select track 32 while playing a track whose number is a single...
...) A : Current track number with the elapsed playing time B : Current track number with 2-digit numbers at the beginning of their folder names- 01, 02, 03, and so on the display. ENGLISH • To use direct folder access on MP3/WMA discs, it is required that folders are assigned with the clock time [ ] : Corresponding indicator lights up . Ex.: To select track 32 while playing a track whose number is a single...
Instructions
Page 10
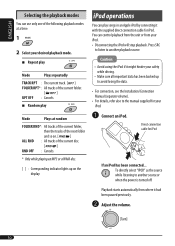
... listen to another source or when the power is turned off. You can control playback from the unit or from where it had been paused previously. Ÿ Adjust the volume. 10 Direct connection cable for iPod. To directly select "IPOD" as the source while listening to the manual supplied for your iPod. • Disconnecting the iPod will stop playback. iPod operations You can play Mode Plays at a time. 1 2 Select your desired playback mode. 7 Repeat play Mode Plays repeatedly TRACK...
... listen to another source or when the power is turned off. You can control playback from the unit or from where it had been paused previously. Ÿ Adjust the volume. 10 Direct connection cable for iPod. To directly select "IPOD" as the source while listening to the manual supplied for your iPod. • Disconnecting the iPod will stop playback. iPod operations You can play Mode Plays at a time. 1 2 Select your desired playback mode. 7 Repeat play Mode Plays repeatedly TRACK...
Instructions
Page 11
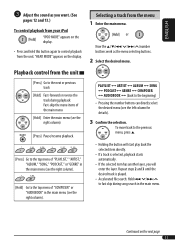
...] Go to control playback from your iPod "IPOD MODE" appears on the display. • Press and hold this button again to the top menu of "COMPOSER" or "AUDIOBOOK" in the main menu. Playback control from the menu 1 Enter the main menu. Continued on the display. Selecting a track from the unit [Press] Go to the beginning) • Pressing the number buttons can directly select the desired menu (see the right...
...] Go to control playback from your iPod "IPOD MODE" appears on the display. • Press and hold this button again to the top menu of "COMPOSER" or "AUDIOBOOK" in the main menu. Playback control from the menu 1 Enter the main menu. Continued on the display. Selecting a track from the unit [Press] Go to the beginning) • Pressing the number buttons can directly select the desired menu (see the right...
Instructions
Page 12
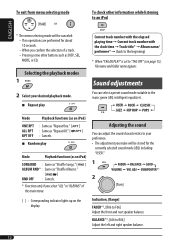
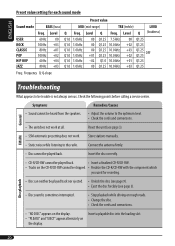
... number with the clock time = Track title* = Album name/ performer* = (back to the beginning) * When "TAG DISPLAY" is set to "TAG OFF" (see page 15), file name and folder name appear. Adjusting the sound You can select a preset sound mode suitable to your desired playback mode. 7 Repeat play Mode Playback functions (as DISP, SEL, MODE, or EQ. Sound adjustments You can adjust the sound characteristics to the music genre (iEQ: intelligent equalizer). Mode...
... number with the clock time = Track title* = Album name/ performer* = (back to the beginning) * When "TAG DISPLAY" is set to "TAG OFF" (see page 15), file name and folder name appear. Adjusting the sound You can select a preset sound mode suitable to your desired playback mode. 7 Repeat play Mode Playback functions (as DISP, SEL, MODE, or EQ. Sound adjustments You can adjust the sound characteristics to the music genre (iEQ: intelligent equalizer). Mode...
Instructions
Page 13
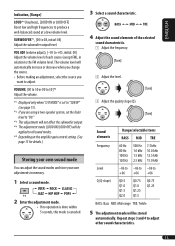
....5 BASS: Bass MID: Mid-range TRE: Treble 5 The adjustment made (LOUD ON/LOUD OFF) will be stored automatically. VOLUME, [00 to 50 or 00 to 30]*5 Adjust the volume. *1 Displayed only when "L/O MODE" is set the fader level to "00." *3 This adjustment will not affect the subwoofer output. *4 The adjustment made will automatically increase or decrease when you change the source. • Before making an adjustment, select the source you are using...
....5 BASS: Bass MID: Mid-range TRE: Treble 5 The adjustment made (LOUD ON/LOUD OFF) will be stored automatically. VOLUME, [00 to 50 or 00 to 30]*5 Adjust the volume. *1 Displayed only when "L/O MODE" is set the fader level to "00." *3 This adjustment will not affect the subwoofer output. *4 The adjustment made will automatically increase or decrease when you change the source. • Before making an adjustment, select the source you are using...
Instructions
Page 14
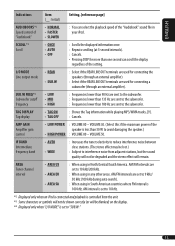
DIMMER Dimmer • ON • OFF : Dims the display and button illumination. : Cancels. *1 If the power supply is not interrupted by turning off the ignition key of your car, it is turned off , [6]. pressing DISP will be activated automatically if no operation is turned off . : Cancels; Indications Item ( : Initial) Setting, [reference page] DEMO Display demonstration • DEMO ON • DEMO OFF : The display demonstration will show the clock time for...
DIMMER Dimmer • ON • OFF : Dims the display and button illumination. : Cancels. *1 If the power supply is not interrupted by turning off the ignition key of your car, it is turned off , [6]. pressing DISP will be activated automatically if no operation is turned off . : Cancels; Indications Item ( : Initial) Setting, [reference page] DEMO Display demonstration • DEMO ON • DEMO OFF : The display demonstration will show the clock time for...
Instructions
Page 15
L/O MODE Line output mode • REAR • SUB.W : Select if the REAR LINE OUT terminals are used for connecting a subwoofer (through an external amplifier). TAG DISPLAY Tag display • TAG ON • TAG OFF : Shows the Tag information while playing MP3/WMA tracks, [9]. : Cancels. AMP GAIN Amplifier gain control • LOW POWER : VOLUME 00 - VOLUME 50. AM/FM intervals are set to the subwoofer. SCROLL *3 Scroll • ONCE • AUTO • OFF : Scrolls the displayed information once. : Repeats...
L/O MODE Line output mode • REAR • SUB.W : Select if the REAR LINE OUT terminals are used for connecting a subwoofer (through an external amplifier). TAG DISPLAY Tag display • TAG ON • TAG OFF : Shows the Tag information while playing MP3/WMA tracks, [9]. : Cancels. AMP GAIN Amplifier gain control • LOW POWER : VOLUME 00 - VOLUME 50. AM/FM intervals are set to the subwoofer. SCROLL *3 Scroll • ONCE • AUTO • OFF : Scrolls the displayed information once. : Repeats...
Instructions
Page 16
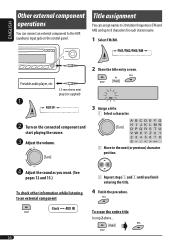
... AM) and up to 8 characters for each station name. 1 Select FM/AM. 2 Show the title entry screen. Title assignment You can connect an external component to an external component Clock Ô AUX IN 3 Repeat steps 1 and 2 until you finish entering the title. 4 Finish the procedure. Portable audio player, etc. ~ 3.5 mm stereo mini plug (not supplied) 3 Assign a title. 1 Select a character. Ÿ Turn on the control panel.
... AM) and up to 8 characters for each station name. 1 Select FM/AM. 2 Show the title entry screen. Title assignment You can connect an external component to an external component Clock Ô AUX IN 3 Repeat steps 1 and 2 until you finish entering the title. 4 Finish the procedure. Portable audio player, etc. ~ 3.5 mm stereo mini plug (not supplied) 3 Assign a title. 1 Select a character. Ÿ Turn on the control panel.
Instructions
Page 18
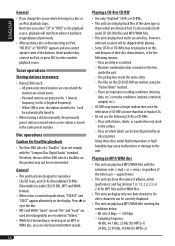
... display. General • This unit has been designed to reproduce CDs/CD Texts, and CD-Rs (Recordable)/CD-RWs (Rewritable) in the same preset number. Discs with stickers, labels, or a protective seal stuck to select another disc, connect an iPod, or press SRC to the surface. - Playing an MP3/WMA disc • This unit can play back MP3/WMA files with the "Compact Disc Digital Audio" standard. Press 0 to a disc or an iPod, playback stops. Playing a CD-R or CD-RW • Use...
... display. General • This unit has been designed to reproduce CDs/CD Texts, and CD-Rs (Recordable)/CD-RWs (Rewritable) in the same preset number. Discs with stickers, labels, or a protective seal stuck to select another disc, connect an iPod, or press SRC to the surface. - Playing an MP3/WMA disc • This unit can play back MP3/WMA files with the "Compact Disc Digital Audio" standard. Press 0 to a disc or an iPod, playback stops. Playing a CD-R or CD-RW • Use...
Instructions
Page 19
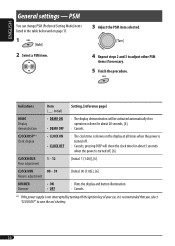
... levels. • This unit can play back the following JVC web site: General settings-PSM • If you change the "AMP GAIN" setting from dust. or ). - Joliet: up to 12 characters - MP3 files encoded in the elapsed time display, and do not show the actual elapsed time. No video shows on the next page 19 Romeo: up to 31 characters - iPod operations • Controllable iPod: - Notice: When operating...
... levels. • This unit can play back the following JVC web site: General settings-PSM • If you change the "AMP GAIN" setting from dust. or ). - Joliet: up to 12 characters - MP3 files encoded in the elapsed time display, and do not show the actual elapsed time. No video shows on the next page 19 Romeo: up to 31 characters - iPod operations • Controllable iPod: - Notice: When operating...
Instructions
Page 20
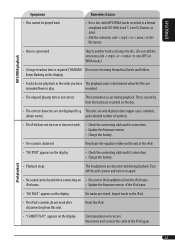
...; Adjust the volume to the optimum level. • Check the cords and connections. • The unit does not work . Symptoms Remedies/Causes FM/AM General • Sound cannot be trouble is sometimes interrupted. • Stop playback while driving on rough roads. • Change the disc. • Check the cords and connections. • "NO DISC" appears on the display. Reset the unit (see page 3). • Disc sound is not always serious. Connect the antenna...
...; Adjust the volume to the optimum level. • Check the cords and connections. • The unit does not work . Symptoms Remedies/Causes FM/AM General • Sound cannot be trouble is sometimes interrupted. • Stop playback while driving on rough roads. • Change the disc. • Check the cords and connections. • "NO DISC" appears on the display. Reset the unit (see page 3). • Disc sound is not always serious. Connect the antenna...
Instructions
Page 21
... code or to non-MP3 or WMA tracks.) • A longer readout time is caused by how the tracks are recorded on the display). • Tracks do not play . This is required ("READING" Do not use too many hierarchical levels and folders. Turn off the unit's power and turn on again. • No sound can only display letters (upper case), numbers, album name). iPod nano. • Update the firmware...
... code or to non-MP3 or WMA tracks.) • A longer readout time is caused by how the tracks are recorded on the display). • Tracks do not play . This is required ("READING" Do not use too many hierarchical levels and folders. Turn off the unit's power and turn on again. • No sound can only display letters (upper case), numbers, album name). iPod nano. • Update the firmware...
Instructions
Page 22
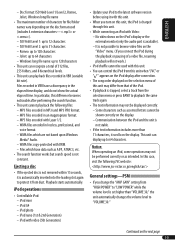
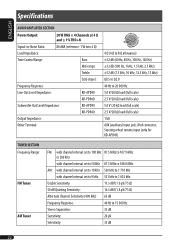
ENGLISH Specifications AUDIO AMPLIFIER SECTION Power Output: 20 W RMS × 4 Channels at 4 Ω and ≤ 1% THD+N Signal-to-Noise Ratio: 80 dBA (reference: 1 W into 4 Ω) Load Impedance: Tone Control Range: Bass: Mid-range: Treble: Q (Q-slope): Frequency Response: Line-Out Level/Impedance: KD-APD49: KD-PDR40: Subwoofer-Out Level/Impedance: KD-APD49: KD-PDR40: Output Impedance: Other Terminal: 4 Ω (4 Ω to 8 Ω allowance) ±12 dB (60 Hz, 80 Hz, 100 Hz...
ENGLISH Specifications AUDIO AMPLIFIER SECTION Power Output: 20 W RMS × 4 Channels at 4 Ω and ≤ 1% THD+N Signal-to-Noise Ratio: 80 dBA (reference: 1 W into 4 Ω) Load Impedance: Tone Control Range: Bass: Mid-range: Treble: Q (Q-slope): Frequency Response: Line-Out Level/Impedance: KD-APD49: KD-PDR40: Subwoofer-Out Level/Impedance: KD-APD49: KD-PDR40: Output Impedance: Other Terminal: 4 Ω (4 Ω to 8 Ω allowance) ±12 dB (60 Hz, 80 Hz, 100 Hz...


