
Instructions
Page 2
... view directly with the instructions, may be sure to look around carefully or you for a long time in hot or cold weather, wait until the temperature in a particular installation. If you have parked the car for purchasing a JVC product. However, there is no user serviceable parts inside the car... Reorient or relocate the receiving antenna. - REPRODUCTION OF LABEL: CAUTION LABEL, PLACED OUTSIDE THE UNIT...
... view directly with the instructions, may be sure to look around carefully or you for a long time in hot or cold weather, wait until the temperature in a particular installation. If you have parked the car for purchasing a JVC product. However, there is no user serviceable parts inside the car... Reorient or relocate the receiving antenna. - REPRODUCTION OF LABEL: CAUTION LABEL, PLACED OUTSIDE THE UNIT...

Instructions
Page 3
... the iPod/iPhone 21 • When connected with the USB cable .......... 21 • When connected with other external components ... 25 SETTINGS Selecting a preset sound mode 26 Bluetooth settings 27 Menu operations 28 Color settings 32 REFERENCES More about this unit 33 Troubleshooting 37 Maintenance 43 Specifications 44 3 ENGLISH Caution on USB device 12 • Disc/file operations 13 EXTERNAL DEVICES Using the Bluetooth® devices 14 • Using the Bluetooth cellular phone 16 • Using the Bluetooth audio player 17 Listening to the CD changer 18...
... the iPod/iPhone 21 • When connected with the USB cable .......... 21 • When connected with other external components ... 25 SETTINGS Selecting a preset sound mode 26 Bluetooth settings 27 Menu operations 28 Color settings 32 REFERENCES More about this unit 33 Troubleshooting 37 Maintenance 43 Specifications 44 3 ENGLISH Caution on USB device 12 • Disc/file operations 13 EXTERNAL DEVICES Using the Bluetooth® devices 14 • Using the Bluetooth cellular phone 16 • Using the Bluetooth audio player 17 Listening to the CD changer 18...

Instructions
Page 4
... adjust the volume during pause when the selected source is CD/USB/USB-IPOD. ty u 9 Select the sound mode. p Detach the panel. r • Tag the PSD (Program Service Data) from HD Radio broadcast. • USB-IPOD: Cancel transferring the tagged PSD to the previous menu. • USB-IPOD: Switch the setting between "HEAD MODE" and "IPOD MODE"*6 [Hold]. w Change the display information. Select HD Radio™ multicast channel. - Search for HD Radio stations only [Hold]. • SIRIUS/XM: Select category. • CD/USB/CD-CH: Select folder. • IPOD...
... adjust the volume during pause when the selected source is CD/USB/USB-IPOD. ty u 9 Select the sound mode. p Detach the panel. r • Tag the PSD (Program Service Data) from HD Radio broadcast. • USB-IPOD: Cancel transferring the tagged PSD to the previous menu. • USB-IPOD: Switch the setting between "HEAD MODE" and "IPOD MODE"*6 [Hold]. w Change the display information. Select HD Radio™ multicast channel. - Search for HD Radio stations only [Hold]. • SIRIUS/XM: Select category. • CD/USB/CD-CH: Select folder. • IPOD...

Instructions
Page 5
... / Folder number / Setting and list operation information 4 (USB) indicator 5 (iPod/iPhone) indicator 6 HD (HD Radio™ broadcast) indicator 7 Playback mode / item indicators-RND (random), (disc), (folder), RPT (repeat) e r 8 HOLD (reception hold) indicator 9 ST (stereo) indicator p TAG (PSD reception) indicator q Disc/device information indicators- (track/ file) and (folder) w (Bluetooth) indicator e Main display r Menu hierarchy position indicator- (top), (middle), (bottom) * As the number increases, the signal/battery power becomes stronger. Before using the remote controller...
... / Folder number / Setting and list operation information 4 (USB) indicator 5 (iPod/iPhone) indicator 6 HD (HD Radio™ broadcast) indicator 7 Playback mode / item indicators-RND (random), (disc), (folder), RPT (repeat) e r 8 HOLD (reception hold) indicator 9 ST (stereo) indicator p TAG (PSD reception) indicator q Disc/device information indicators- (track/ file) and (folder) w (Bluetooth) indicator e Main display r Menu hierarchy position indicator- (top), (middle), (bottom) * As the number increases, the signal/battery power becomes stronger. Before using the remote controller...
Instructions
Page 6
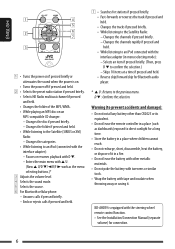
... it. D ∞ : Confirms the selection. Warning (to direct sunlight for Bluetooth audio player. * 5 U : Returns to an iPod connected with the interface adapter (in a place (such as the menu selecting buttons.)* 3 Adjusts the volume level. 4 Selects the sound mode. 5 Selects the source. 6 For Bluetooth cellular phone: - Enters the main menu with 5 U. (Now 5 U/D ∞/2 R/F 3 work as dashboards) exposed to prevent accidents and damage): • Do not install any battery other metallic materials. • Do not...
... it. D ∞ : Confirms the selection. Warning (to direct sunlight for Bluetooth audio player. * 5 U : Returns to an iPod connected with the interface adapter (in a place (such as the menu selecting buttons.)* 3 Adjusts the volume level. 4 Selects the sound mode. 5 Selects the source. 6 For Bluetooth cellular phone: - Enters the main menu with 5 U. (Now 5 U/D ∞/2 R/F 3 work as dashboards) exposed to prevent accidents and damage): • Do not install any battery other metallic materials. • Do not...

Instructions
Page 7
Select "CLOCK" = "CLOCK SET." Preparation Canceling the display demonstration and setting the clock • See also page 28. 1 Turn on : The display information of the current source changes as follows: FM/AM Call Sign*1 = Frequency = PTY (Program Type)*2 = Text*3 = Clock = (back to the beginning) CD/USB • Audio CD/CD Text: /CD-CH Disc title/performer*4 = Track title*4 = Current track number with the elapsed playing time = Current track number with the clock time = (back...
Select "CLOCK" = "CLOCK SET." Preparation Canceling the display demonstration and setting the clock • See also page 28. 1 Turn on : The display information of the current source changes as follows: FM/AM Call Sign*1 = Frequency = PTY (Program Type)*2 = Text*3 = Clock = (back to the beginning) CD/USB • Audio CD/CD Text: /CD-CH Disc title/performer*4 = Track title*4 = Current track number with the elapsed playing time = Current track number with the clock time = (back...

Instructions
Page 12
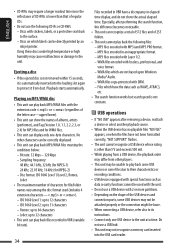
... also connect the iPod/iPhone to the USB terminal of the unit. 12 Playing a file on USB device This unit can play MP3/WMA files stored on the power. 2 Insert a disc. All tracks will be played repeatedly until you change the source or eject the disc. ENGLISH Disc/USB operations Playing a disc 1 Turn on a USB mass storage class device. Press SRC to listen to the USB ( ) terminal of the unit. Stop playing and ejecting the disc Prohibiting disc ejection • "NO DISC" appears...
... also connect the iPod/iPhone to the USB terminal of the unit. 12 Playing a file on USB device This unit can play MP3/WMA files stored on the power. 2 Insert a disc. All tracks will be played repeatedly until you change the source or eject the disc. ENGLISH Disc/USB operations Playing a disc 1 Turn on a USB mass storage class device. Press SRC to listen to the USB ( ) terminal of the unit. Stop playing and ejecting the disc Prohibiting disc ejection • "NO DISC" appears...

Instructions
Page 14
... the display. 14 OPEN SEARCH Make the unit ready to turn on its Bluetooth function. 1 Select "BT PHONE" or "BT AUDIO." 2 Select "NEW DEVICE." Some devices have their own PIN code. Enter the specified PIN code to the unit. 1 Move to the next (or previous) number position. 2 Select a number. [Turn] 3 Repeat steps 1 and 2 until you reset your unit. Up to five devices can be connected at a time for each source ("BT PHONE" and "BT AUDIO"). Connection is established by operating the Bluetooth device. flashes...
... the display. 14 OPEN SEARCH Make the unit ready to turn on its Bluetooth function. 1 Select "BT PHONE" or "BT AUDIO." 2 Select "NEW DEVICE." Some devices have their own PIN code. Enter the specified PIN code to the unit. 1 Move to the next (or previous) number position. 2 Select a number. [Turn] 3 Repeat steps 1 and 2 until you reset your unit. Up to five devices can be connected at a time for each source ("BT PHONE" and "BT AUDIO"). Connection is established by operating the Bluetooth device. flashes...

Instructions
Page 17
... Bluetooth audio player to the next (or previous) number position. "SAY NAME" appears on the display. 2 Speak the name you finish entering the phone number. 5 Voice dialing: 1 Select "VOICE." Reverse skip/forward skip Pause/start playback* 4 Repeat steps 2 and 3 until you want to call. • If your cellular phone does not support the voice recognition system, "ERROR" appears on the unit. - If the sound...
... Bluetooth audio player to the next (or previous) number position. "SAY NAME" appears on the display. 2 Speak the name you finish entering the phone number. 5 Voice dialing: 1 Select "VOICE." Reverse skip/forward skip Pause/start playback* 4 Repeat steps 2 and 3 until you want to call. • If your cellular phone does not support the voice recognition system, "ERROR" appears on the unit. - If the sound...

Instructions
Page 25
... to : • EXT INPUT: CD changer jack on the rear of this unit using the following adapters (not supplied): - KS-U58: For connecting the component with pin jacks - KS-U57: For connecting the component with stereo mini jack Preparation: Make sure "EXT INPUT" is selected in the "SELECT SRC" = "EXT IN" setting, see page 31. • AUX IN: Input jack on the connected component and start playing the source. 3 Adjust the volume. [Turn] 4 -
... to : • EXT INPUT: CD changer jack on the rear of this unit using the following adapters (not supplied): - KS-U58: For connecting the component with pin jacks - KS-U57: For connecting the component with stereo mini jack Preparation: Make sure "EXT INPUT" is selected in the "SELECT SRC" = "EXT IN" setting, see page 31. • AUX IN: Input jack on the connected component and start playing the source. 3 Adjust the volume. [Turn] 4 -

Instructions
Page 28
... adjusted using the clock Clock adjustment data provided via the Satellite Radio channel or the HD Radio broadcast. • OFF: Cancels. CLOCK DISP*1 • CLOCK ON: Clock time is shown on the display at all times when the power is set to DST. • DST OFF: Cancels. CLOCK SET Adjust the hour, then the minute, [7]. Clock setting [Initial: 1:00] CLOCK ADJ • AUTO: The built-in clock is turned off . • CLOCK OFF: Cancels; Select a preset sound mode suitable to the previous menu...
... adjusted using the clock Clock adjustment data provided via the Satellite Radio channel or the HD Radio broadcast. • OFF: Cancels. CLOCK DISP*1 • CLOCK ON: Clock time is shown on the display at all times when the power is set to DST. • DST OFF: Cancels. CLOCK SET Adjust the hour, then the minute, [7]. Clock setting [Initial: 1:00] CLOCK ADJ • AUTO: The built-in clock is turned off . • CLOCK OFF: Cancels; Select a preset sound mode suitable to the previous menu...

Instructions
Page 29
... "Installation/Connection Manual.") *4 Some characters or symbols will not be shown correctly (or will be lost , [9]. Restore the stereo effect. BLEND HOLD*6 • AUTO: HD Radio • DIGITAL: reception mode • ANALOG: Switch between adjacent stations. (Stereo effect may be lost .) Subject to digital audio only. Tuning to interference noises from adjacent stations, but stereo effect will be blanked) on the display. *5 Displayed only when SIRIUS Satellite Radio is connected. *6 Displayed only...
... "Installation/Connection Manual.") *4 Some characters or symbols will not be shown correctly (or will be lost , [9]. Restore the stereo effect. BLEND HOLD*6 • AUTO: HD Radio • DIGITAL: reception mode • ANALOG: Switch between adjacent stations. (Stereo effect may be lost .) Subject to digital audio only. Tuning to interference noises from adjacent stations, but stereo effect will be blanked) on the display. *5 Displayed only when SIRIUS Satellite Radio is connected. *6 Displayed only...
Instructions
Page 30
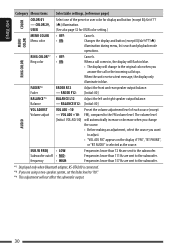
... Adjust the left and right speaker output balance. - Changes the display and button (except EQ/ /0) illumination during menu, list search and playback mode operations. VOL ADJ +10: FM), compared to the subwoofer. *7 Displayed only when Bluetooth adapter, KS-BTA200 is selected as the source. ENGLISH Category Menu items Selectable settings, [reference page] COLOR COLOR 01 - FADER*8 Fader FADER R12 Adjust the front and rear speaker output balance. - Frequencies lower than 111 Hz are sent to the FM volume level...
... Adjust the left and right speaker output balance. - Changes the display and button (except EQ/ /0) illumination during menu, list search and playback mode operations. VOL ADJ +10: FM), compared to the subwoofer. *7 Displayed only when Bluetooth adapter, KS-BTA200 is selected as the source. ENGLISH Category Menu items Selectable settings, [reference page] COLOR COLOR 01 - FADER*8 Fader FADER R12 Adjust the front and rear speaker output balance. - Frequencies lower than 111 Hz are sent to the FM volume level...

Instructions
Page 31
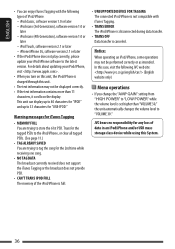
..." in amplifier. SELECT SRC EXT IN*12,*13 External input • CH/IPOD: To use a JVC CD changer, [18], or an Apple iPod, [22]. • EXT INPUT: To connect portable audio player to clear all tag information, then "COMPLETED" appears. SETTINGS 31 Enable "AUX IN" in source selection, [4]. control *10 The volume level automatically changes to "VOLUME 30" if you change to prevent damaging the speaker.) • HIGH POWER: VOLUME 00 - iPod/iPhone • IPOD MODE: Controls iPod/iPhone playback through the unit. SUB...
..." in amplifier. SELECT SRC EXT IN*12,*13 External input • CH/IPOD: To use a JVC CD changer, [18], or an Apple iPod, [22]. • EXT INPUT: To connect portable audio player to clear all tag information, then "COMPLETED" appears. SETTINGS 31 Enable "AUX IN" in source selection, [4]. control *10 The volume level automatically changes to "VOLUME 30" if you change to prevent damaging the speaker.) • HIGH POWER: VOLUME 00 - iPod/iPhone • IPOD MODE: Controls iPod/iPhone playback through the unit. SUB...
Instructions
Page 32
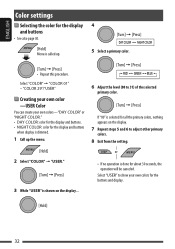
... buttons. • NIGHT COLOR: color for the display and buttons when display is dimmed. 1 Call up . 5 Select a primary color. [Turn] = [Press] • Repeat this procedure. Select "COLOR" = "COLOR 01" - ENGLISH Color settings Selecting the color for the buttons and display. 3 While "USER" is shown on the display. 7 Repeat steps 5 and 6 to show your own colors for the display 4 and buttons • See also page 30. [Turn] = [Press] [Hold] Menu is called up the menu. [Turn] = [Press] 6 Adjust the level...
... buttons. • NIGHT COLOR: color for the display and buttons when display is dimmed. 1 Call up . 5 Select a primary color. [Turn] = [Press] • Repeat this procedure. Select "COLOR" = "COLOR 01" - ENGLISH Color settings Selecting the color for the buttons and display. 3 While "USER" is shown on the display. 7 Repeat steps 5 and 6 to show your own colors for the display 4 and buttons • See also page 30. [Turn] = [Press] [Hold] Menu is called up the menu. [Turn] = [Press] 6 Adjust the level...
Instructions
Page 34
... search function works but search speed is not constant. No other characters can be directly printed by an ink jet printer. USB operations • If "NO USB" appears after performing the search function, this difference becomes noticeable. • This unit can be correctly displayed. • This unit can display only one USB device to 31 characters - Ejecting a disc • If the ejected disc is not removed within 15...
... search function works but search speed is not constant. No other characters can be directly printed by an ink jet printer. USB operations • If "NO USB" appears after performing the search function, this difference becomes noticeable. • This unit can be correctly displayed. • This unit can display only one USB device to 31 characters - Ejecting a disc • If the ejected disc is not removed within 15...
Instructions
Page 36
... an iPod/iPhone and/or USB mass storage class device while using this case, visit the following JVC web site: (English website only) Menu operations • If you turn on the display. iPhone/iPhone 3G, software version 2.1 or later • If the iPod/iPhone does not play correctly, please update your iPod/iPhone, visit . • When you change the "AMP GAIN" setting from "HIGH POWER" to "LOW POWER" while the volume level is canceled. JVC bears...
... an iPod/iPhone and/or USB mass storage class device while using this case, visit the following JVC web site: (English website only) Menu operations • If you turn on the display. iPhone/iPhone 3G, software version 2.1 or later • If the iPod/iPhone does not play correctly, please update your iPod/iPhone, visit . • When you change the "AMP GAIN" setting from "HIGH POWER" to "LOW POWER" while the volume level is canceled. JVC bears...

Instructions
Page 37
... indicator lights up on the display. REFERENCES 37 Check the "USER" color setting (see page 3). • "AUX IN" cannot be selected. Reset the unit (see page 32). • SSM automatic presetting does not work at all digital broadcast of HD Radio station. Store stations manually. • Static noise while listening to the optimum level. • Check the cords and connections. General • The unit does not work . Connect the antenna firmly. ENGLISH Troubleshooting What...
... indicator lights up on the display. REFERENCES 37 Check the "USER" color setting (see page 3). • "AUX IN" cannot be selected. Reset the unit (see page 32). • SSM automatic presetting does not work at all digital broadcast of HD Radio station. Store stations manually. • Static noise while listening to the optimum level. • Check the cords and connections. General • The unit does not work . Connect the antenna firmly. ENGLISH Troubleshooting What...

Instructions
Page 40
... not make pairing with the Bluetooth device. • Enter the same PIN code for "BT PHONE." • Turn off, then turn on the display. "RESET 7" appears on the display. Insert the magazine. While connecting a device, this unit and the CD changer correctly and press the reset button of a Bluetooth audio player. • Reduce the distance between the unit and the Bluetooth cellular phone. • Move the car to the instructions supplied with one Bluetooth cellular phone and one Bluetooth audio device...
... not make pairing with the Bluetooth device. • Enter the same PIN code for "BT PHONE." • Turn off, then turn on the display. "RESET 7" appears on the display. Insert the magazine. While connecting a device, this unit and the CD changer correctly and press the reset button of a Bluetooth audio player. • Reduce the distance between the unit and the Bluetooth cellular phone. • Move the car to the instructions supplied with one Bluetooth cellular phone and one Bluetooth audio device...

Instructions
Page 42
... the adapter and this unit. • The iPod/iPhone's controls do not work . • Check the connecting cable and its connection. • Update the firmware version of the iPod/iPhone. • Charge the battery of the iPod/iPhone. • Reset the iPod/iPhone. • Check whether "IPOD SWITCH" setting is appropriate (see pages 21 to 23). • "NO FILES" appears on the display. • Check the connecting cable and its connection. • Charge the battery of the iPod/iPhone...
... the adapter and this unit. • The iPod/iPhone's controls do not work . • Check the connecting cable and its connection. • Update the firmware version of the iPod/iPhone. • Charge the battery of the iPod/iPhone. • Reset the iPod/iPhone. • Check whether "IPOD SWITCH" setting is appropriate (see pages 21 to 23). • "NO FILES" appears on the display. • Check the connecting cable and its connection. • Charge the battery of the iPod/iPhone...


