

Printer Friendly Spec
Page 1
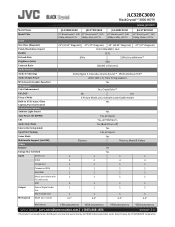
...; 3000 HDTV www.jvc.com Key Features: • Full HD 1080p Resolution • XinemaSound™ System And SRS StudioSound HD™ • Dolby Digital 5.1 • CrystalColor™ Enhancement • USB Multimedia Support • Ambient Light Sensor • Audio Only Mode • Auto Power Off (DPMS) • HDMI-CEC Input/Output & Measurements • 2 HDMI Inputs • 1 Component Input • 1 Composite Input • 1 PC input (VGA) Inputs • 1 Music Port/PC Audio Input • 1 USB Port • 1 RF Antenna Input • 1 Optical Digital Audio Output...
...; 3000 HDTV www.jvc.com Key Features: • Full HD 1080p Resolution • XinemaSound™ System And SRS StudioSound HD™ • Dolby Digital 5.1 • CrystalColor™ Enhancement • USB Multimedia Support • Ambient Light Sensor • Audio Only Mode • Auto Power Off (DPMS) • HDMI-CEC Input/Output & Measurements • 2 HDMI Inputs • 1 Component Input • 1 Composite Input • 1 PC input (VGA) Inputs • 1 Music Port/PC Audio Input • 1 USB Port • 1 RF Antenna Input • 1 Optical Digital Audio Output...
Printer Friendly Spec
Page 2
... Caption/Parental Control Convenience Features Ambient Light Sensor Yes Auto Power Off (DPMS) Yes, all inputs CEC Yes, all HDMI ports Audio Only Mode Yes (Backlit turn off) Interactive Setup Guide Yes Input Port Naming Yes, all inputs Game Mode Yes Multimedia Support (via USB) Pictures Pictures, Music & Videos Others Remote IR Energy Star Certified Yes Input Antenna in 1 1 1 1 HDMI 2 2 4 4 Component 1 1 1 1 Composite (RCA) 1 1 1 1 VGA/RGB 1 1 1 1 Music port (share with 1 1 PC audio port) USB 1 1 1 1 1 1 Output Optical Digital Audio...
... Caption/Parental Control Convenience Features Ambient Light Sensor Yes Auto Power Off (DPMS) Yes, all inputs CEC Yes, all HDMI ports Audio Only Mode Yes (Backlit turn off) Interactive Setup Guide Yes Input Port Naming Yes, all inputs Game Mode Yes Multimedia Support (via USB) Pictures Pictures, Music & Videos Others Remote IR Energy Star Certified Yes Input Antenna in 1 1 1 1 HDMI 2 2 4 4 Component 1 1 1 1 Composite (RCA) 1 1 1 1 VGA/RGB 1 1 1 1 Music port (share with 1 1 PC audio port) USB 1 1 1 1 1 1 Output Optical Digital Audio...
User Manual
Page 4
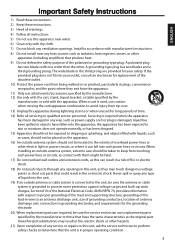
... for the grounding electrode. 20) When replacement parts are provided for long periods of the polarized or grounding-type plug. When installing an outside antenna or cable system is connected to the unit, be sure the antenna or cable system is used, use caution when moving the cart/apparatus combination to qualified service personnel. If the provided plug does not fit into the unit...
... for the grounding electrode. 20) When replacement parts are provided for long periods of the polarized or grounding-type plug. When installing an outside antenna or cable system is connected to the unit, be sure the antenna or cable system is used, use caution when moving the cart/apparatus combination to qualified service personnel. If the provided plug does not fit into the unit...
User Manual
Page 5
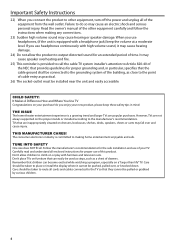
... watching a program, especially on a "larger than life"TV. Care should be taken to route all enclosed instructions for proper grounding and, in mind: THE ISSUE The home theater entertainment experience is committed to making any connections. 23) Sudden high volume sound may cause an electric shock and serious personal injury. Read the owner's manual of time. As you use headphones...
... watching a program, especially on a "larger than life"TV. Care should be taken to route all enclosed instructions for proper grounding and, in mind: THE ISSUE The home theater entertainment experience is committed to making any connections. 23) Sudden high volume sound may cause an electric shock and serious personal injury. Read the owner's manual of time. As you use headphones...
User Manual
Page 7
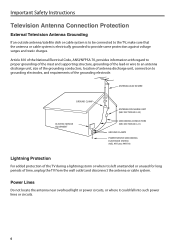
... not locate the antenna near overhead light or power circuits, or where it is electrically grounded to grounding electrodes, and requirements of time, unplug the TV from the wall outlet and disconnect the antenna or cable system. Article 810 of the National Electrical Code, ANSI/NFPSA 70, provides information with regard to proper grounding of the mast and supporting structure...
... not locate the antenna near overhead light or power circuits, or where it is electrically grounded to grounding electrodes, and requirements of time, unplug the TV from the wall outlet and disconnect the antenna or cable system. Article 810 of the National Electrical Code, ANSI/NFPSA 70, provides information with regard to proper grounding of the mast and supporting structure...
User Manual
Page 9
... Stand 11 Package Contents 12 Remote Control Batteries 12 Parts and Functions 13 Front and Side Views 13 Rear View 13 Remote Control 14 Making Connections 15 Connecting Antenna / Cable 15 Connecting HD Devices 15 Via HDMI 15 Via Component Connection 16 Via Composite Connection 16 Connecting External Speakers / Soundbar / AV Receivers 17 Digital Connection 17 Analog Connection 17 Connecting Computers and Laptops 18 Basic Operations 19 Setup Wizard 19 Exit Retail Mode 20 Basic TV Operation 20 Changing Channel 20 Mute Volume 21 Set Sleep Timer...
... Stand 11 Package Contents 12 Remote Control Batteries 12 Parts and Functions 13 Front and Side Views 13 Rear View 13 Remote Control 14 Making Connections 15 Connecting Antenna / Cable 15 Connecting HD Devices 15 Via HDMI 15 Via Component Connection 16 Via Composite Connection 16 Connecting External Speakers / Soundbar / AV Receivers 17 Digital Connection 17 Analog Connection 17 Connecting Computers and Laptops 18 Basic Operations 19 Setup Wizard 19 Exit Retail Mode 20 Basic TV Operation 20 Changing Channel 20 Mute Volume 21 Set Sleep Timer...

User Manual
Page 10
ENGLISH Select Antenna / Cable 34 Scan Channels 34 Add Channel 35 Delete Channel 35 Sleep Timer 35 Appendix 36 Supported Input Source for PIP/POP 36 Supported Resolution 36 Troubleshooting 37 Specifications 38 Limited Warranty 40 Product Registration 43 Contents 9
ENGLISH Select Antenna / Cable 34 Scan Channels 34 Add Channel 35 Delete Channel 35 Sleep Timer 35 Appendix 36 Supported Input Source for PIP/POP 36 Supported Resolution 36 Troubleshooting 37 Specifications 38 Limited Warranty 40 Product Registration 43 Contents 9
User Manual
Page 15
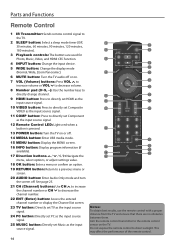
... button: Change the display mode (Normal, Wide, Zoom Panoramic). 6 MUTE button: Turn the TV audio off or on. 7 VOL (Volume) buttons: Press VOL to increase volume or VOL to decrease volume. 8 Number pad (0~9, -): Use the number keys to directly change channel. 9 HDMI button: Press to directly set HDMI as the input source signal. 10 VIDEO button: Press to directly set Composite VIDEO as the input source signal. 11 COMP button: Press to directly set Music as the input source signal. 12 Remote Control LED: Lights red when a button is pressed. 13 POWER button: Turn...
... button: Change the display mode (Normal, Wide, Zoom Panoramic). 6 MUTE button: Turn the TV audio off or on. 7 VOL (Volume) buttons: Press VOL to increase volume or VOL to decrease volume. 8 Number pad (0~9, -): Use the number keys to directly change channel. 9 HDMI button: Press to directly set HDMI as the input source signal. 10 VIDEO button: Press to directly set Composite VIDEO as the input source signal. 11 COMP button: Press to directly set Music as the input source signal. 12 Remote Control LED: Lights red when a button is pressed. 13 POWER button: Turn...
User Manual
Page 19
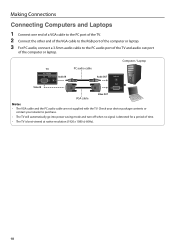
... VGA cable to the RGB port of the computer or laptop. 3 For PC audio, connect a 3.5mm audio cable to purchase. • The TV will automatically go into power saving mode and turn off when no signal is detected for a period of the computer or laptop. Computer / Laptop TV PC / MUSIC PC AUDIO / MUSIC Audio IN PC audio cable Audio OUT Audio out VGA Video IN VGA cable Video OUT...
... VGA cable to the RGB port of the computer or laptop. 3 For PC audio, connect a 3.5mm audio cable to purchase. • The TV will automatically go into power saving mode and turn off when no signal is detected for a period of the computer or laptop. Computer / Laptop TV PC / MUSIC PC AUDIO / MUSIC Audio IN PC audio cable Audio OUT Audio out VGA Video IN VGA cable Video OUT...
User Manual
Page 20
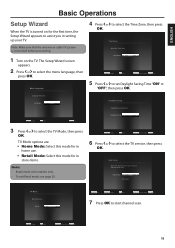
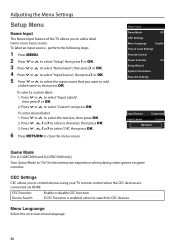
... Operations Setup Wizard When the TV is turned on the TV. Change OK Select RETURN Previous Setup INFO Exit 19 Signal Type: Cable Start Scan TV Mode Mode Selection Mode: Home Mode Move Change OK Select RETURN Previous Setup INFO Exit 7 Press OK to select the TV Mode, then press OK. The Setup Wizard screen appears. 2 Press or to set Daylight Saving Time "ON" or "OFF", then press OK. TV Mode...
... Operations Setup Wizard When the TV is turned on the TV. Change OK Select RETURN Previous Setup INFO Exit 19 Signal Type: Cable Start Scan TV Mode Mode Selection Mode: Home Mode Move Change OK Select RETURN Previous Setup INFO Exit 7 Press OK to select the TV Mode, then press OK. The Setup Wizard screen appears. 2 Press or to set Daylight Saving Time "ON" or "OFF", then press OK. TV Mode...
User Manual
Page 26
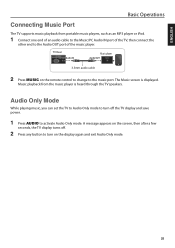
... display again and exit Audio Only mode. 25 A message appears on the remote control to change to activate Audio Only mode. ENGLISH Basic Operations Connecting Music Port The TV supports music playback from the music player is displayed. TV Rear PC / MUSIC Audio IN PC AUDIO / MUSIC Music player Audio OUT Earphone 3.5mm audio cable 2 Press MUSIC on the screen, then after a few seconds, the TV display turns off the TV display and save power. 1 Press AUDIO...
... display again and exit Audio Only mode. 25 A message appears on the remote control to change to activate Audio Only mode. ENGLISH Basic Operations Connecting Music Port The TV supports music playback from the music player is displayed. TV Rear PC / MUSIC Audio IN PC AUDIO / MUSIC Music player Audio OUT Earphone 3.5mm audio cable 2 Press MUSIC on the screen, then after a few seconds, the TV display turns off the TV display and save power. 1 Press AUDIO...
User Manual
Page 27
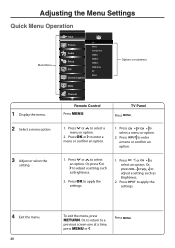
Press or to apply the settings. 1. Press OK to select a menu or option. 2. Press INPUT to enter a menu or confirm an option. 1. Press MENU. Adjusting the Menu Settings Quick Menu Operation Main Menu Input Picture Audio Setup PIP Closed Caption Wide Channel TV TV Video Component HDMI-1 HDMI-2 HDMI-3 HDMI Side PC Music Options or submenu 1 Display the menu. Press OK or to apply the settings. 4 Exit the menu. 26 To exit the menu, press RETURN. Press INPUT to adjust a setting, such as Brightness. 2. Or...
Press or to apply the settings. 1. Press OK to select a menu or option. 2. Press INPUT to enter a menu or confirm an option. 1. Press MENU. Adjusting the Menu Settings Quick Menu Operation Main Menu Input Picture Audio Setup PIP Closed Caption Wide Channel TV TV Video Component HDMI-1 HDMI-2 HDMI-3 HDMI Side PC Music Options or submenu 1 Display the menu. Press OK or to apply the settings. 4 Exit the menu. 26 To exit the menu, press RETURN. Press INPUT to adjust a setting, such as Brightness. 2. Or...
User Manual
Page 28
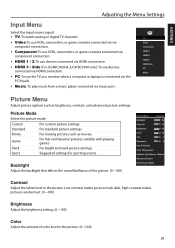
...Picture Picture Mode Backlight Standard 85 Custom Standard For custom picture settings. For standard picture settings. Input Picture Mode Select the picture mode. For fast and dynamic pictures suitable with playing games. Input • TV: To watch analog or digital TV channels. • Video: To use VCRs, camcorders, or game consoles connected via music port. Wide • Music: To play music from a music player connected via component connection. Color 60 Setup Tint 0 PIP Sharpness 8 Size & Position Color Temperature Closed Caption Ambient Light Sensor...
...Picture Picture Mode Backlight Standard 85 Custom Standard For custom picture settings. For standard picture settings. Input Picture Mode Select the picture mode. For fast and dynamic pictures suitable with playing games. Input • TV: To watch analog or digital TV channels. • Video: To use VCRs, camcorders, or game consoles connected via music port. Wide • Music: To play music from a music player connected via component connection. Color 60 Setup Tint 0 PIP Sharpness 8 Size & Position Color Temperature Closed Caption Ambient Light Sensor...
User Manual
Page 29
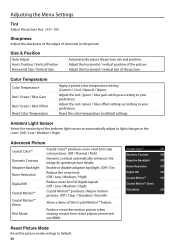
... Contrast Off Adaptive Backlight Off Noise Reduction Off Digital NR Off Crystal MotionTM Off Crystal MotionTM Demo Film Mode Off Reset Picture Mode Reset the picture mode setings to light changes in the picture. Position / Vertical Positon Horizontal Size / Vertical Size Automatically adjust the picture size and position. Adjust the horizontal / vertical size of the picture. Reset the color temperature to default settings. Produce smoother motion picture when viewing movies from video players connected via HDMI. Adjusting the Menu Settings Tint Adjust the picture hue. (-50...
... Contrast Off Adaptive Backlight Off Noise Reduction Off Digital NR Off Crystal MotionTM Off Crystal MotionTM Demo Film Mode Off Reset Picture Mode Reset the picture mode setings to light changes in the picture. Position / Vertical Positon Horizontal Size / Vertical Size Automatically adjust the picture size and position. Adjust the horizontal / vertical size of the picture. Reset the color temperature to default settings. Produce smoother motion picture when viewing movies from video players connected via HDMI. Adjusting the Menu Settings Tint Adjust the picture hue. (-50...
User Manual
Page 31
... playing video games on game consoles. Press or to select a character, then press OK. 3. Press , , or to select "Custom" and press OK. CEC Function Device Search Enable or disable CEC function. CEC Settings CEC allows you want to add a label name to control devices using your TV remote control when the CEC devices are connected via HDMI. Menu Languange Select the on an input source...
... playing video games on game consoles. Press or to select a character, then press OK. 3. Press , , or to select "Custom" and press OK. CEC Function Device Search Enable or disable CEC function. CEC Settings CEC allows you want to add a label name to control devices using your TV remote control when the CEC devices are connected via HDMI. Menu Languange Select the on an input source...

User Manual
Page 35
... and displays closed caption data of television programs as text size and text color. To stop scanning, select "Stop Scan" and press OK. 34 Scanning progress is equipped with network signals and memorizes them into memory. Picture Audio Channel Menu Setup Select Antenna / Cable Select Antenna or Cable depending on the menu screen. Closed Caption TV Mode Cable 2 Press or to select "Analog Closed Caption" or "Digital Closed Caption, then press or OK. Channel Partial Channel Scan Find Channel Channel Management Scan Channels Digital MTS English Auto Scan Channels The...
... and displays closed caption data of television programs as text size and text color. To stop scanning, select "Stop Scan" and press OK. 34 Scanning progress is equipped with network signals and memorizes them into memory. Picture Audio Channel Menu Setup Select Antenna / Cable Select Antenna or Cable depending on the menu screen. Closed Caption TV Mode Cable 2 Press or to select "Analog Closed Caption" or "Digital Closed Caption, then press or OK. Channel Partial Channel Scan Find Channel Channel Management Scan Channels Digital MTS English Auto Scan Channels The...
User Manual
Page 38
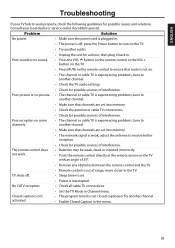
... and solutions. Problem Solution No power. • Make sure the power cord is plugged in . No CATV reception. • Check all cable TV connections. • Set the TV Mode in the menu. 37 Poor picture or no sound. • Press the VOL button on the remote control or the VOL + button on the TV. • Press MUTE on the remote control to turn on . • The channel or cable TV is...
... and solutions. Problem Solution No power. • Make sure the power cord is plugged in . No CATV reception. • Check all cable TV connections. • Set the TV Mode in the menu. 37 Poor picture or no sound. • Press the VOL button on the remote control or the VOL + button on the TV. • Press MUTE on the remote control to turn on . • The channel or cable TV is...
User Manual
Page 39
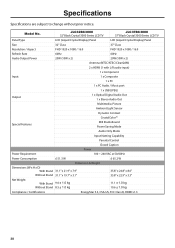
... 32" Black Crystal 3000 Series LCD TV JLC37BC3000 37" Black Crystal 3000 Series LCD TV Panel Type LCD (Liquid Crystal Display) Panel LCD (Liquid Crystal Display) Panel Size 32" Class 37" Class Resolution / Aspect FHD 1920 x 1080 / 16:9 FHD 1920 x 1080 / 16:9 Refresh Rate 60Hz 60Hz Audio Output Power 20W (10W x 2) 20W (10W x 2) Antenna (NTSC/ATSC/ClearQAM) 2 x HDMI (1 with L/R audio input) 1 x Component Input 1 x Composite 1 x PC 1 x PC Audio / Music port 1 x USB (JPEG) Output 1 x Optical Digital Audio Out 1 x Stereo Audio Out Multimedia: Picture Ambient Light Sensor...
... 32" Black Crystal 3000 Series LCD TV JLC37BC3000 37" Black Crystal 3000 Series LCD TV Panel Type LCD (Liquid Crystal Display) Panel LCD (Liquid Crystal Display) Panel Size 32" Class 37" Class Resolution / Aspect FHD 1920 x 1080 / 16:9 FHD 1920 x 1080 / 16:9 Refresh Rate 60Hz 60Hz Audio Output Power 20W (10W x 2) 20W (10W x 2) Antenna (NTSC/ATSC/ClearQAM) 2 x HDMI (1 with L/R audio input) 1 x Component Input 1 x Composite 1 x PC 1 x PC Audio / Music port 1 x USB (JPEG) Output 1 x Optical Digital Audio Out 1 x Stereo Audio Out Multimedia: Picture Ambient Light Sensor...
User Manual
Page 40
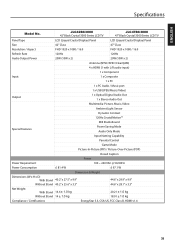
... LCD TV JLC47BC3000 47" Black Crystal 3000 Series LCD TV Panel Type LCD (Liquid Crystal Display) Panel LCD (Liquid Crystal Display) Panel Size 42" Class 47" Class Resolution / Aspect FHD 1920 x 1080 / 16:9 FHD 1920 x 1080 / 16:9 Refresh Rate 120Hz 120Hz Audio Output Power 20W (10W x 2) 20W (10W x 2) Antenna (NTSC/ATSC/ClearQAM) 4 x HDMI (1 with L/R audio input) 1 x Component Input 1 x Composite 1 x PC 1 x PC Audio / Music port 1 x USB (JPEG/Music/Video) Output 1 x Optical Digital Audio Out 1 x Stereo Audio Out Multimedia: Picture, Music, Video Ambient Light Sensor...
... LCD TV JLC47BC3000 47" Black Crystal 3000 Series LCD TV Panel Type LCD (Liquid Crystal Display) Panel LCD (Liquid Crystal Display) Panel Size 42" Class 47" Class Resolution / Aspect FHD 1920 x 1080 / 16:9 FHD 1920 x 1080 / 16:9 Refresh Rate 120Hz 120Hz Audio Output Power 20W (10W x 2) 20W (10W x 2) Antenna (NTSC/ATSC/ClearQAM) 4 x HDMI (1 with L/R audio input) 1 x Component Input 1 x Composite 1 x PC 1 x PC Audio / Music port 1 x USB (JPEG/Music/Video) Output 1 x Optical Digital Audio Out 1 x Stereo Audio Out Multimedia: Picture, Music, Video Ambient Light Sensor...
User Manual
Page 41
... that a Product is within the warranty period, the Warrantor will provide instructions for packing and shipping the covered Product to designated service centers must be sent to the designated service center to be no charge for parts or labor during the warranty period. Type of Service Defective Products must utilize either repair or replace the Product at the Warrantor's option...
... that a Product is within the warranty period, the Warrantor will provide instructions for packing and shipping the covered Product to designated service centers must be sent to the designated service center to be no charge for parts or labor during the warranty period. Type of Service Defective Products must utilize either repair or replace the Product at the Warrantor's option...


