
Printer Friendly Spec
Page 2
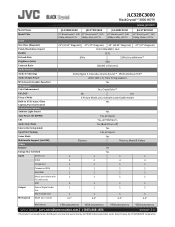
...; 3000 HDTV www.jvc.com Model Name JLC32BC3000 JLC37BC3000 JLC42BC3000 JLC47BC3000 Model Title 32" BlackCrystal™, FHD 37" BlackCrystal™, FHD 42" BlackCrystal™, FHD 47" BlackCrystal... (Backlit turn off) Interactive Setup Guide Yes Input Port Naming Yes, all inputs Game Mode Yes Multimedia Support (via USB) Pictures Pictures, Music & Videos Others Remote IR Energy Star Certified Yes Input Antenna in 1 1 1 1 HDMI 2 2 4 4 Component 1 1 1 1 Composite (RCA) 1 1 1 1 VGA/RGB 1 1 1 1 Music port (share with 1 1 PC audio port) USB 1 ...
...; 3000 HDTV www.jvc.com Model Name JLC32BC3000 JLC37BC3000 JLC42BC3000 JLC47BC3000 Model Title 32" BlackCrystal™, FHD 37" BlackCrystal™, FHD 42" BlackCrystal™, FHD 47" BlackCrystal... (Backlit turn off) Interactive Setup Guide Yes Input Port Naming Yes, all inputs Game Mode Yes Multimedia Support (via USB) Pictures Pictures, Music & Videos Others Remote IR Energy Star Certified Yes Input Antenna in 1 1 1 1 HDMI 2 2 4 4 Component 1 1 1 1 Composite (RCA) 1 1 1 1 VGA/RGB 1 1 1 1 Music port (share with 1 1 PC audio port) USB 1 ...
User Manual
Page 9
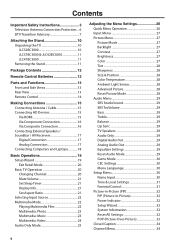
....... 6 DTV Transition Advisory 7 Attaching the Stand 10 Unpacking the TV 10 JLC32BC3000 10 JLC37BC3000 & JLC42BC3000 11 JLC47BC3000 11 Removing the Stand 11 Package Contents 12 Remote Control Batteries 12 Parts and Functions 13 Front and Side Views 13 Rear View 13 Remote Control 14 Making Connections 15 Connecting Antenna / Cable 15 Connecting HD...
....... 6 DTV Transition Advisory 7 Attaching the Stand 10 Unpacking the TV 10 JLC32BC3000 10 JLC37BC3000 & JLC42BC3000 11 JLC47BC3000 11 Removing the Stand 11 Package Contents 12 Remote Control Batteries 12 Parts and Functions 13 Front and Side Views 13 Rear View 13 Remote Control 14 Making Connections 15 Connecting Antenna / Cable 15 Connecting HD...
User Manual
Page 11
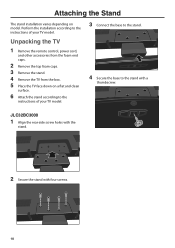
Unpacking the TV 1 Remove the remote control, power cord, and other accessories from the foam end caps. 2 Remove the top foam caps. 3 Remove the stand. 4 Remove the TV from the box. 5 Place the TV face down on model. JLC32BC3000 1 Align the rear-side screw holes with the stand. 2 Secure the stand with a thumbscrew...
Unpacking the TV 1 Remove the remote control, power cord, and other accessories from the foam end caps. 2 Remove the top foam caps. 3 Remove the stand. 4 Remove the TV from the box. 5 Place the TV face down on model. JLC32BC3000 1 Align the rear-side screw holes with the stand. 2 Secure the stand with a thumbscrew...
User Manual
Page 13
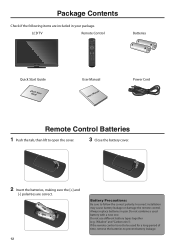
... a used for a long period of time, remove the batteries to prevent battery leakage. Do not use different battery types together (e.g. LCD TV Remote Control I N SLEEP NPUT MENU MEDIA INFO OK W IDE AUDIO RETUR VOL CH MUTE 123 456 789 _ 0 ENT HDMI PC TV VIDEO COMP... MUSIC Batteries Quick Start Guide QGuuicidkeStart User Manual User's Manual Power Cord Remote Control Batteries 1 Push the tab, then lift to open the cover. 3 Close the battery cover. 2 Insert the batteries, making sure the [+]...
... a used for a long period of time, remove the batteries to prevent battery leakage. Do not use different battery types together (e.g. LCD TV Remote Control I N SLEEP NPUT MENU MEDIA INFO OK W IDE AUDIO RETUR VOL CH MUTE 123 456 789 _ 0 ENT HDMI PC TV VIDEO COMP... MUSIC Batteries Quick Start Guide QGuuicidkeStart User Manual User's Manual Power Cord Remote Control Batteries 1 Push the tab, then lift to open the cover. 3 Close the battery cover. 2 Insert the batteries, making sure the [+]...
User Manual
Page 14
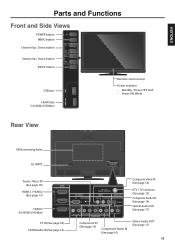
... Channel Up / Down button CH VOL + Volume Up / Down button VOL _ INPUT button INPUT USB port HDMI Side (For JLC42BC3000 & JLC47BC3000 only) HDMI Side USB Remote control sensor Power indicator • Standby / Power OFF: Red • Power ON: White Rear View VESA mounting holes AC INPUT AC IN HDMI 1 2 3 PC / MUSIC...
... Channel Up / Down button CH VOL + Volume Up / Down button VOL _ INPUT button INPUT USB port HDMI Side (For JLC42BC3000 & JLC47BC3000 only) HDMI Side USB Remote control sensor Power indicator • Standby / Power OFF: Red • Power ON: White Rear View VESA mounting holes AC INPUT AC IN HDMI 1 2 3 PC / MUSIC...
User Manual
Page 15
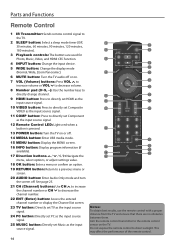
... between them. See page 25. 21 CH (Channel) buttons: Use CH to increase the channel number or CH to direct sunlight. Do not expose the remote control to decrease the channel number. 22 ENT (Enter) button: Access the entered channel number or display the Channel list screen. 23 TV button: Directly... 21 MUTE 123 456 8 789 _ 0 ENT 22 9 HDMI PC TV 23 24 10 VIDEO COMP MUSIC 25 11 Notes: To obtain best results, use the remote control with a proper distance from the TV and ensure that there are used for Photo, Music, Video, and HDMI CEC function. 4 INPUT button: Change the...
... between them. See page 25. 21 CH (Channel) buttons: Use CH to increase the channel number or CH to direct sunlight. Do not expose the remote control to decrease the channel number. 22 ENT (Enter) button: Access the entered channel number or display the Channel list screen. 23 TV button: Directly... 21 MUTE 123 456 8 789 _ 0 ENT 22 9 HDMI PC TV 23 24 10 VIDEO COMP MUSIC 25 11 Notes: To obtain best results, use the remote control with a proper distance from the TV and ensure that there are used for Photo, Music, Video, and HDMI CEC function. 4 INPUT button: Change the...
User Manual
Page 21
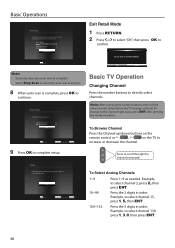
... Channel scan in order, Example, to select channel 130, press 1, 3, 0, then press ENT. 20 To Browse Channel Press the Channel up/down buttons on the remote control or CH , CH on the TV to exit Setup Wizard. To change to select channel 2, press 2, then press ENT. 10~99 Press the 2 digits...
... Channel scan in order, Example, to select channel 130, press 1, 3, 0, then press ENT. 20 To Browse Channel Press the Channel up/down buttons on the remote control or CH , CH on the TV to exit Setup Wizard. To change to select channel 2, press 2, then press ENT. 10~99 Press the 2 digits...
User Manual
Page 23
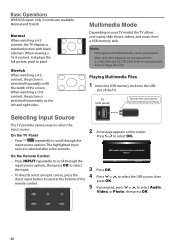
When watching a 16:9 content, the picture is selected after a few seconds. 123 On the Remote Control USB media detected. Playing Multimedia Files 1 Insert the USB memory stick into the slot. TV (side panel) Take note of the 5 press OK. VIDEO ... an in8put sourc9e, press the 4 Press or to play slide show of the TV. Basic Operations With VGA input, only 2 modes are not supported in JLC32BC3000 and JLC37BC3000. When viewing a 16:9 content, it displays the full picture, pixel to pixel. Do not force the device into the USB slot of image...
When watching a 16:9 content, the picture is selected after a few seconds. 123 On the Remote Control USB media detected. Playing Multimedia Files 1 Insert the USB memory stick into the slot. TV (side panel) Take note of the 5 press OK. VIDEO ... an in8put sourc9e, press the 4 Press or to play slide show of the TV. Basic Operations With VGA input, only 2 modes are not supported in JLC32BC3000 and JLC37BC3000. When viewing a 16:9 content, it displays the full picture, pixel to pixel. Do not force the device into the USB slot of image...
User Manual
Page 25
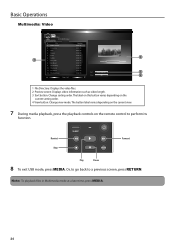
... The Hurds 01:44:15 11. Suffler 1 7. Fish story 02:03:15 3. Runner 01:20:15 5. The label on this button varies depending on the remote control to a previous screen, press RETURN. Basic Operations Multimedia: Video Video PATH:/MMP/Video/ # File 1.
... The Hurds 01:44:15 11. Suffler 1 7. Fish story 02:03:15 3. Runner 01:20:15 5. The label on this button varies depending on the remote control to a previous screen, press RETURN. Basic Operations Multimedia: Video Video PATH:/MMP/Video/ # File 1.
User Manual
Page 26
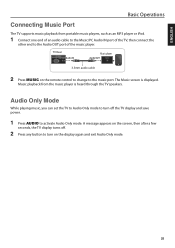
... from the music player is displayed. Audio Only Mode While playing music, you can set the TV to Audio Only mode to turn on the remote control to change to the music port. A message appears on the screen, then after a few seconds, the TV display turns off. 2 Press any button to...
... from the music player is displayed. Audio Only Mode While playing music, you can set the TV to Audio Only mode to turn on the remote control to change to the music port. A message appears on the screen, then after a few seconds, the TV display turns off. 2 Press any button to...
User Manual
Page 27
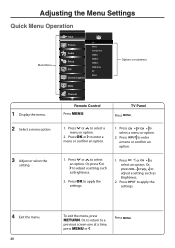
..., to return to select an option. Press CH or CH to a previous screen one at a time, press MENU or . Press INPUT to apply the settings. 1. Remote Control Press MENU. Press OK to enter a menu or confirm an option. 3 Adjust or select the setting. 1. Press or to adjust a setting, such as Brightness...
..., to return to select an option. Press CH or CH to a previous screen one at a time, press MENU or . Press INPUT to apply the settings. 1. Remote Control Press MENU. Press OK to enter a menu or confirm an option. 3 Adjust or select the setting. 1. Press or to adjust a setting, such as Brightness...
User Manual
Page 31
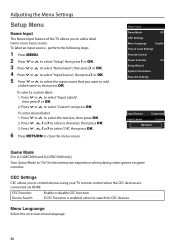
... "OK", then press OK. CEC Settings CEC allows you to select the text box, then press OK. 2. Press or to control devices using your TV remote control when the CEC devices are connected via HDMI. Input Source Component Input Labels Custom My Input 6 Press RETURN to "On" for CEC devices. Power...
... "OK", then press OK. CEC Settings CEC allows you to select the text box, then press OK. 2. Press or to control devices using your TV remote control when the CEC devices are connected via HDMI. Input Source Component Input Labels Custom My Input 6 Press RETURN to "On" for CEC devices. Power...
User Manual
Page 38
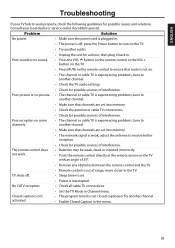
... Caption in Channel menu. Poor picture or no sound. • Press the VOL button on the remote control or the VOL + button on the TV. • Press MUTE on the remote control to ensure that channels are set into memory. • The network signal is weak, adjust the...Batteries may be weak, dead, or inserted incorrectly. • Point the remote control directly at the remote sensor on the TV with an angle of 35º. • Remove any obstacles between the remote control and the TV. • Remote control is out of interference. Poor reception on some channels. • The...
... Caption in Channel menu. Poor picture or no sound. • Press the VOL button on the remote control or the VOL + button on the TV. • Press MUTE on the remote control to ensure that channels are set into memory. • The network signal is weak, adjust the...Batteries may be weak, dead, or inserted incorrectly. • Point the remote control directly at the remote sensor on the TV with an angle of 35º. • Remove any obstacles between the remote control and the TV. • Remote control is out of interference. Poor reception on some channels. • The...


