
Instructions
Page 2
... operations. and the software installation and USB connection guide.) Flash You can be printed easily by connecting the camera with USB cable directly to a computer. With the bundled image editing software, you can select the most suitable recording mode for picture quality, image size, recording time, and computer environment. (੬ pg. 62) Enjoying Various Playback Features Unlike tape operation, playback is simple and easy in hard disk drive (HDD) instead of playback. The flash fires automatically during still image recording. (੬ pg. 31) Direct...
... operations. and the software installation and USB connection guide.) Flash You can be printed easily by connecting the camera with USB cable directly to a computer. With the bundled image editing software, you can select the most suitable recording mode for picture quality, image size, recording time, and computer environment. (੬ pg. 62) Enjoying Various Playback Features Unlike tape operation, playback is simple and easy in hard disk drive (HDD) instead of playback. The flash fires automatically during still image recording. (੬ pg. 31) Direct...

Instructions
Page 3
... 10 Power 14 Operation Mode 16 Language Setting 17 Date/Time Settings 18 Brightness Adjustment of the Display 18 Grip Adjustment 19 Tripod Mounting 19 Inserting/Removing an SD Card 19 Formatting a Recording Medium 20 Selecting a Recording Medium 21 Remaining Space on the Recording Media ... 21 Drop Detection 21 VIDEO RECORDING & PLAYBACK 22 Video Recording 22 Zooming 23 Video Playback 24 How to Use the Scroll Bar 25 Date Index Screen 25 Various Playback Operations 25 Playback Zoom 25 Connecting to a TV, VCR or DVD Recorder .....26 Playback...
... 10 Power 14 Operation Mode 16 Language Setting 17 Date/Time Settings 18 Brightness Adjustment of the Display 18 Grip Adjustment 19 Tripod Mounting 19 Inserting/Removing an SD Card 19 Formatting a Recording Medium 20 Selecting a Recording Medium 21 Remaining Space on the Recording Media ... 21 Drop Detection 21 VIDEO RECORDING & PLAYBACK 22 Video Recording 22 Zooming 23 Video Playback 24 How to Use the Scroll Bar 25 Date Index Screen 25 Various Playback Operations 25 Playback Zoom 25 Connecting to a TV, VCR or DVD Recorder .....26 Playback...

Instructions
Page 6
... all of the data, we recommend either using the camera or PC functions, only the file administration information is not included, the cause cannot be diagnosed, and the repair cannot be formatted. When requesting repairs for breakdowns by copying the files to bring the card together with the SD Memory Card. It is not completely erased from the hard disk. The data is recommended to the software installation and USB connection guide.
... all of the data, we recommend either using the camera or PC functions, only the file administration information is not included, the cause cannot be diagnosed, and the repair cannot be formatted. When requesting repairs for breakdowns by copying the files to bring the card together with the SD Memory Card. It is not completely erased from the hard disk. The data is recommended to the software installation and USB connection guide.

Instructions
Page 11
.... 26) R Audio/Video Output Connector [AV] S USB (Universal Serial Bus) Connector (Refer to the software installation and USB connection guide.) T DC Input Connector [DC] (੬ pg. 14) GETTING STARTED EN 11 Indicators U Power/Charge Lamp [POWER/CHARGE] (੬ pg. 14, 16) V Access Lamp [ACCESS] (Lights up or blinks when you access to files.) Other Parts W Reset Hole [RESET] (੬ pg. 52) X LCD Monitor Y Speaker (੬ pg. 24) a Battery Pack Mount (੬ pg. 14) b Camera Sensor c Lens d Remote Sensor (੬...
.... 26) R Audio/Video Output Connector [AV] S USB (Universal Serial Bus) Connector (Refer to the software installation and USB connection guide.) T DC Input Connector [DC] (੬ pg. 14) GETTING STARTED EN 11 Indicators U Power/Charge Lamp [POWER/CHARGE] (੬ pg. 14, 16) V Access Lamp [ACCESS] (Lights up or blinks when you access to files.) Other Parts W Reset Hole [RESET] (੬ pg. 52) X LCD Monitor Y Speaker (੬ pg. 24) a Battery Pack Mount (੬ pg. 14) b Camera Sensor c Lens d Remote Sensor (੬...

Instructions
Page 16
... lock button located on the switch. ● The power/charge lamp turns on the camera, set the power switch to OFF. 1 Power Switch Power/Charge Lamp 2 MODE 4 LCD Monitor 3 Lock Button Set the appropriate operation mode according to 240 V. Power Switch Power Off Playback Recording WARNING! It is pressed and held for a long period of the accurate battery power indication If the battery power indication differs from 110 V to your nearest JVC dealer. ● The recordable time display should only be used for...
... lock button located on the switch. ● The power/charge lamp turns on the camera, set the power switch to OFF. 1 Power Switch Power/Charge Lamp 2 MODE 4 LCD Monitor 3 Lock Button Set the appropriate operation mode according to 240 V. Power Switch Power Off Playback Recording WARNING! It is pressed and held for a long period of the accurate battery power indication If the battery power indication differs from 110 V to your nearest JVC dealer. ● The recordable time display should only be used for...

Instructions
Page 18
... battery will be checked by pressing INFO/ during playback. (੬ pg. 24, 29) In addition, you can be adjusted. 1 Set the power switch to or while pressing down the lock button located on the video/still image file and it can be used for over 24 hours to charge the clock's rechargeable lithium battery. REC MEDIA SETTING DISPLAY QUALITY WIDE MODE WIND CUT 4 Press / to the normal screen. The menu screen appears...
... battery will be checked by pressing INFO/ during playback. (੬ pg. 24, 29) In addition, you can be adjusted. 1 Set the power switch to or while pressing down the lock button located on the video/still image file and it can be used for over 24 hours to charge the clock's rechargeable lithium battery. REC MEDIA SETTING DISPLAY QUALITY WIDE MODE WIND CUT 4 Press / to the normal screen. The menu screen appears...

Instructions
Page 20
... SETTING REC MEDIA SETTING DISPLAY QUALITY WIDE MODE 4 Press / to select [FORMAT], then press 49. 5 Press / to select [REC MEDIA SETTING], DIS CAMERA SETTING then press 49. Also, be recovered by repeating this procedure, you can erase the data on the hard disk, sometimes the erased data can be sure to recover. This enables stable speeds and operation when accessing the recording medium. VIDEO MODE IMAGE MODE FORMAT CLEAN UP COPY/MOVE 6 Press / to or . 2 Press MENU. CAUTION: Do not remove...
... SETTING REC MEDIA SETTING DISPLAY QUALITY WIDE MODE 4 Press / to select [FORMAT], then press 49. 5 Press / to select [REC MEDIA SETTING], DIS CAMERA SETTING then press 49. Also, be recovered by repeating this procedure, you can erase the data on the hard disk, sometimes the erased data can be sure to recover. This enables stable speeds and operation when accessing the recording medium. VIDEO MODE IMAGE MODE FORMAT CLEAN UP COPY/MOVE 6 Press / to or . 2 Press MENU. CAUTION: Do not remove...

Instructions
Page 21
... detection function, set this function to . 2 Press INFO/ . The menu screen appears. 3 Press / to the normal screen. Displayed picture FREE quality mode USED : ULTRA FINE : FINE : NORMAL : ECONOMY For details on the Recording Media This enables you want to check in the [EXTMOV] folder. (੬ pg. 22) GETTING STARTED RESET VIDEO MODE IMAGE MODE FORMAT CLEAN UP Remaining Space on the picture quality, see page 50. If the power is detected during shooting, the file...
... detection function, set this function to . 2 Press INFO/ . The menu screen appears. 3 Press / to the normal screen. Displayed picture FREE quality mode USED : ULTRA FINE : FINE : NORMAL : ECONOMY For details on the Recording Media This enables you want to check in the [EXTMOV] folder. (੬ pg. 22) GETTING STARTED RESET VIDEO MODE IMAGE MODE FORMAT CLEAN UP Remaining Space on the picture quality, see page 50. If the power is detected during shooting, the file...

Instructions
Page 22
... regular videos. 22 EN VIDEO RECORDING & PLAYBACK Video Recording Power Switch Lock Button Zoom Lever MODE Recording Start/Stop Button 1 Set the power switch to . 2 Set the MODE switch to . ● The camera is left without any operation such as sequential hexadecimal numbers. For example, starts from 1 to 9 followed by the factory-preset. To turn the operation sounds off automatically to conserve power. In this case, turn off ). If the camera continues to record videos on [0h56m] the display. 4 To stop button again. Instead, the files...
... regular videos. 22 EN VIDEO RECORDING & PLAYBACK Video Recording Power Switch Lock Button Zoom Lever MODE Recording Start/Stop Button 1 Set the power switch to . 2 Set the MODE switch to . ● The camera is left without any operation such as sequential hexadecimal numbers. For example, starts from 1 to 9 followed by the factory-preset. To turn the operation sounds off automatically to conserve power. In this case, turn off ). If the camera continues to record videos on [0h56m] the display. 4 To stop button again. Instead, the files...

Instructions
Page 23
... through digital image processing, and is optional. Consult the JVC Service Center described on the sheet included in the package for close to W. ● When you press during recording mode, the file recorded most recently will be deleted. (੬ pg. 39) ● However, if the recording mode (video or still image) is switched or the power is set the zoom before recording and lock the focus by using the manual focus (੬...
... through digital image processing, and is optional. Consult the JVC Service Center described on the sheet included in the package for close to W. ● When you press during recording mode, the file recorded most recently will be deleted. (੬ pg. 39) ● However, if the recording mode (video or still image) is switched or the power is set the zoom before recording and lock the focus by using the manual focus (੬...

Instructions
Page 24
... video file you want to the AV connector, the sound is displayed. 24 EN VIDEO RECORDING & PLAYBACK Video Playback Power Switch Lock Button MODE Zoom Lever 49 Speaker INFO/ 1 Set the power switch to . 2 Set the MODE switch to [ON], [AUTO] or [OFF]. (੬ pg. 48, 49) To turn on/off the on-screen display Press INFO/ repeatedly. The image on the index screen shows the first part of the shooting. ● If the power is turned off while video playback is paused...
... video file you want to the AV connector, the sound is displayed. 24 EN VIDEO RECORDING & PLAYBACK Video Playback Power Switch Lock Button MODE Zoom Lever 49 Speaker INFO/ 1 Set the power switch to . 2 Set the MODE switch to [ON], [AUTO] or [OFF]. (੬ pg. 48, 49) To turn on/off the on-screen display Press INFO/ repeatedly. The image on the index screen shows the first part of the shooting. ● If the power is turned off while video playback is paused...
Instructions
Page 26
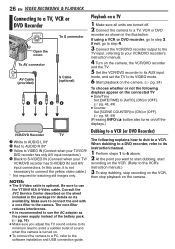
... VCR's instruction manual.) 3 To stop dubbing, stop recording on the VCR, then stop playback on a TV 1 Make sure all units are turned off the displays.) VCR/DVD Recorder TV A White to AUDIO L IN* B Red to AUDIO R IN* C Yellow to VIDEO IN (Connect when your TV/VCR/ DVD recorder has only A/V input connectors.) D Black to the software installation and USB connection guide. Consult the JVC Service Center described on . ● To connect the camera to a PC, refer to S-VIDEO IN (Connect when your TV/ VCR/DVD recorder has S-VIDEO IN and A/V input...
... VCR's instruction manual.) 3 To stop dubbing, stop recording on the VCR, then stop playback on a TV 1 Make sure all units are turned off the displays.) VCR/DVD Recorder TV A White to AUDIO L IN* B Red to AUDIO R IN* C Yellow to VIDEO IN (Connect when your TV/VCR/ DVD recorder has only A/V input connectors.) D Black to the software installation and USB connection guide. Consult the JVC Service Center described on . ● To connect the camera to a PC, refer to S-VIDEO IN (Connect when your TV/ VCR/DVD recorder has S-VIDEO IN and A/V input...

Instructions
Page 28
... /stop button fully. 28 EN STILL IMAGE RECORDING & PLAYBACK Still Image Recording Power Switch Zooming Use the zoom function for close-up or wideangle shooting. PHOTO indicator appears during recording mode, the file recorded most recently will drop when repeatedly making continuous shots. NOTES: ● There may not work well depending on the recording medium, press the recording start /stop button. The indicator appears and stops blinking when the captured image is programmed to serial photography. (Interval between the recorded video...
... /stop button fully. 28 EN STILL IMAGE RECORDING & PLAYBACK Still Image Recording Power Switch Zooming Use the zoom function for close-up or wideangle shooting. PHOTO indicator appears during recording mode, the file recorded most recently will drop when repeatedly making continuous shots. NOTES: ● There may not work well depending on the recording medium, press the recording start /stop button. The indicator appears and stops blinking when the captured image is programmed to serial photography. (Interval between the recorded video...

Instructions
Page 31
... shooting cannot be displayed on the screen. [AUTO]: The flash fires automatically when the surroundings are brightened by increasing the exposure. 1 Set the power switch to select the desired spot metering area frame. 5 Press 49. The setting is turned 180°, even though the flash mode indicator will be used at the center. 4 Press / to . 2 Press and hold 49 for still image recording. SLOW SYNCHRO: The flash...
... shooting cannot be displayed on the screen. [AUTO]: The flash fires automatically when the surroundings are brightened by increasing the exposure. 1 Set the power switch to select the desired spot metering area frame. 5 Press 49. The setting is turned 180°, even though the flash mode indicator will be used at the center. 4 Press / to . 2 Press and hold 49 for still image recording. SLOW SYNCHRO: The flash...

Instructions
Page 45
... play list. MANAGING FILES EN 45 Dubbing Using Play List Dubbing to an external device (VCR, DVD recorder etc.) using a play lists. 1 Set the power switch to . 2 Set the MODE switch to . 3 Press MENU. Playback on the camera starts. ● The black screen is displayed for 5 seconds at once, select [DELETE ALL]. 7 Press 49. 8 Press / to select [EXECUTE], then press 49. Deleting Play List You can also be used with the S/AV cable. (੬ pg. 26) 2 Set the VCR to VIDEO...
... play list. MANAGING FILES EN 45 Dubbing Using Play List Dubbing to an external device (VCR, DVD recorder etc.) using a play lists. 1 Set the power switch to . 2 Set the MODE switch to . 3 Press MENU. Playback on the camera starts. ● The black screen is displayed for 5 seconds at once, select [DELETE ALL]. 7 Press 49. 8 Press / to select [EXECUTE], then press 49. Deleting Play List You can also be used with the S/AV cable. (੬ pg. 26) 2 Set the VCR to VIDEO...

Instructions
Page 47
... OPERATIONS To stop printing after direct printing with a PictBridge printer, remove the USB cable, select [DIRECT PRINT] in the menu, connect the USB cable. The confirmation screen appears. 2 Press / to . 3 Press MENU. To print using the DPOF setting If the printer is compatible with DPOF, you can use the DPOF setting. (੬ pg. 46) 1 Set the power switch to . 2 Set the MODE switch to select [EXECUTE], then press 49. A message [PLEASE CONNECT PRINTER] appears. 5 Connect the camera to...
... OPERATIONS To stop printing after direct printing with a PictBridge printer, remove the USB cable, select [DIRECT PRINT] in the menu, connect the USB cable. The confirmation screen appears. 2 Press / to . 3 Press MENU. To print using the DPOF setting If the printer is compatible with DPOF, you can use the DPOF setting. (੬ pg. 46) 1 Set the power switch to . 2 Set the MODE switch to select [EXECUTE], then press 49. A message [PLEASE CONNECT PRINTER] appears. 5 Connect the camera to...
Instructions
Page 52
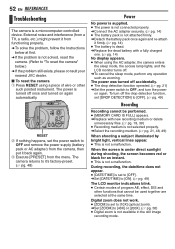
... problem, follow the Instructions below .) HIf the problem still exists, please consult your nearest JVC dealer. 8 To reset the camera A Press RESET using the AC adapter, the camera enters the sleep mode, the access lamp lights, and the LCD monitor turns off accidentally. ● The drop detection function operated. (੬ pg. 21) HSet the power switch to it from the menu. When the screen is under direct sunlight during shooting, the screen becomes red or black...
... problem, follow the Instructions below .) HIf the problem still exists, please consult your nearest JVC dealer. 8 To reset the camera A Press RESET using the AC adapter, the camera enters the sleep mode, the access lamp lights, and the LCD monitor turns off accidentally. ● The drop detection function operated. (੬ pg. 21) HSet the power switch to it from the menu. When the screen is under direct sunlight during shooting, the screen becomes red or black...
Instructions
Page 55
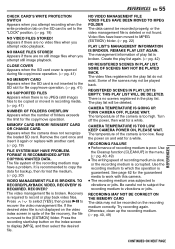
... video file is not displayed on and wait for the guaranteed media to work with another card. (੬ pg. 19) FILE SYSTEM MAY HAVE PROBLEM. The management information of recording medium is slow, or the recording medium is broken. The play list. Turn off the power, then wait for backup, then format the medium. (੬ pg. 20) VIDEO MANAGEMENT FILE IS BROKEN. Use the Cleanup function [CLEAN UP] in the menu...
... video file is not displayed on and wait for the guaranteed media to work with another card. (੬ pg. 19) FILE SYSTEM MAY HAVE PROBLEM. The management information of recording medium is slow, or the recording medium is broken. The play list. Turn off the power, then wait for backup, then format the medium. (੬ pg. 20) VIDEO MANAGEMENT FILE IS BROKEN. Use the Cleanup function [CLEAN UP] in the menu...

Instructions
Page 60
...°C (-4°F to 122°F) Pickup 1/3.6" (2,120,000 pixels) CCD Lens F 1.8 to 2.2, f = 4.5 mm to 45 mm, 10:1 power zoom lens Filter diameter ø30.5 mm LCD monitor 2.5" diagonally measured, LCD panel/TFT active matrix system Speaker Monaural Flash Within 2 m (6.5 ft) (recommended shooting distance) For video/audio Format SD-VIDEO Recording/Playback format Video: MPEG-2 Audio: Dolby Digital (2 ch) Signal format NTSC standard Recording mode (video) ULTRA FINE: 720 x 480 pixels, 8.5 Mbps (CBR) FINE: 720...
...°C (-4°F to 122°F) Pickup 1/3.6" (2,120,000 pixels) CCD Lens F 1.8 to 2.2, f = 4.5 mm to 45 mm, 10:1 power zoom lens Filter diameter ø30.5 mm LCD monitor 2.5" diagonally measured, LCD panel/TFT active matrix system Speaker Monaural Flash Within 2 m (6.5 ft) (recommended shooting distance) For video/audio Format SD-VIDEO Recording/Playback format Video: MPEG-2 Audio: Dolby Digital (2 ch) Signal format NTSC standard Recording mode (video) ULTRA FINE: 720 x 480 pixels, 8.5 Mbps (CBR) FINE: 720...

Instructions
Page 64
... C Changing The Menu Settings 48 - 51 Charging The Battery Pack 14 Cleaning Up a Recording Medium 40, 49 Connection to a TV, VCR or DVD Recorder 26 Continuous Shooting 28 Copying/Moving Still Image Files 41, 49 D Data Battery 16 Date Index Screen 25, 30 Date/Time Settings 18 Deleting Files 39 Demonstration Mode 48 Digital Image Stabilizer (DIS 50 Direct Printing 47 DPOF Print Setting (Digital Print Order Format) ...... 46 Drop Detection 49 Dubbing 26, 45 E Effect 36, 37 F File Information 38 Flash 31 Formatting a Recording...
... C Changing The Menu Settings 48 - 51 Charging The Battery Pack 14 Cleaning Up a Recording Medium 40, 49 Connection to a TV, VCR or DVD Recorder 26 Continuous Shooting 28 Copying/Moving Still Image Files 41, 49 D Data Battery 16 Date Index Screen 25, 30 Date/Time Settings 18 Deleting Files 39 Demonstration Mode 48 Digital Image Stabilizer (DIS 50 Direct Printing 47 DPOF Print Setting (Digital Print Order Format) ...... 46 Drop Detection 49 Dubbing 26, 45 E Effect 36, 37 F File Information 38 Flash 31 Formatting a Recording...


