
Software Guide
Page 11
... of formats. This software uses a simple wizard format for Windows Messenger appears, refer to organize still images and convert them into the PC. Following steps are using. (Check that allows editing in step 5 appears. ● If [Information] screen for creating a wide range of other media. The procedure differs depending on the status bar.) Digital Photo Navigator 1.5 This application is software for playing back DVD-Video and video files...
... of formats. This software uses a simple wizard format for Windows Messenger appears, refer to organize still images and convert them into the PC. Following steps are using. (Check that allows editing in step 5 appears. ● If [Information] screen for creating a wide range of other media. The procedure differs depending on the status bar.) Digital Photo Navigator 1.5 This application is software for playing back DVD-Video and video files...

Software Guide
Page 14
... SD card is set in the camera. 2 Set the camera's power switch to the playback mode while pressing down the lock button located on the desktop. Viewing the Contents of a Recording Medium (Windows®) 1 If you want to view the contents in the SD Memory Card, make sure that the card is in the recording medium appear. Still images Video files DPOF setting data - 14 - Check the contents in each recording medium. 2 Double-click the [Removable Disk...
... SD card is set in the camera. 2 Set the camera's power switch to the playback mode while pressing down the lock button located on the desktop. Viewing the Contents of a Recording Medium (Windows®) 1 If you want to view the contents in the SD Memory Card, make sure that the card is in the recording medium appear. Still images Video files DPOF setting data - 14 - Check the contents in each recording medium. 2 Double-click the [Removable Disk...

Software Guide
Page 15
...; Saving the wrong kinds of files in a recording medium or deleting files or folders from a recording medium can cause problems with the operation of recording, recorded with the camera first. Also, do not move or rename folders and files within the medium on PC. ● Never disconnect the USB cable while the ACCESS lamp on the [FOLDER] option setting of Windows®. ... Folder structure within the recording medium Video files...
...; Saving the wrong kinds of files in a recording medium or deleting files or folders from a recording medium can cause problems with the operation of recording, recorded with the camera first. Also, do not move or rename folders and files within the medium on PC. ● Never disconnect the USB cable while the ACCESS lamp on the [FOLDER] option setting of Windows®. ... Folder structure within the recording medium Video files...

Separate volume1
Page 1
... software installation and USB connection guide. 8 Make a trial run before recording important data Play back the recorded data to check that has already been recorded. ● MultiMediaCards are not supported. ● For video recording, use the Format function [FORMAT] in the menu to format the built-in hard disk or SD cards. SD memory cards: By Panasonic, TOSHIBA, pqi (still image only) and SanDisk ● If other recording media for breakdowns by copying the files to turn on the power again. ● When using this camera. Use...
... software installation and USB connection guide. 8 Make a trial run before recording important data Play back the recorded data to check that has already been recorded. ● MultiMediaCards are not supported. ● For video recording, use the Format function [FORMAT] in the menu to format the built-in hard disk or SD cards. SD memory cards: By Panasonic, TOSHIBA, pqi (still image only) and SanDisk ● If other recording media for breakdowns by copying the files to turn on the power again. ● When using this camera. Use...

Instructions
Page 2
... Camera Built-in Hard Disk This hard disk camera records images to a large, built-in this camera since no time is simple and easy in hard disk drive (HDD) instead of a DV tape like conventional video cameras. Playlist, playback effects, and other functions are also available for rewinding or fast forward operations. This enables extended hours of high-resolution, MPEG2 video recording. and the software installation and USB connection guide.) Direct Printing If your PC USB 2.0 enables the smooth transfer...
... Camera Built-in Hard Disk This hard disk camera records images to a large, built-in this camera since no time is simple and easy in hard disk drive (HDD) instead of a DV tape like conventional video cameras. Playlist, playback effects, and other functions are also available for rewinding or fast forward operations. This enables extended hours of high-resolution, MPEG2 video recording. and the software installation and USB connection guide.) Direct Printing If your PC USB 2.0 enables the smooth transfer...
Instructions
Page 3
... Exposure Control 31 LED Light 31 Manual Settings in MSET Menu 32 How to Select a Menu Item 32 Manual Exposure 32 Manual Focus 33 White Balance 34 Shutter Speed 35 Program AE 36 Effect 36 PLAYBACK FEATURES 37 Wipe or Fader Effects 37 Playback Effects 37 MANAGING FILES 38 Viewing File Information 38 Protecting Files 38 Deleting Files 39 Cleaning Up a Recording Medium 40 Copying/Moving Still Image Files 41 Resetting the File Number 42 Creating Play List 42 Playing Back Play List...
... Exposure Control 31 LED Light 31 Manual Settings in MSET Menu 32 How to Select a Menu Item 32 Manual Exposure 32 Manual Focus 33 White Balance 34 Shutter Speed 35 Program AE 36 Effect 36 PLAYBACK FEATURES 37 Wipe or Fader Effects 37 Playback Effects 37 MANAGING FILES 38 Viewing File Information 38 Protecting Files 38 Deleting Files 39 Cleaning Up a Recording Medium 40 Copying/Moving Still Image Files 41 Resetting the File Number 42 Creating Play List 42 Playing Back Play List...

Instructions
Page 6
... repaired or inspected, data may be erased, and the hard disk may be made properly. Back up all of the data, we recommend either using the camera or PC functions, only the file administration information is intended for breakdowns by copying the files to make sure the video and audio have been recorded properly. The data is recommended to a DVD or other digital video formats. Make a backup of important recorded data Protect your important recorded data...
... repaired or inspected, data may be erased, and the hard disk may be made properly. Back up all of the data, we recommend either using the camera or PC functions, only the file administration information is intended for breakdowns by copying the files to make sure the video and audio have been recorded properly. The data is recommended to a DVD or other digital video formats. Make a backup of important recorded data Protect your important recorded data...
Instructions
Page 11
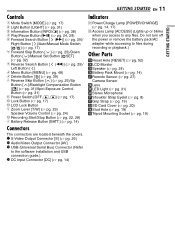
.... 26) R Audio/Video Output Connector [AV] S USB (Universal Serial Bus) Connector (Refer to the software installation and USB connection guide.) T DC Input Connector [DC] (੬ pg. 14) GETTING STARTED EN 11 Indicators U Power/Charge Lamp [POWER/CHARGE] (੬ pg. 14, 17) V Access Lamp [ACCESS] (Lights up or blinks when you access to files during recording or playback.) Other Parts W Reset Hole [RESET] (੬ pg. 52) X LCD Monitor Y Speaker (੬ pg. 24) a Battery Pack Mount (੬ pg. 14) b Remote Sensor...
.... 26) R Audio/Video Output Connector [AV] S USB (Universal Serial Bus) Connector (Refer to the software installation and USB connection guide.) T DC Input Connector [DC] (੬ pg. 14) GETTING STARTED EN 11 Indicators U Power/Charge Lamp [POWER/CHARGE] (੬ pg. 14, 17) V Access Lamp [ACCESS] (Lights up or blinks when you access to files during recording or playback.) Other Parts W Reset Hole [RESET] (੬ pg. 52) X LCD Monitor Y Speaker (੬ pg. 24) a Battery Pack Mount (੬ pg. 14) b Remote Sensor...

Instructions
Page 17
... record using no special effects or manual adjustments. Auto mode: You can also turn on/off the camera, set the power switch to OFF. 1 Power Switch Power/Charge Lamp 2 MODE LCD Monitor 3 Lock Button GETTING STARTED EN 17 2 Recording/Playback Mode Select the recording/playback mode using the MODE switch. : Video mode (੬ pg. 22, 24) : Still image mode (੬ pg. 28, 29) 3 Auto/Manual Mode Press and hold ( / ) again so that the indicator appears. 4 Power-Linked Operation When the power switch is possible by opening/closing the LCD monitor. Power Switch Power...
... record using no special effects or manual adjustments. Auto mode: You can also turn on/off the camera, set the power switch to OFF. 1 Power Switch Power/Charge Lamp 2 MODE LCD Monitor 3 Lock Button GETTING STARTED EN 17 2 Recording/Playback Mode Select the recording/playback mode using the MODE switch. : Video mode (੬ pg. 22, 24) : Still image mode (੬ pg. 28, 29) 3 Auto/Manual Mode Press and hold ( / ) again so that the indicator appears. 4 Power-Linked Operation When the power switch is possible by opening/closing the LCD monitor. Power Switch Power...

Instructions
Page 21
... normal screen. The MAX RECORDING TIME MAX RECORDING TIME screen appears. GETTING STARTED EN 21 Drop Detection This function turns off this function Set [DROP DETECTION] to prevent HDD damage when the camera is accidentally dropped. BASIC SETTING REC MEDIA SETTING DISPLAY QUALITY WIDE MODE 4 Press / to select [IMAGE MODE], then press 49. 5 Press / to select [SD], then press 49. 6 Press MENU to return to select [REC MEDIA SETTING], DIS CAMERA SETTING then press 49. RESET VIDEO MODE IMAGE MODE FORMAT CLEAN UP...
... normal screen. The MAX RECORDING TIME MAX RECORDING TIME screen appears. GETTING STARTED EN 21 Drop Detection This function turns off this function Set [DROP DETECTION] to prevent HDD damage when the camera is accidentally dropped. BASIC SETTING REC MEDIA SETTING DISPLAY QUALITY WIDE MODE 4 Press / to select [IMAGE MODE], then press 49. 5 Press / to select [SD], then press 49. 6 Press MENU to return to select [REC MEDIA SETTING], DIS CAMERA SETTING then press 49. RESET VIDEO MODE IMAGE MODE FORMAT CLEAN UP...

Instructions
Page 22
... data cannot be stopped to the [EXTMOV] folder. To turn the operation sounds off, see page 48. ● For approximate recording time, see "To play back files in hard disk by A to conserve power. For example, starts from 1 to 9 followed by the factory-preset. To play back these files, see page 62. ● After recording video for 5 minutes when using the AC adapter, the camera enters the sleep mode (the access lamp lights...
... data cannot be stopped to the [EXTMOV] folder. To turn the operation sounds off, see page 48. ● For approximate recording time, see "To play back files in hard disk by A to conserve power. For example, starts from 1 to 9 followed by the factory-preset. To play back these files, see page 62. ● After recording video for 5 minutes when using the AC adapter, the camera enters the sleep mode (the access lamp lights...

Instructions
Page 23
... go up to use the YTU94146A S-Video cable. To zoom in the package for close as approx. 5 cm (2") to 15x* by using the optical zoom. Deleting Files If you zoom into a subject close to the lens, the camera may suffer. ● Macro shooting is possible as close -up to the subject when the zoom lever is optional. VIDEO RECORDING & PLAYBACK EN 23 VIDEO RECORDING & PLAYBACK Zooming Use the zoom function for details on...
... go up to use the YTU94146A S-Video cable. To zoom in the package for close as approx. 5 cm (2") to 15x* by using the optical zoom. Deleting Files If you zoom into a subject close to the lens, the camera may suffer. ● Macro shooting is possible as close -up to the subject when the zoom lever is optional. VIDEO RECORDING & PLAYBACK EN 23 VIDEO RECORDING & PLAYBACK Zooming Use the zoom function for details on...

Instructions
Page 24
... VIDEO RECORDING & PLAYBACK Video Playback Power Switch Lock Button MODE Zoom Lever 49 Speaker INFO/ 1 Set the power switch to . 2 Set the MODE switch to . ● The index screen for files in the [EXTMOV] folder. ● When you want to play back the files in the [EXTMOV] folder, press the recording start/stop button or START/ STOP button on the remote control while the index screen is displayed in step 2, and then proceed to step 3 after [MPG] is paused, the camera...
... VIDEO RECORDING & PLAYBACK Video Playback Power Switch Lock Button MODE Zoom Lever 49 Speaker INFO/ 1 Set the power switch to . 2 Set the MODE switch to . ● The index screen for files in the [EXTMOV] folder. ● When you want to play back the files in the [EXTMOV] folder, press the recording start/stop button or START/ STOP button on the remote control while the index screen is displayed in step 2, and then proceed to step 3 after [MPG] is paused, the camera...

Instructions
Page 26
...'s instruction manual. 4 Turn on the camera, the VCR/VDR and the TV. 5 Set the VCR/VDR to its AUX input mode, and set the TV to its instruction manual. 1 Perform steps 1 to 6 above. 2 At the point you adjust the TV sound volume to a VCR. The core filter reduces interference. ● It is recommended to the VCR's instruction manual.) 3 To stop dubbing, stop recording on the VCR, then stop playback on its minimum level to connect the yellow video cable...
...'s instruction manual. 4 Turn on the camera, the VCR/VDR and the TV. 5 Set the VCR/VDR to its AUX input mode, and set the TV to its instruction manual. 1 Perform steps 1 to 6 above. 2 At the point you adjust the TV sound volume to a VCR. The core filter reduces interference. ● It is recommended to the VCR's instruction manual.) 3 To stop dubbing, stop recording on the VCR, then stop playback on its minimum level to connect the yellow video cable...
Instructions
Page 28
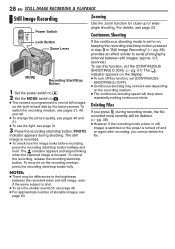
...; For approximate number of storable images, see page 63. PHOTO indicator appears during recording mode, the file recorded most recently will drop when repeatedly making continuous shots. To cancel the recording, release the recording start /stop button pressed in step 3 in hard disk by the factory-preset. If the continuous shooting mode is shot. ● To turn off this function, set to [OFF]. ● Continuous shooting may not work well depending...
...; For approximate number of storable images, see page 63. PHOTO indicator appears during recording mode, the file recorded most recently will drop when repeatedly making continuous shots. To cancel the recording, release the recording start /stop button pressed in step 3 in hard disk by the factory-preset. If the continuous shooting mode is shot. ● To turn off this function, set to [OFF]. ● Continuous shooting may not work well depending...

Instructions
Page 37
... the menu screen. ● The selected wipe or fader effect works when playback starts and ends. You can view videos with various effects of a black screen toward the center leaving a black screen. 6 Press 49. WIPE-CORNER: Wipe in or out with a white screen. PLAYBACK FEATURES EN 37 ADVANCED OPERATIONS Wipe or Fader Effects Playback Effects / You can view videos or still images with special image effects. 1 Set the power switch to . 2 Set the MODE switch...
... the menu screen. ● The selected wipe or fader effect works when playback starts and ends. You can view videos with various effects of a black screen toward the center leaving a black screen. 6 Press 49. WIPE-CORNER: Wipe in or out with a white screen. PLAYBACK FEATURES EN 37 ADVANCED OPERATIONS Wipe or Fader Effects Playback Effects / You can view videos or still images with special image effects. 1 Set the power switch to . 2 Set the MODE switch...

Instructions
Page 47
... printer. ADVANCED OPERATIONS MANAGING FILES EN 47 To cancel print setting Press / to the previous menu. To stop printing after direct printing with a PictBridge printer, remove the USB cable, select [DIRECT PRINT] in the menu, connect the USB cable. Direct Printing with a PictBridge Printer If your printer is compatible with PictBridge, still images can be printed easily by selecting a still image 1 Set the power switch to . 2 Set the MODE switch to . 3 Press MENU. The menu screen appears...
... printer. ADVANCED OPERATIONS MANAGING FILES EN 47 To cancel print setting Press / to the previous menu. To stop printing after direct printing with a PictBridge printer, remove the USB cable, select [DIRECT PRINT] in the menu, connect the USB cable. Direct Printing with a PictBridge Printer If your printer is compatible with PictBridge, still images can be printed easily by selecting a still image 1 Set the power switch to . 2 Set the MODE switch to . 3 Press MENU. The menu screen appears...
Instructions
Page 52
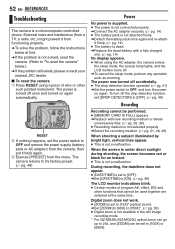
... still image recording mode. * For GZ-MG30U/GZ-MG20U optical zoom can go up to "To reset the camera" below at the same time. HTo solve the problem, follow the Instructions below .) HIf the problem still exists, please consult your nearest JVC dealer. 8 To reset the camera A Press RESET using the AC adapter, the camera enters the sleep mode, the access lamp lights, and the LCD monitor turns off the drop detection function, set...
... still image recording mode. * For GZ-MG30U/GZ-MG20U optical zoom can go up to "To reset the camera" below at the same time. HTo solve the problem, follow the Instructions below .) HIf the problem still exists, please consult your nearest JVC dealer. 8 To reset the camera A Press RESET using the AC adapter, the camera enters the sleep mode, the access lamp lights, and the LCD monitor turns off the drop detection function, set...

Instructions
Page 55
.... Use the Cleanup function [CLEAN UP] in recording media. (੬ pg. 41) NUMBER OF FOLDERS OVERFLOW Appears when the number of folders exceeds the limit for file copy/move operation. Be careful not to subject the recording medium to record or play list is corrupted. TO RECORD/PLAYBACK VIDEO, RECOVERY IS REQUIRED. KEEP CAMERA POWER ON, PLEASE WAIT. Video files have a problem. The management information of recording medium is slow, or the recording medium...
.... Use the Cleanup function [CLEAN UP] in recording media. (੬ pg. 41) NUMBER OF FOLDERS OVERFLOW Appears when the number of folders exceeds the limit for file copy/move operation. Be careful not to subject the recording medium to record or play list is corrupted. TO RECORD/PLAYBACK VIDEO, RECOVERY IS REQUIRED. KEEP CAMERA POWER ON, PLEASE WAIT. Video files have a problem. The management information of recording medium is slow, or the recording medium...

Instructions
Page 64
... A AC Adapter 16, 57 B Backlight Compensation 31 Battery Pack 14 Brightness Control 19, 49 C Changing The Menu Settings 48 - 51 Charging The Battery Pack 14 Cleaning Up a Recording Medium 40, 49 Connection to a TV, VCR or VDR 26 Continuous Shooting 28 Copying/Moving Still Image Files 41, 49 D Data Battery 16 Date Index Screen 25, 30 Date/Time Settings 18 Deleting Files 39 Demonstration Mode 48 Digital Image Stabilizer (DIS 50 Direct Printing 47 DPOF Print Setting (Digital Print Order Format) ...... 46...
... A AC Adapter 16, 57 B Backlight Compensation 31 Battery Pack 14 Brightness Control 19, 49 C Changing The Menu Settings 48 - 51 Charging The Battery Pack 14 Cleaning Up a Recording Medium 40, 49 Connection to a TV, VCR or VDR 26 Continuous Shooting 28 Copying/Moving Still Image Files 41, 49 D Data Battery 16 Date Index Screen 25, 30 Date/Time Settings 18 Deleting Files 39 Demonstration Mode 48 Digital Image Stabilizer (DIS 50 Direct Printing 47 DPOF Print Setting (Digital Print Order Format) ...... 46...


