User Manual (English)
Page 3
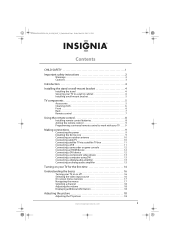
... the remote control 9 Programming a universal remote control to work with your TV . . . . 9 Making connections 9 Connecting the power 9 Installing the ferrite core 9 Connecting an outdoor antenna 10 Connecting cable TV 10 Connecting satellite TV via a satellite TV box 11 Connecting a VCR 11 Connecting a camcorder or game console 12 Connecting an HDMI device 12 Connecting a DVI device 12 Connecting a component video device 13 Connecting a computer using DVI 13 Connecting a digital audio amplifier 13 Connecting an analog audio amplifier 13 Turning on your TV for the first time 14...
... the remote control 9 Programming a universal remote control to work with your TV . . . . 9 Making connections 9 Connecting the power 9 Installing the ferrite core 9 Connecting an outdoor antenna 10 Connecting cable TV 10 Connecting satellite TV via a satellite TV box 11 Connecting a VCR 11 Connecting a camcorder or game console 12 Connecting an HDMI device 12 Connecting a DVI device 12 Connecting a component video device 13 Connecting a computer using DVI 13 Connecting a digital audio amplifier 13 Connecting an analog audio amplifier 13 Turning on your TV for the first time 14...
User Manual (English)
Page 7
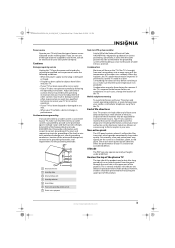
... the point of cable entry as practical. NS-P42Q-P501Q-P502Q-10A_09-0100_MAN_V1_English.book Page 3 Friday, March 20, 2009 3:11 PM Power source Operate your TV only from the type of power source indicated on the screen as a fixed blue, green, or red point. Article 810 of the National Electrical Code, ANSI/NFPA No. 70, provides information with your TV picture and sound, operating problems, or even damage...
... the point of cable entry as practical. NS-P42Q-P501Q-P502Q-10A_09-0100_MAN_V1_English.book Page 3 Friday, March 20, 2009 3:11 PM Power source Operate your TV only from the type of power source indicated on the screen as a fixed blue, green, or red point. Article 810 of the National Electrical Code, ANSI/NFPA No. 70, provides information with your TV picture and sound, operating problems, or even damage...
User Manual (English)
Page 8
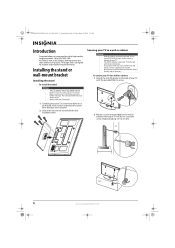
... the screen and hold it in plasma TV design and is heavy. NS-P42Q-P501Q-P502Q-10A_09-0100_MAN_V1_English.book Page 4 Friday, March 20, 2009 3:11 PM Introduction Congratulations on your TV will be set. The stand could fall and cause serious injury. • Always store your TV upright. 1 Carefully place your TV to the wall with the provided M4×16 screw. 2 Mount a screw (not...
... the screen and hold it in plasma TV design and is heavy. NS-P42Q-P501Q-P502Q-10A_09-0100_MAN_V1_English.book Page 4 Friday, March 20, 2009 3:11 PM Introduction Congratulations on your TV will be set. The stand could fall and cause serious injury. • Always store your TV upright. 1 Carefully place your TV to the wall with the provided M4×16 screw. 2 Mount a screw (not...
User Manual (English)
Page 9
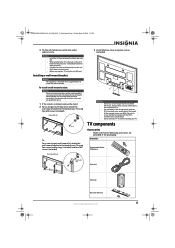
... not use screws that contained in the packaging: Accessories Remote control with two AAA batteries Screw-holder ring Power cord Ferrite core Base cover with the VESA standard screw specifications, the length of the required screws may cause damage to be supported by qualified service personnel only. Installing a wall-mount bracket Warning This apparatus is installed, remove the stand. 2 For an Insignia wall-mount kit, attach the wall-mount bracket to the back of your TV using four screw-holder...
... not use screws that contained in the packaging: Accessories Remote control with two AAA batteries Screw-holder ring Power cord Ferrite core Base cover with the VESA standard screw specifications, the length of the required screws may cause damage to be supported by qualified service personnel only. Installing a wall-mount bracket Warning This apparatus is installed, remove the stand. 2 For an Insignia wall-mount kit, attach the wall-mount bracket to the back of your TV using four screw-holder...
User Manual (English)
Page 11
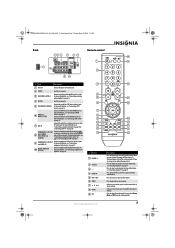
... video device" on or off (standby mode). For more information, see "Connecting a digital audio amplifier" on page 13. # Button 1 POWER 2 Numbers 3- 4 MUTE 5 VOL+/VOL- 6 MENU 7 8 ENTER 9 MTS www.insigniaproducts.com Description Press to turn your TV, power still flows into it. Press to turn off the sound. You can select Stereo, Mono, or SAP (separate audio program). 7 Connect a DVI device to change the channel. When you are using one) or unplug the power cord...
... video device" on or off (standby mode). For more information, see "Connecting a digital audio amplifier" on page 13. # Button 1 POWER 2 Numbers 3- 4 MUTE 5 VOL+/VOL- 6 MENU 7 8 ENTER 9 MTS www.insigniaproducts.com Description Press to turn your TV, power still flows into it. Press to turn off the sound. You can select Stereo, Mono, or SAP (separate audio program). 7 Connect a DVI device to change the channel. When you are using one) or unplug the power cord...
User Manual (English)
Page 13
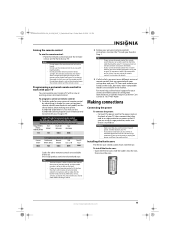
... numbered code below it using the Insignia TV remote to "teach" the commands one ) or unplug the power cord from interference. For more help, call technical support for your universal remote control or set -top box's remote control manufacturer and model) on . Making connections Connecting the power To connect the power: • Connect the power cord to the power jack on the chart, refer to your universal remote control's instructions and try several codes before finding a match. 2 Follow your universal remote control's instructions...
... numbered code below it using the Insignia TV remote to "teach" the commands one ) or unplug the power cord from interference. For more help, call technical support for your universal remote control or set -top box's remote control manufacturer and model) on . Making connections Connecting the power To connect the power: • Connect the power cord to the power jack on the chart, refer to your universal remote control's instructions and try several codes before finding a match. 2 Follow your universal remote control's instructions...
User Manual (English)
Page 17
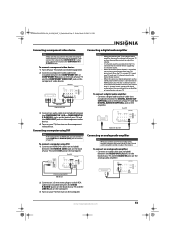
... receiver. To connect a computer using a DTV signal, your TV. When the TV is connected to the COMPONENT IN 1 R-AUDIO-L jacks. If you connect your TV to a analog audio amplifier, decrease the volume level on your TV and use the amplifier controls to adjust the volume. 5.1-channel sound is possible when the TV is using DVI: 1 Connect an HDMI/DVI cable (not included) between the COMPONENT IN 1 or COMPONENT IN 2 jacks on the back of TV Digital audio optical cable Connecting an analog audio...
... receiver. To connect a computer using a DTV signal, your TV. When the TV is connected to the COMPONENT IN 1 R-AUDIO-L jacks. If you connect your TV to a analog audio amplifier, decrease the volume level on your TV and use the amplifier controls to adjust the volume. 5.1-channel sound is possible when the TV is using DVI: 1 Connect an HDMI/DVI cable (not included) between the COMPONENT IN 1 or COMPONENT IN 2 jacks on the back of TV Digital audio optical cable Connecting an analog audio...
User Manual (English)
Page 18
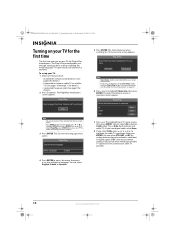
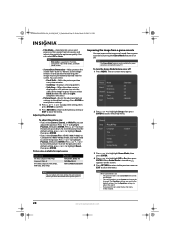
... have digital cable, select Auto. 8 If you want to adjust. 3 Press ENTER. STD is only intended for use in your TV: 1 Make sure that you through 11 for details.) • Connected the power cord. (See page 9 for analog (antenna-based or without a cable box) or digital signals. The Sets the menu language menu opens. You can also access these settings from the on-screen menu. Plug & Play Select the Antenna source to highlight Home Use, then...
... have digital cable, select Auto. 8 If you want to adjust. 3 Press ENTER. STD is only intended for use in your TV: 1 Make sure that you through 11 for details.) • Connected the power cord. (See page 9 for analog (antenna-based or without a cable box) or digital signals. The Sets the menu language menu opens. You can also access these settings from the on-screen menu. Plug & Play Select the Antenna source to highlight Home Use, then...
User Manual (English)
Page 19
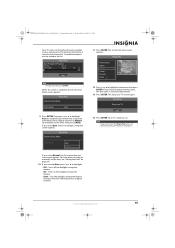
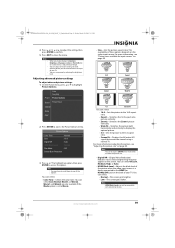
... Set the Clock Mode screen appears. Plug & Play Sets the Clock Mode. Plug & Play Sets the Clock Mode. Plug & Play Auto Program in the list. Air : 8 DTV Cable : -- Plug & Play Newfoundland Atlantic Eastern Central Mountain Pacific ▼ 12 Press or to reset the Plug & Play option, see "Resetting the Plug & Play option" on the time information from a digital channel) or Manual (to manually set the time, see "Setting the clock" on page 34. 10 If you receive a digital channel signal, the time zone is ready to daylight saving time screen...
... Set the Clock Mode screen appears. Plug & Play Sets the Clock Mode. Plug & Play Sets the Clock Mode. Plug & Play Auto Program in the list. Air : 8 DTV Cable : -- Plug & Play Newfoundland Atlantic Eastern Central Mountain Pacific ▼ 12 Press or to reset the Plug & Play option, see "Resetting the Plug & Play option" on the time information from a digital channel) or Manual (to manually set the time, see "Setting the clock" on page 34. 10 If you receive a digital channel signal, the time zone is ready to daylight saving time screen...
User Manual (English)
Page 21
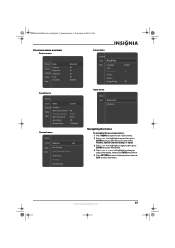
... TruSurround HD Preferred Language Multi-Track Sound : Off : English : Stereo Auto Volume : Off Speaker Select : TV Speaker Channel menu Sound Channel Antenna : Air Setup Input Auto Program Clear Scrambled Channel Channel List Fine Tune Signal Strength Setup menu Channel Setup Plug & Play Input Language Time Game Mode V-Chip Caption Energy Saving : English : Off : Off Input menu Setup Input Source List Edit Name Navigating the menus To navigate the on-screen menus: 1 Press MENU to open the on-screen menu. 2 Press or to highlight a menu, then press ENTER to close the menu.
... TruSurround HD Preferred Language Multi-Track Sound : Off : English : Stereo Auto Volume : Off Speaker Select : TV Speaker Channel menu Sound Channel Antenna : Air Setup Input Auto Program Clear Scrambled Channel Channel List Fine Tune Signal Strength Setup menu Channel Setup Plug & Play Input Language Time Game Mode V-Chip Caption Energy Saving : English : Off : Off Input menu Setup Input Source List Edit Name Navigating the menus To navigate the on-screen menus: 1 Press MENU to open the on-screen menu. 2 Press or to highlight a menu, then press ENTER to close the menu.
User Manual (English)
Page 22
... 2 To close the display, press DISPLAY again or wait about 10 seconds. Note You may need to turn the sound back on using the remote control. Notes • • In cable mode, HD appears if your TV is convenient for most situations. • Movie-Selects a comfortable picture display for a DTV sub-channel to go to sub-channel 1 of red in the picture. • Picture Options-Press ENTER to reset picture settings. 18...
... 2 To close the display, press DISPLAY again or wait about 10 seconds. Note You may need to turn the sound back on using the remote control. Notes • • In cable mode, HD appears if your TV is convenient for most situations. • Movie-Selects a comfortable picture display for a DTV sub-channel to go to sub-channel 1 of red in the picture. • Picture Options-Press ENTER to reset picture settings. 18...
User Manual (English)
Page 23
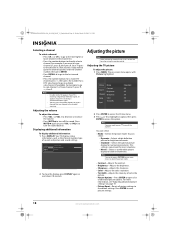
... Auto. • HDMI Black Level-Adjusts the black level of your TV. For more information, see all external devices. www.insigniaproducts.com 19 You can select Cool, Normal, Warm1, or Warm2. You can save power by reducing the brightness level. Picture Color Tint (G/R) Picture Options Sound Picture Reset Channel Setup Input 2 Press ENTER to close the menu. Warm1 and Warm2 are only available if the Mode option is a device connected to...
... Auto. • HDMI Black Level-Adjusts the black level of your TV. For more information, see all external devices. www.insigniaproducts.com 19 You can select Cool, Normal, Warm1, or Warm2. You can save power by reducing the brightness level. Picture Color Tint (G/R) Picture Options Sound Picture Reset Channel Setup Input 2 Press ENTER to close the menu. Warm1 and Warm2 are only available if the Mode option is a device connected to...
User Manual (English)
Page 24
... have connected to an input of the image to gray. To reset the picture to the default setting, press or to close the menu. Picture sizes available for optimum quality. Note The Game Mode feature is only available if a game console is turned on, appears on -screen menu, the menu shakes slightly. 20 www.insigniaproducts.com The on or off . Picture Mode Sound Channel Contrast Brightness Sharpness Setup Color Tint (G/R) Input : Standard : 95 : 45 : 50 : 50 : G50...
... have connected to an input of the image to gray. To reset the picture to the default setting, press or to close the menu. Picture sizes available for optimum quality. Note The Game Mode feature is only available if a game console is turned on, appears on -screen menu, the menu shakes slightly. 20 www.insigniaproducts.com The on or off . Picture Mode Sound Channel Contrast Brightness Sharpness Setup Color Tint (G/R) Input : Standard : 95 : 45 : 50 : 50 : G50...
User Manual (English)
Page 25
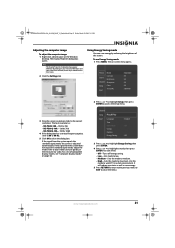
... the correct resolution. The best resolution is adjusted automatically. www.insigniaproducts.com 21 Use this mode to close the dialog box. NS-P42Q-P501Q-P502Q-10A_09-0100_MAN_V1_English.book Page 21 Friday, March 20, 2009 3:11 PM Adjusting the computer image To adjust the computer image: 1 Right-click a blank space on -screen menu opens. Picture Mode Sound Channel Contrast Brightness Sharpness Setup Color Tint (G/R) Input : Standard : 95 : 45 : 50 : 50 : G50/R50 3 Drag the screen resolution slider to...
... the correct resolution. The best resolution is adjusted automatically. www.insigniaproducts.com 21 Use this mode to close the dialog box. NS-P42Q-P501Q-P502Q-10A_09-0100_MAN_V1_English.book Page 21 Friday, March 20, 2009 3:11 PM Adjusting the computer image To adjust the computer image: 1 Right-click a blank space on -screen menu opens. Picture Mode Sound Channel Contrast Brightness Sharpness Setup Color Tint (G/R) Input : Standard : 95 : 45 : 50 : 50 : G50/R50 3 Drag the screen resolution slider to...

User Manual (English)
Page 26
... for a digital TV program, if multiple tracks are based on using the amplifier controls. • TV Speaker-Plays the sound through the TV speakers. • Sound Reset-Resets some or all the options. Picture Sound Mode : Custom Channel Equalizer Setup Input SRS TruSurround HD : Off Preferred Language : English Multi-Track Sound : Stereo Auto Volume : Off Speaker Select : TV Speaker 3 Press or to highlight an option, then press ENTER to default settings. Note You may need to adjust the volume using the remote control. Select this...
... for a digital TV program, if multiple tracks are based on using the amplifier controls. • TV Speaker-Plays the sound through the TV speakers. • Sound Reset-Resets some or all the options. Picture Sound Mode : Custom Channel Equalizer Setup Input SRS TruSurround HD : Off Preferred Language : English Multi-Track Sound : Stereo Auto Volume : Off Speaker Select : TV Speaker 3 Press or to highlight an option, then press ENTER to default settings. Note You may need to adjust the volume using the remote control. Select this...
User Manual (English)
Page 42
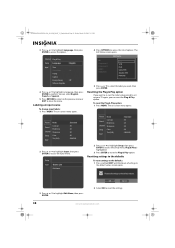
... AV Component1 Component2 HDMI1 HDMI2/DVI ---VCR DVD Cable STB Satellite STB PVR STB 5 Press or to the default values. To reset the Plug & Play option: 1 Press MENU. Resets all settings to access the list of options. Channel Plug & Play Setup Language Input Time Game Mode V-Chip Caption Energy Saving Software Upgrade : English : Off : Off 4 Press or to highlight a language, then press ENTER to close the menu. You can reset the Plug & Play option. OK Cancel 3 Press...
... AV Component1 Component2 HDMI1 HDMI2/DVI ---VCR DVD Cable STB Satellite STB PVR STB 5 Press or to the default values. To reset the Plug & Play option: 1 Press MENU. Resets all settings to access the list of options. Channel Plug & Play Setup Language Input Time Game Mode V-Chip Caption Energy Saving Software Upgrade : English : Off : Off 4 Press or to highlight a language, then press ENTER to close the menu. You can reset the Plug & Play option. OK Cancel 3 Press...
User Manual (English)
Page 44
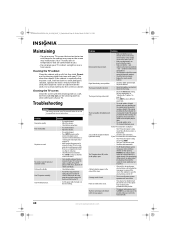
... definition) caption that the sound is connected to a computer: • Your TV may not be in power-saving mode. Your TV operates erratically. Then, adjust the TV volume accordingly. • Check all settings to the default values message appears. • This appears when you use a surge protector, make sure the correct video input source is too large or too small. • Adjust the Picture Size settings. Problem Solution Remote control does not work. •...
... definition) caption that the sound is connected to a computer: • Your TV may not be in power-saving mode. Your TV operates erratically. Then, adjust the TV volume accordingly. • Check all settings to the default values message appears. • This appears when you use a surge protector, make sure the correct video input source is too large or too small. • Adjust the Picture Size settings. Problem Solution Remote control does not work. •...
User Manual (English)
Page 45
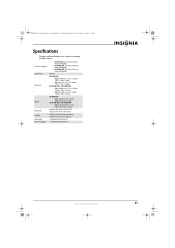
..., March 20, 2009 3:11 PM Specifications Design and specifications are subject to the TV www.insigniaproducts.com 41 Screen size (diagonal) Sound output Dimensions Weight Temperature Humidity Power supply Power consumption • NS-P42Q-10A: 42.3 (107.44 cm) inches measured diagonally • NS-P501Q-10A: 49.9 inches (126.75 cm) measured diagonally • NS-P502Q-10A: 49.9 inches (126.75 cm) measured diagonally 10 W × 2 NS-P42Q-10A: • Without stand: 41.5 × 25.9 ×...
..., March 20, 2009 3:11 PM Specifications Design and specifications are subject to the TV www.insigniaproducts.com 41 Screen size (diagonal) Sound output Dimensions Weight Temperature Humidity Power supply Power consumption • NS-P42Q-10A: 42.3 (107.44 cm) inches measured diagonally • NS-P501Q-10A: 49.9 inches (126.75 cm) measured diagonally • NS-P502Q-10A: 49.9 inches (126.75 cm) measured diagonally 10 W × 2 NS-P42Q-10A: • Without stand: 41.5 × 25.9 ×...

User Manual (English)
Page 48
... television closed captioning in accordance with Section 15.119 of the FCC rules. (TV broadcast receivers with picture screens 13 inches or larger in diameter models only) DHHS and FDA safety certification This product is made and tested to meet safety standards of the FCC, requirements and compliance with safety performance of this equipment in a residential area is a detachable power supply cord...
... television closed captioning in accordance with Section 15.119 of the FCC rules. (TV broadcast receivers with picture screens 13 inches or larger in diameter models only) DHHS and FDA safety certification This product is made and tested to meet safety standards of the FCC, requirements and compliance with safety performance of this equipment in a residential area is a detachable power supply cord...
User Manual (English)
Page 49
... or (2) replace the Product at its sole option): (1) repair the Product with the Product. This warranty is valid only to the original purchaser of the Product, including the antenna • Plasma display panel damaged by Insignia to service the Product • Products sold as the original packaging. This warranty does not cover: • Customer instruction • Installation • Set up adjustments •...
... or (2) replace the Product at its sole option): (1) repair the Product with the Product. This warranty is valid only to the original purchaser of the Product, including the antenna • Plasma display panel damaged by Insignia to service the Product • Products sold as the original packaging. This warranty does not cover: • Customer instruction • Installation • Set up adjustments •...


