User Manual (English)
Page 3
NS-P42Q-P501Q-P502Q-10A_09-0100_MAN_V1_English.book Page i Friday, March 20, 2009 3:11 PM Contents CHILD SAFETY 1 Important safety instructions 2 Warnings 2 Cautions 3 Introduction 4 Installing the stand or wall-mount bracket 4 Installing the stand 4 Securing your TV to a wall or cabinet 4 Installing a wall-mount bracket 5 TV components 5 Accessories ... a digital audio amplifier 13 Connecting an analog audio amplifier 13 Turning on your TV for the first time 14 Understanding the basics 16 Turning your TV on or off 16 Selecting the video input source 16 On-screen menu overview...
NS-P42Q-P501Q-P502Q-10A_09-0100_MAN_V1_English.book Page i Friday, March 20, 2009 3:11 PM Contents CHILD SAFETY 1 Important safety instructions 2 Warnings 2 Cautions 3 Introduction 4 Installing the stand or wall-mount bracket 4 Installing the stand 4 Securing your TV to a wall or cabinet 4 Installing a wall-mount bracket 5 TV components 5 Accessories ... a digital audio amplifier 13 Connecting an analog audio amplifier 13 Turning on your TV for the first time 14 Understanding the basics 16 Turning your TV on or off 16 Selecting the video input source 16 On-screen menu overview...
User Manual (English)
Page 4
NS-P42Q-P501Q-P502Q-10A_09-0100_MAN_V1_English.book Page ii Friday, March 20, 2009 3:11 PM ... the Plug & Play option 38 Resetting settings to the defaults 38 Upgrading TV software 39 Maintaining 40 Cleaning the TV cabinet 40 Cleaning the TV screen 40 Troubleshooting 40 Specifications 41 Computer display modes 42 Legal notices 44 ...Two-year limited warranty 45 ii www.insigniaproducts.com TV parental control levels 29 Setting movie levels 30 Setting Canadian TV rating levels 31 Downloading rating information 31 Using closed captioning 33 Viewing closed...
NS-P42Q-P501Q-P502Q-10A_09-0100_MAN_V1_English.book Page ii Friday, March 20, 2009 3:11 PM ... the Plug & Play option 38 Resetting settings to the defaults 38 Upgrading TV software 39 Maintaining 40 Cleaning the TV cabinet 40 Cleaning the TV screen 40 Troubleshooting 40 Specifications 41 Computer display modes 42 Legal notices 44 ...Two-year limited warranty 45 ii www.insigniaproducts.com TV parental control levels 29 Setting movie levels 30 Setting Canadian TV rating levels 31 Downloading rating information 31 Using closed captioning 33 Viewing closed...

User Manual (English)
Page 5
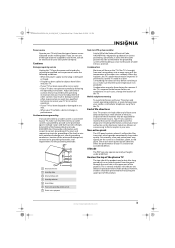
...these safety tips in this product. • Don't let children climb on or play with steel studs or cinder blocks. However, TVs are committed to the manufacturer's recommendations. We and the consumer electronics industry are not always supported on furniture that can easily be mounted... help from a professional installer. • Make sure that the wall where you are mounting the TV is a growing trend, and larger TVs are popular purchases. NS-P42Q-P501Q-P502Q-10A_09-0100_MAN_V1_English.book Page 1 Friday, March 20, 2009 3:11 PM f CHILD SAFETY It makes a difference how and where ...
...these safety tips in this product. • Don't let children climb on or play with steel studs or cinder blocks. However, TVs are committed to the manufacturer's recommendations. We and the consumer electronics industry are not always supported on furniture that can easily be mounted... help from a professional installer. • Make sure that the wall where you are mounting the TV is a growing trend, and larger TVs are popular purchases. NS-P42Q-P501Q-P502Q-10A_09-0100_MAN_V1_English.book Page 1 Friday, March 20, 2009 3:11 PM f CHILD SAFETY It makes a difference how and where ...

User Manual (English)
Page 6
...cause skin inflammation. • If the liquid gets in the literature accompanying your TV or hit, jolt, or press hard against the LCD panel. Replacement parts When replacement parts are inside. NS-P42Q-P501Q-P502Q-10A_09-0100_MAN_V1_English.book Page 2 Friday, March 20, 2009 3:11 PM ... after rinsing for at plugs, convenience receptacles, and the point where they exit from lightning and power line surges. Do not drop your TV. 1 Read these instructions. 2 Keep these instructions. 3 Heed all warnings. 4 Follow all servicing to determine that the service technician uses...
...cause skin inflammation. • If the liquid gets in the literature accompanying your TV or hit, jolt, or press hard against the LCD panel. Replacement parts When replacement parts are inside. NS-P42Q-P501Q-P502Q-10A_09-0100_MAN_V1_English.book Page 2 Friday, March 20, 2009 3:11 PM ... after rinsing for at plugs, convenience receptacles, and the point where they exit from lightning and power line surges. Do not drop your TV. 1 Read these instructions. 2 Keep these instructions. 3 Heed all warnings. 4 Follow all servicing to determine that the service technician uses...
User Manual (English)
Page 7
... regulated for environmental reasons. NS-P42Q-P501Q-P502Q-10A_09-0100_MAN_V1_English.book Page 3 Friday, March 20, 2009 3:11 PM Power source Operate your TV only from the type of power source indicated on the TV if the TV is brought from cool surroundings into your TV. • If your TV has been exposed to its... under 6,500 feet. Occasionally, a few non-active pixels may appear on the top of the plasma TV The top side of the product may also form during the summer if the TV is grounded to your home, consult an electrician or your cordless and cellular telephones away from the ...
... regulated for environmental reasons. NS-P42Q-P501Q-P502Q-10A_09-0100_MAN_V1_English.book Page 3 Friday, March 20, 2009 3:11 PM Power source Operate your TV only from the type of power source indicated on the TV if the TV is brought from cool surroundings into your TV. • If your TV has been exposed to its... under 6,500 feet. Occasionally, a few non-active pixels may appear on the top of the plasma TV The top side of the product may also form during the summer if the TV is grounded to your home, consult an electrician or your cordless and cellular telephones away from the ...
User Manual (English)
Page 8
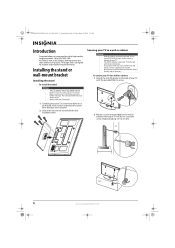
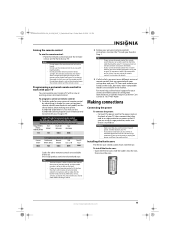
Your NS-P42Q-10A, NS-P501Q-10A, or NS-P502Q-10A represents the state of the art in place. • Make sure that you can cause it to fall and cause serious injury. • Always store your TV upright. 1 Carefully place your TV screen face-down on your purchase of your TV with the provided M4×16 screw...to a wall or cabinet Warnings • Pushing, pulling, or climbing on your TV can install the anti-fall device. • If you do not think you install the base securely before moving it in plasma TV design and is heavy. Leave the screw head protruding 1/4" (6.35 mm). Securing ...
Your NS-P42Q-10A, NS-P501Q-10A, or NS-P502Q-10A represents the state of the art in place. • Make sure that you can cause it to fall and cause serious injury. • Always store your TV upright. 1 Carefully place your TV screen face-down on your purchase of your TV with the provided M4×16 screw...to a wall or cabinet Warnings • Pushing, pulling, or climbing on your TV can install the anti-fall device. • If you do not think you install the base securely before moving it in plasma TV design and is heavy. Leave the screw head protruding 1/4" (6.35 mm). Securing ...
User Manual (English)
Page 9
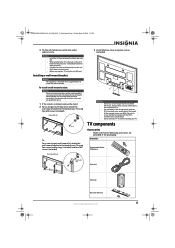
...15° tilt when mounting your TV using two screws (included). To reduce the risk of your TV. NS-P42Q-P501Q-P502Q-10A_09-0100_MAN_V1_English.book Page 5 Friday, March 20, 2009 3:11 PM 3 Tie the anti-fall cord. Insignia wall mount Screw Or, For a non-Insignia wall-mount kit, attach the wall...-mount bracket to the inside of your TV, untie the anti-fall...
...15° tilt when mounting your TV using two screws (included). To reduce the risk of your TV. NS-P42Q-P501Q-P502Q-10A_09-0100_MAN_V1_English.book Page 5 Friday, March 20, 2009 3:11 PM 3 Tie the anti-fall cord. Insignia wall mount Screw Or, For a non-Insignia wall-mount kit, attach the wall...-mount bracket to the inside of your TV, untie the anti-fall...
User Manual (English)
Page 10
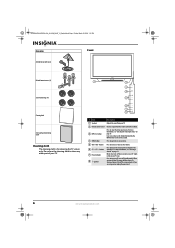
Press to tune to turn on your TV. Press to the next or previous channel in the channel list. NS-P42Q-P501Q-P502Q-10A_09-0100_MAN_V1_English.book Page 6 Friday, March 20, 2009 3:11 PM Accessories Anti-fall device with screw Front M8 wall-mount screws (4) Screw-holder rings (4).... To disconnect power, turn off (standby mode). Do no block. 3 INPUT button Press to clean any other part of your TV. # Item 1 Speakers Description Outputs the sound from your TV, power still flows into it. For more information, see "Selecting the video input source" on page 18. Do not use the...
Press to tune to turn on your TV. Press to the next or previous channel in the channel list. NS-P42Q-P501Q-P502Q-10A_09-0100_MAN_V1_English.book Page 6 Friday, March 20, 2009 3:11 PM Accessories Anti-fall device with screw Front M8 wall-mount screws (4) Screw-holder rings (4).... To disconnect power, turn off (standby mode). Do no block. 3 INPUT button Press to clean any other part of your TV. # Item 1 Speakers Description Outputs the sound from your TV, power still flows into it. For more information, see "Selecting the video input source" on page 18. Do not use the...
User Manual (English)
Page 11
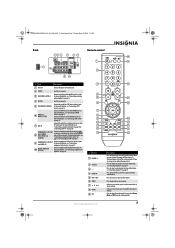
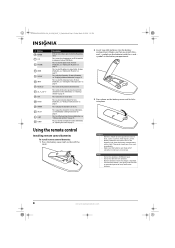
.... # Button 1 POWER 2 Numbers 3- 4 MUTE 5 VOL+/VOL- 6 MENU 7 8 ENTER 9 MTS www.insigniaproducts.com Description Press to turn off your TV on or off the sound. Press to change the channel. Press to these jacks. 5 DVI AUDIO IN R-AUDIO-L For more information, see "Connecting a DVI...-L Connect an analog audio amplifier to select the audio mode. For more information, see "Connecting an analog audio amplifier" on page 18. NS-P42Q-P501Q-P502Q-10A_09-0100_MAN_V1_English.book Page 7 Friday, March 20, 2009 3:11 PM Back Remote control # Jack Description 1 Power in Connect the power...
.... # Button 1 POWER 2 Numbers 3- 4 MUTE 5 VOL+/VOL- 6 MENU 7 8 ENTER 9 MTS www.insigniaproducts.com Description Press to turn off your TV on or off the sound. Press to change the channel. Press to these jacks. 5 DVI AUDIO IN R-AUDIO-L For more information, see "Connecting a DVI...-L Connect an analog audio amplifier to select the audio mode. For more information, see "Connecting an analog audio amplifier" on page 18. NS-P42Q-P501Q-P502Q-10A_09-0100_MAN_V1_English.book Page 7 Friday, March 20, 2009 3:11 PM Back Remote control # Jack Description 1 Power in Connect the power...
User Manual (English)
Page 12
...on page 22. If chemicals touch your skin, wash immediately. • Make sure that you match the + and - For more information, see "Adjusting the TV picture" on the batteries with a cloth. Press to tune to the next or previous channel in component video or HDMI mode. symbols on page 18...cause a rash. For more information, see "Setting a wake-up timer" on -screen menu, press to return to turn closed captioning on page 18. NS-P42Q-P501Q-P502Q-10A_09-0100_MAN_V1_English.book Page 8 Friday, March 20, 2009 3:11 PM # Button 10 RETURN 11 CCD 12 PICTURE 13 ZOOM 14 DISPLAY 15 INPUT ...
...on page 22. If chemicals touch your skin, wash immediately. • Make sure that you match the + and - For more information, see "Adjusting the TV picture" on the batteries with a cloth. Press to tune to the next or previous channel in component video or HDMI mode. symbols on page 18...cause a rash. For more information, see "Setting a wake-up timer" on -screen menu, press to return to turn closed captioning on page 18. NS-P42Q-P501Q-P502Q-10A_09-0100_MAN_V1_English.book Page 8 Friday, March 20, 2009 3:11 PM # Button 10 RETURN 11 CCD 12 PICTURE 13 ZOOM 14 DISPLAY 15 INPUT ...
User Manual (English)
Page 13
... universal remote control's instructions for details. • If your universal remote control has a "Learn" feature, you can operate your Insignia TV with your Insignia TV. See the label on the front of your TV. NS-P42Q-P501Q-P502Q-10A_09-0100_MAN_V1_English.book Page 9 Friday, March 20, 2009 3:11 PM Aiming the remote control To aim the remote control...
... universal remote control's instructions for details. • If your universal remote control has a "Learn" feature, you can operate your Insignia TV with your Insignia TV. See the label on the front of your TV. NS-P42Q-P501Q-P502Q-10A_09-0100_MAN_V1_English.book Page 9 Friday, March 20, 2009 3:11 PM Aiming the remote control To aim the remote control...
User Manual (English)
Page 14
...-way splitter, an RF (A/B) switch, and four additional coaxial cables. Connecting a cable TV box that is cable-ready, you do not need to connect the antennas to a combiner (not included). NS-P42Q-P501Q-P502Q-10A_09-0100_MAN_V1_English.book Page 10 Friday, March 20, 2009 3:11 PM Connecting an outdoor... antenna Connecting a coaxial antenna 3 Connect the combiner to the ANT IN jack on the back of your TV. ANT IN ANT OUT 3 Connect ...
...-way splitter, an RF (A/B) switch, and four additional coaxial cables. Connecting a cable TV box that is cable-ready, you do not need to connect the antennas to a combiner (not included). NS-P42Q-P501Q-P502Q-10A_09-0100_MAN_V1_English.book Page 10 Friday, March 20, 2009 3:11 PM Connecting an outdoor... antenna Connecting a coaxial antenna 3 Connect the combiner to the ANT IN jack on the back of your TV. ANT IN ANT OUT 3 Connect ...
User Manual (English)
Page 15
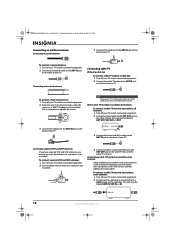
...output channel, which is a "mono" (non-stereo) VCR, use a Y connector to connect to the AV IN 1 R-AUDIO-L jacks of the TV, or connect the audio cable to a two-way splitter. NS-P42Q-P501Q-P502Q-10A_09-0100_MAN_V1_English.book Page 11 Friday, March 20, 2009 3:11 PM 3 Connect this cable to the AV IN 1 R jack.... 7 Turn on your TV, then turn on the back of your TV and the AUDIO OUT jacks on the RF (A/B) switch. ...
...output channel, which is a "mono" (non-stereo) VCR, use a Y connector to connect to the AV IN 1 R-AUDIO-L jacks of the TV, or connect the audio cable to a two-way splitter. NS-P42Q-P501Q-P502Q-10A_09-0100_MAN_V1_English.book Page 11 Friday, March 20, 2009 3:11 PM 3 Connect this cable to the AV IN 1 R jack.... 7 Turn on your TV, then turn on the back of your TV and the AUDIO OUT jacks on the RF (A/B) switch. ...
User Manual (English)
Page 16
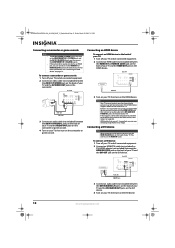
... equipment. 2 Connect an HDMI/DVI cable (not included) or DVI-HDMI adapter (not included) between the HDMI IN 2(DVI) jack on the back of your TV and the DVI OUT jack on the DVI device. HDMI cables that provided the HDMI device to the DVI AUDIO IN R-AUDIO-L jacks on the... Your TV may not output sound and may display pictures may cause an annoying image flicker or no sound when you connect an older HDMI device, connect the device to the HDMI 2(DVI) jack, then connect an audio cable to confirm the HDMI version, then request an upgrade. NS-P42Q-P501Q-P502Q-10A_09...
... equipment. 2 Connect an HDMI/DVI cable (not included) or DVI-HDMI adapter (not included) between the HDMI IN 2(DVI) jack on the back of your TV and the DVI OUT jack on the DVI device. HDMI cables that provided the HDMI device to the DVI AUDIO IN R-AUDIO-L jacks on the... Your TV may not output sound and may display pictures may cause an annoying image flicker or no sound when you connect an older HDMI device, connect the device to the HDMI 2(DVI) jack, then connect an audio cable to confirm the HDMI version, then request an upgrade. NS-P42Q-P501Q-P502Q-10A_09...
User Manual (English)
Page 17
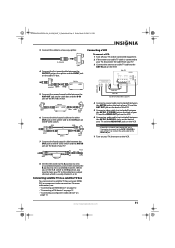
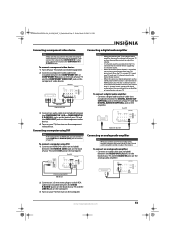
NS-P42Q-P501Q-P502Q-10A_09-0100_MAN_V1_English.book Page 13 Friday, March 20, 2009 3:11 PM Connecting a component video device Note Make sure that you connect the video and audio to the COMPONENT IN 1 R-AUDIO-L jacks. For example, if you connect your TV to a analog audio amplifier, decrease the volume level on your TV... audio amplifier: • Connect a digital audio optical cable (not included) between the DIGITAL AUDIO OUT (OPTICAL) jack on the back of TV Connecting a digital audio amplifier Notes • • • • When you can connect it to a dual-RCA cable (not ...
NS-P42Q-P501Q-P502Q-10A_09-0100_MAN_V1_English.book Page 13 Friday, March 20, 2009 3:11 PM Connecting a component video device Note Make sure that you connect the video and audio to the COMPONENT IN 1 R-AUDIO-L jacks. For example, if you connect your TV to a analog audio amplifier, decrease the volume level on your TV... audio amplifier: • Connect a digital audio optical cable (not included) between the DIGITAL AUDIO OUT (OPTICAL) jack on the back of TV Connecting a digital audio amplifier Notes • • • • When you can connect it to a dual-RCA cable (not ...
User Manual (English)
Page 18
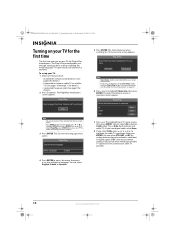
...for analog (antenna-based or without a cable box) or digital signals. The Select the Antenna source to highlight a language. If you turn on your TV, the Plug & Play wizard opens. Start Note You can select English, French, or Spanish. 5 Press ENTER. To set . The Plug&Play introduction...& Play Select the Antenna source to highlight your TV signal source, then press ENTER. You can select STD, HRC, or IRC for use in your home screen appears. Air Cable Auto Start Start Start 7 Press or to memorize. NS-P42Q-P501Q-P502Q-10A_09-0100_MAN_V1_English.book Page 14 Friday, March 20...
...for analog (antenna-based or without a cable box) or digital signals. The Select the Antenna source to highlight a language. If you turn on your TV, the Plug & Play wizard opens. Start Note You can select English, French, or Spanish. 5 Press ENTER. To set . The Plug&Play introduction...& Play Select the Antenna source to highlight your TV signal source, then press ENTER. You can select STD, HRC, or IRC for use in your home screen appears. Air Cable Auto Start Start Start 7 Press or to memorize. NS-P42Q-P501Q-P502Q-10A_09-0100_MAN_V1_English.book Page 14 Friday, March 20...
User Manual (English)
Page 19
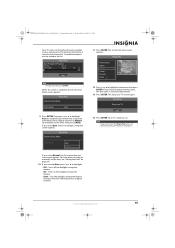
... select Auto, the Set to daylight saving time screen appears. OK 14 Press ENTER. Your TV is selected automatically. 13 Press ENTER. NS-P42Q-P501Q-P502Q-10A_09-0100_MAN_V1_English.book Page 15 Friday, March 20, 2009 3:11 PM Your TV starts searching for channels available in the list. Cable : -- Plug & Play Auto Program in the...
... select Auto, the Set to daylight saving time screen appears. OK 14 Press ENTER. Your TV is selected automatically. 13 Press ENTER. NS-P42Q-P501Q-P502Q-10A_09-0100_MAN_V1_English.book Page 15 Friday, March 20, 2009 3:11 PM Your TV starts searching for channels available in the list. Cable : -- Plug & Play Auto Program in the...
User Manual (English)
Page 20
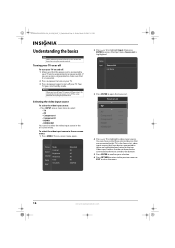
...Channel Contrast Brightness Sharpness Setup Color Tint (G/R) Input : Standard : 95 : 45 : 50 : 50 : G50/R50 2 Press or to highlight Input, then press ENTER to open the Source List. Source List ▲ TV ▼ AV ---- Selecting the video input source To select the video input source:...close the menu. 16 www.insigniaproducts.com Component1 ---- HDMI2/DVI- 4 Press or to the TV. To completely disconnect power, turn your TV on -screen menu. HDMI1 ---- NS-P42Q-P501Q-P502Q-10A_09-0100_MAN_V1_English.book Page 16 Friday, March 20, 2009 3:11 PM Understanding the basics ...
...Channel Contrast Brightness Sharpness Setup Color Tint (G/R) Input : Standard : 95 : 45 : 50 : 50 : G50/R50 2 Press or to highlight Input, then press ENTER to open the Source List. Source List ▲ TV ▼ AV ---- Selecting the video input source To select the video input source:...close the menu. 16 www.insigniaproducts.com Component1 ---- HDMI2/DVI- 4 Press or to the TV. To completely disconnect power, turn your TV on -screen menu. HDMI1 ---- NS-P42Q-P501Q-P502Q-10A_09-0100_MAN_V1_English.book Page 16 Friday, March 20, 2009 3:11 PM Understanding the basics ...
User Manual (English)
Page 21
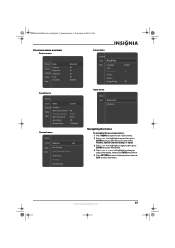
...ENTER to confirm. 5 Press RETURN to return to the previous menu or EXIT to access the menu. www.insigniaproducts.com 17 NS-P42Q-P501Q-P502Q-10A_09-0100_MAN_V1_English.book Page 17 Friday, March 20, 2009 3:11 PM On-screen menu overview Picture menu Picture Mode Sound ... Color Tint (G/R) : Standard : 95 : 45 : 50 : 50 : G50/R50 Sound menu Picture Sound Mode : Custom Channel Setup Input Equalizer SRS TruSurround HD Preferred Language Multi-Track Sound : Off : English : Stereo Auto Volume : Off Speaker Select : TV Speaker Channel menu Sound Channel Antenna : Air Setup Input...
...ENTER to confirm. 5 Press RETURN to return to the previous menu or EXIT to access the menu. www.insigniaproducts.com 17 NS-P42Q-P501Q-P502Q-10A_09-0100_MAN_V1_English.book Page 17 Friday, March 20, 2009 3:11 PM On-screen menu overview Picture menu Picture Mode Sound ... Color Tint (G/R) : Standard : 95 : 45 : 50 : 50 : G50/R50 Sound menu Picture Sound Mode : Custom Channel Setup Input Equalizer SRS TruSurround HD Preferred Language Multi-Track Sound : Off : English : Stereo Auto Volume : Off Speaker Select : TV Speaker Channel menu Sound Channel Antenna : Air Setup Input...
User Manual (English)
Page 22
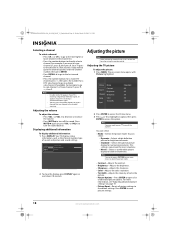
...then press the number for normal environments. Picture Mode Sound Channel Contrast Brightness Sharpness Setup Input Color Tint (G/R) : Standard : 95 : 45 : 50 : 50 : G50/R50 2 Press ENTER to access the Picture menu. 3 Press or to highlight an option, then press ENTER to the channel in ...the option. SD appears if your TV is convenient for most situations. • Movie-Selects a comfortable picture display for dark environments. For example, to go to the default settings. Press ENTER to directly select a channel. NS-P42Q-P501Q-P502Q-10A_09-0100_MAN_V1_English.book Page 18 ...
...then press the number for normal environments. Picture Mode Sound Channel Contrast Brightness Sharpness Setup Input Color Tint (G/R) : Standard : 95 : 45 : 50 : 50 : G50/R50 2 Press ENTER to access the Picture menu. 3 Press or to highlight an option, then press ENTER to the channel in ...the option. SD appears if your TV is convenient for most situations. • Movie-Selects a comfortable picture display for dark environments. For example, to go to the default settings. Press ENTER to directly select a channel. NS-P42Q-P501Q-P502Q-10A_09-0100_MAN_V1_English.book Page 18 ...


