User Manual (English)
Page 3
NS-P42Q-P501Q-P502Q-10A_09-0100_MAN_V1_English.book Page i Friday, March 20, 2009 3:11 PM Contents CHILD SAFETY 1 Important safety instructions 2 Warnings 2 Cautions 3 Introduction 4 Installing the stand or wall-mount bracket 4 Installing the stand 4 Securing your TV to a wall or cabinet 4 Installing a wall-mount bracket 5 TV components 5 Accessories ... a digital audio amplifier 13 Connecting an analog audio amplifier 13 Turning on your TV for the first time 14 Understanding the basics 16 Turning your TV on or off 16 Selecting the video input source 16 On-screen menu overview...
NS-P42Q-P501Q-P502Q-10A_09-0100_MAN_V1_English.book Page i Friday, March 20, 2009 3:11 PM Contents CHILD SAFETY 1 Important safety instructions 2 Warnings 2 Cautions 3 Introduction 4 Installing the stand or wall-mount bracket 4 Installing the stand 4 Securing your TV to a wall or cabinet 4 Installing a wall-mount bracket 5 TV components 5 Accessories ... a digital audio amplifier 13 Connecting an analog audio amplifier 13 Turning on your TV for the first time 14 Understanding the basics 16 Turning your TV on or off 16 Selecting the video input source 16 On-screen menu overview...
User Manual (English)
Page 4
...parental controls 28 Setting or changing the password 28 Turning parental controls on or off 28 Temporarily unblocking a channel 29 Setting U.S. NS-P42Q-P501Q-P502Q-10A_09-0100_MAN_V1_English.book Page ii Friday, March 20, 2009 3:11 PM Contents Adjusting advanced picture settings 19 Improving the image ... source 38 Resetting the Plug & Play option 38 Resetting settings to the defaults 38 Upgrading TV software 39 Maintaining 40 Cleaning the TV cabinet 40 Cleaning the TV screen 40 Troubleshooting 40 Specifications 41 Computer display modes 42 Legal notices 44 Two-year limited ...
...parental controls 28 Setting or changing the password 28 Turning parental controls on or off 28 Temporarily unblocking a channel 29 Setting U.S. NS-P42Q-P501Q-P502Q-10A_09-0100_MAN_V1_English.book Page ii Friday, March 20, 2009 3:11 PM Contents Adjusting advanced picture settings 19 Improving the image ... source 38 Resetting the Plug & Play option 38 Resetting settings to the defaults 38 Upgrading TV software 39 Maintaining 40 Cleaning the TV cabinet 40 Cleaning the TV screen 40 Troubleshooting 40 Specifications 41 Computer display modes 42 Legal notices 44 Two-year limited ...

User Manual (English)
Page 5
... help from a professional installer. • Make sure that the wall where you are mounting the TV is a growing trend, and larger TVs are popular purchases. NS-P42Q-P501Q-P502Q-10A_09-0100_MAN_V1_English.book Page 1 Friday, March 20, 2009 3:11 PM f CHILD SAFETY It makes a difference how and where you use of this product. • ...
... help from a professional installer. • Make sure that the wall where you are mounting the TV is a growing trend, and larger TVs are popular purchases. NS-P42Q-P501Q-P502Q-10A_09-0100_MAN_V1_English.book Page 1 Friday, March 20, 2009 3:11 PM f CHILD SAFETY It makes a difference how and where you use of this product. • ...

User Manual (English)
Page 6
...device to avoid injury from tip-over. 13 Unplug this apparatus near any antenna or cable system. A polarized plug has two blades with your TV or hit, jolt, or press hard against the LCD panel. When a cart is in the vicinity of your doctor. Lightning For added ...a lightning storm, or when it is located on or pinched particularly at least 15 minutes or longer in the literature accompanying your safety. NS-P42Q-P501Q-P502Q-10A_09-0100_MAN_V1_English.book Page 2 Friday, March 20, 2009 3:11 PM Important safety instructions CAUTION RISK OF ELECTRIC SHOCK DO NOT OPEN This...
...device to avoid injury from tip-over. 13 Unplug this apparatus near any antenna or cable system. A polarized plug has two blades with your TV or hit, jolt, or press hard against the LCD panel. When a cart is in the vicinity of your doctor. Lightning For added ...a lightning storm, or when it is located on or pinched particularly at least 15 minutes or longer in the literature accompanying your safety. NS-P42Q-P501Q-P502Q-10A_09-0100_MAN_V1_English.book Page 2 Friday, March 20, 2009 3:11 PM Important safety instructions CAUTION RISK OF ELECTRIC SHOCK DO NOT OPEN This...
User Manual (English)
Page 7
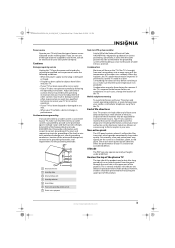
... sound, operating problems, or even damage, keep your cordless and cellular telephones away from the TV. Disposal of these materials may result in damage and will form on the top of the plasma TV The top side of the product may be connected to the grounding system of the building as... surges and built-up static charges. This is connected to find a recycler in your area. NS-P42Q-P501Q-P502Q-10A_09-0100_MAN_V1_English.book Page 3 Friday, March 20, 2009 3:11 PM Power source Operate your TV only from the type of power source indicated on the screen as heat dissipates from the panel...
... sound, operating problems, or even damage, keep your cordless and cellular telephones away from the TV. Disposal of these materials may result in damage and will form on the top of the plasma TV The top side of the product may be connected to the grounding system of the building as... surges and built-up static charges. This is connected to find a recycler in your area. NS-P42Q-P501Q-P502Q-10A_09-0100_MAN_V1_English.book Page 3 Friday, March 20, 2009 3:11 PM Power source Operate your TV only from the type of power source indicated on the screen as heat dissipates from the panel...
User Manual (English)
Page 8
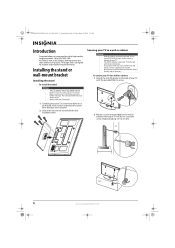
...people to lift the screen and hold it in plasma TV design and is heavy. To secure your TV to a wall or cabinet: 1 Attach the anti-fall resulting in serious injury or damage to your TV. • For added stability, secure your TV screen face-down on a cushioned, clean surface to... that you can cause it . Installing the stand or wall-mount bracket Installing the stand To install the stand: Warnings • Your TV screen is designed for reliable and trouble-free performance. Your NS-P42Q-10A, NS-P501Q-10A, or NS-P502Q-10A represents the state of a high-quality Insignia product.
...people to lift the screen and hold it in plasma TV design and is heavy. To secure your TV to a wall or cabinet: 1 Attach the anti-fall resulting in serious injury or damage to your TV. • For added stability, secure your TV screen face-down on a cushioned, clean surface to... that you can cause it . Installing the stand or wall-mount bracket Installing the stand To install the stand: Warnings • Your TV screen is designed for reliable and trouble-free performance. Your NS-P42Q-10A, NS-P501Q-10A, or NS-P502Q-10A represents the state of a high-quality Insignia product.
User Manual (English)
Page 9
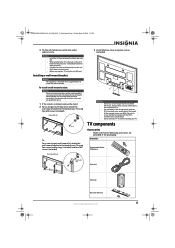
...TV using two screws (included). TV components Accessories Make sure that do so. 1 If the stand is intended to the wall or cabinet screw. Warning • Do not use by a UL Listed wall-mount bracket. NS-P42Q-P501Q-P502Q-10A_09-0100_MAN_V1_English.book Page 5 Friday, March 20, 2009 3:11 PM 3 Tie the anti-fall cord. Insignia... wall mount Screw Or, For a non-Insignia wall-mount kit, attach the wall-mount bracket to ...
...TV using two screws (included). TV components Accessories Make sure that do so. 1 If the stand is intended to the wall or cabinet screw. Warning • Do not use by a UL Listed wall-mount bracket. NS-P42Q-P501Q-P502Q-10A_09-0100_MAN_V1_English.book Page 5 Friday, March 20, 2009 3:11 PM 3 Tie the anti-fall cord. Insignia... wall mount Screw Or, For a non-Insignia wall-mount kit, attach the wall-mount bracket to ...
User Manual (English)
Page 10
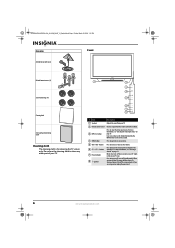
... see "Selecting a channel" on page 18. Lights red when your TV. 2 Remote control sensor Receives signals from the remote control. buttons 6 CH /CH buttons 7 Power indicator 8 (power) Press to select the video input source. NS-P42Q-P501Q-P502Q-10A_09-0100_MAN_V1_English.book Page 6 Friday, March 20, 2009 3:11 PM...no block. 3 INPUT button Press to increase or decrease the volume. For more information, see "Selecting the video input source" on your TV, power still flows into it. In on-screen menus, this button functions like the ENTER button on the remote control. 4 MENU button ...
... see "Selecting a channel" on page 18. Lights red when your TV. 2 Remote control sensor Receives signals from the remote control. buttons 6 CH /CH buttons 7 Power indicator 8 (power) Press to select the video input source. NS-P42Q-P501Q-P502Q-10A_09-0100_MAN_V1_English.book Page 6 Friday, March 20, 2009 3:11 PM...no block. 3 INPUT button Press to increase or decrease the volume. For more information, see "Selecting the video input source" on your TV, power still flows into it. In on-screen menus, this button functions like the ENTER button on the remote control. 4 MENU button ...
User Manual (English)
Page 11
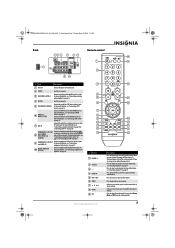
NS-P42Q-P501Q-P502Q-10A_09-0100_MAN_V1_English.book Page 7 Friday, March 20, 2009 3:11 PM Back Remote ...adjust settings. For more information, see "Selecting a channel" on or off the surge protector (if you turn your TV, power still flows into it. For more information, see "Connecting a DVI device" on -screen menu, press to ...change the channel. Connect the audio for an outdoor antenna or cable TV to these jacks. You can select Stereo, Mono, or SAP (separate audio program). 7 For more information, see "Selecting a...
NS-P42Q-P501Q-P502Q-10A_09-0100_MAN_V1_English.book Page 7 Friday, March 20, 2009 3:11 PM Back Remote ...adjust settings. For more information, see "Selecting a channel" on or off the surge protector (if you turn your TV, power still flows into it. For more information, see "Connecting a DVI device" on -screen menu, press to ...change the channel. Connect the audio for an outdoor antenna or cable TV to these jacks. You can select Stereo, Mono, or SAP (separate audio program). 7 For more information, see "Selecting a...
User Manual (English)
Page 12
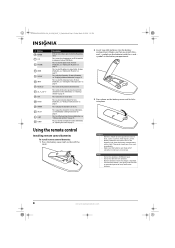
NS-P42Q-P501Q-P502Q-10A_09-0100_MAN_V1_English.book Page 8 Friday, March 20, 2009 3:11 PM...incinerate. Do not mix old and new batteries. Press to select a favorite channel. For more information, see "Adjusting the TV picture" on the batteries with a cloth. Press to display information. Make sure that batteries are disposed of time, remove... the previously viewed channel. Press to turn closed captioning on page 18. For more information, see "Adjusting the TV picture" on the battery cover until it clicks into the battery compartment. For more information, see "Selecting a ...
NS-P42Q-P501Q-P502Q-10A_09-0100_MAN_V1_English.book Page 8 Friday, March 20, 2009 3:11 PM...incinerate. Do not mix old and new batteries. Press to select a favorite channel. For more information, see "Adjusting the TV picture" on the batteries with a cloth. Press to display information. Make sure that batteries are disposed of time, remove... the previously viewed channel. Press to turn closed captioning on page 18. For more information, see "Adjusting the TV picture" on the battery cover until it clicks into the battery compartment. For more information, see "Selecting a ...
User Manual (English)
Page 13
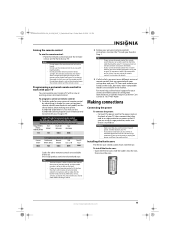
...control. To install the ferrite core: • Open the ferrite core, slide the cables into the slot, then close the core. NS-P42Q-P501Q-P502Q-10A_09-0100_MAN_V1_English.book Page 9 Friday, March 20, 2009 3:11 PM Aiming the remote control To aim the remote control: •...try several codes before finding a match. 2 Follow your universal remote control's instructions to enter the TV code you can manually program it using a surge protector, make sure that matches your TV. Insignia TV codes for universal remote controls (for the brands Orion, Emerson, Memorex, Sansui, Sylvania, or Zenith....
...control. To install the ferrite core: • Open the ferrite core, slide the cables into the slot, then close the core. NS-P42Q-P501Q-P502Q-10A_09-0100_MAN_V1_English.book Page 9 Friday, March 20, 2009 3:11 PM Aiming the remote control To aim the remote control: •...try several codes before finding a match. 2 Follow your universal remote control's instructions to enter the TV code you can manually program it using a surge protector, make sure that matches your TV. Insignia TV codes for universal remote controls (for the brands Orion, Emerson, Memorex, Sansui, Sylvania, or Zenith....
User Manual (English)
Page 14
NS-P42Q-P501Q-P502Q-10A_09-0100_MAN_V1_English.book Page 10 Friday, March 20, 2009 3:11 PM Connecting an outdoor antenna Connecting a coaxial antenna 3 Connect the combiner to the ANT IN jack on the back of your TV. ANT IN Connecting a twin-lead antenna UHF VHF ANT IN Connecting cable TV Without a cable box To connect cable...
NS-P42Q-P501Q-P502Q-10A_09-0100_MAN_V1_English.book Page 10 Friday, March 20, 2009 3:11 PM Connecting an outdoor antenna Connecting a coaxial antenna 3 Connect the combiner to the ANT IN jack on the back of your TV. ANT IN Connecting a twin-lead antenna UHF VHF ANT IN Connecting cable TV Without a cable box To connect cable...
User Manual (English)
Page 15
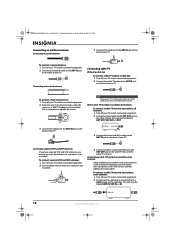
NS-P42Q-P501Q-P502Q-10A_09-0100_MAN_V1_English.book Page 11 Friday, March 20, 2009 3:11 PM 3 Connect this cable to the A-IN jack on page 13 www.insigniaproducts.com 11 TV back Splitter Cable box ANT IN To ANT IN on VCR Audio cable Video cable From ANT OUT on VCR to ANT IN ... the A/B switch to the B position, you need to the cable box's output channel, which is usually channel 3 or 4.) Connecting satellite TV via a satellite TV box You can connect a satellite TV box using an HDMI, DVI, or component video connection. Note If the VCR is connected to the ANT IN jack on the...
NS-P42Q-P501Q-P502Q-10A_09-0100_MAN_V1_English.book Page 11 Friday, March 20, 2009 3:11 PM 3 Connect this cable to the A-IN jack on page 13 www.insigniaproducts.com 11 TV back Splitter Cable box ANT IN To ANT IN on VCR Audio cable Video cable From ANT OUT on VCR to ANT IN ... the A/B switch to the B position, you need to the cable box's output channel, which is usually channel 3 or 4.) Connecting satellite TV via a satellite TV box You can connect a satellite TV box using an HDMI, DVI, or component video connection. Note If the VCR is connected to the ANT IN jack on the...
User Manual (English)
Page 16
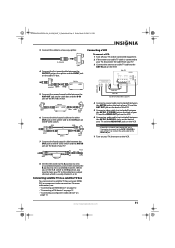
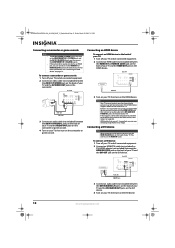
... to the HDMI 2(DVI) jack, then connect an audio cable to the HDMI IN 1 or HDMI IN 2(DVI) jack on the back of your TV. Back of TV HDMI cable Audio cable Video cable 3 Connect an audio cable (not included) between the AV IN 1 R-AUDIO-L jacks on the back of your... 1 (Y/VIDEO) jack, and the AV IN 1 R-AUDIO-L jacks are not 1.3-compliant may with abnormal color if the HDMI device supports HDMI versions older than 1.3. NS-P42Q-P501Q-P502Q-10A_09-0100_MAN_V1_English.book Page 12 Friday, March 20, 2009 3:11 PM Connecting a camcorder or game console Notes • • The AV IN 1 VIDEO (Y/...
... to the HDMI 2(DVI) jack, then connect an audio cable to the HDMI IN 1 or HDMI IN 2(DVI) jack on the back of your TV. Back of TV HDMI cable Audio cable Video cable 3 Connect an audio cable (not included) between the AV IN 1 R-AUDIO-L jacks on the back of your... 1 (Y/VIDEO) jack, and the AV IN 1 R-AUDIO-L jacks are not 1.3-compliant may with abnormal color if the HDMI device supports HDMI versions older than 1.3. NS-P42Q-P501Q-P502Q-10A_09-0100_MAN_V1_English.book Page 12 Friday, March 20, 2009 3:11 PM Connecting a camcorder or game console Notes • • The AV IN 1 VIDEO (Y/...
User Manual (English)
Page 17
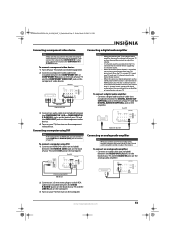
... amplifier: • Connect a digital audio optical cable (not included) between the COMPONENT IN 1 or COMPONENT IN 2 jacks on the back of your TV to the home theater receiver. www.insigniaproducts.com 13 Connecting a computer using DVI: 1 Connect an HDMI/DVI cable (not included) between the COMPONENT IN...amplifier, decrease the volume level on the back of your TV's optical jack. For example, if you connect the video to the COMPONENT IN 1 video jacks, connect the audio to matching jacks in the same row. NS-P42Q-P501Q-P502Q-10A_09-0100_MAN_V1_English.book Page 13 Friday, March 20, ...
... amplifier: • Connect a digital audio optical cable (not included) between the COMPONENT IN 1 or COMPONENT IN 2 jacks on the back of your TV to the home theater receiver. www.insigniaproducts.com 13 Connecting a computer using DVI: 1 Connect an HDMI/DVI cable (not included) between the COMPONENT IN...amplifier, decrease the volume level on the back of your TV's optical jack. For example, if you connect the video to the COMPONENT IN 1 video jacks, connect the audio to matching jacks in the same row. NS-P42Q-P501Q-P502Q-10A_09-0100_MAN_V1_English.book Page 13 Friday, March 20, ...
User Manual (English)
Page 18
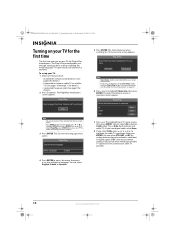
... Time will be set to Store Demo mode, reset the Plug & Play option. Air Cable Auto Start Start Start 7 Press or to highlight the cable TV signal type, then press ENTER. STD is accidentally set . Start Note You can select English, French, or Spanish. 5 Press ENTER. The Sets the ...Store Demo Home Use Note Store Demo mode is only intended for use in your TV is the most common setting. NS-P42Q-P501Q-P502Q-10A_09-0100_MAN_V1_English.book Page 14 Friday, March 20, 2009 3:11 PM Turning on your TV for the first time The first time you through 11 for details.) • ...
... Time will be set to Store Demo mode, reset the Plug & Play option. Air Cable Auto Start Start Start 7 Press or to highlight the cable TV signal type, then press ENTER. STD is accidentally set . Start Note You can select English, French, or Spanish. 5 Press ENTER. The Sets the ...Store Demo Home Use Note Store Demo mode is only intended for use in your TV is the most common setting. NS-P42Q-P501Q-P502Q-10A_09-0100_MAN_V1_English.book Page 14 Friday, March 20, 2009 3:11 PM Turning on your TV for the first time The first time you through 11 for details.) • ...
User Manual (English)
Page 19
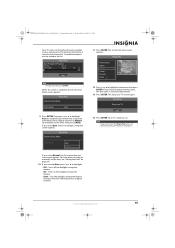
...time information from a digital channel) or Manual (to automatically set the time), then press ENTER. NS-P42Q-P501Q-P502Q-10A_09-0100_MAN_V1_English.book Page 15 Friday, March 20, 2009 3:11 PM Your TV starts searching for channels available in Progress. Plug & Play Sets the Clock Mode. Clock Mode ... Manual If you receive a digital channel signal, the time zone is complete, the Set the Clock Mode screen appears. The Enjoy your TV. OK 14 Press ENTER. Plug & Play Newfoundland Atlantic Eastern Central Mountain Pacific ▼ 12 Press or to highlight: • Off-...
...time information from a digital channel) or Manual (to automatically set the time), then press ENTER. NS-P42Q-P501Q-P502Q-10A_09-0100_MAN_V1_English.book Page 15 Friday, March 20, 2009 3:11 PM Your TV starts searching for channels available in Progress. Plug & Play Sets the Clock Mode. Clock Mode ... Manual If you receive a digital channel signal, the time zone is complete, the Set the Clock Mode screen appears. The Enjoy your TV. OK 14 Press ENTER. Plug & Play Newfoundland Atlantic Eastern Central Mountain Pacific ▼ 12 Press or to highlight: • Off-...
User Manual (English)
Page 20
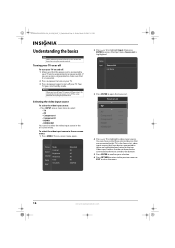
... to the bottom. 5 Press ENTER to confirm your TV, power still flows into Standby mode. Picture Mode Sound Channel Contrast Brightness Sharpness Setup Color Tint (G/R) Input : Standard : 95 : 45 : 50 : 50 : G50/R50 2 Press or to highlight Input, ...then press ENTER to open the Source List. Component2 ---- In the Source List, video input sources that it . Your TV goes into it is connected to close the menu. 16 www.insigniaproducts.com Source List ▲ TV ▼ AV ---- Source List is highlighted. NS-P42Q-P501Q...
... to the bottom. 5 Press ENTER to confirm your TV, power still flows into Standby mode. Picture Mode Sound Channel Contrast Brightness Sharpness Setup Color Tint (G/R) Input : Standard : 95 : 45 : 50 : 50 : G50/R50 2 Press or to highlight Input, ...then press ENTER to open the Source List. Component2 ---- In the Source List, video input sources that it . Your TV goes into it is connected to close the menu. 16 www.insigniaproducts.com Source List ▲ TV ▼ AV ---- Source List is highlighted. NS-P42Q-P501Q...
User Manual (English)
Page 21
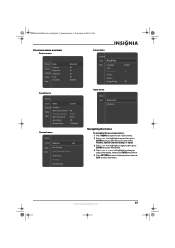
NS-P42Q-P501Q-P502Q-10A_09-0100_MAN_V1_English.book Page 17 Friday, March 20, 2009 3:11 PM On-screen menu overview Picture menu Picture Mode Sound Channel Contrast Brightness Sharpness Setup Input Color Tint (G/R) : Standard : 95 : 45 : 50 : 50 : G50/R50 Sound menu Picture Sound Mode :... Custom Channel Setup Input Equalizer SRS TruSurround HD Preferred Language Multi-Track Sound : Off : English : Stereo Auto Volume : Off Speaker Select : TV Speaker Channel menu Sound Channel Antenna : Air ...
NS-P42Q-P501Q-P502Q-10A_09-0100_MAN_V1_English.book Page 17 Friday, March 20, 2009 3:11 PM On-screen menu overview Picture menu Picture Mode Sound Channel Contrast Brightness Sharpness Setup Input Color Tint (G/R) : Standard : 95 : 45 : 50 : 50 : G50/R50 Sound menu Picture Sound Mode :... Custom Channel Setup Input Equalizer SRS TruSurround HD Preferred Language Multi-Track Sound : Off : English : Stereo Auto Volume : Off Speaker Select : TV Speaker Channel menu Sound Channel Antenna : Air ...
User Manual (English)
Page 22
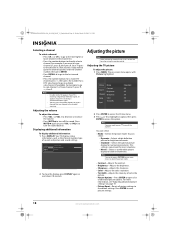
Spillane's Mike Hammer Bonocrunch 1:55 am - 2:55 am M. NS-P42Q-P501Q-P502Q-10A_09-0100_MAN_V1_English.book Page 18 Friday, March 20, 2009 3:11 PM Selecting a channel To select a channel: • Press CH or CH... • Movie-Selects a comfortable picture display for normal environments. Your TV displays status information, such as the channel number, type of main channel 7, press 7, -, then 1. Picture Mode Sound Channel Contrast Brightness Sharpness Setup Input Color Tint (G/R) : Standard : 95 : 45 : 50 : 50 : G50/R50 2 Press ENTER to access the Picture menu. 3 ...
Spillane's Mike Hammer Bonocrunch 1:55 am - 2:55 am M. NS-P42Q-P501Q-P502Q-10A_09-0100_MAN_V1_English.book Page 18 Friday, March 20, 2009 3:11 PM Selecting a channel To select a channel: • Press CH or CH... • Movie-Selects a comfortable picture display for normal environments. Your TV displays status information, such as the channel number, type of main channel 7, press 7, -, then 1. Picture Mode Sound Channel Contrast Brightness Sharpness Setup Input Color Tint (G/R) : Standard : 95 : 45 : 50 : 50 : G50/R50 2 Press ENTER to access the Picture menu. 3 ...


