User Manual (English)
Page 4
NS-P42Q-P501Q-P502Q-10A_09-0100_MAN_V1_English.book Page ii Friday, March 20, 2009 3:11 PM Contents Adjusting advanced picture settings 19 Improving the image from a game console 20 Adjusting the computer image 21 Using Energy Saving mode 21 Adjusting the sound 22 Adjusting the sound 22 Changing channel settings...DTV signal strength 27 Setting parental controls 28 Setting or changing the password 28 Turning parental controls on or off 28 Temporarily unblocking a channel 29 Setting U.S. TV parental control levels 29 Setting movie levels 30 Setting Canadian TV rating levels 31 ...
NS-P42Q-P501Q-P502Q-10A_09-0100_MAN_V1_English.book Page ii Friday, March 20, 2009 3:11 PM Contents Adjusting advanced picture settings 19 Improving the image from a game console 20 Adjusting the computer image 21 Using Energy Saving mode 21 Adjusting the sound 22 Adjusting the sound 22 Changing channel settings...DTV signal strength 27 Setting parental controls 28 Setting or changing the password 28 Turning parental controls on or off 28 Temporarily unblocking a channel 29 Setting U.S. TV parental control levels 29 Setting movie levels 30 Setting Canadian TV rating levels 31 ...
User Manual (English)
Page 8
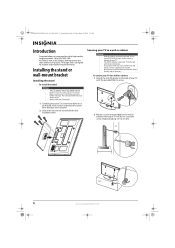
...the art in plasma TV design and is heavy. Installing the stand or wall-mount bracket Installing the stand To install the stand: Warnings • Your TV screen is designed for reliable and trouble-free performance. Your NS-P42Q-10A, NS-P501Q-10A, or NS-P502Q-10A represents the state of a high-quality Insignia product. You ... use two people to lift the screen and hold it to fall device to the back of your TV will be set. Leave the screw head protruding 1/4" (6.35 mm). To secure your TV to a wall or cabinet: 1 Attach the anti-fall resulting in place. • Make sure...
...the art in plasma TV design and is heavy. Installing the stand or wall-mount bracket Installing the stand To install the stand: Warnings • Your TV screen is designed for reliable and trouble-free performance. Your NS-P42Q-10A, NS-P501Q-10A, or NS-P502Q-10A represents the state of a high-quality Insignia product. You ... use two people to lift the screen and hold it to fall device to the back of your TV will be set. Leave the screw head protruding 1/4" (6.35 mm). To secure your TV to a wall or cabinet: 1 Attach the anti-fall resulting in place. • Make sure...
User Manual (English)
Page 11
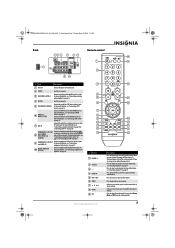
... again to turn off the sound. In the on-screen menu, press to select menu items or adjust settings. For more information, see "Connecting an outdoor antenna" on page 10 or "Connecting cable TV" on page 10. 8 COMPONENT IN 2 PR, PB, Y and R-AUDIO-L AV1 IN VIDEO and R-AUDIO-L Connect... information, see "Connecting a DVI device" on page 12. 6 HDMI IN 1/ HDMI IN 2 (DVI) Connect an HDMI device to either HDMI jack. NS-P42Q-P501Q-P502Q-10A_09-0100_MAN_V1_English.book Page 7 Friday, March 20, 2009 3:11 PM Back Remote control # Jack Description 1 Power in Connect the power cord to this ...
... again to turn off the sound. In the on-screen menu, press to select menu items or adjust settings. For more information, see "Connecting an outdoor antenna" on page 10 or "Connecting cable TV" on page 10. 8 COMPONENT IN 2 PR, PB, Y and R-AUDIO-L AV1 IN VIDEO and R-AUDIO-L Connect... information, see "Connecting a DVI device" on page 12. 6 HDMI IN 1/ HDMI IN 2 (DVI) Connect an HDMI device to either HDMI jack. NS-P42Q-P501Q-P502Q-10A_09-0100_MAN_V1_English.book Page 7 Friday, March 20, 2009 3:11 PM Back Remote control # Jack Description 1 Power in Connect the power cord to this ...
User Manual (English)
Page 12
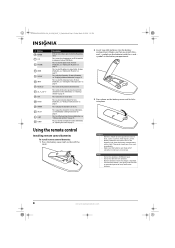
... input source. Press to close the on or off. For more information, see "Adjusting the TV picture" on page 18. Press to select the picture size (aspect ratio). If chemicals touch your..."Selecting a channel" on page 36. Press to select a favorite channel. For more information, see "Setting a wake-up timer" on page 18. symbols in the channel list. If the remote control is depleted... page 27. Press to display the channel list sub-menu. Press to select the picture mode. NS-P42Q-P501Q-P502Q-10A_09-0100_MAN_V1_English.book Page 8 Friday, March 20, 2009 3:11 PM # Button 10 RETURN...
... input source. Press to close the on or off. For more information, see "Adjusting the TV picture" on page 18. Press to select the picture size (aspect ratio). If chemicals touch your..."Selecting a channel" on page 36. Press to select a favorite channel. For more information, see "Setting a wake-up timer" on page 18. symbols in the channel list. If the remote control is depleted... page 27. Press to display the channel list sub-menu. Press to select the picture mode. NS-P42Q-P501Q-P502Q-10A_09-0100_MAN_V1_English.book Page 8 Friday, March 20, 2009 3:11 PM # Button 10 RETURN...
User Manual (English)
Page 13
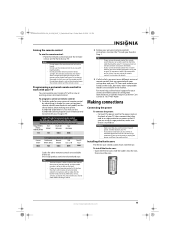
...or Zenith. Four such remotes are listed on the chart, but many other remote controls are available in an area with high humidity. NS-P42Q-P501Q-P502Q-10A_09-0100_MAN_V1_English.book Page 9 Friday, March 20, 2009 3:11 PM Aiming the remote control To aim the remote control: •...instructions for details. 3 If all Insignia TVs manufactured after Jan. 1, 2007) Universal remote control manufacturers and models Philips PHDVD5, PH5DSS, PMDVR8, PDVR8 RCA RCU807 One for All URC-6690 Sony RM-VL600 115 135 0464 8043 Comcast M1057 0463 Set-top box manufacturers and models Dish ...
...or Zenith. Four such remotes are listed on the chart, but many other remote controls are available in an area with high humidity. NS-P42Q-P501Q-P502Q-10A_09-0100_MAN_V1_English.book Page 9 Friday, March 20, 2009 3:11 PM Aiming the remote control To aim the remote control: •...instructions for details. 3 If all Insignia TVs manufactured after Jan. 1, 2007) Universal remote control manufacturers and models Philips PHDVD5, PH5DSS, PMDVR8, PDVR8 RCA RCU807 One for All URC-6690 Sony RM-VL600 115 135 0464 8043 Comcast M1057 0463 Set-top box manufacturers and models Dish ...
User Manual (English)
Page 15
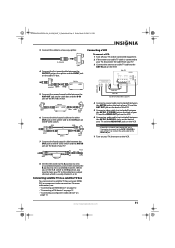
NS-P42Q-P501Q-P502Q-10A_09-0100_MAN_V1_English.book Page 11 Friday, March 20, 2009 3:11 PM 3 Connect this ... IN 1 R jack. 7 Turn on your TV, then turn on the VCR. 8 Set the A/B switch to the A position to view unscrambled channels, and set the switch to the B position to view scrambled channels. (When you set the A/B switch to the B position, you need...cable (not included) between the AV IN 1 (Y/VIDEO) jack on the back of your TV. 3 Connect the antenna or cable TV cable to your TV, disconnect the cable from your TV and the VIDEO OUT jack on the VCR. 6 Connect an audio cable (not included) ...
NS-P42Q-P501Q-P502Q-10A_09-0100_MAN_V1_English.book Page 11 Friday, March 20, 2009 3:11 PM 3 Connect this ... IN 1 R jack. 7 Turn on your TV, then turn on the VCR. 8 Set the A/B switch to the A position to view unscrambled channels, and set the switch to the B position to view scrambled channels. (When you set the A/B switch to the B position, you need...cable (not included) between the AV IN 1 (Y/VIDEO) jack on the back of your TV. 3 Connect the antenna or cable TV cable to your TV, disconnect the cable from your TV and the VIDEO OUT jack on the VCR. 6 Connect an audio cable (not included) ...
User Manual (English)
Page 18
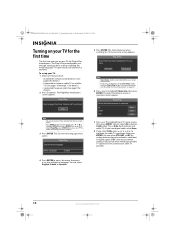
...screen appears. Start Note You can select STD, HRC, or IRC for use in your TV, the Plug & Play wizard opens. You can select English, French, or Spanish. 5 Press ENTER. NS-P42Q-P501Q-P502Q-10A_09-0100_MAN_V1_English.book Page 14 Friday, March 20, 2009 3:11 PM Turning on your... TV for the first time The first time you through 11 for details.) • Connected the power cord. (See page 9 for details.) 2 Press (power). The Sets the menu language...
...screen appears. Start Note You can select STD, HRC, or IRC for use in your TV, the Plug & Play wizard opens. You can select English, French, or Spanish. 5 Press ENTER. NS-P42Q-P501Q-P502Q-10A_09-0100_MAN_V1_English.book Page 14 Friday, March 20, 2009 3:11 PM Turning on your... TV for the first time The first time you through 11 for details.) • Connected the power cord. (See page 9 for details.) 2 Press (power). The Sets the menu language...
User Manual (English)
Page 19
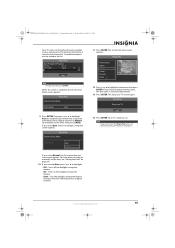
...11 3% Stop Note To stop the search, press ENTER. When the search is stored in your viewing area. The Enjoy your TV. Your TV is selected automatically. 13 Press ENTER. www.insigniaproducts.com 15 Scrambled channels are not stored in Progress. OK 14 Press ENTER. Note... signal, the time zone is ready to reset the Plug & Play option, see "Setting the clock" on page 38. Cable : -- DTV Air : -- The channel information is complete, the Set the Clock Mode screen appears. NS-P42Q-P501Q-P502Q-10A_09-0100_MAN_V1_English.book Page 15 Friday, March 20, 2009 3:11 PM Your...
...11 3% Stop Note To stop the search, press ENTER. When the search is stored in your viewing area. The Enjoy your TV. Your TV is selected automatically. 13 Press ENTER. www.insigniaproducts.com 15 Scrambled channels are not stored in Progress. OK 14 Press ENTER. Note... signal, the time zone is ready to reset the Plug & Play option, see "Setting the clock" on page 38. Cable : -- DTV Air : -- The channel information is complete, the Set the Clock Mode screen appears. NS-P42Q-P501Q-P502Q-10A_09-0100_MAN_V1_English.book Page 15 Friday, March 20, 2009 3:11 PM Your...
User Manual (English)
Page 21
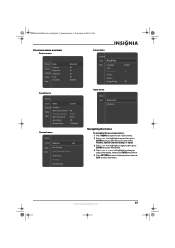
...NS-P42Q-P501Q-P502Q-10A_09-0100_MAN_V1_English.book Page 17 Friday, March 20, 2009 3:11 PM On-screen menu overview Picture menu Picture Mode Sound Channel Contrast Brightness Sharpness Setup Input Color Tint (G/R) : Standard : 95 : 45 : 50 : 50... : G50/R50 Sound menu Picture Sound Mode : Custom Channel Setup Input Equalizer SRS TruSurround HD Preferred Language Multi-Track Sound : Off : English : Stereo Auto Volume : Off Speaker Select : TV...to access the option. 4 Press or , or to highlight a setting or adjust the option, then press ENTER to confirm. 5 Press RETURN to return...
...NS-P42Q-P501Q-P502Q-10A_09-0100_MAN_V1_English.book Page 17 Friday, March 20, 2009 3:11 PM On-screen menu overview Picture menu Picture Mode Sound Channel Contrast Brightness Sharpness Setup Input Color Tint (G/R) : Standard : 95 : 45 : 50 : 50... : G50/R50 Sound menu Picture Sound Mode : Custom Channel Setup Input Equalizer SRS TruSurround HD Preferred Language Multi-Track Sound : Off : English : Stereo Auto Volume : Off Speaker Select : TV...to access the option. 4 Press or , or to highlight a setting or adjust the option, then press ENTER to confirm. 5 Press RETURN to return...
User Manual (English)
Page 22
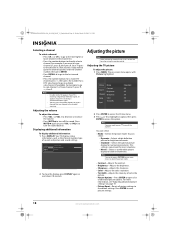
... picture settings to the default settings. to see "Adjusting advanced picture settings" on using the remote control. Your TV goes ... volume. • Press MUTE to access the option. NS-P42Q-P501Q-P502Q-10A_09-0100_MAN_V1_English.book Page 18 Friday, March 20, ...2009 3:11 PM Selecting a channel To select a channel: • Press CH or CH to go to sub-channel 1 of main channel 7, press 7, -, then 1. Picture Mode Sound Channel Contrast Brightness Sharpness Setup Input Color Tint (G/R) : Standard : 95 : 45 : 50 : 50...
... picture settings to the default settings. to see "Adjusting advanced picture settings" on using the remote control. Your TV goes ... volume. • Press MUTE to access the option. NS-P42Q-P501Q-P502Q-10A_09-0100_MAN_V1_English.book Page 18 Friday, March 20, ...2009 3:11 PM Selecting a channel To select a channel: • Press CH or CH to go to sub-channel 1 of main channel 7, press 7, -, then 1. Picture Mode Sound Channel Contrast Brightness Sharpness Setup Input Color Tint (G/R) : Standard : 95 : 45 : 50 : 50...
User Manual (English)
Page 23
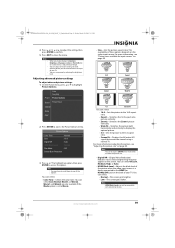
...Black Level : Normal Film Mode : Off Screen Burn Protection 3 Press or to highlight an option, then press ENTER to an input of your TV. The availability of these options depends on the back of the picture when the video input source is a device connected to see "Adjusting the... Tint G/R), the on page 20. You can select Cool, Normal, Warm1, or Warm2. NS-P42Q-P501Q-P502Q-10A_09-0100_MAN_V1_English.book Page 19 Friday, March 20, 2009 3:11 PM 4 Press or , or to adjust the setting, then press ENTER to confirm. 5 Press EXIT to access the Picture Options menu. Picture ...
...Black Level : Normal Film Mode : Off Screen Burn Protection 3 Press or to highlight an option, then press ENTER to an input of your TV. The availability of these options depends on the back of the picture when the video input source is a device connected to see "Adjusting the... Tint G/R), the on page 20. You can select Cool, Normal, Warm1, or Warm2. NS-P42Q-P501Q-P502Q-10A_09-0100_MAN_V1_English.book Page 19 Friday, March 20, 2009 3:11 PM 4 Press or , or to adjust the setting, then press ENTER to confirm. 5 Press EXIT to access the Picture Options menu. Picture ...
User Manual (English)
Page 24
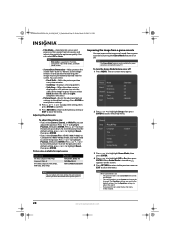
...RETURN to return to the previous menu or EXIT to move the picture. Press or to your TV. Note The Game Mode feature is only available if a game console is turned on, appears...Color Tint (G/R) Input : Standard : 95 : 45 : 50 : 50 : G50/R50 2 Press or to highlight Setup, then press ENTER to the default settings. The Equalizer settings are reset to access the Setup menu. When Game Mode ... reset the picture to the default setting, press or to Custom and cannot be permanently burned into the screen. You can select Off or Auto. NS-P42Q-P501Q-P502Q-10A_09-0100_MAN_V1_English.book Page 20 ...
...RETURN to return to the previous menu or EXIT to move the picture. Press or to your TV. Note The Game Mode feature is only available if a game console is turned on, appears...Color Tint (G/R) Input : Standard : 95 : 45 : 50 : 50 : G50/R50 2 Press or to highlight Setup, then press ENTER to the default settings. The Equalizer settings are reset to access the Setup menu. When Game Mode ... reset the picture to the default setting, press or to Custom and cannot be permanently burned into the screen. You can select Off or Auto. NS-P42Q-P501Q-P502Q-10A_09-0100_MAN_V1_English.book Page 20 ...
User Manual (English)
Page 25
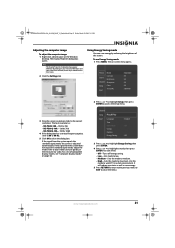
... Press or to highlight Energy Saving, then press ENTER. 4 Press or to watch TV in most cases. 2 Click the Settings tab. Note The Display Properties dialog box may be no video. For a list... Mode Sound Channel Contrast Brightness Sharpness Setup Color Tint (G/R) Input : Standard : 95 : 45 : 50 : 50 : G50/R50 3 Drag the screen resolution slider to maximum. You can save energy. 5 Press ..., the screen is : • NS-P42Q-10A-1024 x 768 • NS-P501Q-10A-1360 x 768 • NS-P502Q-10A-1920 x 1080 4 If the dialog box has a vertical frequency option, set it to 60 or 60 Hz. ...
... Press or to highlight Energy Saving, then press ENTER. 4 Press or to watch TV in most cases. 2 Click the Settings tab. Note The Display Properties dialog box may be no video. For a list... Mode Sound Channel Contrast Brightness Sharpness Setup Color Tint (G/R) Input : Standard : 95 : 45 : 50 : 50 : G50/R50 3 Drag the screen resolution slider to maximum. You can save energy. 5 Press ..., the screen is : • NS-P42Q-10A-1024 x 768 • NS-P501Q-10A-1360 x 768 • NS-P502Q-10A-1920 x 1080 4 If the dialog box has a vertical frequency option, set it to 60 or 60 Hz. ...

User Manual (English)
Page 26
...-Use for general purposes. • Music-Lets you customize the sound settings to select the language for a digital program. • Multi-Track Sound-Selects the audio mode for an analog TV program. NS-P42Q-P501Q-P502Q-10A_09-0100_MAN_V1_English.book Page 22 Friday, March 20, 2009 3:11 PM.... Picture Mode Sound Channel Contrast Brightness Sharpness Setup Input Color Tint (G/R) : Standard : 95 : 45 : 50 : 50 : G50/R50 2 Press or to highlight Sound, then press ENTER to default settings. You can select: • Mode-Selects the sound mode. You can select On or Off. •...
...-Use for general purposes. • Music-Lets you customize the sound settings to select the language for a digital program. • Multi-Track Sound-Selects the audio mode for an analog TV program. NS-P42Q-P501Q-P502Q-10A_09-0100_MAN_V1_English.book Page 22 Friday, March 20, 2009 3:11 PM.... Picture Mode Sound Channel Contrast Brightness Sharpness Setup Input Color Tint (G/R) : Standard : 95 : 45 : 50 : 50 : G50/R50 2 Press or to highlight Sound, then press ENTER to default settings. You can select: • Mode-Selects the sound mode. You can select On or Off. •...
User Manual (English)
Page 27
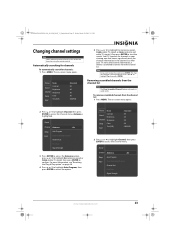
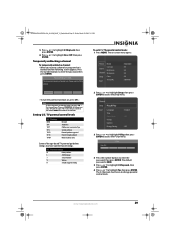
...channels To automatically search for channels in your TV stores the channel information, it deletes scrambled channels from the channel list. Picture Mode Sound Channel Contrast Brightness Sharpness Setup Input Color Tint (G/R) : Standard : 95 : 45 : 50 : 50 : G50/R50 5 Press or to ...highlight Air (antenna signal), Cable (cable TV signal), or Auto (antenna and cable TV signals), then press ENTER to access the option. NS-P42Q-P501Q-P502Q-10A_09-0100_MAN_V1_English.book Page 23 Friday, March 20, 2009 3:11 PM Changing channel settings Note Unless...
...channels To automatically search for channels in your TV stores the channel information, it deletes scrambled channels from the channel list. Picture Mode Sound Channel Contrast Brightness Sharpness Setup Input Color Tint (G/R) : Standard : 95 : 45 : 50 : 50 : G50/R50 5 Press or to ...highlight Air (antenna signal), Cable (cable TV signal), or Auto (antenna and cable TV signals), then press ENTER to access the option. NS-P42Q-P501Q-P502Q-10A_09-0100_MAN_V1_English.book Page 23 Friday, March 20, 2009 3:11 PM Changing channel settings Note Unless...
User Manual (English)
Page 28
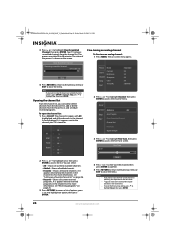
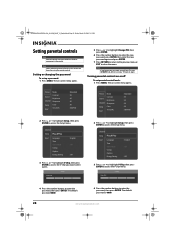
NS-P42Q-P501Q-P502Q-10A_09-...Sound Channel Contrast Brightness Sharpness Setup Input Color Tint (G/R) : Standard : 95 : 45 : 50 : 50 : G50/R50 2 Press or to highlight Channel, then press ENTER to highlight Clear Scrambled Channel...to. 6 6-1 All 7 Added 7-1 9 Favorite 9-1 10 Reserve 10-1 11-1 Air TV #6 Air TV #7 Air TV #9 Air TV #10 TV #11 2 Press or to highlight a list, then press ENTER to reserved programs in the...more information, see "Reserving programs" on the screen. To reset the fine tuning setting, press to access the Fine Tune screen. This process may take 20 to the...
NS-P42Q-P501Q-P502Q-10A_09-...Sound Channel Contrast Brightness Sharpness Setup Input Color Tint (G/R) : Standard : 95 : 45 : 50 : 50 : G50/R50 2 Press or to highlight Channel, then press ENTER to highlight Clear Scrambled Channel...to. 6 6-1 All 7 Added 7-1 9 Favorite 9-1 10 Reserve 10-1 11-1 Air TV #6 Air TV #7 Air TV #9 Air TV #10 TV #11 2 Press or to highlight a list, then press ENTER to reserved programs in the...more information, see "Reserving programs" on the screen. To reset the fine tuning setting, press to access the Fine Tune screen. This process may take 20 to the...
User Manual (English)
Page 30
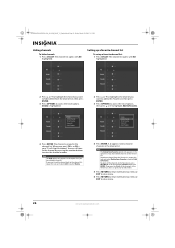
... menu. 26 www.insigniaproducts.com NS-P42Q-P501Q-P502Q-10A_09-0100_MAN_V1_English.book Page 26 Friday, March 20, 2009 3:11 PM Hiding channels To hide channels: 1 Press CH.LIST. The channel list opens with All highlighted. 6 6-1 All 7 Added 7-1 9 Favorite 9-1 Reserve 10 10-1 11-1 Air TV #6 Air TV #7 Air TV #9 Air TV #10 TV #11 Setting up a favorite channel list...
... menu. 26 www.insigniaproducts.com NS-P42Q-P501Q-P502Q-10A_09-0100_MAN_V1_English.book Page 26 Friday, March 20, 2009 3:11 PM Hiding channels To hide channels: 1 Press CH.LIST. The channel list opens with All highlighted. 6 6-1 All 7 Added 7-1 9 Favorite 9-1 Reserve 10 10-1 11-1 Air TV #6 Air TV #7 Air TV #9 Air TV #10 TV #11 Setting up a favorite channel list...
User Manual (English)
Page 32
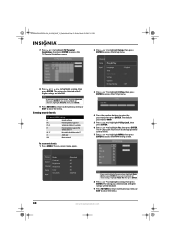
...Channel Contrast Brightness Sharpness Setup Input Color Tint (G/R) : Standard : 95 : 45 : 50 : 50 : G50/R50 Picture Mode Sound Channel Contrast Brightness Sharpness Setup Color Tint (G/R) Input : Standard : 95 : 45 : 50 : 50 : G50/R50 2 Press or to highlight Setup, then press ENTER to enter the ...menu. Turning parental controls on or off your TV, press MUTE, 8, 2, 4, then turn your TV back on using the remote control. NS-P42Q-P501Q-P502Q-10A_09-0100_MAN_V1_English.book Page 28 Friday, March 20, 2009 3:11 PM Setting parental controls Note Parental controls are based on...
...Channel Contrast Brightness Sharpness Setup Input Color Tint (G/R) : Standard : 95 : 45 : 50 : 50 : G50/R50 Picture Mode Sound Channel Contrast Brightness Sharpness Setup Color Tint (G/R) Input : Standard : 95 : 45 : 50 : 50 : G50/R50 2 Press or to highlight Setup, then press ENTER to enter the ...menu. Turning parental controls on or off your TV, press MUTE, 8, 2, 4, then turn your TV back on using the remote control. NS-P42Q-P501Q-P502Q-10A_09-0100_MAN_V1_English.book Page 28 Friday, March 20, 2009 3:11 PM Setting parental controls Note Parental controls are based on...
User Manual (English)
Page 33
...Channel Contrast Brightness Sharpness Setup Color Tint (G/R) Input : Standard : 95 : 45 : 50 : 50 : G50/R50 2 Press or to highlight Setup, then press ENTER to access the ...TV back on -screen menu opens. Setting U.S. Please enter the PIN to unblock. • To turn your TV, press MUTE, 8, 2, 4, then turn the parental lock back on to enter the password, then press ENTER. TV ratings NONE TV-Y TV-Y7 TV-G TV-PG TV-14 TV... audiences only Some of the age-based TV parental guidelines ratings also have content-based ratings. NS-P42Q-P501Q-P502Q-10A_09-0100_MAN_V1_English.book Page 29 Friday,...
...Channel Contrast Brightness Sharpness Setup Color Tint (G/R) Input : Standard : 95 : 45 : 50 : 50 : G50/R50 2 Press or to highlight Setup, then press ENTER to access the ...TV back on -screen menu opens. Setting U.S. Please enter the PIN to unblock. • To turn your TV, press MUTE, 8, 2, 4, then turn the parental lock back on to enter the password, then press ENTER. TV ratings NONE TV-Y TV-Y7 TV-G TV-PG TV-14 TV... audiences only Some of the age-based TV parental guidelines ratings also have content-based ratings. NS-P42Q-P501Q-P502Q-10A_09-0100_MAN_V1_English.book Page 29 Friday,...
User Manual (English)
Page 34
... Color Tint (G/R) Input : Standard : 95 : 45 : 50 : 50 : G50/R50 2 Press or to highlight Setup, then press ENTER to access the TV Parental Guidelines screen. The V-Chip Lock must be blocked. 9...close the menu. 30 www.insigniaproducts.com NS-P42Q-P501Q-P502Q-10A_09-0100_MAN_V1_English.book Page 30 Friday, March 20, 2009 3:11 PM 7 Press or to highlight TV Parental Guidelines, then press ENTER to access ... 17 NC-17 Not suitable for children under 17 X Adults only N/A Movie not rated To set movie levels: 1 Press MENU. MPAA Rating Allow All Block All Note If you want to unblock...
... Color Tint (G/R) Input : Standard : 95 : 45 : 50 : 50 : G50/R50 2 Press or to highlight Setup, then press ENTER to access the TV Parental Guidelines screen. The V-Chip Lock must be blocked. 9...close the menu. 30 www.insigniaproducts.com NS-P42Q-P501Q-P502Q-10A_09-0100_MAN_V1_English.book Page 30 Friday, March 20, 2009 3:11 PM 7 Press or to highlight TV Parental Guidelines, then press ENTER to access ... 17 NC-17 Not suitable for children under 17 X Adults only N/A Movie not rated To set movie levels: 1 Press MENU. MPAA Rating Allow All Block All Note If you want to unblock...