User Manual (English)
Page 3
NS-P42Q-P501Q-P502Q-10A_09-0100_MAN_V1_English.book Page i Friday, March 20, 2009 3:11 PM Contents CHILD SAFETY 1 Important safety instructions 2 Warnings 2 Cautions 3 Introduction 4 Installing the stand or wall-mount bracket 4 Installing the stand 4 Securing your TV to a wall or cabinet 4 Installing a wall-mount bracket 5 TV components 5 Accessories 5 Cleaning cloth 6 Front 6 Back 7 Remote control 7 Using the remote control...
NS-P42Q-P501Q-P502Q-10A_09-0100_MAN_V1_English.book Page i Friday, March 20, 2009 3:11 PM Contents CHILD SAFETY 1 Important safety instructions 2 Warnings 2 Cautions 3 Introduction 4 Installing the stand or wall-mount bracket 4 Installing the stand 4 Securing your TV to a wall or cabinet 4 Installing a wall-mount bracket 5 TV components 5 Accessories 5 Cleaning cloth 6 Front 6 Back 7 Remote control 7 Using the remote control...

User Manual (English)
Page 6
...manufacturer that you connect the Class I apparatus to a grounding-type, three-prong outlet. 17 Remote control batteries should not be exposed to rain or moisture, does not operate normally, or has...screen breaks, be located in your eyes or touches your skin, consult with your TV. The wide blade or the third prong are important operating and maintenance instructions in ...correct operating condition. 2 www.insigniaproducts.com Replacement parts When replacement parts are inside. NS-P42Q-P501Q-P502Q-10A_09-0100_MAN_V1_English.book Page 2 Friday, March 20, 2009 3:11 PM Important safety...
...manufacturer that you connect the Class I apparatus to a grounding-type, three-prong outlet. 17 Remote control batteries should not be exposed to rain or moisture, does not operate normally, or has...screen breaks, be located in your eyes or touches your skin, consult with your TV. The wide blade or the third prong are important operating and maintenance instructions in ...correct operating condition. 2 www.insigniaproducts.com Replacement parts When replacement parts are inside. NS-P42Q-P501Q-P502Q-10A_09-0100_MAN_V1_English.book Page 2 Friday, March 20, 2009 3:11 PM Important safety...
User Manual (English)
Page 9
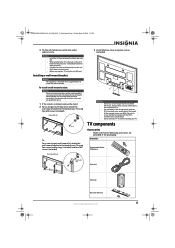
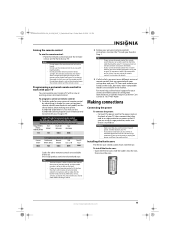
... the risk of hazards, do not comply with the VESA standard screw specifications. • Do not exceed a 15° tilt when mounting your TV. NS-P42Q-P501Q-P502Q-10A_09-0100_MAN_V1_English.book Page 5 Friday, March 20, 2009 3:11 PM 3 Tie the anti-fall device cord to the back of your... TV using four screw-holder rings (included) and four M8 screws (included). Insignia wall mount Screw Or, For a non-Insignia wall-mount kit, attach the wall-mount bracket to the wall or cabinet screw. Do not use screws that contained in the packaging: Accessories Remote control with two...
... the risk of hazards, do not comply with the VESA standard screw specifications. • Do not exceed a 15° tilt when mounting your TV. NS-P42Q-P501Q-P502Q-10A_09-0100_MAN_V1_English.book Page 5 Friday, March 20, 2009 3:11 PM 3 Tie the anti-fall device cord to the back of your... TV using four screw-holder rings (included) and four M8 screws (included). Insignia wall mount Screw Or, For a non-Insignia wall-mount kit, attach the wall-mount bracket to the wall or cabinet screw. Do not use screws that contained in the packaging: Accessories Remote control with two...
User Manual (English)
Page 10
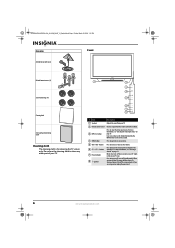
... from the remote control. When you turn off when you are using one) or unplug the power cord. 6 www.insigniaproducts.com For more information, see "Selecting the video input source" on your TV. Blinks, then turns off the surge protector (if you turn your TV, power still flows into it. NS-P42Q-P501Q-P502Q-10A_09...
... from the remote control. When you turn off when you are using one) or unplug the power cord. 6 www.insigniaproducts.com For more information, see "Selecting the video input source" on your TV. Blinks, then turns off the surge protector (if you turn your TV, power still flows into it. NS-P42Q-P501Q-P502Q-10A_09...
User Manual (English)
Page 11
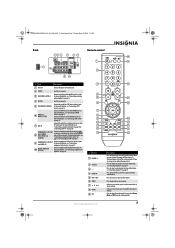
... changes. For more information, see "Connecting an analog audio amplifier" on page 13. 4 EX-LINK Used for an outdoor antenna or cable TV to this jack. Connect the audio for service only. 3 AUDIO OUT R-AUDIO-L Connect an analog audio amplifier to these jacks. For more ...10 DIGITAL AUDIO OUT (OPTICAL) Connect a digital audio amplifier to this jack. Press to change the channel. NS-P42Q-P501Q-P502Q-10A_09-0100_MAN_V1_English.book Page 7 Friday, March 20, 2009 3:11 PM Back Remote control # Jack Description 1 Power in Connect the power cord to this jack. 2 SERVICE Used for a...
... changes. For more information, see "Connecting an analog audio amplifier" on page 13. 4 EX-LINK Used for an outdoor antenna or cable TV to this jack. Connect the audio for service only. 3 AUDIO OUT R-AUDIO-L Connect an analog audio amplifier to these jacks. For more ...10 DIGITAL AUDIO OUT (OPTICAL) Connect a digital audio amplifier to this jack. Press to change the channel. NS-P42Q-P501Q-P502Q-10A_09-0100_MAN_V1_English.book Page 7 Friday, March 20, 2009 3:11 PM Back Remote control # Jack Description 1 Power in Connect the power cord to this jack. 2 SERVICE Used for a...
User Manual (English)
Page 12
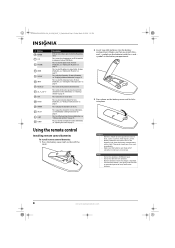
... the sleep timer. Press to open the channel list. For more information, see "Adjusting the TV picture" on page 18. symbols on the batteries with a cloth. symbols in , then lift... information, see "Setting a wake-up timer" on page 36. Using the remote control Installing remote control batteries To install remote control batteries: 1 Press the battery cover latch in the battery compartment. 3 ...clean the battery compartment with the + and - Notes Do not mix batteries of correctly. NS-P42Q-P501Q-P502Q-10A_09-0100_MAN_V1_English.book Page 8 Friday, March 20, 2009 3:11 PM # Button 10 ...
... the sleep timer. Press to open the channel list. For more information, see "Adjusting the TV picture" on page 18. symbols on the batteries with a cloth. symbols in , then lift... information, see "Setting a wake-up timer" on page 36. Using the remote control Installing remote control batteries To install remote control batteries: 1 Press the battery cover latch in the battery compartment. 3 ...clean the battery compartment with the + and - Notes Do not mix batteries of correctly. NS-P42Q-P501Q-P502Q-10A_09-0100_MAN_V1_English.book Page 8 Friday, March 20, 2009 3:11 PM # Button 10 ...
User Manual (English)
Page 13
... the remote sensor. NS-P42Q-P501Q-P502Q-10A_09-0100_MAN_V1_English.book Page 9 Friday, March 20, 2009 3:11 PM Aiming the remote control To aim the remote control: • Point the remote control towards the remote sensor on the remote sensor. Do not place the remote control in the market. You will use a different universal remote control that you can operate your TV...
... the remote sensor. NS-P42Q-P501Q-P502Q-10A_09-0100_MAN_V1_English.book Page 9 Friday, March 20, 2009 3:11 PM Aiming the remote control To aim the remote control: • Point the remote control towards the remote sensor on the remote sensor. Do not place the remote control in the market. You will use a different universal remote control that you can operate your TV...
User Manual (English)
Page 18
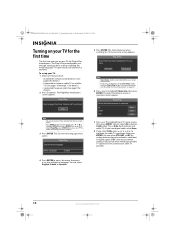
... Language : English 4 Press ENTER to access the menu, then press or to memorize screen appears. You can also access these settings from the on the remote control, press or to Store Demo mode, reset the Plug & Play option. If you do not know which type of cable... sure that you have digital cable, select Auto. 8 If you select Cable, press or , or to memorize. NS-P42Q-P501Q-P502Q-10A_09-0100_MAN_V1_English.book Page 14 Friday, March 20, 2009 3:11 PM Turning on your TV for the first time The first time you turn on your home screen appears. Press MENU on...
... Language : English 4 Press ENTER to access the menu, then press or to memorize screen appears. You can also access these settings from the on the remote control, press or to Store Demo mode, reset the Plug & Play option. If you do not know which type of cable... sure that you have digital cable, select Auto. 8 If you select Cable, press or , or to memorize. NS-P42Q-P501Q-P502Q-10A_09-0100_MAN_V1_English.book Page 14 Friday, March 20, 2009 3:11 PM Turning on your TV for the first time The first time you turn on your home screen appears. Press MENU on...
User Manual (English)
Page 20
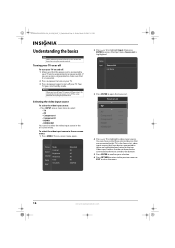
...return to the previous menu or EXIT to turn off your TV on or off To turn off : 1 Make sure that are connected to access the Input menu. Turning your TV. Warning When you are using the remote control. Selecting the video input source To select the video ...Picture Mode Sound Channel Contrast Brightness Sharpness Setup Color Tint (G/R) Input : Standard : 95 : 45 : 50 : 50 : G50/R50 2 Press or to highlight Input, then press ENTER to the TV. NS-P42Q-P501Q-P502Q-10A_09-0100_MAN_V1_English.book Page 16 Friday, March 20, 2009 3:11 PM Understanding the basics Note Unless otherwise...
...return to the previous menu or EXIT to turn off your TV on or off To turn off : 1 Make sure that are connected to access the Input menu. Turning your TV. Warning When you are using the remote control. Selecting the video input source To select the video ...Picture Mode Sound Channel Contrast Brightness Sharpness Setup Color Tint (G/R) Input : Standard : 95 : 45 : 50 : 50 : G50/R50 2 Press or to highlight Input, then press ENTER to the TV. NS-P42Q-P501Q-P502Q-10A_09-0100_MAN_V1_English.book Page 16 Friday, March 20, 2009 3:11 PM Understanding the basics Note Unless otherwise...
User Manual (English)
Page 22
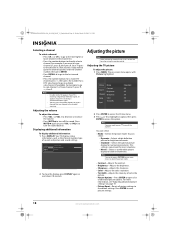
...-channel (if available). Note You may need to directly select a channel. NS-P42Q-P501Q-P502Q-10A_09-0100_MAN_V1_English.book Page 18 Friday, March 20, 2009 3:11 PM...Setup Input Color Tint (G/R) : Standard : 95 : 45 : 50 : 50 : G50/R50 2 Press ENTER to access the Picture menu. 3.... • Standard-Selects the optimal picture display for normal environments. Your TV displays status information, such as the channel number, type of red in ... list of main channel 7, press 7, -, then 1. The on using the remote control. Press ENTER to the channel in this section are based on -screen...
...-channel (if available). Note You may need to directly select a channel. NS-P42Q-P501Q-P502Q-10A_09-0100_MAN_V1_English.book Page 18 Friday, March 20, 2009 3:11 PM...Setup Input Color Tint (G/R) : Standard : 95 : 45 : 50 : 50 : G50/R50 2 Press ENTER to access the Picture menu. 3.... • Standard-Selects the optimal picture display for normal environments. Your TV displays status information, such as the channel number, type of red in ... list of main channel 7, press 7, -, then 1. The on using the remote control. Press ENTER to the channel in this section are based on -screen...

User Manual (English)
Page 26
... Mode Sound Channel Contrast Brightness Sharpness Setup Input Color Tint (G/R) : Standard : 95 : 45 : 50 : 50 : G50/R50 2 Press or to highlight Sound, then press ENTER to see the Equalizer option in... mode. You can select Mono, Stereo, or SAP (separate audio program), depending on the TV and the TV remote do not work. When you select this sound mode when watching news, soap operas, or... settings. Note You can also press MTS one or more information, see all the options. NS-P42Q-P501Q-P502Q-10A_09-0100_MAN_V1_English.book Page 22 Friday, March 20, 2009 3:11 PM Adjusting the sound...
... Mode Sound Channel Contrast Brightness Sharpness Setup Input Color Tint (G/R) : Standard : 95 : 45 : 50 : 50 : G50/R50 2 Press or to highlight Sound, then press ENTER to see the Equalizer option in... mode. You can select Mono, Stereo, or SAP (separate audio program), depending on the TV and the TV remote do not work. When you select this sound mode when watching news, soap operas, or... settings. Note You can also press MTS one or more information, see all the options. NS-P42Q-P501Q-P502Q-10A_09-0100_MAN_V1_English.book Page 22 Friday, March 20, 2009 3:11 PM Adjusting the sound...
User Manual (English)
Page 27
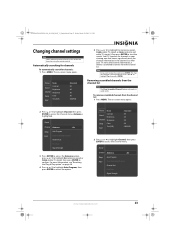
...press or to highlight Air (antenna signal) or Cable (cable TV signal), then press ENTER to stop the search, press ENTER. For more information, see "Resetting the Plug & Play option" on using the remote control. NS-P42Q-P501Q-P502Q-10A_09-0100_MAN_V1_English.book Page 23 Friday, March 20, 2009 3:... Program? Press or to access the option. Picture Mode Sound Channel Contrast Brightness Sharpness Setup Input Color Tint (G/R) : Standard : 95 : 45 : 50 : 50 : G50/R50 2 Press or to highlight Channel, then press ENTER to start the search. The on -screen menu opens. 2 Press or to highlight...
...press or to highlight Air (antenna signal) or Cable (cable TV signal), then press ENTER to stop the search, press ENTER. For more information, see "Resetting the Plug & Play option" on using the remote control. NS-P42Q-P501Q-P502Q-10A_09-0100_MAN_V1_English.book Page 23 Friday, March 20, 2009 3:... Program? Press or to access the option. Picture Mode Sound Channel Contrast Brightness Sharpness Setup Input Color Tint (G/R) : Standard : 95 : 45 : 50 : 50 : G50/R50 2 Press or to highlight Channel, then press ENTER to start the search. The on -screen menu opens. 2 Press or to highlight...
User Manual (English)
Page 32
...MENU. Turning parental controls on -screen menu opens. The on or off your TV back on using the remote control. Enter PIN V-Chip 4 Press the number buttons to access the Setup ... Color Tint (G/R) : Standard : 95 : 45 : 50 : 50 : G50/R50 Picture Mode Sound Channel Contrast Brightness Sharpness Setup Color Tint (G/R) Input : Standard : 95 : 45 : 50 : 50 : G50/R50 2 Press or to highlight Setup, then...RETURN to return to the previous menu or EXIT to access the V-Chip menu. NS-P42Q-P501Q-P502Q-10A_09-0100_MAN_V1_English.book Page 28 Friday, March 20, 2009 3:11 PM Setting ...
...MENU. Turning parental controls on -screen menu opens. The on or off your TV back on using the remote control. Enter PIN V-Chip 4 Press the number buttons to access the Setup ... Color Tint (G/R) : Standard : 95 : 45 : 50 : 50 : G50/R50 Picture Mode Sound Channel Contrast Brightness Sharpness Setup Color Tint (G/R) Input : Standard : 95 : 45 : 50 : 50 : G50/R50 2 Press or to highlight Setup, then...RETURN to return to the previous menu or EXIT to access the V-Chip menu. NS-P42Q-P501Q-P502Q-10A_09-0100_MAN_V1_English.book Page 28 Friday, March 20, 2009 3:11 PM Setting ...
User Manual (English)
Page 37
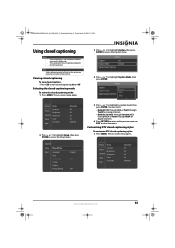
...Sound Channel Contrast Brightness Sharpness Setup Input Color Tint (G/R) : Standard : 95 : 45 : 50 : 50 : G50/R50 2 Press or to highlight Setup, then press ENTER to access the Caption ...Sound Channel Contrast Brightness Sharpness Setup Input Color Tint (G/R) : Standard : 95 : 45 : 50 : 50 : G50/R50 www.insigniaproducts.com 33 Note Unless otherwise noted, all tasks in HDMI or ...Default Digital Caption Options 4 Press or to turn closed captioning styles: 1 Press MENU. NS-P42Q-P501Q-P502Q-10A_09-0100_MAN_V1_English.book Page 33 Friday, March 20, 2009 3:11 PM Using closed ...
...Sound Channel Contrast Brightness Sharpness Setup Input Color Tint (G/R) : Standard : 95 : 45 : 50 : 50 : G50/R50 2 Press or to highlight Setup, then press ENTER to access the Caption ...Sound Channel Contrast Brightness Sharpness Setup Input Color Tint (G/R) : Standard : 95 : 45 : 50 : 50 : G50/R50 www.insigniaproducts.com 33 Note Unless otherwise noted, all tasks in HDMI or ...Default Digital Caption Options 4 Press or to turn closed captioning styles: 1 Press MENU. NS-P42Q-P501Q-P502Q-10A_09-0100_MAN_V1_English.book Page 33 Friday, March 20, 2009 3:11 PM Using closed ...
User Manual (English)
Page 38
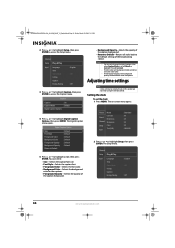
...Opacity-Selects the opacity of the broadcasting station. The Setup menu. The on using the remote control. Picture Mode Sound Channel Contrast Brightness Sharpness Setup Input Color Tint (G/R) : Standard : 95 : 45 : 50 : 50 : G50/R50 2 Press or to Default or Service1 through Service6. The Digital Caption ... and background opacity cannot both be set the clock: 1 Press MENU. Setting the clock To set to access the Caption menu. NS-P42Q-P501Q-P502Q-10A_09-0100_MAN_V1_English.book Page 34 Friday, March 20, 2009 3:11 PM 2 Press or to highlight Setup, then press ENTER to...
...Opacity-Selects the opacity of the broadcasting station. The Setup menu. The on using the remote control. Picture Mode Sound Channel Contrast Brightness Sharpness Setup Input Color Tint (G/R) : Standard : 95 : 45 : 50 : 50 : G50/R50 2 Press or to Default or Service1 through Service6. The Digital Caption ... and background opacity cannot both be set the clock: 1 Press MENU. Setting the clock To set to access the Caption menu. NS-P42Q-P501Q-P502Q-10A_09-0100_MAN_V1_English.book Page 34 Friday, March 20, 2009 3:11 PM 2 Press or to highlight Setup, then press ENTER to...
User Manual (English)
Page 41
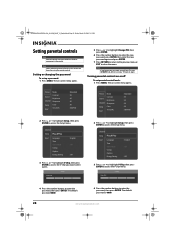
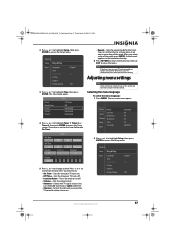
...timer turns on your TV turns off. • Inactive/Active-Turns the timer on using the remote control. You can select Air (antenna) or Cable (cable TV). • Channel-... TV automatically turns off . • Volume-Sets the volume level. • Antenna-Selects the TV signal source. Picture Mode Sound Channel Contrast Brightness Sharpness Setup Color Tint (G/R) Input : Standard : 95 : 45 : 50 : 50...the time your TV turns on. • Off Time-Sets the time your TV and no controls or buttons are based on or off to close the menu. NS-P42Q-P501Q-P502Q-10A_09-0100_MAN_V1_English...
...timer turns on your TV turns off. • Inactive/Active-Turns the timer on using the remote control. You can select Air (antenna) or Cable (cable TV). • Channel-... TV automatically turns off . • Volume-Sets the volume level. • Antenna-Selects the TV signal source. Picture Mode Sound Channel Contrast Brightness Sharpness Setup Color Tint (G/R) Input : Standard : 95 : 45 : 50 : 50...the time your TV turns on. • Off Time-Sets the time your TV and no controls or buttons are based on or off to close the menu. NS-P42Q-P501Q-P502Q-10A_09-0100_MAN_V1_English...
User Manual (English)
Page 44
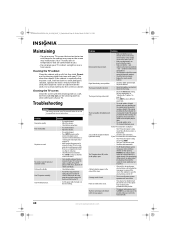
... analog signal into the remote. • Make sure that there are no impact on again. • Check the cable connections. NS-P42Q-P501Q-P502Q-10A_09-0100_MAN_V1_English.book Page 40 Friday, March 20, 2009 3:11 PM Maintaining • Do not use the cleaning cloth to clean other parts of your TV. Your TV works best in...
... analog signal into the remote. • Make sure that there are no impact on again. • Check the cable connections. NS-P42Q-P501Q-P502Q-10A_09-0100_MAN_V1_English.book Page 40 Friday, March 20, 2009 3:11 PM Maintaining • Do not use the cleaning cloth to clean other parts of your TV. Your TV works best in...