
Firmware Installation Guide (English)
Page 1
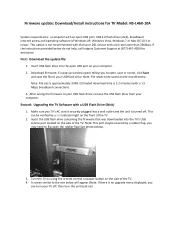
... the rubber flap (See photo below). 3. Note: File size is 1‐2 minutes (with an open USB port on the side of the TV. Note: This port maybe covered by a red indicator light on the root directory. Firmware update: Download/Install instructions for assistance. Note: File... and save the file to the one below do not help, call Insignia Customer Support at (877) 467‐4289 for TV Model: NS‐L46X‐10A System requirements: a computer with a 1.5 Mbps broadband connection). 3. Second: Upgrading the TV Software with a bit rate lower than 256kbps. This option is no ...
... the rubber flap (See photo below). 3. Note: File size is 1‐2 minutes (with an open USB port on the side of the TV. Note: This port maybe covered by a red indicator light on the root directory. Firmware update: Download/Install instructions for assistance. Note: File... and save the file to the one below do not help, call Insignia Customer Support at (877) 467‐4289 for TV Model: NS‐L46X‐10A System requirements: a computer with a 1.5 Mbps broadband connection). 3. Second: Upgrading the TV Software with a bit rate lower than 256kbps. This option is no ...

Firmware Installation Guide (English)
Page 2
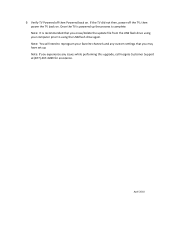
Once the update has completed, a screen similar to the one (1) minute. 6. Remove the USB flash drive (stick) from the TV. 8. The software update will then begin Note: DO NOT TURN THE POWER OFF OR UNPLUG DURING THE UPDATE Note: During the software update, a progress bar will appear: 7. this update takes approximately one shown below will appear displaying the progress of the update; Press the Enter/OK key on the remote. 5. Using your remote control arrow keys, make sure the "Yes" button is highlighted and press enter/OK on the remote control, TV will then restart.
Once the update has completed, a screen similar to the one (1) minute. 6. Remove the USB flash drive (stick) from the TV. 8. The software update will then begin Note: DO NOT TURN THE POWER OFF OR UNPLUG DURING THE UPDATE Note: During the software update, a progress bar will appear: 7. this update takes approximately one shown below will appear displaying the progress of the update; Press the Enter/OK key on the remote. 5. Using your remote control arrow keys, make sure the "Yes" button is highlighted and press enter/OK on the remote control, TV will then restart.
Firmware Installation Guide (English)
Page 3
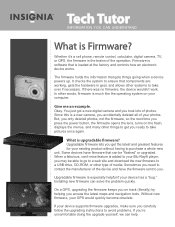
If the TV did not then, power off then Powered back on . then power the TV back on . Note: If you may have set up the process is complete. Verify TV Powered off the TV; Note: You will need to reprogram your favorite channels and any issues while performing this upgrade, call Insignia Customer Support at (877) 467‐4289 for assistance. April 2010 Note: It is powered up . 9. Once the TV is recommended that you experience any custom settings that you erase/delete the update file from the USB flash drive using your computer prior to using the USB flash drive again.
If the TV did not then, power off then Powered back on . then power the TV back on . Note: If you may have set up the process is complete. Verify TV Powered off the TV; Note: You will need to reprogram your favorite channels and any issues while performing this upgrade, call Insignia Customer Support at (877) 467‐4289 for assistance. April 2010 Note: It is powered up . 9. Once the TV is recommended that you experience any custom settings that you erase/delete the update file from the USB flash drive using your computer prior to using the USB flash drive again.

Warranty (English)
Page 1
... will be defective by this warranty that requires service, terms of this warranty apply. Where is determined to be loaned to you until your TV is valid only to the original purchaser of the product in the original manufacture of the material or workmanship for a period of two (2) ... address listed on the receipt you received with the Product. This warranty lasts as long as you sell or otherwise transfer the Product. How to Insignia television consumers residing in -home warranty service for 2 years (730 days) from . To obtain in the United States. This feature is printed ...
... will be defective by this warranty that requires service, terms of this warranty apply. Where is determined to be loaned to you until your TV is valid only to the original purchaser of the product in the original manufacture of the material or workmanship for a period of two (2) ... address listed on the receipt you received with the Product. This warranty lasts as long as you sell or otherwise transfer the Product. How to Insignia television consumers residing in -home warranty service for 2 years (730 days) from . To obtain in the United States. This feature is printed ...
What is Firmware? (English)
Page 1
... especially helpful if your Blu-Ray® player, you need to contact the manufacturer of photos. Whether it's a cell phone, remote control, calculator, digital camera, TV, or GPS, the firmware is added to your device has a "bug." Some devices have the firmware sent to purchase a whole new unit. When a fabulous, can...
... especially helpful if your Blu-Ray® player, you need to contact the manufacturer of photos. Whether it's a cell phone, remote control, calculator, digital camera, TV, or GPS, the firmware is added to your device has a "bug." Some devices have the firmware sent to purchase a whole new unit. When a fabulous, can...
User Manual (English)
Page 3
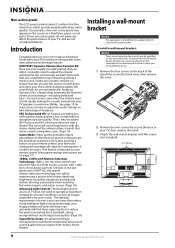
... 8 Using the remote control holder 8 Programming a universal remote control to work with your TV . . . . 8 Making connections 9 Connecting the power 9 Connecting an outdoor antenna 9 Connecting cable TV 9 Connecting satellite TV via a satellite TV box 10 Connecting a VCR 10 Connecting a camcorder or game console 11 Connecting an HDMI ...13 Connecting a digital audio amplifier 13 Connecting an analog audio amplifier 14 Turning on your TV for the first time 14 Understanding the basics 15 Turning your TV on or off 15 Selecting the video input source 15 On-screen menu overview 15 ...
... 8 Using the remote control holder 8 Programming a universal remote control to work with your TV . . . . 8 Making connections 9 Connecting the power 9 Connecting an outdoor antenna 9 Connecting cable TV 9 Connecting satellite TV via a satellite TV box 10 Connecting a VCR 10 Connecting a camcorder or game console 11 Connecting an HDMI ...13 Connecting a digital audio amplifier 13 Connecting an analog audio amplifier 14 Turning on your TV for the first time 14 Understanding the basics 15 Turning your TV on or off 15 Selecting the video input source 15 On-screen menu overview 15 ...
User Manual (English)
Page 4
... the DTV signal strength 23 Setting parental controls 23 Setting or changing the password 23 Setting parental control levels 24 Blocking unrated TV 25 Downloading rating information 26 Locking control buttons 27 Using closed captioning 27 Viewing closed captioning 27 Selecting the closed captioning mode... 29 Adjusting menu settings 30 Selecting the menu language 30 Changing the menu transparency 30 Labeling an input source 31 Adjusting the INSIGNIA logo brightness 32 Turning Auto Input Sensing on or off 32 Resetting settings to the defaults 33 Programming your remote control 33...
... the DTV signal strength 23 Setting parental controls 23 Setting or changing the password 23 Setting parental control levels 24 Blocking unrated TV 25 Downloading rating information 26 Locking control buttons 27 Using closed captioning 27 Viewing closed captioning 27 Selecting the closed captioning mode... 29 Adjusting menu settings 30 Selecting the menu language 30 Changing the menu transparency 30 Labeling an input source 31 Adjusting the INSIGNIA logo brightness 32 Turning Auto Input Sensing on or off 32 Resetting settings to the defaults 33 Programming your remote control 33...

User Manual (English)
Page 5
... use of this product. • Don't let children climb on or play with steel studs or cinder blocks. Tune into safety • One size of TV stand does not fit all . Use only a wall mount rated for safe wall mount installation. Wall mounting If you are committed to wall mount your... TV, always remember: • One size of your new product, keep these safety tips in this manual, or otherwise listed by an independent laboratory as a chest ...
... use of this product. • Don't let children climb on or play with steel studs or cinder blocks. Tune into safety • One size of TV stand does not fit all . Use only a wall mount rated for safe wall mount installation. Wall mounting If you are committed to wall mount your... TV, always remember: • One size of your new product, keep these safety tips in this manual, or otherwise listed by an independent laboratory as a chest ...
User Manual (English)
Page 6
... not touch the liquid in the panel. The wide blade or the third prong are important operating and maintenance instructions in the literature accompanying your TV. 1 Read these instructions. 2 Keep these instructions. 3 Heed all warnings. 4 Follow all servicing to be fatal. Servicing is required when... when unused for at plugs, convenience receptacles, and the point where they exit from being walked on the apparatus. Do not drop your TV. Install in accordance with the manufacturer's instructions. 8 Do not install near water. 6 Clean only with one wider than the other hazards...
... not touch the liquid in the panel. The wide blade or the third prong are important operating and maintenance instructions in the literature accompanying your TV. 1 Read these instructions. 2 Keep these instructions. 3 Heed all warnings. 4 Follow all servicing to be fatal. Servicing is required when... when unused for at plugs, convenience receptacles, and the point where they exit from being walked on the apparatus. Do not drop your TV. Install in accordance with the manufacturer's instructions. 8 Do not install near water. 6 Clean only with one wider than the other hazards...
User Manual (English)
Page 7
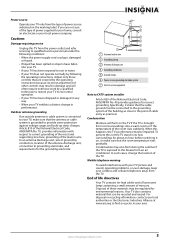
...switching it states that the antenna or cable system is exposed to CATV system installer Article 820 of power source indicated on the TV if the TV is damaged or frayed. • If liquid has been spilled or objects have fallen into a warm room or if the temperature...in any way. • When your local power company. Adjust only those controls that can be connected to its normal operation. • If your TV has been dropped or damaged in wire 2 Grounding clamp 3 Antenna discharge unit 4 Grounding conductors 5 Ground clamps 6 Power service grounding electrode system 7 Electric...
...switching it states that the antenna or cable system is exposed to CATV system installer Article 820 of power source indicated on the TV if the TV is damaged or frayed. • If liquid has been spilled or objects have fallen into a warm room or if the temperature...in any way. • When your local power company. Adjust only those controls that can be connected to its normal operation. • If your TV has been dropped or damaged in wire 2 Grounding clamp 3 Antenna discharge unit 4 Grounding conductors 5 Ground clamps 6 Power service grounding electrode system 7 Electric...
User Manual (English)
Page 8
...you could better hear whispering during a movie scene? SRS TruSurround HD: At Insignia, providing you expect from your TV speakers sound more lifelike. Using intelligent light sensing technology, your Insignia Advanced Series television can automatically find these opportunities to reduce the power consumed ... resolution (up from 720 lines in the operating instructions unless you will automatically adjust for all images projected onto your new Insignia Advanced Series television! It couldn't be easier. (The button is featured on your remote control, your remote control. By...
...you could better hear whispering during a movie scene? SRS TruSurround HD: At Insignia, providing you expect from your TV speakers sound more lifelike. Using intelligent light sensing technology, your Insignia Advanced Series television can automatically find these opportunities to reduce the power consumed ... resolution (up from 720 lines in the operating instructions unless you will automatically adjust for all images projected onto your new Insignia Advanced Series television! It couldn't be easier. (The button is featured on your remote control, your remote control. By...
User Manual (English)
Page 9
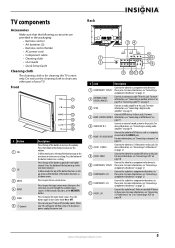
... to these jacks. Connect HDMI devices to these jacks. For more information, see "Connecting a component video device" on page 13. When your TV. For more information, see "Connecting a S-Video device" on page 12. 10 COMPONENT 2 L/R Connect the audio for a component video device to... component video device to these jacks. For more information, see "Connecting an outdoor antenna" on page 9 or "Connecting cable TV" on page 10. TV components Accessories Make sure that the following accessories are provided in the packaging: • Remote control • AA batteries (2) ...
... to these jacks. Connect HDMI devices to these jacks. For more information, see "Connecting a component video device" on page 13. When your TV. For more information, see "Connecting a S-Video device" on page 12. 10 COMPONENT 2 L/R Connect the audio for a component video device to... component video device to these jacks. For more information, see "Connecting an outdoor antenna" on page 9 or "Connecting cable TV" on page 10. TV components Accessories Make sure that the following accessories are provided in the packaging: • Remote control • AA batteries (2) ...
User Manual (English)
Page 10
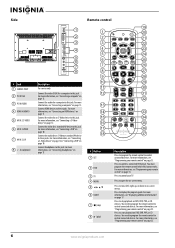
... an S-Video device to this jack. Connect the video for a computer to this jack. You need to program the remote control to control your TV. For more information, see "Programming your remote control" on page 33. 6 www.insigniaproducts.com For more information, see "Programming your remote control"... 26 8 27 9 28 10 29 11 30 12 31 32 13 14 33 15 34 16 GAME 35 DYN VOL 17 36 18 NS-RC02U-10A 37 # Button 1 SET 2 DVD 3 TV 4 MENU 5 6 GUIDE 7 (stop playback on page 12. Press to start playback on page 10. For more information, see "Programming ...
... an S-Video device to this jack. Connect the video for a computer to this jack. You need to program the remote control to control your TV. For more information, see "Programming your remote control" on page 33. 6 www.insigniaproducts.com For more information, see "Programming your remote control"... 26 8 27 9 28 10 29 11 30 12 31 32 13 14 33 15 34 16 GAME 35 DYN VOL 17 36 18 NS-RC02U-10A 37 # Button 1 SET 2 DVD 3 TV 4 MENU 5 6 GUIDE 7 (stop playback on page 12. Press to start playback on page 10. For more information, see "Programming ...
User Manual (English)
Page 11
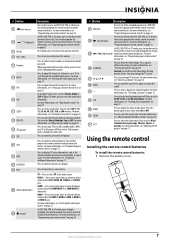
...Savings, Theater, Sports, or Custom. Press to confirm selections or changes. Press to control connected devices. For more information, see "Adjusting the TV picture" on DVD, DVR, PVR, or CD devices. 28 (fast forward) You need to program the remote control to restore the sound.... Remove the battery cover. For more information, see "Programming your remote control" on page 33. To disconnect power, unplug the power cord. TV-Press to the COMPONENT 1 or COMPONENT 2 video jacks. Press this button again to list all the recorded programs in a PVR/STB. For...
...Savings, Theater, Sports, or Custom. Press to confirm selections or changes. Press to control connected devices. For more information, see "Adjusting the TV picture" on DVD, DVR, PVR, or CD devices. 28 (fast forward) You need to program the remote control to restore the sound.... Remove the battery cover. For more information, see "Programming your remote control" on page 33. To disconnect power, unplug the power cord. TV-Press to the COMPONENT 1 or COMPONENT 2 video jacks. Press this button again to list all the recorded programs in a PVR/STB. For...
User Manual (English)
Page 12
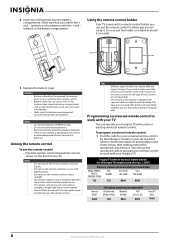
... remote control manufacturers and models Philips PHDVD5, PH5DSS, PMDVR8, PDVR8 RCA RCU807 One for the type of wall. (Screws are disposed of your Insignia TV. Aiming the remote control To aim the remote control: • Point the remote control towards the remote sensor on the front of correctly.... controls (for all types of time, remove the batteries. Using the remote control holder Your TV comes with separate adhesive tape for an extended period of walls. Either move your Insignia TV with the + and - If you want to shock or liquids. Notes Do not mix batteries...
... remote control manufacturers and models Philips PHDVD5, PH5DSS, PMDVR8, PDVR8 RCA RCU807 One for the type of wall. (Screws are disposed of your Insignia TV. Aiming the remote control To aim the remote control: • Point the remote control towards the remote sensor on the front of correctly.... controls (for all types of time, remove the batteries. Using the remote control holder Your TV comes with separate adhesive tape for an extended period of walls. Either move your Insignia TV with the + and - If you want to shock or liquids. Notes Do not mix batteries...
User Manual (English)
Page 13
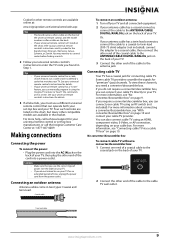
...a different universal remote control that matches your universal remote control's instructions to the coaxial jack on the back of your TV. If you do not intend to the ANTENNA/CABLE DIGITAL/ANALOG jack on your cable TV using the Insignia TV remote to "teach" the commands one end of a coaxial cable to enter the... TV code you use your TV, then plug the other end of the cord into the AC IN jack on the back ...
...a different universal remote control that matches your universal remote control's instructions to the coaxial jack on the back of your TV. If you do not intend to the ANTENNA/CABLE DIGITAL/ANALOG jack on your cable TV using the Insignia TV remote to "teach" the commands one end of a coaxial cable to enter the... TV code you use your TV, then plug the other end of the cord into the AC IN jack on the back ...
User Manual (English)
Page 14
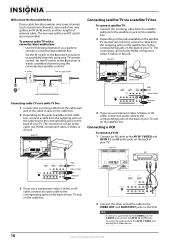
... If your cable box descrambles only some channels (such as a guide to connect a converter/descrambler box. Back of TV Cable box IANNTENONUAT Connecting satellite TV via a cable TV box 1 Connect the incoming cable from the cable wall jack to the cable-in jack on the satellite box. 2...VIDEO jack controls the AV IN 1 L and R jacks. RF switch A Two-set signal splitter B Out In TV Cable converter/descrambler box Connecting cable TV via a satellite TV box To connect satellite TV: 1 Connect the incoming cable from the satellite wall jack to the satellite-in jack on the cable box. 2...
... If your cable box descrambles only some channels (such as a guide to connect a converter/descrambler box. Back of TV Cable box IANNTENONUAT Connecting satellite TV via a cable TV box 1 Connect the incoming cable from the cable wall jack to the cable-in jack on the satellite box. 2...VIDEO jack controls the AV IN 1 L and R jacks. RF switch A Two-set signal splitter B Out In TV Cable converter/descrambler box Connecting cable TV via a satellite TV box To connect satellite TV: 1 Connect the incoming cable from the satellite wall jack to the satellite-in jack on the cable box. 2...
User Manual (English)
Page 15
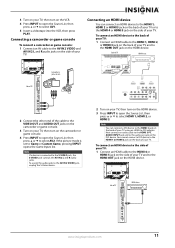
..., then press or to select AV1. 5 Insert a videotape into the VCR, then press PLAY. 3 Turn on your TV, then turn on the HDMI device. 3 Press INPUT to open the Source List, then press or to select HDMI 1, HDMI... 2, or HDMI 3. Back of TV HDMI device Side of TV Camcorder or game console 2 Connect the other end of the cable to the VIDEO OUT and AUDIO ...OUT jacks on the camcorder or game console. 3 Turn on your TV and to the HDMI 4 or HDMI 5 jack on the HDMI device. If the picture mode is connected to...
..., then press or to select AV1. 5 Insert a videotape into the VCR, then press PLAY. 3 Turn on your TV, then turn on the HDMI device. 3 Press INPUT to open the Source List, then press or to select HDMI 1, HDMI... 2, or HDMI 3. Back of TV HDMI device Side of TV Camcorder or game console 2 Connect the other end of the cable to the VIDEO OUT and AUDIO ...OUT jacks on the camcorder or game console. 3 Turn on your TV and to the HDMI 4 or HDMI 5 jack on the HDMI device. If the picture mode is connected to...
User Manual (English)
Page 16
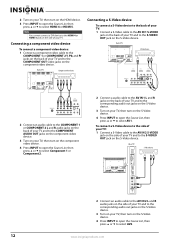
... select Component 1 or Component 2. 2 Connect a audio cable to the AV IN 1 L and R jacks on the back of your TV and to the corresponding audio out jacks on the S-Video device. 3 Turn on your TV, then turn on the S-Video device. 4 Press INPUT to open the Source List, then press or to select... HDMI 4 or HDMI 5 . Back of TV Component video device Connecting a S-Video device To connect a S-Video device to the back of your TV: 1 Connect a S-Video cable to the AV IN 1 S-VIDEO jack on the HDMI device. 3 Press INPUT to open...
... select Component 1 or Component 2. 2 Connect a audio cable to the AV IN 1 L and R jacks on the back of your TV and to the corresponding audio out jacks on the S-Video device. 3 Turn on your TV, then turn on the S-Video device. 4 Press INPUT to open the Source List, then press or to select... HDMI 4 or HDMI 5 . Back of TV Component video device Connecting a S-Video device To connect a S-Video device to the back of your TV: 1 Connect a S-Video cable to the AV IN 1 S-VIDEO jack on the HDMI device. 3 Press INPUT to open...

User Manual (English)
Page 17
... turn on when you can connect it to the PC IN VGA jack on the side of your TV and to select VGA. If your TV does not turn on the computer. 4 Press INPUT to open the Source List, then press or to the digital audio jack on the amplifier. Connecting ...headphones To connect headphones: • Plug headphones into the jack on your TV. Connecting a digital audio amplifier To connect a digital audio amplifier: • Connect a digital audio cable to the SPDIF jack on the back of your...
... turn on when you can connect it to the PC IN VGA jack on the side of your TV and to select VGA. If your TV does not turn on the computer. 4 Press INPUT to open the Source List, then press or to the digital audio jack on the amplifier. Connecting ...headphones To connect headphones: • Plug headphones into the jack on your TV. Connecting a digital audio amplifier To connect a digital audio amplifier: • Connect a digital audio cable to the SPDIF jack on the back of your...


