
Firmware Installation Guide (English)
Page 3
then power the TV back on . Once the TV is powered up the process is recommended that you may have set up. Note: It is complete. Note: If you erase/delete the update file from the USB flash drive using your computer prior to reprogram your favorite channels and any custom settings that you experience any issues while performing this upgrade, call Insignia Customer Support at (877) 467‐4289 for assistance. Verify TV Powered off the TV; Note: You will need to using the USB flash drive again. April 2010 9. If the TV did not then, power off then Powered back on .
then power the TV back on . Once the TV is powered up the process is recommended that you may have set up. Note: It is complete. Note: If you erase/delete the update file from the USB flash drive using your computer prior to reprogram your favorite channels and any custom settings that you experience any issues while performing this upgrade, call Insignia Customer Support at (877) 467‐4289 for assistance. Verify TV Powered off the TV; Note: You will need to using the USB flash drive again. April 2010 9. If the TV did not then, power off then Powered back on .
Warranty (English)
Page 2
...TO, ANY IMPLIED WARRANTIES OF AND CONDITIONS OF MERCHANTABILITY AND FITNESS FOR A PARTICULAR PURPOSE, ARE LIMITED IN DURATION TO THE WARRANTY PERIOD SET FORTH ABOVE AND NO WARRANTIES, WHETHER EXPRESS OR IMPLIED, WILL APPLY AFTER THE WARRANTY PERIOD. All rights reserved. What does the ...Best Buy Purchasing, LLC 7601 Penn Avenue South, Richfield, Minnesota, U.S.A. 55423-3645 © 2009 Best Buy Enterprise Services, Inc. Contact Insignia: For customer service please call 1-877-467-4289 www.insigniaproducts.com Distributed by anyone other products and brand names are trademarks of Best Buy...
...TO, ANY IMPLIED WARRANTIES OF AND CONDITIONS OF MERCHANTABILITY AND FITNESS FOR A PARTICULAR PURPOSE, ARE LIMITED IN DURATION TO THE WARRANTY PERIOD SET FORTH ABOVE AND NO WARRANTIES, WHETHER EXPRESS OR IMPLIED, WILL APPLY AFTER THE WARRANTY PERIOD. All rights reserved. What does the ...Best Buy Purchasing, LLC 7601 Penn Avenue South, Richfield, Minnesota, U.S.A. 55423-3645 © 2009 Best Buy Enterprise Services, Inc. Contact Insignia: For customer service please call 1-877-467-4289 www.insigniaproducts.com Distributed by anyone other products and brand names are trademarks of Best Buy...
User Manual (English)
Page 3
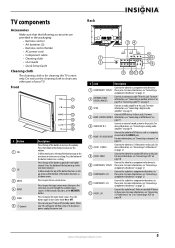
... menus 16 Selecting a channel 16 Adjusting the volume 17 Displaying additional information 17 Adjusting the picture 17 Adjusting the TV picture 17 Adjusting Advanced Video settings 18 www.insigniaproducts.com i
... menus 16 Selecting a channel 16 Adjusting the volume 17 Displaying additional information 17 Adjusting the picture 17 Adjusting the TV picture 17 Adjusting Advanced Video settings 18 www.insigniaproducts.com i
User Manual (English)
Page 4
...DTV closed captioning styles 28 Adjusting time settings 29 Setting the clock 29 Setting the sleep timer 29 Adjusting menu settings 30 Selecting the menu language 30 Changing the menu transparency 30 Labeling an input source 31 Adjusting the INSIGNIA logo brightness 32 Turning Auto Input ...Sensing on or off 32 Resetting settings to the defaults 33 Programming your remote control 33 Troubleshooting remote control programming 37 Manufacturers'...
...DTV closed captioning styles 28 Adjusting time settings 29 Setting the clock 29 Setting the sleep timer 29 Adjusting menu settings 30 Selecting the menu language 30 Changing the menu transparency 30 Labeling an input source 31 Adjusting the INSIGNIA logo brightness 32 Turning Auto Input ...Sensing on or off 32 Resetting settings to the defaults 33 Programming your remote control 33 Troubleshooting remote control programming 37 Manufacturers'...
User Manual (English)
Page 8
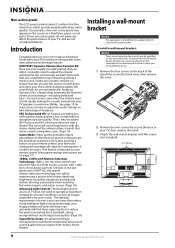
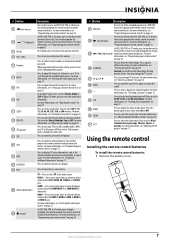
...projected onto your remote control. These non-active pixels do so. 1 Remove the four screws on your remote control, your television settings will be experiencing a picture with clearer detail and brightness, smoother transitions, and reduced motion blurring, particularly when watching fast-motion sports... fixed blue, green, or red point. SRS TruSurround HD: At Insignia, providing you with superior audio quality is featured on how to adjust the audio settings to take advantage of your Insignia Advanced Series television can automatically find these opportunities to reduce the power ...
...projected onto your remote control. These non-active pixels do so. 1 Remove the four screws on your remote control, your television settings will be experiencing a picture with clearer detail and brightness, smoother transitions, and reduced motion blurring, particularly when watching fast-motion sports... fixed blue, green, or red point. SRS TruSurround HD: At Insignia, providing you with superior audio quality is featured on how to adjust the audio settings to take advantage of your Insignia Advanced Series television can automatically find these opportunities to reduce the power ...
User Manual (English)
Page 9
... to open the input source menu, then press the arrow keys to open the on page 13. Press to decrease a setting. Connect the audio for a component video device to increase a setting. In Menu mode, press the top of the button functions as the up arrow and the bottom of the button to...
... to open the input source menu, then press the arrow keys to open the on page 13. Press to decrease a setting. Connect the audio for a component video device to increase a setting. In Menu mode, press the top of the button functions as the up arrow and the bottom of the button to...
User Manual (English)
Page 10
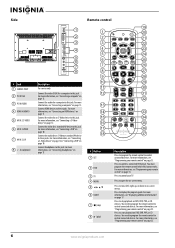
... 25 7 26 8 27 9 28 10 29 11 30 12 31 32 13 14 33 15 34 16 GAME 35 DYN VOL 17 36 18 NS-RC02U-10A 37 # Button 1 SET 2 DVD 3 TV 4 MENU 5 6 GUIDE 7 (stop playback on page 17. For more information, see "Programming your remote control" on page 33. 6 www.insigniaproducts.com...
... 25 7 26 8 27 9 28 10 29 11 30 12 31 32 13 14 33 15 34 16 GAME 35 DYN VOL 17 36 18 NS-RC02U-10A 37 # Button 1 SET 2 DVD 3 TV 4 MENU 5 6 GUIDE 7 (stop playback on page 17. For more information, see "Programming your remote control" on page 33. 6 www.insigniaproducts.com...
User Manual (English)
Page 11
...When your remote control" on page 33. HDMI-Press one or more information, see "Programming your remote control" on page 33. 30 /FREEZE Press to set -top box. You need to program the remote 29 / (skip forward) control to the HDMI 1, HDMI 2, HDMI 3, HDMI 4, or HDMI 5 jack... need to program the remote control to the COMPONENT 1 or COMPONENT 2 video jacks. Press to control connected devices. For more information, see "Setting up a favorite channel list" on page 33. For more information, see "Programming your remote control" on page 21. COMP-Press one or more...
...When your remote control" on page 33. HDMI-Press one or more information, see "Programming your remote control" on page 33. 30 /FREEZE Press to set -top box. You need to program the remote 29 / (skip forward) control to the HDMI 1, HDMI 2, HDMI 3, HDMI 4, or HDMI 5 jack... need to program the remote control to the COMPONENT 1 or COMPONENT 2 video jacks. Press to control connected devices. For more information, see "Setting up a favorite channel list" on page 33. For more information, see "Programming your remote control" on page 21. COMP-Press one or more...
User Manual (English)
Page 12
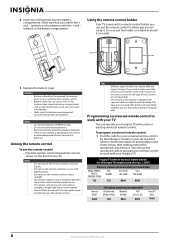
...different types. Make sure that you use the correct tape for wall mounting. Remove batteries when the charge is shipped with all Insignia TVs manufactured after Jan. 1, 2007) Universal remote control manufacturers and models Philips PHDVD5, PH5DSS, PMDVR8, PDVR8 RCA RCU807 One for... your universal remote control by identifying its model (or your set-top box's remote control manufacturer and model) on the front of correctly. 2 Insert two AA batteries into the battery compartment. Screws ...
...different types. Make sure that you use the correct tape for wall mounting. Remove batteries when the charge is shipped with all Insignia TVs manufactured after Jan. 1, 2007) Universal remote control manufacturers and models Philips PHDVD5, PH5DSS, PMDVR8, PDVR8 RCA RCU807 One for... your universal remote control by identifying its model (or your set-top box's remote control manufacturer and model) on the front of correctly. 2 Insert two AA batteries into the battery compartment. Screws ...
User Manual (English)
Page 13
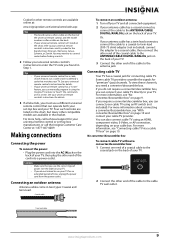
...; Make sure that you need to try codes for your universal remote control or set -top box and your TV. 3 Connect the other compatible models are listed on the back of the... cable to use your set -top box manufacturer, or call technical support for the brands Orion, Emerson, Memorex, Sansui, Sylvania... outdoor antenna: 1 Turn off your TV and all else fails, you can also connect cable TV using the Insignia TV remote to identify a code that can connect your TV. You can manually program it using an HDMI, ...
...; Make sure that you need to try codes for your universal remote control or set -top box and your TV. 3 Connect the other compatible models are listed on the back of the... cable to use your set -top box manufacturer, or call technical support for the brands Orion, Emerson, Memorex, Sansui, Sylvania... outdoor antenna: 1 Turn off your TV and all else fails, you can also connect cable TV using the Insignia TV remote to identify a code that can connect your TV. You can manually program it using an HDMI, ...
User Manual (English)
Page 14
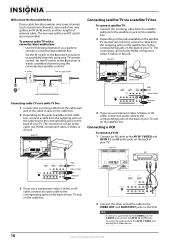
...cable from the cable wall jack to the cable-in jack on the satellite box. 2 Depending on the jacks available on the satellite TV receiver (set signal splitter B Out In TV Cable converter/descrambler box Connecting cable TV via a satellite TV box To connect satellite TV: 1 Connect the incoming ...use a component video, S-Video, or AV cable, connect an audio cable to the corresponding jacks on the back of your TV. RF switch A Two-set -top box), connect a cable from the outgoing jacks on the back of your TV. Back of TV Satellite receiver HDMI Video or S-Video Component 3 If...
...cable from the cable wall jack to the cable-in jack on the satellite box. 2 Depending on the jacks available on the satellite TV receiver (set signal splitter B Out In TV Cable converter/descrambler box Connecting cable TV via a satellite TV box To connect satellite TV: 1 Connect the incoming ...use a component video, S-Video, or AV cable, connect an audio cable to the corresponding jacks on the back of your TV. RF switch A Two-set -top box), connect a cable from the outgoing jacks on the back of your TV. Back of TV Satellite receiver HDMI Video or S-Video Component 3 If...
User Manual (English)
Page 15
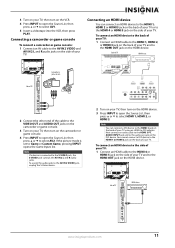
... on the back of your TV using an HDMI-to the HDMI 1 or HDMI 2 jack on the back of your TV. Note If a device is set to the VIDEO OUT and AUDIO OUT jacks on the camcorder or game console. 3 Turn on your TV. Back of TV HDMI device Side of...
... on the back of your TV using an HDMI-to the HDMI 1 or HDMI 2 jack on the back of your TV. Note If a device is set to the VIDEO OUT and AUDIO OUT jacks on the camcorder or game console. 3 Turn on your TV. Back of TV HDMI device Side of...
User Manual (English)
Page 18
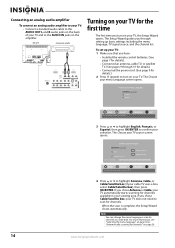
...your menu Language English Français Español MOVE OK ENTER SELECT Set menu language to English, Français,Español MENU PREVIOUS EXIT ...(See page 7 for details). • Connected an antenna, cable TV, or satellite TV. (See pages 9 through setting up your TV: 1 Make sure that you turn on your cable TV uses a box, select Cable/Satellite box), then press... OK/ENTER. To set up basic settings including the menu language, TV signal source, and the channel list. Back of your TV and to highlight ...
...your menu Language English Français Español MOVE OK ENTER SELECT Set menu language to English, Français,Español MENU PREVIOUS EXIT ...(See page 7 for details). • Connected an antenna, cable TV, or satellite TV. (See pages 9 through setting up your TV: 1 Make sure that you turn on your cable TV uses a box, select Cable/Satellite box), then press... OK/ENTER. To set up basic settings including the menu language, TV signal source, and the channel list. Back of your TV and to highlight ...
User Manual (English)
Page 19
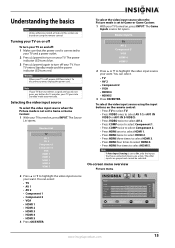
... the video input source using the remote control. Your TV enters Standby mode and the power indicator LED turns red. Warning When your TV is set to Game or Game Custom: 1 With your TV turned on , press INPUT. To select the video input source when the Picture mode is... set to On, only the inputs that the power cord is not set to Game or Game Custom: 1 With your TV turned on , press INPUT. The Game Inputs source list opens. You...
... the video input source using the remote control. Your TV enters Standby mode and the power indicator LED turns red. Warning When your TV is set to Game or Game Custom: 1 With your TV turned on , press INPUT. To select the video input source when the Picture mode is... set to On, only the inputs that the power cord is not set to Game or Game Custom: 1 With your TV turned on , press INPUT. The Game Inputs source list opens. You...
User Manual (English)
Page 20
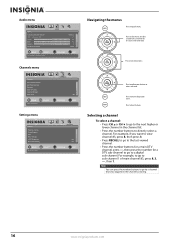
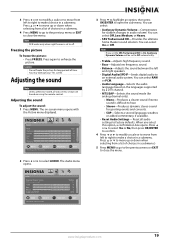
... menu. Audio menu ss Audio Audyssey Dynamic Volume SRS TruSurround HD Treble Bass Balance Digital Audio/SPDIF PICTURE AUDIO CHANNELS SETTINGS Medium Off 32 32 0 RAW MOVE OK ENTER SELECT Adjust settings to affect sound quality MENU PREVIOUS EXIT EXIT Channels menu Channels Auto Channel Search Add/Skip Channels Favorites Channel Labels...
... menu. Audio menu ss Audio Audyssey Dynamic Volume SRS TruSurround HD Treble Bass Balance Digital Audio/SPDIF PICTURE AUDIO CHANNELS SETTINGS Medium Off 32 32 0 RAW MOVE OK ENTER SELECT Adjust settings to affect sound quality MENU PREVIOUS EXIT EXIT Channels menu Channels Auto Channel Search Add/Skip Channels Favorites Channel Labels...
User Manual (English)
Page 21
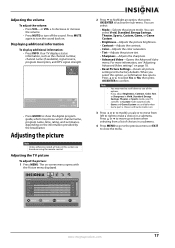
... on the information provided by the broadcaster. Picture Mode Brightness Contrast Color Tint Sharpness PICTURE AUDIO CHANNELS SETTINGS Vivid 42 45 54 0 +5 MOVE OK ENTER SELECT Adjust settings to affect picture quality MENU PREVIOUS EXIT EXIT 2 Press to highlight an option, then press OK/ENTER... time, rating, and summaries, depending on . Adjusting the TV picture To adjust the picture: 1 Press MENU. For more information, see all picture settings to move from a list of choices in a submenu. Note • • • You may show the digital program guide, which may ...
... on the information provided by the broadcaster. Picture Mode Brightness Contrast Color Tint Sharpness PICTURE AUDIO CHANNELS SETTINGS Vivid 42 45 54 0 +5 MOVE OK ENTER SELECT Adjust settings to affect picture quality MENU PREVIOUS EXIT EXIT 2 Press to highlight an option, then press OK/ENTER... time, rating, and summaries, depending on . Adjusting the TV picture To adjust the picture: 1 Press MENU. For more information, see all picture settings to move from a list of choices in a submenu. Note • • • You may show the digital program guide, which may ...
User Manual (English)
Page 22
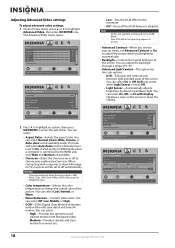
...out in GAME Mode. Picture Advanced Video Color Temperature Noise Reduction DCM Advanced Contrast Backlight Advanced Light Control PICTURE AUDIO CHANNELS SETTINGS Cool Middle Low On 30 MOVE OK ENTER SELECT Automatically adjust picture detail and brightness MENU PREVIOUS EXIT EXIT Picture Advanced ...Video Overscan Color Temperature DCR On Light Sensor On Backlight Advanced Light Control PICTURE AUDIO CHANNELS SETTINGS On Cool Off Off On With Display 21 MOVE OK ENTER SELECT MENU PREVIOUS Enhance contrast ratio between light and dark...
...out in GAME Mode. Picture Advanced Video Color Temperature Noise Reduction DCM Advanced Contrast Backlight Advanced Light Control PICTURE AUDIO CHANNELS SETTINGS Cool Middle Low On 30 MOVE OK ENTER SELECT Automatically adjust picture detail and brightness MENU PREVIOUS EXIT EXIT Picture Advanced ...Video Overscan Color Temperature DCR On Light Sensor On Backlight Advanced Light Control PICTURE AUDIO CHANNELS SETTINGS On Cool Off Off On With Display 21 MOVE OK ENTER SELECT MENU PREVIOUS Enhance contrast ratio between light and dark...
User Manual (English)
Page 23
... Dynamic Volume-Compensates for sporting events and concerts. • SAP-Selects a second language, weather, or added commentary, if available. • Reset Audio Settings- Press or to move up or down when selecting from a list of choices in a submenu. 4 Press MENU to go to the previous menu or...to close the menu. Caution Do not freeze the picture for analog channel only). • Mono-Produces a clearer sound if stereo sound is set to Off automatically. • Treble-Adjusts high frequency sound. • Bass-Adjusts low frequency sound. • Balance-Adjusts the sound between ...
... Dynamic Volume-Compensates for sporting events and concerts. • SAP-Selects a second language, weather, or added commentary, if available. • Reset Audio Settings- Press or to move up or down when selecting from a list of choices in a submenu. 4 Press MENU to go to the previous menu or...to close the menu. Caution Do not freeze the picture for analog channel only). • Mono-Produces a clearer sound if stereo sound is set to Off automatically. • Treble-Adjusts high frequency sound. • Bass-Adjusts low frequency sound. • Balance-Adjusts the sound between ...
User Manual (English)
Page 24
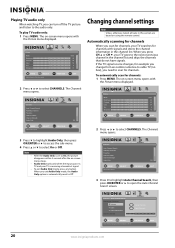
...EXIT EXIT 20 www.insigniaproducts.com Channels Auto Channel Search Add/Skip Channels Favorites Channel Labels Channel Strength Audio Only PICTURE AUDIO CHANNELS SETTINGS Off MOVE OK ENTER SELECT Adjust channel options MENU PREVIOUS EXIT EXIT 3 Press to highlight Auto Channel Search, then press OK/ENTER...OK ENTER SELECT MENU PREVIOUS Select Antenna if using the remote control. When you need to select On or Off. PICTURE AUDIO CHANNELS SETTINGS Channels Auto Channel Search Choose your TV goes to On, the picture disappears within 5 seconds after the on -screen menu opens with...
...EXIT EXIT 20 www.insigniaproducts.com Channels Auto Channel Search Add/Skip Channels Favorites Channel Labels Channel Strength Audio Only PICTURE AUDIO CHANNELS SETTINGS Off MOVE OK ENTER SELECT Adjust channel options MENU PREVIOUS EXIT EXIT 3 Press to highlight Auto Channel Search, then press OK/ENTER...OK ENTER SELECT MENU PREVIOUS Select Antenna if using the remote control. When you need to select On or Off. PICTURE AUDIO CHANNELS SETTINGS Channels Auto Channel Search Choose your TV goes to On, the picture disappears within 5 seconds after the on -screen menu opens with...
User Manual (English)
Page 25
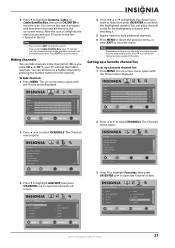
... the number buttons for channels because the available channels are provided by the box. The Channels menu opens. Channels Add/Skip Channel PICTURE AUDIO CHANNELS SETTINGS Ch 5-0 Ch 9-1 WWOR DT Ch 10-0 Ch 60-2 Ch 60-4 Ch 9-0 Ch 9-2 WNYW DT Ch 60-1 Ch 60-3 Ch 60-7 ...Adjust channel options MENU PREVIOUS EXIT EXIT Channels Auto Channel Search Add/Skip Channels Favorites Channel Labels Channel Strength Audio Only PICTURE AUDIO CHANNELS SETTINGS Off MOVE OK ENTER SELECT Adjust channel options MENU PREVIOUS EXIT EXIT 3 Press to highlight Favorites, then press OK/ENTER or to ...
... the number buttons for channels because the available channels are provided by the box. The Channels menu opens. Channels Add/Skip Channel PICTURE AUDIO CHANNELS SETTINGS Ch 5-0 Ch 9-1 WWOR DT Ch 10-0 Ch 60-2 Ch 60-4 Ch 9-0 Ch 9-2 WNYW DT Ch 60-1 Ch 60-3 Ch 60-7 ...Adjust channel options MENU PREVIOUS EXIT EXIT Channels Auto Channel Search Add/Skip Channels Favorites Channel Labels Channel Strength Audio Only PICTURE AUDIO CHANNELS SETTINGS Off MOVE OK ENTER SELECT Adjust channel options MENU PREVIOUS EXIT EXIT 3 Press to highlight Favorites, then press OK/ENTER or to ...


