
Firmware Installation Guide (English)
Page 3
9. then power the TV back on . Note: It is complete. Note: You will need to reprogram your favorite channels and any issues while performing this upgrade, call Insignia Customer Support at (877) 467‐4289 for assistance. Once the TV is powered up . Note: If you experience any custom settings that you may have set up the process is recommended that you erase/delete the update file from the USB flash drive using your computer prior to using the USB flash drive again. Verify TV Powered off the TV; If the TV did not then, power off then Powered back on .
9. then power the TV back on . Note: It is complete. Note: You will need to reprogram your favorite channels and any issues while performing this upgrade, call Insignia Customer Support at (877) 467‐4289 for assistance. Once the TV is powered up . Note: If you experience any custom settings that you may have set up the process is recommended that you erase/delete the update file from the USB flash drive using your computer prior to using the USB flash drive again. Verify TV Powered off the TV; If the TV did not then, power off then Powered back on .
Warranty (English)
Page 2
..., PROVINCES AND JURISDICTIONS DO NOT ALLOW LIMITATIONS ON HOW LONG AN IMPLIED WARRANTY LASTS, SO THE ABOVE LIMITATION MAY NOT APPLY TO YOU. INSIGNIA is or with all faults • Consumables, such as lightning strikes • Accident • Misuse • Abuse • Negligence ... part of Best Buy Enterprise Services, Inc. Registered in ). This warranty does not cover: • Customer instruction • Installation • Set up adjustments • Cosmetic damage • Damage due to service the Product • Products sold as is a trademark of the Product, including...
..., PROVINCES AND JURISDICTIONS DO NOT ALLOW LIMITATIONS ON HOW LONG AN IMPLIED WARRANTY LASTS, SO THE ABOVE LIMITATION MAY NOT APPLY TO YOU. INSIGNIA is or with all faults • Consumables, such as lightning strikes • Accident • Misuse • Abuse • Negligence ... part of Best Buy Enterprise Services, Inc. Registered in ). This warranty does not cover: • Customer instruction • Installation • Set up adjustments • Cosmetic damage • Damage due to service the Product • Products sold as is a trademark of the Product, including...
User Manual (English)
Page 4
... DTV closed captioning styles 31 Adjusting time settings 32 Setting the clock 32 Setting the sleep timer 33 Adjusting menu settings 33 Selecting the menu language 33 Changing the menu transparency 34 Labeling an input source 34 Adjusting the INSIGNIA logo brightness 35 Turning Auto Input Sensing ...on or off 36 Resetting settings to the defaults 36 Manufacturers' codes 37 Maintaining 49 Cleaning the TV cabinet 49 Cleaning...
... DTV closed captioning styles 31 Adjusting time settings 32 Setting the clock 32 Setting the sleep timer 33 Adjusting menu settings 33 Selecting the menu language 33 Changing the menu transparency 34 Labeling an input source 34 Adjusting the INSIGNIA logo brightness 35 Turning Auto Input Sensing ...on or off 36 Resetting settings to the defaults 36 Manufacturers' codes 37 Maintaining 49 Cleaning the TV cabinet 49 Cleaning...

User Manual (English)
Page 8
... bass sounds that automatically finds the richest sound settings-including enhanced bass-for instructions on how to adjust the audio settings to get the maximum experience. Audyssey Dynamic EQ is featured on your Insignia Advanced Series television can automatically find these opportunities to... adjust the volume: wishing that the commercials wouldn't blare and that you could better hear whispering during a movie scene? More game settings instructions are on page 21.)...
... bass sounds that automatically finds the richest sound settings-including enhanced bass-for instructions on how to adjust the audio settings to get the maximum experience. Audyssey Dynamic EQ is featured on your Insignia Advanced Series television can automatically find these opportunities to... adjust the volume: wishing that the commercials wouldn't blare and that you could better hear whispering during a movie scene? More game settings instructions are on page 21.)...
User Manual (English)
Page 9
...audio amplifier" on -screen menu. For more information, see "Connecting a computer" on page 17. 4 HDMI 1/HDMI 2 Connect HDMI devices to decrease a setting. For more information, see "Connecting a VCR" on page 13. 3 SPDIF Connect an audio amplifier to this jack. For more information, see "Connecting a... device" on page 15. 8 AV IN 1 VIDEO Connect the video for a component video device to this button again to increase a setting. For more information, see "Connecting an S-Video device" on page 15. 10 COMPONENT 2 L/R Connect the audio for a standard AV device to these...
...audio amplifier" on -screen menu. For more information, see "Connecting a computer" on page 17. 4 HDMI 1/HDMI 2 Connect HDMI devices to decrease a setting. For more information, see "Connecting a VCR" on page 13. 3 SPDIF Connect an audio amplifier to this jack. For more information, see "Connecting a... device" on page 15. 8 AV IN 1 VIDEO Connect the video for a component video device to this button again to increase a setting. For more information, see "Connecting an S-Video device" on page 15. 10 COMPONENT 2 L/R Connect the audio for a standard AV device to these...
User Manual (English)
Page 10
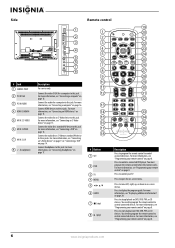
... 25 7 26 8 27 9 28 10 29 11 30 12 31 32 13 14 33 15 34 16 GAME 35 DYN VOL 17 36 18 NS-RC02U-10A 37 # Button 1 SET 2 DVD 3 TV 4 MENU 5 6 GUIDE 7 (stop playback on page 16. Press to this jack. Connect the audio for a standard AV device to control connected...
... 25 7 26 8 27 9 28 10 29 11 30 12 31 32 13 14 33 15 34 16 GAME 35 DYN VOL 17 36 18 NS-RC02U-10A 37 # Button 1 SET 2 DVD 3 TV 4 MENU 5 6 GUIDE 7 (stop playback on page 16. Press to this jack. Connect the audio for a standard AV device to control connected...

User Manual (English)
Page 11
... forward) control to control connected devices. For more information, see "Adjusting the TV picture" on page 18. For more information, see "Adjusting Advanced Video settings" on page 20. In DVD, DVR, PVR, or CD mode, press to control a connected device. In DVD, DVR, PVR, or CD mode,...press to skip back to enter a digital sub-channel number. When your remote control" on page 8. # Button Description 27 PVR/LIST Press to set -top box. For more information, see "Programming your remote control" on DVD, DVR, PVR, or CD devices. In digital TV mode, press...
... forward) control to control connected devices. For more information, see "Adjusting the TV picture" on page 18. For more information, see "Adjusting Advanced Video settings" on page 20. In DVD, DVR, PVR, or CD mode, press to control a connected device. In DVD, DVR, PVR, or CD mode,...press to skip back to enter a digital sub-channel number. When your remote control" on page 8. # Button Description 27 PVR/LIST Press to set -top box. For more information, see "Programming your remote control" on DVD, DVR, PVR, or CD devices. In digital TV mode, press...

User Manual (English)
Page 12
... registers, or fire. • Battery chemicals can put the remote control in when you want to program (TV, DVD, STB, or AUX). 3 Press and hold SET until you find a code that you use the correct tape for the devices you are not using it does not, repeat Steps 3 through 5, trying each...
... registers, or fire. • Battery chemicals can put the remote control in when you want to program (TV, DVD, STB, or AUX). 3 Press and hold SET until you find a code that you use the correct tape for the devices you are not using it does not, repeat Steps 3 through 5, trying each...
User Manual (English)
Page 13
... and 5 for the fifth digit. 6 To check for other device codes, repeat Steps 1 to 8. Programming a learned key To program a learned key: 1 Place your Insignia remote control head-to-head (about 2" apart) from its library to the selected device, starting with the device). Also, locate the key (on your original... learning, avoid high levels of this ) so you would like to learn functions on. 2 Press and hold SET until the device turns off. Press the mode key you want the Insignia remote control to check. Note If the LED does not blink, the code digit is approximately 42 to 75...
... and 5 for the fifth digit. 6 To check for other device codes, repeat Steps 1 to 8. Programming a learned key To program a learned key: 1 Place your Insignia remote control head-to-head (about 2" apart) from its library to the selected device, starting with the device). Also, locate the key (on your original... learning, avoid high levels of this ) so you would like to learn functions on. 2 Press and hold SET until the device turns off. Press the mode key you want the Insignia remote control to check. Note If the LED does not blink, the code digit is approximately 42 to 75...

User Manual (English)
Page 14
... blinks twice, then release. 3 Enter 9 9 3. Deleting all learned keys in all volume control (restoring global unlock): 1 Press and hold SET until the Insignia's LED blinks twice. In either case, the remote cannot learn a new key. To unlock all other modes. Volume is independently controlled for all... still not captured, press and hold SET until a successful capture occurs. The LED blinks twice. In either case, the remote cannot learn a new key. If the LED displays one long flash instead, either your batteries are low, or the Insignia remote control has a memory fault. ...
... blinks twice, then release. 3 Enter 9 9 3. Deleting all learned keys in all volume control (restoring global unlock): 1 Press and hold SET until the Insignia's LED blinks twice. In either case, the remote cannot learn a new key. To unlock all other modes. Volume is independently controlled for all... still not captured, press and hold SET until a successful capture occurs. The LED blinks twice. In either case, the remote cannot learn a new key. If the LED displays one long flash instead, either your batteries are low, or the Insignia remote control has a memory fault. ...

User Manual (English)
Page 15
... you want to assign to a macro. 4 Enter the series of the Device Keys, (power), RECORD, or SET as a source or destination key. Programming macros Your Insignia universal remote control includes the ability to move. 5 Press the new key that you use any key (other functions... 9 7 3.The mode LED blinks twice. 4 Press CH once. To unlock channel locks: 1 Press and hold SET until the LED blinks twice, then release. 2 Press 9 9 4. Using keymover Your Insignia universal remote control includes a keymover feature that should perform the function. The LED blinks twice. 6 Repeat Steps 1-5 ...
... you want to assign to a macro. 4 Enter the series of the Device Keys, (power), RECORD, or SET as a source or destination key. Programming macros Your Insignia universal remote control includes the ability to move. 5 Press the new key that you use any key (other functions... 9 7 3.The mode LED blinks twice. 4 Press CH once. To unlock channel locks: 1 Press and hold SET until the LED blinks twice, then release. 2 Press 9 9 4. Using keymover Your Insignia universal remote control includes a keymover feature that should perform the function. The LED blinks twice. 6 Repeat Steps 1-5 ...
User Manual (English)
Page 16
...5. You may need to "teach" the commands one at 1-877-467-4289. See your universal remote control's instructions for details. 3 If all Insignia TVs manufactured after Jan. 1, 2007) Universal remote control manufacturers and models Philips PHDVD5, PH5DSS, PMDVR8, PDVR8 RCA RCU807 One for All URC-6690 Sony... RM-VL600 115 135 0464 8043 Comcast M1057 0463 Set-top box manufacturers and models Dish Network Motorola VIP508, VIP622 DRC800 TIVO Series 3, HD 720 0463 0091 DirectTV RC23 10463 Codes for ...
...5. You may need to "teach" the commands one at 1-877-467-4289. See your universal remote control's instructions for details. 3 If all Insignia TVs manufactured after Jan. 1, 2007) Universal remote control manufacturers and models Philips PHDVD5, PH5DSS, PMDVR8, PDVR8 RCA RCU807 One for All URC-6690 Sony... RM-VL600 115 135 0464 8043 Comcast M1057 0463 Set-top box manufacturers and models Dish Network Motorola VIP508, VIP622 DRC800 TIVO Series 3, HD 720 0463 0091 DirectTV RC23 10463 Codes for ...

User Manual (English)
Page 17
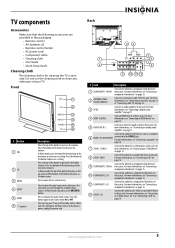
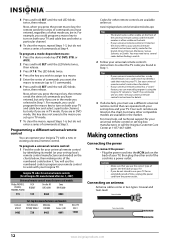
...channels. For more information about connecting a converter/descrambler box, see "With converter/descrambler box" on page 13 and contact your cable TV provider. Set the RF switch to the B position to watch scrambled channels using your TV remote control. Tips If you plan on receiving over-the-air ... No converter/descrambler box To connect cable TV without a converter/descrambler box: 1 Connect one end of a coaxial cable to the antenna jack. Set the RF switch to the A position to tune to your TV. Back of TV Cable box IANNTEONNUAT HDMI Video or S-Video Component 2 Connect ...
...channels. For more information about connecting a converter/descrambler box, see "With converter/descrambler box" on page 13 and contact your cable TV provider. Set the RF switch to the B position to watch scrambled channels using your TV remote control. Tips If you plan on receiving over-the-air ... No converter/descrambler box To connect cable TV without a converter/descrambler box: 1 Connect one end of a coaxial cable to the antenna jack. Set the RF switch to the A position to tune to your TV. Back of TV Cable box IANNTEONNUAT HDMI Video or S-Video Component 2 Connect ...

User Manual (English)
Page 18
... AV IN 2 VIDEO and AV IN 2 L and R audio jacks on the side of your TV and on the satellite box. If the picture mode is set -top box), connect a cable from the outgoing jacks on the satellite box to the corresponding jacks on the back of your TV. To assign the... cable from the satellite wall jack to the satellite-in jack on the satellite box. 2 Depending on the jacks available on the satellite TV receiver (set to the HDMI, component video, S-Video, or AV jack. Back of TV VCR 2 Connect the other end of TV 4 Press INPUT to open the Source...
... AV IN 2 VIDEO and AV IN 2 L and R audio jacks on the side of your TV and on the satellite box. If the picture mode is set -top box), connect a cable from the outgoing jacks on the satellite box to the corresponding jacks on the back of your TV. To assign the... cable from the satellite wall jack to the satellite-in jack on the satellite box. 2 Depending on the jacks available on the satellite TV receiver (set to the HDMI, component video, S-Video, or AV jack. Back of TV VCR 2 Connect the other end of TV 4 Press INPUT to open the Source...

User Manual (English)
Page 22
... Antenna Cable Cable/Satellite box 0 Analog Channels 0 Digital Channels Scan for details). • Connected an antenna, cable TV, or satellite TV. (See pages 12 through setting up your TV. Note You can select: • TV • AV 1 • AV 2 • Component 1 • Component 2 • VGA • HDMI 1 &#...14 for details.) • Connected the power cord. (See page 12 for 15 minutes, your TV. When the scan is not set up basic settings including the menu language, TV signal source, and the channel list. The Setup Wizard guides you do not press any button for details.)...
... Antenna Cable Cable/Satellite box 0 Analog Channels 0 Digital Channels Scan for details). • Connected an antenna, cable TV, or satellite TV. (See pages 12 through setting up your TV. Note You can select: • TV • AV 1 • AV 2 • Component 1 • Component 2 • VGA • HDMI 1 &#...14 for details.) • Connected the power cord. (See page 12 for 15 minutes, your TV. When the scan is not set up basic settings including the menu language, TV signal source, and the channel list. The Setup Wizard guides you do not press any button for details.)...

User Manual (English)
Page 23
... source list opens. To select the video input source using the input buttons on , press INPUT. Note If Auto Input Sensing is set to On, only the inputs that have connected devices are grayed and cannot be selected. On-screen menu overview Picture menu Picture Mode ...Brightness Contrast Color Tint Sharpness PICTURE AUDIO CHANNELS SETTINGS Vivid 42 45 54 0 +5 MOVE OK ENTER SELECT Adjust settings to affect picture quality MENU PREVIOUS EXIT EXIT Audio menu Audio Audyssey Dynamic Volume SRS TruSurround HD Treble ...
... source list opens. To select the video input source using the input buttons on , press INPUT. Note If Auto Input Sensing is set to On, only the inputs that have connected devices are grayed and cannot be selected. On-screen menu overview Picture menu Picture Mode ...Brightness Contrast Color Tint Sharpness PICTURE AUDIO CHANNELS SETTINGS Vivid 42 45 54 0 +5 MOVE OK ENTER SELECT Adjust settings to affect picture quality MENU PREVIOUS EXIT EXIT Audio menu Audio Audyssey Dynamic Volume SRS TruSurround HD Treble ...

User Manual (English)
Page 25
...HDMI jack, only Wide and Normal are based on or off automatically. Picture Brightness Contrast Color Tint Sharpness Advanced Video PICTURE AUDIO CHANNELS SETTINGS 50 50 64 0 0 MOVE OK ENTER SELECT MENU PREVIOUS Adjust advanced video features to fine tune the picture EXIT EXIT Picture ...Select the Overscan on using the remote control. Note • You may need to choose your preferred picture size. Adjusting Advanced Video settings To adjust advanced video settings: 1 On the Picture menu, press or to access the sub-menu. You can select: • Mode-Selects the picture mode....
...HDMI jack, only Wide and Normal are based on or off automatically. Picture Brightness Contrast Color Tint Sharpness Advanced Video PICTURE AUDIO CHANNELS SETTINGS 50 50 64 0 0 MOVE OK ENTER SELECT MENU PREVIOUS Adjust advanced video features to fine tune the picture EXIT EXIT Picture ...Select the Overscan on using the remote control. Note • You may need to choose your preferred picture size. Adjusting Advanced Video settings To adjust advanced video settings: 1 On the Picture menu, press or to access the sub-menu. You can select: • Mode-Selects the picture mode....

User Manual (English)
Page 26
...select On or Off. Picture Advanced Video Color Temperature Noise Reduction DCM Advanced Contrast Backlight Advanced Light Control PICTURE AUDIO CHANNELS SETTINGS Cool Middle Low On 30 MOVE OK ENTER SELECT Automatically adjust picture detail and brightness MENU PREVIOUS EXIT EXIT Picture Advanced ...Video Overscan Color Temperature DCR On Light Sensor On Backlight Advanced Light Control PICTURE AUDIO CHANNELS SETTINGS On Cool Off Off On With Display 21 MOVE OK ENTER SELECT MENU PREVIOUS Enhance contrast ratio between light and dark...
...select On or Off. Picture Advanced Video Color Temperature Noise Reduction DCM Advanced Contrast Backlight Advanced Light Control PICTURE AUDIO CHANNELS SETTINGS Cool Middle Low On 30 MOVE OK ENTER SELECT Automatically adjust picture detail and brightness MENU PREVIOUS EXIT EXIT Picture Advanced ...Video Overscan Color Temperature DCR On Light Sensor On Backlight Advanced Light Control PICTURE AUDIO CHANNELS SETTINGS On Cool Off Off On With Display 21 MOVE OK ENTER SELECT MENU PREVIOUS Enhance contrast ratio between light and dark...

User Manual (English)
Page 27
...stereo sound for sporting events and concerts. • SAP-Selects a second language, weather, or added commentary, if available. • Reset Audio Settings- You can select RAW or PCM. • Audio Language-Selects the audio language based on the languages supported by a DTV channel. • .... www.insigniaproducts.com 23 Channels Auto Channel Search Add/Skip Channels Favorites Channel Labels Channel Strength Audio Only PICTURE AUDIO CHANNELS SETTINGS Off MOVE OK ENTER SELECT Adjust channel options MENU PREVIOUS EXIT EXIT 3 Press to highlight Audio Only, then press OK/ENTER...
...stereo sound for sporting events and concerts. • SAP-Selects a second language, weather, or added commentary, if available. • Reset Audio Settings- You can select RAW or PCM. • Audio Language-Selects the audio language based on the languages supported by a DTV channel. • .... www.insigniaproducts.com 23 Channels Auto Channel Search Add/Skip Channels Favorites Channel Labels Channel Strength Audio Only PICTURE AUDIO CHANNELS SETTINGS Off MOVE OK ENTER SELECT Adjust channel options MENU PREVIOUS EXIT EXIT 3 Press to highlight Audio Only, then press OK/ENTER...

User Manual (English)
Page 28
...channels: 1 Press MENU. Channels Auto Channel Search Add/Skip Channels Favorites Channel Labels Channel Strength Audio Only PICTURE AUDIO CHANNELS SETTINGS Off MOVE OK ENTER SELECT Adjust channel options MENU PREVIOUS EXIT EXIT Channels Auto Channel Search Add/Skip Channels Favorites Channel Labels... Channel Strength Audio Only PICTURE AUDIO CHANNELS SETTINGS Off MOVE OK ENTER SELECT Adjust channel options MENU PREVIOUS EXIT EXIT 3 Press to highlight Auto Channel Search, then press...
...channels: 1 Press MENU. Channels Auto Channel Search Add/Skip Channels Favorites Channel Labels Channel Strength Audio Only PICTURE AUDIO CHANNELS SETTINGS Off MOVE OK ENTER SELECT Adjust channel options MENU PREVIOUS EXIT EXIT Channels Auto Channel Search Add/Skip Channels Favorites Channel Labels... Channel Strength Audio Only PICTURE AUDIO CHANNELS SETTINGS Off MOVE OK ENTER SELECT Adjust channel options MENU PREVIOUS EXIT EXIT 3 Press to highlight Auto Channel Search, then press...


