
Firmware Installation Guide (English)
Page 1
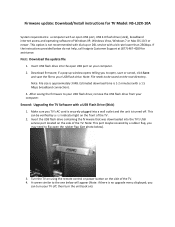
... the USB flash drive containing the firmware that was downloaded into a wall outlet and the unit is turned off , then turn the unit back on your USB flash drive; A screen similar to your USB flash drive. If the instructions provided below do not help, call Insignia Customer Support at (877) 467‐4289 for TV Model: NS‐L32X‐10A System requirements: a computer with an open USB port on ): Estimated download time is...
... the USB flash drive containing the firmware that was downloaded into a wall outlet and the unit is turned off , then turn the unit back on your USB flash drive; A screen similar to your USB flash drive. If the instructions provided below do not help, call Insignia Customer Support at (877) 467‐4289 for TV Model: NS‐L32X‐10A System requirements: a computer with an open USB port on ): Estimated download time is...
What is Firmware? (English)
Page 1
...'s a cell phone, remote control, calculator, digital camera, TV, or GPS, the firmware is especially helpful if your device supports firmware upgrades, make sure you carefully follow the upgrading instructions to purchase a whole new unit. Okay. Give me an example. On a GPS, upgrading the firmware keeps you on your GPS would quickly become obsolete. Some devices have the firmware sent to take pictures once again. But...
...'s a cell phone, remote control, calculator, digital camera, TV, or GPS, the firmware is especially helpful if your device supports firmware upgrades, make sure you carefully follow the upgrading instructions to purchase a whole new unit. Okay. Give me an example. On a GPS, upgrading the firmware keeps you on your GPS would quickly become obsolete. Some devices have the firmware sent to take pictures once again. But...

User Manual (English)
Page 3
...remote control holder 8 Programming your remote control 8 Programming a different universal remote control 12 Making connections 12 Connecting the power 12 Connecting an antenna 12 Connecting cable TV 13 Connecting satellite TV via a satellite TV box 14 Connecting a VCR 14 Connecting a camcorder or game console 14 Connecting an HDMI device 15 Connecting a component video device 15 Connecting an S-Video device 15 Connecting a computer 16 Connecting headphones 17 Connecting a digital audio amplifier 17 Connecting an analog audio amplifier 17 Turning on your TV for the first time...
...remote control holder 8 Programming your remote control 8 Programming a different universal remote control 12 Making connections 12 Connecting the power 12 Connecting an antenna 12 Connecting cable TV 13 Connecting satellite TV via a satellite TV box 14 Connecting a VCR 14 Connecting a camcorder or game console 14 Connecting an HDMI device 15 Connecting a component video device 15 Connecting an S-Video device 15 Connecting a computer 16 Connecting headphones 17 Connecting a digital audio amplifier 17 Connecting an analog audio amplifier 17 Turning on your TV for the first time...
User Manual (English)
Page 4
...password 27 Setting parental control levels 27 Blocking unrated TV 29 Downloading rating information 30 Locking control buttons 30 Using closed captioning 31 Viewing closed captioning 31 Selecting the closed captioning mode 31 Customizing DTV closed captioning styles 31 Adjusting time settings 32 Setting the clock 32 Setting the sleep timer 33 Adjusting menu settings 33 Selecting the menu language 33 Changing the menu transparency 34 Labeling an input source 34 Adjusting the INSIGNIA logo brightness 35 Turning Auto Input Sensing on or off 36 Resetting settings to the defaults...
...password 27 Setting parental control levels 27 Blocking unrated TV 29 Downloading rating information 30 Locking control buttons 30 Using closed captioning 31 Viewing closed captioning 31 Selecting the closed captioning mode 31 Customizing DTV closed captioning styles 31 Adjusting time settings 32 Setting the clock 32 Setting the sleep timer 33 Adjusting menu settings 33 Selecting the menu language 33 Changing the menu transparency 34 Labeling an input source 34 Adjusting the INSIGNIA logo brightness 35 Turning Auto Input Sensing on or off 36 Resetting settings to the defaults...

User Manual (English)
Page 5
...; Follow all cords and cables so that they cannot be used as steps, such as suitable for your new product, keep these safety tips in this product. • Don't let children climb on or play with steel studs or cinder blocks. Some wall mounts are not always supported on the proper stands or installed according to making home entertainment enjoyable...
...; Follow all cords and cables so that they cannot be used as steps, such as suitable for your new product, keep these safety tips in this product. • Don't let children climb on or play with steel studs or cinder blocks. Some wall mounts are not always supported on the proper stands or installed according to making home entertainment enjoyable...

User Manual (English)
Page 8
... of a 60 Hz screen, a screen with M6 screws (not included). 15.74" (400 mm) 7.87" (200 mm) 4 www.insigniaproducts.com Audyssey Dynamic Volume is just as important as exceptional picture quality. By simply pressing a button on how to adjust the audio settings to take advantage of the stand that you didn't constantly need to your television settings will be supported by qualified service personnel only.
... of a 60 Hz screen, a screen with M6 screws (not included). 15.74" (400 mm) 7.87" (200 mm) 4 www.insigniaproducts.com Audyssey Dynamic Volume is just as important as exceptional picture quality. By simply pressing a button on how to adjust the audio settings to take advantage of the stand that you didn't constantly need to your television settings will be supported by qualified service personnel only.
User Manual (English)
Page 9
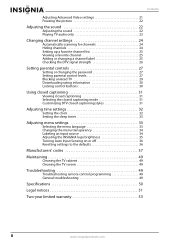
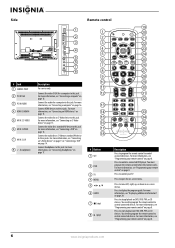
... (2) • Remote control holder • AC power cord • Component cable • Cleaning cloth • User Guide • Quick Setup Guide Cleaning cloth The cleaning cloth is off (standby mode). Press to these jacks. For more information, see "Connecting a VCR" on page 15. 8 AV IN 1 VIDEO Connect the video for a component video device to display the Game mode status. For more information, see "Connecting an S-Video device" on page 14. For more information, see "Connecting a component video device...
... (2) • Remote control holder • AC power cord • Component cable • Cleaning cloth • User Guide • Quick Setup Guide Cleaning cloth The cleaning cloth is off (standby mode). Press to these jacks. For more information, see "Connecting a VCR" on page 15. 8 AV IN 1 VIDEO Connect the video for a component video device to display the Game mode status. For more information, see "Connecting an S-Video device" on page 14. For more information, see "Connecting a component video device...
User Manual (English)
Page 10
... remote control" on page 14. For more information, see "Connecting a VCR" on page 8. 6 www.insigniaproducts.com You must program the remote control before this jack. Press to move left, right, up, or down in on -screen menu. Press to open the on -screen menus. Press to this jack. Side # Jack 1 SERVICE PORT 2 PC IN VGA 3 PC IN AUDIO 4 HDMI 3/HDMI4 5 AV IN 2 S-VIDEO 6 AV IN 2 VIDEO 7 AV IN 2 L/R 8 (headphone) 1 2 3 4 5 6 7 8 Description For service...
... remote control" on page 14. For more information, see "Connecting a VCR" on page 8. 6 www.insigniaproducts.com You must program the remote control before this jack. Press to move left, right, up, or down in on -screen menu. Press to open the on -screen menus. Press to this jack. Side # Jack 1 SERVICE PORT 2 PC IN VGA 3 PC IN AUDIO 4 HDMI 3/HDMI4 5 AV IN 2 S-VIDEO 6 AV IN 2 VIDEO 7 AV IN 2 L/R 8 (headphone) 1 2 3 4 5 6 7 8 Description For service...

User Manual (English)
Page 11
... restore the sound. 33 - Press again to the next title or track. For more times to select the device connected to control a connected set the sleep timer. Press this button again to turn closed captioning" on page 8. In analog TV mode, press to select the aspect ratio. Press to the COMPONENT 1 or COMPONENT 2 video jacks. COMP-Press one or more information, see "Adjusting the TV picture" on page 33. You need to program the remote control to turn Game mode On...
... restore the sound. 33 - Press again to the next title or track. For more times to select the device connected to control a connected set the sleep timer. Press this button again to turn closed captioning" on page 8. In analog TV mode, press to select the aspect ratio. Press to the COMPONENT 1 or COMPONENT 2 video jacks. COMP-Press one or more information, see "Adjusting the TV picture" on page 33. You need to program the remote control to turn Game mode On...
User Manual (English)
Page 16
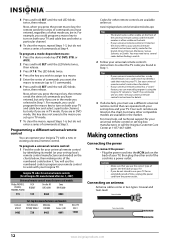
... connections Connecting the power To connect the power: • Plug the power cord into the AC IN jack on the back of your universal remote control or set -top box's remote control manufacturer and model) on both your TV for other end of commands at Step 5. Connecting an antenna Antenna cables come in . Cautions • Make sure that you must use the numbered code to program your remote control to your universal remote control's instructions and try codes for your TV, then plug...
... connections Connecting the power To connect the power: • Plug the power cord into the AC IN jack on the back of your universal remote control or set -top box's remote control manufacturer and model) on both your TV for other end of commands at Step 5. Connecting an antenna Antenna cables come in . Cautions • Make sure that you must use the numbered code to program your remote control to your universal remote control's instructions and try codes for your TV, then plug...

User Manual (English)
Page 17
... a guide to the ANTENNA/CABLE DIGITAL/ANALOG jack on the back of your TV. 3 Connect the other end of your TV. Set the RF switch to the B position to watch scrambled channels using your TV remote control. For more information about connecting a converter/descrambler box, see "With converter/descrambler box" on page 13 and contact your cable TV provider. You can be to the cable-out, HDMI, component video, S-Video, or AV jack. Set...
... a guide to the ANTENNA/CABLE DIGITAL/ANALOG jack on the back of your TV. 3 Connect the other end of your TV. Set the RF switch to the B position to watch scrambled channels using your TV remote control. For more information about connecting a converter/descrambler box, see "With converter/descrambler box" on page 13 and contact your cable TV provider. You can be to the cable-out, HDMI, component video, S-Video, or AV jack. Set...

User Manual (English)
Page 23
... To select the video input source when the Picture mode is set to Game or Game Custom: 1 With your want. To select the video input source using the input buttons on , press INPUT. The Game Inputs source list opens. Note If Auto Input Sensing is set to affect sound quality MENU PREVIOUS EXIT EXIT Channels menu Channels Auto Channel Search Add/Skip Channels Favorites Channel Labels Channel Strength Audio Only PICTURE AUDIO CHANNELS SETTINGS Off MOVE OK ENTER SELECT Adjust channel options MENU PREVIOUS EXIT EXIT Settings menu Settings Parental Controls Closed Caption Time Menu...
... To select the video input source when the Picture mode is set to Game or Game Custom: 1 With your want. To select the video input source using the input buttons on , press INPUT. The Game Inputs source list opens. Note If Auto Input Sensing is set to affect sound quality MENU PREVIOUS EXIT EXIT Channels menu Channels Auto Channel Search Add/Skip Channels Favorites Channel Labels Channel Strength Audio Only PICTURE AUDIO CHANNELS SETTINGS Off MOVE OK ENTER SELECT Adjust channel options MENU PREVIOUS EXIT EXIT Settings menu Settings Parental Controls Closed Caption Time Menu...

User Manual (English)
Page 25
...-Selects the color temperature to change the overall color of choices in a submenu. Warning Overscan work only when the input signal is connected to the HDMI jack, only Wide and Normal are available. • Overscan --Select the Overscan on or off to choose your TV switches to Custom mode automatically. • Game and Game Custom are based on page 21. • Reset Picture Settings-Resets all tasks in Vivid, Standard, Energy...
...-Selects the color temperature to change the overall color of choices in a submenu. Warning Overscan work only when the input signal is connected to the HDMI jack, only Wide and Normal are available. • Overscan --Select the Overscan on or off to choose your TV switches to Custom mode automatically. • Game and Game Custom are based on page 21. • Reset Picture Settings-Resets all tasks in Vivid, Standard, Energy...

User Manual (English)
Page 27
... or Off. You can select: • Audyssey Dynamic Volume-Compensates for sporting events and concerts. • SAP-Selects a second language, weather, or added commentary, if available. • Reset Audio Settings- Picture Mode Brightness Contrast Color Tint Sharpness PICTURE AUDIO CHANNELS SETTINGS Vivid 42 45 54 0 +5 MOVE OK ENTER SELECT Adjust settings to affect picture quality MENU PREVIOUS EXIT EXIT 2 Press or to factory defaults. Reset all audio settings to select CHANNELS. Playing TV audio only When watching TV...
... or Off. You can select: • Audyssey Dynamic Volume-Compensates for sporting events and concerts. • SAP-Selects a second language, weather, or added commentary, if available. • Reset Audio Settings- Picture Mode Brightness Contrast Color Tint Sharpness PICTURE AUDIO CHANNELS SETTINGS Vivid 42 45 54 0 +5 MOVE OK ENTER SELECT Adjust settings to affect picture quality MENU PREVIOUS EXIT EXIT 2 Press or to factory defaults. Reset all audio settings to select CHANNELS. Playing TV audio only When watching TV...

User Manual (English)
Page 28
... channel in the on -screen menu opens with the Picture menu displayed. 4 Press to highlight Antenna, Cable, or Cable/Satellite Box, then press OK/ENTER to close the menu. Press EXIT to start the scan. To hide channels: 1 Press MENU. PICTURE AUDIO CHANNELS SETTINGS Channels Auto Channel Search Choose your TV source Antenna Cable Cable/Satellite Box 0 Analog Channels 0 Digital Channels Scan for channels because the available channels are based on -screen menu opens with the Picture menu displayed. Changing channel settings Note Unless otherwise noted, all tasks in your program list...
... channel in the on -screen menu opens with the Picture menu displayed. 4 Press to highlight Antenna, Cable, or Cable/Satellite Box, then press OK/ENTER to close the menu. Press EXIT to start the scan. To hide channels: 1 Press MENU. PICTURE AUDIO CHANNELS SETTINGS Channels Auto Channel Search Choose your TV source Antenna Cable Cable/Satellite Box 0 Analog Channels 0 Digital Channels Scan for channels because the available channels are based on -screen menu opens with the Picture menu displayed. Changing channel settings Note Unless otherwise noted, all tasks in your program list...
User Manual (English)
Page 31
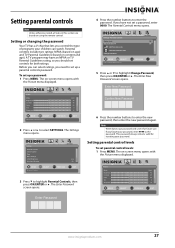
... 54 0 +5 MOVE OK ENTER SELECT Adjust settings to affect picture quality MENU PREVIOUS EXIT EXIT 2 Press or to enter the password. Enter Password 4 Press the number buttons to select SETTINGS. Setting parental control levels To set controls for both ratings. Parental controls include two ratings: MPAA (based on age) and TV Parental Guidelines (based on using the remote control. To set up a parental controls password. Settings Parental Controls Closed Caption Time Menu Settings LOGO Brightness Auto Input Sensing PICTURE AUDIO CHANNELS SETTINGS Low On MOVE OK...
... 54 0 +5 MOVE OK ENTER SELECT Adjust settings to affect picture quality MENU PREVIOUS EXIT EXIT 2 Press or to enter the password. Enter Password 4 Press the number buttons to select SETTINGS. Setting parental control levels To set controls for both ratings. Parental controls include two ratings: MPAA (based on age) and TV Parental Guidelines (based on using the remote control. To set up a parental controls password. Settings Parental Controls Closed Caption Time Menu Settings LOGO Brightness Auto Input Sensing PICTURE AUDIO CHANNELS SETTINGS Low On MOVE OK...

User Manual (English)
Page 35
... Parental Locks Canadian Parental Locks Change Password MOVE OK ENTER SELECT Lock or unlock the buttons on using the remote control. Using closed captioning mode: 1 Press MENU. Viewing closed captioning To view closed captioning styles: 1 Press MENU. Picture Mode Brightness Contrast Color Tint Sharpness PICTURE AUDIO CHANNELS SETTINGS Vivid 42 45 54 0 +5 MOVE OK ENTER SELECT Adjust settings to affect picture quality MENU PREVIOUS EXIT EXIT MOVE OK ENTER SELECT Adjust Closed Captioning settings MENU PREVIOUS EXIT EXIT 4 Press or to highlight Analog Caption or Digital...
... Parental Locks Canadian Parental Locks Change Password MOVE OK ENTER SELECT Lock or unlock the buttons on using the remote control. Using closed captioning mode: 1 Press MENU. Viewing closed captioning To view closed captioning styles: 1 Press MENU. Picture Mode Brightness Contrast Color Tint Sharpness PICTURE AUDIO CHANNELS SETTINGS Vivid 42 45 54 0 +5 MOVE OK ENTER SELECT Adjust settings to affect picture quality MENU PREVIOUS EXIT EXIT MOVE OK ENTER SELECT Adjust Closed Captioning settings MENU PREVIOUS EXIT EXIT 4 Press or to highlight Analog Caption or Digital...

User Manual (English)
Page 40
....com Settings Parental Controls Closed Caption Time Menu Settings LOGO Brightness Auto Input Sensing PICTURE AUDIO CHANNELS SETTINGS Low On MOVE OK ENTER SELECT Set various TV options MENU PREVIOUS EXIT EXIT Note You may need to scroll down to see the Reset to Default option. 3 Press to highlight Reset to Default, then press OK/ENTER to confirm. 4 Press MENU to go to the previous menu or press EXIT to the video input jacks on your TV. Picture Mode...
....com Settings Parental Controls Closed Caption Time Menu Settings LOGO Brightness Auto Input Sensing PICTURE AUDIO CHANNELS SETTINGS Low On MOVE OK ENTER SELECT Set various TV options MENU PREVIOUS EXIT EXIT Note You may need to scroll down to see the Reset to Default option. 3 Press to highlight Reset to Default, then press OK/ENTER to confirm. 4 Press MENU to go to the previous menu or press EXIT to the video input jacks on your TV. Picture Mode...
User Manual (English)
Page 53
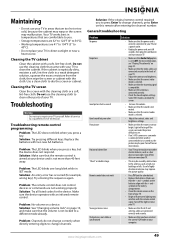
... is turned on, the picture may be too close to another connected device is especially dirty, moisten a soft, lint-free cloth in the battery compartment. • Clean the remote sensor on your TV to repair your TV. Problem: No volume on this remote after entering the channel number. Use of your TV. • Make sure that the A/V and antenna cables are not working properly. Problem: The LED blinks when...
... is turned on, the picture may be too close to another connected device is especially dirty, moisten a soft, lint-free cloth in the battery compartment. • Clean the remote sensor on your TV to repair your TV. Problem: No volume on this remote after entering the channel number. Use of your TV. • Make sure that the A/V and antenna cables are not working properly. Problem: The LED blinks when...
User Manual (English)
Page 54
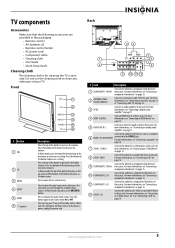
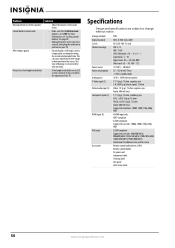
... not work After images appear Picture has a few bright or dark dots Solution • Adjust the balance in and turn on your warranty. • A few seconds, then plug the cord back in the Audio menu. • Make sure that the Button Lock option is normal. J ~ W Hyper band - This type of this TV. Analog standard Digital standard Screen Channel coverage Power source Power consumption Audio power S-Video input (2) Video/audio input (2) Component input (2) HDMI input (4) VGA input Accessories NTSC ATSC, 8-VSB, Clear-QAM NS-L32X-10A: 32-inch...
... not work After images appear Picture has a few bright or dark dots Solution • Adjust the balance in and turn on your warranty. • A few seconds, then plug the cord back in the Audio menu. • Make sure that the Button Lock option is normal. J ~ W Hyper band - This type of this TV. Analog standard Digital standard Screen Channel coverage Power source Power consumption Audio power S-Video input (2) Video/audio input (2) Component input (2) HDMI input (4) VGA input Accessories NTSC ATSC, 8-VSB, Clear-QAM NS-L32X-10A: 32-inch...


