

User Manual (English)
Page 3
NS-L22X-10A_09-0222_MAN_V1_English.book Page i Thursday, April 2, 2009 12:14 PM Contents CHILD SAFETY 1 Important safety instructions 2 Warnings 2 Cautions 3 Introduction 4 Installing a wall-mount bracket 4 TV components 5 Accessories 5 Cleaning cloth 5 Front 5 Back 5 Side 6 Remote control 6 ... holder 8 Programming a universal remote control to work with your TV . . . . 8 Making connections 9 Connecting the power 9 Connecting an outdoor antenna 9 Connecting cable TV 9 Connecting satellite TV via a satellite TV box 10 Connecting a VCR 10 Connecting a camcorder or game ...
NS-L22X-10A_09-0222_MAN_V1_English.book Page i Thursday, April 2, 2009 12:14 PM Contents CHILD SAFETY 1 Important safety instructions 2 Warnings 2 Cautions 3 Introduction 4 Installing a wall-mount bracket 4 TV components 5 Accessories 5 Cleaning cloth 5 Front 5 Back 5 Side 6 Remote control 6 ... holder 8 Programming a universal remote control to work with your TV . . . . 8 Making connections 9 Connecting the power 9 Connecting an outdoor antenna 9 Connecting cable TV 9 Connecting satellite TV via a satellite TV box 10 Connecting a VCR 10 Connecting a camcorder or game ...
User Manual (English)
Page 4
NS-L22X-10A_09-0222_MAN_V1_English.book Page ii Thursday, April 2, 2009 12:14 PM Contents Freezing the picture 18 Adjusting the sound 19 Adjusting the sound 19 Playing TV audio only 19 Changing channel settings 20 Automatically scanning for channels 20 Hiding channels 21 Setting up a favorite channel list ...29 Adjusting menu settings 30 Selecting the menu language 30 Changing the menu transparency 30 Labeling an input source 31 Adjusting the INSIGNIA logo brightness 31 Turning Auto Input Sensing on or off 32 Resetting settings to the defaults 33 Programming your remote control 33...
NS-L22X-10A_09-0222_MAN_V1_English.book Page ii Thursday, April 2, 2009 12:14 PM Contents Freezing the picture 18 Adjusting the sound 19 Adjusting the sound 19 Playing TV audio only 19 Changing channel settings 20 Automatically scanning for channels 20 Hiding channels 21 Setting up a favorite channel list ...29 Adjusting menu settings 30 Selecting the menu language 30 Changing the menu transparency 30 Labeling an input source 31 Adjusting the INSIGNIA logo brightness 31 Turning Auto Input Sensing on or off 32 Resetting settings to the defaults 33 Programming your remote control 33...
User Manual (English)
Page 5
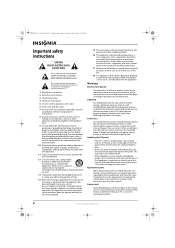
... laboratory as a chest of drawers. • Remember that are inappropriately placed on or play with steel studs or cinder blocks. NS-L22X-10A_09-0222_MAN_V1_English.book Page 1 Thursday, April 2, 2009 12:14 PM f CHILD SAFETY It makes a difference how and where you use of...mount rated for the weight of wall mount does not fit all enclosed instructions for safe wall mount installation. Use only a TV stand rated for the weight of your TV. • Carefully read and understand all . We and the consumer electronics industry are committed to making home entertainment enjoyable ...
... laboratory as a chest of drawers. • Remember that are inappropriately placed on or play with steel studs or cinder blocks. NS-L22X-10A_09-0222_MAN_V1_English.book Page 1 Thursday, April 2, 2009 12:14 PM f CHILD SAFETY It makes a difference how and where you use of...mount rated for the weight of wall mount does not fit all enclosed instructions for safe wall mount installation. Use only a TV stand rated for the weight of your TV. • Carefully read and understand all . We and the consumer electronics industry are committed to making home entertainment enjoyable ...
User Manual (English)
Page 6
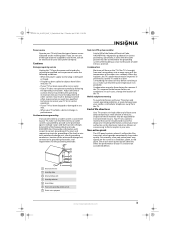
... are provided for your safety. The wide blade or the third prong are important operating and maintenance instructions in the literature accompanying your TV. 1 Read these instructions. 2 Keep these instructions. 3 Heed all warnings. 4 Follow all servicing to qualified service personnel. When ... water. 6 Clean only with dry cloth. 7 Do not block any way, such as radiators, heat registers, stoves, or other hazards. NS-L22X-10A_09-0222_MAN_V1_English.book Page 2 Thursday, April 2, 2009 12:14 PM Important safety instructions CAUTION RISK OF ELECTRIC SHOCK DO NOT OPEN This symbol...
... are provided for your safety. The wide blade or the third prong are important operating and maintenance instructions in the literature accompanying your TV. 1 Read these instructions. 2 Keep these instructions. 3 Heed all warnings. 4 Follow all servicing to qualified service personnel. When ... water. 6 Clean only with dry cloth. 7 Do not block any way, such as radiators, heat registers, stoves, or other hazards. NS-L22X-10A_09-0222_MAN_V1_English.book Page 2 Thursday, April 2, 2009 12:14 PM Important safety instructions CAUTION RISK OF ELECTRIC SHOCK DO NOT OPEN This symbol...
User Manual (English)
Page 7
... End of life directives Your TV contains tin-lead solder and a fluorescent lamp containing a small amount of the TV. Non-active pixels The LCD panel contains almost 3 million thin film transistors, which provide exceptionally sharp video quality. NS-L22X-10A_09-0222_MAN_V1_English.book Page 3 ...Thursday, April 2, 2009 12:14 PM Power source Operate your TV only from the TV. To prevent this TV from the power outlet and refer servicing to qualified service...
... End of life directives Your TV contains tin-lead solder and a fluorescent lamp containing a small amount of the TV. Non-active pixels The LCD panel contains almost 3 million thin film transistors, which provide exceptionally sharp video quality. NS-L22X-10A_09-0222_MAN_V1_English.book Page 3 ...Thursday, April 2, 2009 12:14 PM Power source Operate your TV only from the TV. To prevent this TV from the power outlet and refer servicing to qualified service...
User Manual (English)
Page 8
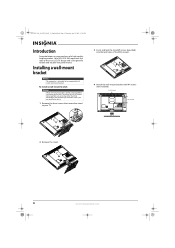
...screws that contained in LCD TV design and is intended to your purchase of the VESA mount. 4 Attach the wall-mount bracket with M4 screws (not included). 3.94" (100 mm) 3.94" (100 mm) 2 Remove the stand. 4 www.insigniaproducts.com Your NS-L22X-10A represents the state of the ... than that secure the stand to be supported by qualified service personnel only. NS-L22X-10A_09-0222_MAN_V1_English.book Page 4 Thursday, April 2, 2009 12:14 PM Introduction Congratulations on your TV. 3 Insert and lock the standoff screws (provided) into the lock holes of a high-quality Insignia product.
...screws that contained in LCD TV design and is intended to your purchase of the VESA mount. 4 Attach the wall-mount bracket with M4 screws (not included). 3.94" (100 mm) 3.94" (100 mm) 2 Remove the stand. 4 www.insigniaproducts.com Your NS-L22X-10A represents the state of the ... than that secure the stand to be supported by qualified service personnel only. NS-L22X-10A_09-0222_MAN_V1_English.book Page 4 Thursday, April 2, 2009 12:14 PM Introduction Congratulations on your TV. 3 Insert and lock the standoff screws (provided) into the lock holes of a high-quality Insignia product.

User Manual (English)
Page 9
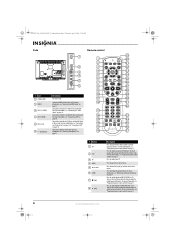
... COMPONENT 1 Y/Pb/Pr these jacks. In Menu mode, the top of the button functions as the up arrow and the bottom of your TV is for cleaning the TV screen only. Back 34 5 6 1 7 2 8 9 10 11 12 13 # Jack Description Connect the video for a component video ... Connect an external sound system to this jack. When your TV. Press this jack. Connect the video for a component video device to the next lower channel. NS-L22X-10A_09-0222_MAN_V1_English.book Page 5 Thursday, April 2, 2009 12:14 PM TV components Accessories Make sure that the following accessories are provided in ...
... COMPONENT 1 Y/Pb/Pr these jacks. In Menu mode, the top of the button functions as the up arrow and the bottom of your TV is for cleaning the TV screen only. Back 34 5 6 1 7 2 8 9 10 11 12 13 # Jack Description Connect the video for a component video ... Connect an external sound system to this jack. When your TV. Press this jack. Connect the video for a component video device to the next lower channel. NS-L22X-10A_09-0222_MAN_V1_English.book Page 5 Thursday, April 2, 2009 12:14 PM TV components Accessories Make sure that the following accessories are provided in ...
User Manual (English)
Page 10
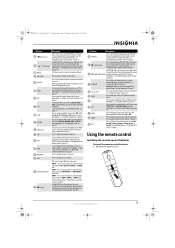
...31 32 13 14 33 15 34 16 GAME 35 DYN VOL 17 36 18 NS-RC02U-10A 37 # Button 1 SET 2 DVD 3 TV 4 MENU 5 6 GUIDE 7 (stop playback on page 33. For more information, see "Programming your TV. Press to display the program guide. For more information, see "Connecting an ... move left, right, up, or down in on page 11. Press to this jack. You need to program the remote control to control connected devices. NS-L22X-10A_09-0222_MAN_V1_English.book Page 6 Thursday, April 2, 2009 12:14 PM Side Remote control 1 2 3 4 5 6 # Jack 1 SERVICE PORT 2 HDMI 3 3 AV IN 2 S-VIDEO 4 ...
...31 32 13 14 33 15 34 16 GAME 35 DYN VOL 17 36 18 NS-RC02U-10A 37 # Button 1 SET 2 DVD 3 TV 4 MENU 5 6 GUIDE 7 (stop playback on page 33. For more information, see "Programming your TV. Press to display the program guide. For more information, see "Connecting an ... move left, right, up, or down in on page 11. Press to this jack. You need to program the remote control to control connected devices. NS-L22X-10A_09-0222_MAN_V1_English.book Page 6 Thursday, April 2, 2009 12:14 PM Side Remote control 1 2 3 4 5 6 # Jack 1 SERVICE PORT 2 HDMI 3 3 AV IN 2 S-VIDEO 4 ...
User Manual (English)
Page 11
.... When programming the remote control, press to increase or decrease the volume. To disconnect power, unplug the power cord. Press to display TV status information, such as the video source. For more information, see "Selecting the video input source" on page18. For more information, see...connected devices. Press to open the Favorite Channel list. Press to open the Source List, then press or to cycle through the available input sources. NS-L22X-10A_09-0222_MAN_V1_English.book Page 7 Thursday, April 2, 2009 12:14 PM # Button 9 (fast reverse) 10 / (skip back) 11 RECALL 12 VOL...
.... When programming the remote control, press to increase or decrease the volume. To disconnect power, unplug the power cord. Press to display TV status information, such as the video source. For more information, see "Selecting the video input source" on page18. For more information, see...connected devices. Press to open the Favorite Channel list. Press to open the Source List, then press or to cycle through the available input sources. NS-L22X-10A_09-0222_MAN_V1_English.book Page 7 Thursday, April 2, 2009 12:14 PM # Button 9 (fast reverse) 10 / (skip back) 11 RECALL 12 VOL...
User Manual (English)
Page 12
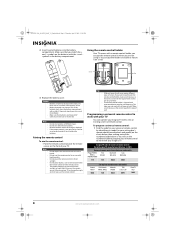
... or existing universal remote control. If you want to excessive heat, such as furniture, between the remote control and the remote sensor. Insignia TV codes for universal remote controls (for the type of wall. Make sure that you use the remote control. Do not burn or incinerate... One for an extended period of correctly. Do not mix old and new batteries. Either move your Insignia TV with high humidity. This tape may require different types of different types. NS-L22X-10A_09-0222_MAN_V1_English.book Page 8 Thursday, April 2, 2009 12:14 PM 2 Insert two AA batteries into...
... or existing universal remote control. If you want to excessive heat, such as furniture, between the remote control and the remote sensor. Insignia TV codes for universal remote controls (for the type of wall. Make sure that you use the remote control. Do not burn or incinerate... One for an extended period of correctly. Do not mix old and new batteries. Either move your Insignia TV with high humidity. This tape may require different types of different types. NS-L22X-10A_09-0222_MAN_V1_English.book Page 8 Thursday, April 2, 2009 12:14 PM 2 Insert two AA batteries into...
User Manual (English)
Page 13
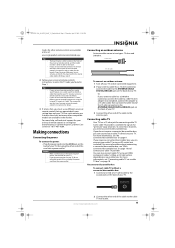
...unplug the power cord from the power outlet. You can also connect cable TV using an HDMI, component video, S-Video, or AV connection, depending on page 10 and contact your cable TV provider. NS-L22X-10A_09-0222_MAN_V1_English.book Page 9 Thursday, April 2, 2009 12:14 PM Codes ...• Plug the power cord into a power outlet. Some cable TV providers scramble the signals for connecting cable TV. For more help, call the Insignia Customer Care Center at a time. No converter/descrambler box To connect cable TV without a converter/descrambler box: 1 Connect one at 1-877-467-...
...unplug the power cord from the power outlet. You can also connect cable TV using an HDMI, component video, S-Video, or AV connection, depending on page 10 and contact your cable TV provider. NS-L22X-10A_09-0222_MAN_V1_English.book Page 9 Thursday, April 2, 2009 12:14 PM Codes ...• Plug the power cord into a power outlet. Some cable TV providers scramble the signals for connecting cable TV. For more help, call the Insignia Customer Care Center at a time. No converter/descrambler box To connect cable TV without a converter/descrambler box: 1 Connect one at 1-877-467-...

User Manual (English)
Page 14
...using the converter/descrambler controls. The two-way splitter and RF switch are not provided. Cable box IANNTENONUAT Connecting satellite TV via a satellite TV box To connect satellite TV: 1 Connect the incoming cable from the satellite wall jack to the satellite-in jack on the satellite box. 2...Two-set -top box), connect a cable from the outgoing jacks on the cable box to the corresponding jacks on the back of your TV. NS-L22X-10A_09-0222_MAN_V1_English.book Page 10 Thursday, April 2, 2009 12:14 PM With converter/descrambler box If your cable box descrambles only some channels ...
...using the converter/descrambler controls. The two-way splitter and RF switch are not provided. Cable box IANNTENONUAT Connecting satellite TV via a satellite TV box To connect satellite TV: 1 Connect the incoming cable from the satellite wall jack to the satellite-in jack on the satellite box. 2...Two-set -top box), connect a cable from the outgoing jacks on the cable box to the corresponding jacks on the back of your TV. NS-L22X-10A_09-0222_MAN_V1_English.book Page 10 Thursday, April 2, 2009 12:14 PM With converter/descrambler box If your cable box descrambles only some channels ...

User Manual (English)
Page 15
...the AV IN 2 VIDEO jack, unplug the S-Video device. 2 Turn on your TV, then turn on the VCR. 4 Press INPUT to open the Source List, then press or to select AV1. 5 Insert a videotape into the VCR, then press PLAY. NS-L22X-10A_09-0222_MAN_V1_English.book Page 11 Thursday, April 2, 2009 12:14 PM 3 Turn... on your TV, then turn on the HDMI device. 3 Press INPUT to open the Source List, then press or to select...
...the AV IN 2 VIDEO jack, unplug the S-Video device. 2 Turn on your TV, then turn on the VCR. 4 Press INPUT to open the Source List, then press or to select AV1. 5 Insert a videotape into the VCR, then press PLAY. NS-L22X-10A_09-0222_MAN_V1_English.book Page 11 Thursday, April 2, 2009 12:14 PM 3 Turn... on your TV, then turn on the HDMI device. 3 Press INPUT to open the Source List, then press or to select...

User Manual (English)
Page 16
... an audio cable to the AV IN 1 L and R jacks on the back of your TV and to select AV2. 12 www.insigniaproducts.com NS-L22X-10A_09-0222_MAN_V1_English.book Page 12 Thursday, April 2, 2009 12:14 PM 2 Turn on your TV, then turn on the HDMI device. 3 Press INPUT to open the Source List, then...: 1 Connect a component video cable to the COMPONENT 1 or COMPONENT 2 Y, Pb, and Pr jacks on the back of your TV and to the corresponding audio out jacks on the S-Video device. 3 Turn on your TV, then turn on the S-Video device. 4 Press INPUT to open the Source List, then press or to the...
... an audio cable to the AV IN 1 L and R jacks on the back of your TV and to select AV2. 12 www.insigniaproducts.com NS-L22X-10A_09-0222_MAN_V1_English.book Page 12 Thursday, April 2, 2009 12:14 PM 2 Turn on your TV, then turn on the HDMI device. 3 Press INPUT to open the Source List, then...: 1 Connect a component video cable to the COMPONENT 1 or COMPONENT 2 Y, Pb, and Pr jacks on the back of your TV and to the corresponding audio out jacks on the S-Video device. 3 Turn on your TV, then turn on the S-Video device. 4 Press INPUT to open the Source List, then press or to the...

User Manual (English)
Page 17
...; Plug headphones into the jack on your TV. Note When the computer enters standby mode, your TV's speakers is muted. NS-L22X-10A_09-0222_MAN_V1_English.book Page 13 Thursday, April 2, 2009 12:14 PM Connecting a computer Note If the computer has an HDMI jack, you "wake" your TV or remote control. Note When headphones are plugged...
...; Plug headphones into the jack on your TV. Note When the computer enters standby mode, your TV's speakers is muted. NS-L22X-10A_09-0222_MAN_V1_English.book Page 13 Thursday, April 2, 2009 12:14 PM Connecting a computer Note If the computer has an HDMI jack, you "wake" your TV or remote control. Note When headphones are plugged...

User Manual (English)
Page 18
...cord. (See page 9 for standard or HD TV EXIT EXIT 4 Press or to the AUDIO IN jacks on the amplifier. For more information, see "Selecting the menu language" on page 30 or "Automatically scanning for channels at a later date. NS-L22X-10A_09-0222_MAN_V1_English.book Page 14 Thursday, April 2,... 2009 12:14 PM Connecting an analog audio amplifier To connect an analog audio amplifier to your TV: • Connect a standard audio cable to the AUDIO OUT L and ...
...cord. (See page 9 for standard or HD TV EXIT EXIT 4 Press or to the AUDIO IN jacks on the amplifier. For more information, see "Selecting the menu language" on page 30 or "Automatically scanning for channels at a later date. NS-L22X-10A_09-0222_MAN_V1_English.book Page 14 Thursday, April 2,... 2009 12:14 PM Connecting an analog audio amplifier To connect an analog audio amplifier to your TV: • Connect a standard audio cable to the AUDIO OUT L and ...

User Manual (English)
Page 19
.... www.insigniaproducts.com 15 The Game Inputs list opens. Note If Auto Input Sensing is set to Game or Game Custom: 1 With your TV turned on , press INPUT. NS-L22X-10A_09-0222_MAN_V1_English.book Page 15 Thursday, April 2, 2009 12:14 PM Understanding the basics Note Unless otherwise noted, all tasks in this section...
.... www.insigniaproducts.com 15 The Game Inputs list opens. Note If Auto Input Sensing is set to Game or Game Custom: 1 With your TV turned on , press INPUT. NS-L22X-10A_09-0222_MAN_V1_English.book Page 15 Thursday, April 2, 2009 12:14 PM Understanding the basics Note Unless otherwise noted, all tasks in this section...
User Manual (English)
Page 20
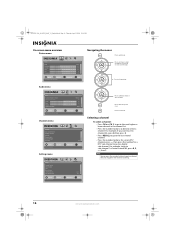
... Parental Controls Closed Caption Time Menu Settings LOGO Brightness Auto Input Sensing PICTURE AUDIO CHANNELS SETTINGS Low On MOVE OK ENTER SELECT Set various TV options MENU PREVIOUS EXIT EXIT Press to the previous screen. Press to return to confirm your selections or enter a sub-menu. Note... You can press the number buttons to go to move the on-screen cursor left or right. NS-L22X-10A_09-0222_MAN_V1_English.book Page 16 Thursday, April 2, 2009 12:14 PM On-screen menu overview Picture menu ss Picture Mode Brightness Contrast Color Tint...
... Parental Controls Closed Caption Time Menu Settings LOGO Brightness Auto Input Sensing PICTURE AUDIO CHANNELS SETTINGS Low On MOVE OK ENTER SELECT Set various TV options MENU PREVIOUS EXIT EXIT Press to the previous screen. Press to return to confirm your selections or enter a sub-menu. Note... You can press the number buttons to go to move the on-screen cursor left or right. NS-L22X-10A_09-0222_MAN_V1_English.book Page 16 Thursday, April 2, 2009 12:14 PM On-screen menu overview Picture menu ss Picture Mode Brightness Contrast Color Tint...

User Manual (English)
Page 21
... Wide On Cool Middle On 30 MOVE OK ENTER SELECT Adjust how the picture fills the screen MENU PREVIOUS EXIT EXIT www.insigniaproducts.com 17 NS-L22X-10A_09-0222_MAN_V1_English.book Page 17 Thursday, April 2, 2009 12:14 PM Adjusting the volume To adjust the volume: • Press VOL - Displaying ...ENTER to open the sub-menu. Press or to move from a list of choices in Vivid, Standard, Energy Savings, Theater, or Sports mode, your TV switches to Custom mode automatically. • Game and Game Custom are based on page 17. • Reset Picture Settings-Resets all tasks in a submenu....
... Wide On Cool Middle On 30 MOVE OK ENTER SELECT Adjust how the picture fills the screen MENU PREVIOUS EXIT EXIT www.insigniaproducts.com 17 NS-L22X-10A_09-0222_MAN_V1_English.book Page 17 Thursday, April 2, 2009 12:14 PM Adjusting the volume To adjust the volume: • Press VOL - Displaying ...ENTER to open the sub-menu. Press or to move from a list of choices in Vivid, Standard, Energy Savings, Theater, or Sports mode, your TV switches to Custom mode automatically. • Game and Game Custom are based on page 17. • Reset Picture Settings-Resets all tasks in a submenu....

User Manual (English)
Page 22
...adjust the picture detail and brightness automatically. • Backlight-Controls the overall brilliance of time. When connecting with Display (displays a scale on TV, overscan will be set ot Off. • Light Sensor-Automatically adjusts brightness by HDMI/DVI input. • Color temperature-Selects the color... the picture. Note You may damage your preferred picture size. Caution Do not freeze the picture for long periods of the screen. NS-L22X-10A_09-0222_MAN_V1_English.book Page 18 Thursday, April 2, 2009 12:14 PM 2 Press to highlight an option, then press OK/ENTER to...
...adjust the picture detail and brightness automatically. • Backlight-Controls the overall brilliance of time. When connecting with Display (displays a scale on TV, overscan will be set ot Off. • Light Sensor-Automatically adjusts brightness by HDMI/DVI input. • Color temperature-Selects the color... the picture. Note You may damage your preferred picture size. Caution Do not freeze the picture for long periods of the screen. NS-L22X-10A_09-0222_MAN_V1_English.book Page 18 Thursday, April 2, 2009 12:14 PM 2 Press to highlight an option, then press OK/ENTER to...


