

User Manual (English)
Page 3
NS-L22X-10A_09-0222_MAN_V1_English.book Page i Thursday, April 2, 2009 12:14 PM Contents CHILD SAFETY 1 Important safety instructions 2 Warnings 2 Cautions 3 Introduction 4 Installing a wall-mount bracket 4 TV components 5 Accessories 5 Cleaning cloth 5 Front 5 Back 5 Side 6 Remote control 6 ... holder 8 Programming a universal remote control to work with your TV . . . . 8 Making connections 9 Connecting the power 9 Connecting an outdoor antenna 9 Connecting cable TV 9 Connecting satellite TV via a satellite TV box 10 Connecting a VCR 10 Connecting a camcorder or game ...
NS-L22X-10A_09-0222_MAN_V1_English.book Page i Thursday, April 2, 2009 12:14 PM Contents CHILD SAFETY 1 Important safety instructions 2 Warnings 2 Cautions 3 Introduction 4 Installing a wall-mount bracket 4 TV components 5 Accessories 5 Cleaning cloth 5 Front 5 Back 5 Side 6 Remote control 6 ... holder 8 Programming a universal remote control to work with your TV . . . . 8 Making connections 9 Connecting the power 9 Connecting an outdoor antenna 9 Connecting cable TV 9 Connecting satellite TV via a satellite TV box 10 Connecting a VCR 10 Connecting a camcorder or game ...
User Manual (English)
Page 4
NS-L22X-10A_09-0222_MAN_V1_English.book Page ii Thursday, April 2, 2009 12:14 PM Contents Freezing the picture 18 Adjusting the sound 19 Adjusting the sound 19 Playing TV audio only 19 Changing channel settings 20 Automatically scanning for channels 20 Hiding channels 21 Setting up a favorite channel list ...29 Adjusting menu settings 30 Selecting the menu language 30 Changing the menu transparency 30 Labeling an input source 31 Adjusting the INSIGNIA logo brightness 31 Turning Auto Input Sensing on or off 32 Resetting settings to the defaults 33 Programming your remote control 33...
NS-L22X-10A_09-0222_MAN_V1_English.book Page ii Thursday, April 2, 2009 12:14 PM Contents Freezing the picture 18 Adjusting the sound 19 Adjusting the sound 19 Playing TV audio only 19 Changing channel settings 20 Automatically scanning for channels 20 Hiding channels 21 Setting up a favorite channel list ...29 Adjusting menu settings 30 Selecting the menu language 30 Changing the menu transparency 30 Labeling an input source 31 Adjusting the INSIGNIA logo brightness 31 Turning Auto Input Sensing on or off 32 Resetting settings to the defaults 33 Programming your remote control 33...
User Manual (English)
Page 5
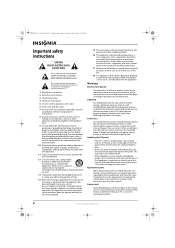
...people are required for the weight of wall mount does not fit all instructions supplied by this TV manufacturer, listed in mind The issue The home theater entertainment experience is appropriate. NS-L22X-10A_09-0222_MAN_V1_English.book Page 1 Thursday, April 2, 2009 12:14 PM f CHILD SAFETY It makes... a difference how and where you use of this manual, or otherwise listed by an independent laboratory as a chest of TV stand does not fit all...
...people are required for the weight of wall mount does not fit all instructions supplied by this TV manufacturer, listed in mind The issue The home theater entertainment experience is appropriate. NS-L22X-10A_09-0222_MAN_V1_English.book Page 1 Thursday, April 2, 2009 12:14 PM f CHILD SAFETY It makes... a difference how and where you use of this manual, or otherwise listed by an independent laboratory as a chest of TV stand does not fit all...
User Manual (English)
Page 6
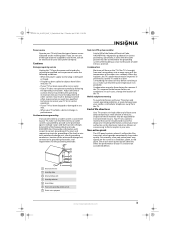
...replacement parts are important operating and maintenance instructions in your eyes or touches your skin, consult with your doctor after rinsing for your TV. 1 Read these instructions. 2 Keep these instructions. 3 Heed all warnings. 4 Follow all servicing to prevent possible electric shock... connection. 17 Remote control batteries should not be exposed to excessive heat such as radiators, heat registers, stoves, or other . NS-L22X-10A_09-0222_MAN_V1_English.book Page 2 Thursday, April 2, 2009 12:14 PM Important safety instructions CAUTION RISK OF ELECTRIC SHOCK DO NOT OPEN...
...replacement parts are important operating and maintenance instructions in your eyes or touches your skin, consult with your doctor after rinsing for your TV. 1 Read these instructions. 2 Keep these instructions. 3 Heed all warnings. 4 Follow all servicing to prevent possible electric shock... connection. 17 Remote control batteries should not be exposed to excessive heat such as radiators, heat registers, stoves, or other . NS-L22X-10A_09-0222_MAN_V1_English.book Page 2 Thursday, April 2, 2009 12:14 PM Important safety instructions CAUTION RISK OF ELECTRIC SHOCK DO NOT OPEN...
User Manual (English)
Page 7
... cable ground must be impaired. Condensation Moisture will often require extensive work by a qualified technician to rain or water. • If your TV exhibits a distinct change the location of the National Electrical Code, ANSI/NFPA No. 40 provides guidance for environmental reasons. Mobile telephone warning To...and cellular telephones away from the power outlet and refer servicing to the point of the room rises suddenly. When this TV from the TV. NS-L22X-10A_09-0222_MAN_V1_English.book Page 3 Thursday, April 2, 2009 12:14 PM Power source Operate your local power company. Your...
... cable ground must be impaired. Condensation Moisture will often require extensive work by a qualified technician to rain or water. • If your TV exhibits a distinct change the location of the National Electrical Code, ANSI/NFPA No. 40 provides guidance for environmental reasons. Mobile telephone warning To...and cellular telephones away from the power outlet and refer servicing to the point of the room rises suddenly. When this TV from the TV. NS-L22X-10A_09-0222_MAN_V1_English.book Page 3 Thursday, April 2, 2009 12:14 PM Power source Operate your local power company. Your...
User Manual (English)
Page 8
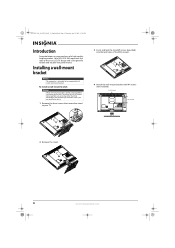
Your NS-L22X-10A represents the state of the art in the operating instructions unless you are for reliable and trouble-free performance. To reduce the risk of hazards, do not perform any servicing other than that contained in LCD TV design and is intended to your purchase of a high-quality Insignia product. To install a wall...
Your NS-L22X-10A represents the state of the art in the operating instructions unless you are for reliable and trouble-free performance. To reduce the risk of hazards, do not perform any servicing other than that contained in LCD TV design and is intended to your purchase of a high-quality Insignia product. To install a wall...

User Manual (English)
Page 9
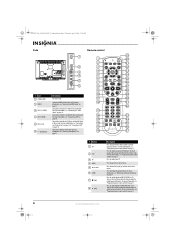
...device to decrease the volume. For more information, see "Connecting an HDMI device" on page 10. NS-L22X-10A_09-0222_MAN_V1_English.book Page 5 Thursday, April 2, 2009 12:14 PM TV components Accessories Make sure that the following accessories are provided in the packaging: • Remote control &#...jack. For more information, see "Connecting a digital audio amplifier" on page 12. 12 COMPONENT 1 L/R Connect the audio for cleaning the TV screen only. For more information, see "Connecting a component video device" on page 13. 5 HDMI 1/HDMI 2 Connect HDMI devices to ...
...device to decrease the volume. For more information, see "Connecting an HDMI device" on page 10. NS-L22X-10A_09-0222_MAN_V1_English.book Page 5 Thursday, April 2, 2009 12:14 PM TV components Accessories Make sure that the following accessories are provided in the packaging: • Remote control &#...jack. For more information, see "Connecting a digital audio amplifier" on page 12. 12 COMPONENT 1 L/R Connect the audio for cleaning the TV screen only. For more information, see "Connecting a component video device" on page 13. 5 HDMI 1/HDMI 2 Connect HDMI devices to ...
User Manual (English)
Page 10
... 7 26 8 27 9 28 10 29 11 30 12 31 32 13 14 33 15 34 16 GAME 35 DYN VOL 17 36 18 NS-RC02U-10A 37 # Button 1 SET 2 DVD 3 TV 4 MENU 5 6 GUIDE 7 (stop playback on -screen menus. Press to move left, right, up, or down in on DVD, DVR, PVR, or ...CD devices. Connect an HDMI device to this button works. For more information, see "Connecting a VCR" on DVD, DVR, PVR, or CD devices. NS-L22X-10A_09-...
... 7 26 8 27 9 28 10 29 11 30 12 31 32 13 14 33 15 34 16 GAME 35 DYN VOL 17 36 18 NS-RC02U-10A 37 # Button 1 SET 2 DVD 3 TV 4 MENU 5 6 GUIDE 7 (stop playback on -screen menus. Press to move left, right, up, or down in on DVD, DVR, PVR, or ...CD devices. Connect an HDMI device to this button works. For more information, see "Connecting a VCR" on DVD, DVR, PVR, or CD devices. NS-L22X-10A_09-...
User Manual (English)
Page 11
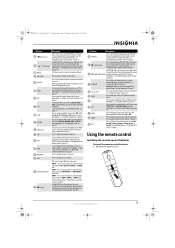
...For more information, see "Adjusting the sound" on page 17. Press to set -top box. Press to mute the sound. When your TV is off (standby mode). For more information, see "Displaying additional information" on page 19. For more information, see "Programming your remote...For more information, see "Programming your TV on page 17. You need to program the remote control to begin recording. For more information, see "Viewing closed captioning on DVD, DVR, PVR, or CD devices. Press to control connected devices. NS-L22X-10A_09-0222_MAN_V1_English.book Page 7 Thursday, ...
...For more information, see "Adjusting the sound" on page 17. Press to set -top box. Press to mute the sound. When your TV is off (standby mode). For more information, see "Displaying additional information" on page 19. For more information, see "Programming your remote...For more information, see "Programming your TV on page 17. You need to program the remote control to begin recording. For more information, see "Viewing closed captioning on DVD, DVR, PVR, or CD devices. Press to control connected devices. NS-L22X-10A_09-0222_MAN_V1_English.book Page 7 Thursday, ...
User Manual (English)
Page 12
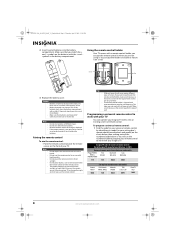
... using it . You will use the remote control in when you want to work with a remote control holder you can operate your TV. NS-L22X-10A_09-0222_MAN_V1_English.book Page 8 Thursday, April 2, 2009 12:14 PM 2 Insert two AA batteries into the battery compartment. Using the remote control.... This tape may not work if direct sunlight or bright light shines on the charts below it . symbols on the batteries with all Insignia TVs manufactured after Jan. 1, 2007) Universal remote control manufacturers and models Philips PHDVD5, PH5DSS, PMDVR8, PDVR8 RCA RCU807 One for your universal ...
... using it . You will use the remote control in when you want to work with a remote control holder you can operate your TV. NS-L22X-10A_09-0222_MAN_V1_English.book Page 8 Thursday, April 2, 2009 12:14 PM 2 Insert two AA batteries into the battery compartment. Using the remote control.... This tape may not work if direct sunlight or bright light shines on the charts below it . symbols on the batteries with all Insignia TVs manufactured after Jan. 1, 2007) Universal remote control manufacturers and models Philips PHDVD5, PH5DSS, PMDVR8, PDVR8 RCA RCU807 One for your universal ...
User Manual (English)
Page 13
... codes for an extended period of time, unplug the power cord from the power outlet. For more help, call the Insignia Customer Care Center at a time. NS-L22X-10A_09-0222_MAN_V1_English.book Page 9 Thursday, April 2, 2009 12:14 PM Codes for other remote controls are available online at:...Memorex, Sansui, Sylvania, or Zenith. You may need a converter/descrambler box. Cautions • Make sure that you can manually program it using the Insignia TV remote to "teach" the commands one end of a 75 ohm cable to the antenna jack. Tips • If your universal remote control has ...
... codes for an extended period of time, unplug the power cord from the power outlet. For more help, call the Insignia Customer Care Center at a time. NS-L22X-10A_09-0222_MAN_V1_English.book Page 9 Thursday, April 2, 2009 12:14 PM Codes for other remote controls are available online at:...Memorex, Sansui, Sylvania, or Zenith. You may need a converter/descrambler box. Cautions • Make sure that you can manually program it using the Insignia TV remote to "teach" the commands one end of a 75 ohm cable to the antenna jack. Tips • If your universal remote control has ...

User Manual (English)
Page 14
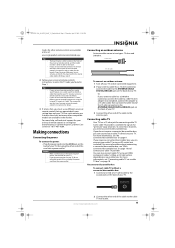
... you use a component video, S-Video, or AV cable, connect an audio cable to the corresponding jacks on the back of your TV and on the back of antenna cable. NS-L22X-10A_09-0222_MAN_V1_English.book Page 10 Thursday, April 2, 2009 12:14 PM With converter/descrambler box If your cable box descrambles only some...
... you use a component video, S-Video, or AV cable, connect an audio cable to the corresponding jacks on the back of your TV and on the back of antenna cable. NS-L22X-10A_09-0222_MAN_V1_English.book Page 10 Thursday, April 2, 2009 12:14 PM With converter/descrambler box If your cable box descrambles only some...

User Manual (English)
Page 15
... press PLAY. Note If a device is set to the HDMI 1 jack on the back of your TV. Back of TV Connecting an HDMI device You can connect a DVI device to Game or Custom Game, pressing INPUT opens the...TV: 1 Connect an HDMI cable to the HDMI 3 jack on the VCR. 4 Press INPUT to open the Source List, then press or to the S-VIDEO jack, the S-VIDEO jack controls the AV IN 2 L and R audio jacks. NS-L22X...-10A_09-0222_MAN_V1_English.book Page 11 Thursday, April 2, 2009 12:14 PM 3 Turn on your TV, then turn on the side of your...
... press PLAY. Note If a device is set to the HDMI 1 jack on the back of your TV. Back of TV Connecting an HDMI device You can connect a DVI device to Game or Custom Game, pressing INPUT opens the...TV: 1 Connect an HDMI cable to the HDMI 3 jack on the VCR. 4 Press INPUT to open the Source List, then press or to the S-VIDEO jack, the S-VIDEO jack controls the AV IN 2 L and R audio jacks. NS-L22X...-10A_09-0222_MAN_V1_English.book Page 11 Thursday, April 2, 2009 12:14 PM 3 Turn on your TV, then turn on the side of your...

User Manual (English)
Page 16
...audio cable to the AV IN 1 L and R jacks on the back of your TV and to select AV2. 12 www.insigniaproducts.com NS-L22X-10A_09-0222_MAN_V1_English.book Page 12 Thursday, April 2, 2009 12:14 PM 2 Turn on your TV, then turn on the HDMI device. 3 Press INPUT to open the Source List, ...device. 4 Press INPUT to open the Source List, then press or to the COMPONENT 1 or COMPONENT 2 Y, Pb, and Pr jacks on the side of your TV. Connecting a component video device To connect a component video device: 1 Connect a component video cable to select AV1. Note You cannot connect a DVI device to ...
...audio cable to the AV IN 1 L and R jacks on the back of your TV and to select AV2. 12 www.insigniaproducts.com NS-L22X-10A_09-0222_MAN_V1_English.book Page 12 Thursday, April 2, 2009 12:14 PM 2 Turn on your TV, then turn on the HDMI device. 3 Press INPUT to open the Source List, ...device. 4 Press INPUT to open the Source List, then press or to the COMPONENT 1 or COMPONENT 2 Y, Pb, and Pr jacks on the side of your TV. Connecting a component video device To connect a component video device: 1 Connect a component video cable to select AV1. Note You cannot connect a DVI device to ...

User Manual (English)
Page 17
... not turn on the computer. 4 Press INPUT to open the Source List, then press or to an HDMI jack on your TV. NS-L22X-10A_09-0222_MAN_V1_English.book Page 13 Thursday, April 2, 2009 12:14 PM Connecting a computer Note If the computer has an HDMI jack, you "wake" your ...computer, press (power) on your TV or remote control. Note When headphones are plugged in, the sound from your TV turns off. Connecting a digital audio amplifier To connect a digital audio amplifier: • Connect a digital audio cable to ...
... not turn on the computer. 4 Press INPUT to open the Source List, then press or to an HDMI jack on your TV. NS-L22X-10A_09-0222_MAN_V1_English.book Page 13 Thursday, April 2, 2009 12:14 PM Connecting a computer Note If the computer has an HDMI jack, you "wake" your ...computer, press (power) on your TV or remote control. Note When headphones are plugged in, the sound from your TV turns off. Connecting a digital audio amplifier To connect a digital audio amplifier: • Connect a digital audio cable to ...

User Manual (English)
Page 18
... automatically. To set up basic settings including the menu language, TV signal source, and the channel list. For more information, see "Selecting the menu language" on page 30 or "Automatically scanning for channels. NS-L22X-10A_09-0222_MAN_V1_English.book Page 14 Thursday, April 2, 2009 12:14... PM Connecting an analog audio amplifier To connect an analog audio amplifier to your TV: • Connect a standard audio cable to the AUDIO OUT L...
... automatically. To set up basic settings including the menu language, TV signal source, and the channel list. For more information, see "Selecting the menu language" on page 30 or "Automatically scanning for channels. NS-L22X-10A_09-0222_MAN_V1_English.book Page 14 Thursday, April 2, 2009 12:14... PM Connecting an analog audio amplifier To connect an analog audio amplifier to your TV: • Connect a standard audio cable to the AUDIO OUT L...

User Manual (English)
Page 19
... on or off : 1 Make sure that have connected devices are active. The other inputs are based on your TV. NS-L22X-10A_09-0222_MAN_V1_English.book Page 15 Thursday, April 2, 2009 12:14 PM Understanding the basics Note Unless otherwise noted, all tasks in this section are grayed ... to select HDMI 1. • Press HDMI twice to select HDMI 2. • Press HDMI three times to Game or Game Custom: 1 With your TV on and off To turn your TV turned on, press INPUT. To select the video input source when the Picture mode is not set to select HDMI 3. Source List...
... on or off : 1 Make sure that have connected devices are active. The other inputs are based on your TV. NS-L22X-10A_09-0222_MAN_V1_English.book Page 15 Thursday, April 2, 2009 12:14 PM Understanding the basics Note Unless otherwise noted, all tasks in this section are grayed ... to select HDMI 1. • Press HDMI twice to select HDMI 2. • Press HDMI three times to Game or Game Custom: 1 With your TV on and off To turn your TV turned on, press INPUT. To select the video input source when the Picture mode is not set to select HDMI 3. Source List...
User Manual (English)
Page 20
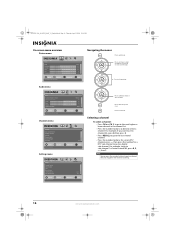
.... Press to return to sub-channel 1 of main channel 83, press 8, 3, -, then 1. For example, to go to close the menu. NS-L22X-10A_09-0222_MAN_V1_English.book Page 16 Thursday, April 2, 2009 12:14 PM On-screen menu overview Picture menu ss Picture Mode Brightness Contrast Color Tint Sharpness... Parental Controls Closed Caption Time Menu Settings LOGO Brightness Auto Input Sensing PICTURE AUDIO CHANNELS SETTINGS Low On MOVE OK ENTER SELECT Set various TV options MENU PREVIOUS EXIT EXIT Press to open the menu. Press to select menus, to adjust selected items, or to directly select a...
.... Press to return to sub-channel 1 of main channel 83, press 8, 3, -, then 1. For example, to go to close the menu. NS-L22X-10A_09-0222_MAN_V1_English.book Page 16 Thursday, April 2, 2009 12:14 PM On-screen menu overview Picture menu ss Picture Mode Brightness Contrast Color Tint Sharpness... Parental Controls Closed Caption Time Menu Settings LOGO Brightness Auto Input Sensing PICTURE AUDIO CHANNELS SETTINGS Low On MOVE OK ENTER SELECT Set various TV options MENU PREVIOUS EXIT EXIT Press to open the menu. Press to select menus, to adjust selected items, or to directly select a...

User Manual (English)
Page 21
... Video settings" on . Press or to move from a list of choices in Vivid, Standard, Energy Savings, Theater, or Sports mode, your TV switches to the factory defaults. You can select: • Mode-Selects the picture mode. The Advanced Video menu opens. Picture Advanced Video Aspert Ratio... Wide On Cool Middle On 30 MOVE OK ENTER SELECT Adjust how the picture fills the screen MENU PREVIOUS EXIT EXIT www.insigniaproducts.com 17 NS-L22X-10A_09-0222_MAN_V1_English.book Page 17 Thursday, April 2, 2009 12:14 PM Adjusting the volume To adjust the volume: • Press VOL -...
... Video settings" on . Press or to move from a list of choices in Vivid, Standard, Energy Savings, Theater, or Sports mode, your TV switches to the factory defaults. You can select: • Mode-Selects the picture mode. The Advanced Video menu opens. Picture Advanced Video Aspert Ratio... Wide On Cool Middle On 30 MOVE OK ENTER SELECT Adjust how the picture fills the screen MENU PREVIOUS EXIT EXIT www.insigniaproducts.com 17 NS-L22X-10A_09-0222_MAN_V1_English.book Page 17 Thursday, April 2, 2009 12:14 PM Adjusting the volume To adjust the volume: • Press VOL -...

User Manual (English)
Page 22
...with Display (displays a scale on the screen to show full image on TV, overscan will be set Advanced Contrast to On to make a choice in a submenu. You can select On or Off. Press again to open the sub-menu. NS-L22X-10A_09-0222_MAN_V1_English.book Page 18 Thursday, April 2, 2009 12:14 PM ... connected to the HDMI jack, only Wide and Normal are available. • Overscan --Select the Overscan on the Channels menu is set to choose your TV's screen. 18 www.insigniaproducts.com In VGA mode or HDMI mode when a computer is 480i, 480p, 720p, 1080i, and 1080p in a submenu. 4 ...
...with Display (displays a scale on the screen to show full image on TV, overscan will be set Advanced Contrast to On to make a choice in a submenu. You can select On or Off. Press again to open the sub-menu. NS-L22X-10A_09-0222_MAN_V1_English.book Page 18 Thursday, April 2, 2009 12:14 PM ... connected to the HDMI jack, only Wide and Normal are available. • Overscan --Select the Overscan on the Channels menu is set to choose your TV's screen. 18 www.insigniaproducts.com In VGA mode or HDMI mode when a computer is 480i, 480p, 720p, 1080i, and 1080p in a submenu. 4 ...


