Quick Setup Guide (English)
Page 4
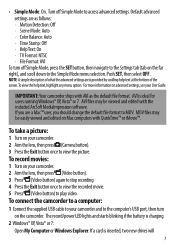
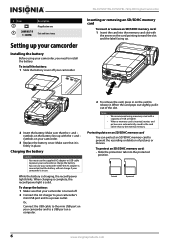
... can use your camcorder while the AC charger is plugged in, but the battery will not charge unless the camcorder is turned off.You cannot use your camcorder while it is turned off, then connect the AC charger to your LCD 4 1 Picture resolution: 2592 × 1944 (5 mp) With memory card: number of...
... can use your camcorder while the AC charger is plugged in, but the battery will not charge unless the camcorder is turned off.You cannot use your camcorder while it is turned off, then connect the AC charger to your LCD 4 1 Picture resolution: 2592 × 1944 (5 mp) With memory card: number of...
Quick Setup Guide (English)
Page 5
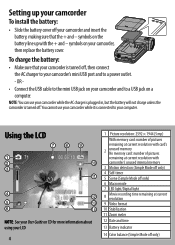
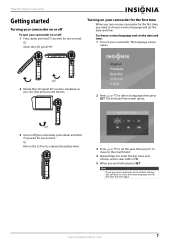
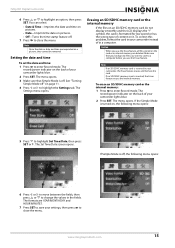
... the card into the memory card slot with the arrow on your camcorder for the first time, your camcorder for the first time When you turn your camcorder before using an SD or SDHC memory card. OR - Close the LCD panel. 90° Initial settings: When you will be in memory.... The card pops out slightly. 2 Pull the card out of your camcorder off: Press down and hold the power button for the first time, you turn your camcorder on your camcorder easier to choose a menu language and set the date and time. 5 Open the LCD panel. OR - Simple Mode hides advanced...
... the card into the memory card slot with the arrow on your camcorder for the first time, your camcorder for the first time When you turn your camcorder before using an SD or SDHC memory card. OR - Close the LCD panel. 90° Initial settings: When you will be in memory.... The card pops out slightly. 2 Pull the card out of your camcorder off: Press down and hold the power button for the first time, you turn your camcorder on your camcorder easier to choose a menu language and set the date and time. 5 Open the LCD panel. OR - Simple Mode hides advanced...
Quick Setup Guide (English)
Page 6
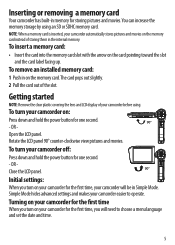
The Set Date/Time screen opens. 3 Press or to select set the date and time: 1 Turn on your camcorder. SD mode also uses less memory than HD mode. • Stabilization: Off. When sounds are the camcorder's default settings: • Video Format: ... press to move to the month field. 4 Repeat Step 3 to enter the day, hour, and minute, and to select AM or PM. These are turned on a standard definitionTV. It can be caused by shaky hands or low light conditions...
The Set Date/Time screen opens. 3 Press or to select set the date and time: 1 Turn on your camcorder. SD mode also uses less memory than HD mode. • Stabilization: Off. When sounds are the camcorder's default settings: • Video Format: ... press to move to the month field. 4 Repeat Step 3 to enter the day, hour, and minute, and to select AM or PM. These are turned on a standard definitionTV. It can be caused by shaky hands or low light conditions...
Quick Setup Guide (English)
Page 7
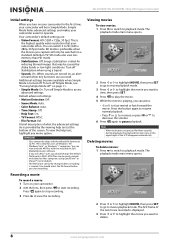
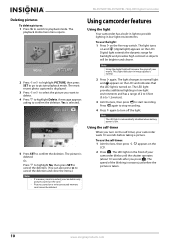
...The record/power LED lights and starts blinking if the battery is ideal for users runningWindows® XP,Vista® or 7. To record movies: 1 Turn on your camcorder. 2 Aim the lens, then press (Video button). 3 Press (Video button) again to stop recording. 4 Press the Exit button ...button) to access advanced settings. AVI is charging. 2 Windows® XP, Vista® or 7: Open My Computer or Windows Explorer. To take a picture: 1 Turn on your camcorder. 2 Aim the lens, then press (Camera button). 3 Press the Exit button once to MOV. • Simple Mode: On. If a card is...
...The record/power LED lights and starts blinking if the battery is ideal for users runningWindows® XP,Vista® or 7. To record movies: 1 Turn on your camcorder. 2 Aim the lens, then press (Video button). 3 Press (Video button) again to stop recording. 4 Press the Exit button ...button) to access advanced settings. AVI is charging. 2 Windows® XP, Vista® or 7: Open My Computer or Windows Explorer. To take a picture: 1 Turn on your camcorder. 2 Aim the lens, then press (Camera button). 3 Press the Exit button once to MOV. • Simple Mode: On. If a card is...
User Manual (English)
Page 2
... mode icons 5 Setting up your camcorder 6 Installing the battery 6 Charging the battery 6 Inserting or removing an SD/SDHC memory card 6 Getting started 7 Turning your camcorder on or off 7 Turning on your camcorder for the first time 7 Initial settings 8 Recording a movie 8 Viewing movies 8 Deleting movies 8 Taking a picture 9 Taking a close-...the date and time 15 Erasing an SD/SDHC memory card or the internal memory 15 Selecting the menu language 16 Turning help text on or off 17 Selecting the TV format 17 Selecting the file format for movies 18 ii www.insigniaproducts.com
... mode icons 5 Setting up your camcorder 6 Installing the battery 6 Charging the battery 6 Inserting or removing an SD/SDHC memory card 6 Getting started 7 Turning your camcorder on or off 7 Turning on your camcorder for the first time 7 Initial settings 8 Recording a movie 8 Viewing movies 8 Deleting movies 8 Taking a picture 9 Taking a close-...the date and time 15 Erasing an SD/SDHC memory card or the internal memory 15 Selecting the menu language 16 Turning help text on or off 17 Selecting the TV format 17 Selecting the file format for movies 18 ii www.insigniaproducts.com
User Manual (English)
Page 6
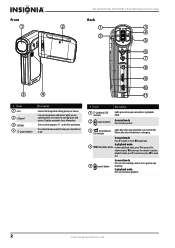
...) LED indicator Lights blue when your camcorder on the five-way button. Press W to decrease the volume. In playback mode Press to turn your camcorder is in playback mode. Press down for one second to start recording a movie. In playback mode 4 T/W (Tele/Wide)... status information. In record mode Press T to zoom in or press W to stop 5 (movie) button recording. Flashes blue when the battery is in record mode. NS-DV720P/NS-DV720PBL 720p HD Digital Camcorder Front Back 1 2 1 3 4 2 5 6 7 8 9 10 3 4 11 # Item 1 Lens 2 LCD panel 3 LED light 4 ...
...) LED indicator Lights blue when your camcorder on the five-way button. Press W to decrease the volume. In playback mode Press to turn your camcorder is in playback mode. Press down for one second to start recording a movie. In playback mode 4 T/W (Tele/Wide)... status information. In record mode Press T to zoom in or press W to stop 5 (movie) button recording. Flashes blue when the battery is in record mode. NS-DV720P/NS-DV720PBL 720p HD Digital Camcorder Front Back 1 2 1 3 4 2 5 6 7 8 9 10 3 4 11 # Item 1 Lens 2 LCD panel 3 LED light 4 ...
User Manual (English)
Page 7
.... Connect a computer to this port. Switch to Macro mode to take close-up in a list of options. www.insigniaproducts.com 3 Press to turn the indicators on the LCD display on the LCD. Press and hold to fast-reverse during movie playback. Press and hold to fast-forward during...Item 6 Five-way button 7 (exit) button 8 A/V out port 9 HDMI out port 10 Mini USB port 11 Strap hook Description In record mode Press to turn the light on or off. Note: The digital light function increases the sensitivity of the camcorder's imaging sensor, which increases the grain of 2 to 4 feet...
.... Connect a computer to this port. Switch to Macro mode to take close-up in a list of options. www.insigniaproducts.com 3 Press to turn the indicators on the LCD display on the LCD. Press and hold to fast-reverse during movie playback. Press and hold to fast-forward during...Item 6 Five-way button 7 (exit) button 8 A/V out port 9 HDMI out port 10 Mini USB port 11 Strap hook Description In record mode Press to turn the light on or off. Note: The digital light function increases the sensitivity of the camcorder's imaging sensor, which increases the grain of 2 to 4 feet...
User Manual (English)
Page 10
NS-DV720P/NS-DV720PBL 720p HD Digital Camcorder Inserting or removing an SD/SDHC memory card To insert or remove an SD/SDHC memory card: 1 Insert the card .... When charging is complete, the record/power light is firmly in place. To charge the battery: 1 Make sure that the + and - When a memory card is turned off your camcorder is charging, the record/power light blinks. Or, Connect the USB cable to the mini USB port on your camcorder and to...
NS-DV720P/NS-DV720PBL 720p HD Digital Camcorder Inserting or removing an SD/SDHC memory card To insert or remove an SD/SDHC memory card: 1 Insert the card .... When charging is complete, the record/power light is firmly in place. To charge the battery: 1 Make sure that the + and - When a memory card is turned off your camcorder is charging, the record/power light blinks. Or, Connect the USB cable to the mini USB port on your camcorder and to...
User Manual (English)
Page 11
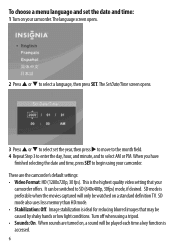
The Set Date/Time screen opens. 3 To turn off : 1 Press down and hold (power) for one second. www.insigniaproducts.com 7 Or Return the ...settings, you need to select the menu language and set the date and time: 1 Turn on your camcorder. To choose a menu language and set the date and time again. 720p HD Digital Camcorder Getting ...started Turning your camcorder on or off To turn your camcorder on or off your camcorder, press down and hold (power) for one second. Turning on your camcorder for the first time When you turn on your camcorder for ...
The Set Date/Time screen opens. 3 To turn off : 1 Press down and hold (power) for one second. www.insigniaproducts.com 7 Or Return the ...settings, you need to select the menu language and set the date and time: 1 Turn on your camcorder. To choose a menu language and set the date and time again. 720p HD Digital Camcorder Getting ...started Turning your camcorder on or off To turn your camcorder on or off your camcorder, press down and hold (power) for one second. Turning on your camcorder for the first time When you turn on your camcorder for ...
User Manual (English)
Page 12
... or Windows® 7 computers. Your camcorder's default settings are a Mac™ user, you should select the file format before you start recording. Turn off " on page 11. • Simple Mode: On. A brief description of what the advanced settings do is ideal for users of the last ... SET to go to movie playback mode. 3 Press or to highlight the movie you want to access advanced settings. NS-DV720P/NS-DV720PBL 720p HD Digital Camcorder Initial settings When you turn off Simple Mode, see "Turning Simple Mode off Stabilization when using QuickTime™ or iMovie™ (not included...
... or Windows® 7 computers. Your camcorder's default settings are a Mac™ user, you should select the file format before you start recording. Turn off " on page 11. • Simple Mode: On. A brief description of what the advanced settings do is ideal for users of the last ... SET to go to movie playback mode. 3 Press or to highlight the movie you want to access advanced settings. NS-DV720P/NS-DV720PBL 720p HD Digital Camcorder Initial settings When you turn off Simple Mode, see "Turning Simple Mode off Stabilization when using QuickTime™ or iMovie™ (not included...
User Manual (English)
Page 13
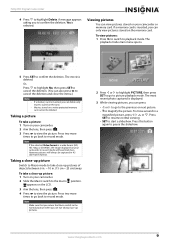
... to picture playback mode. Press this button again to playback mode. 720p HD Digital Camcorder 4 Press to confirm the deletion. To take a close -up picture: 1 Turn on your camcorder or memory card. Note Make sure that you return the Macro switch to the normal position when you can view pictures stored... view the picture. To move around in . (15 cm ~ 25 cm) away. Viewing pictures You can press: • or to go back to take a picture: 1 Turn on your camcorder in 4:3 (full frame) format.
... to picture playback mode. Press this button again to playback mode. 720p HD Digital Camcorder 4 Press to confirm the deletion. To take a close -up picture: 1 Turn on your camcorder or memory card. Note Make sure that you return the Macro switch to the normal position when you can view pictures stored... view the picture. To move around in . (15 cm ~ 25 cm) away. Viewing pictures You can press: • or to go back to take a picture: 1 Turn on your camcorder in 4:3 (full frame) format.
User Manual (English)
Page 14
.... 3 Press or to select the picture you press . The speed of your camcorder waits 10 seconds before the picture is inserted, you turn off the light. A message appears asking to provide lighting in low-light environments and has a range of your camcorder blinks until the shutter... delete. 4 Press to turn on the card. The LED light on the front of 2 to 4 feet (0.6 to 1.2 meters). 3 Aim the lens, then press to playback mode. The LED light provides additional lighting in low-light environments. appears on the LCD. LCD. NS-DV720P/NS-DV720PBL 720p HD Digital Camcorder...
.... 3 Press or to select the picture you press . The speed of your camcorder waits 10 seconds before the picture is inserted, you turn off the light. A message appears asking to provide lighting in low-light environments and has a range of your camcorder blinks until the shutter... delete. 4 Press to turn on the card. The LED light on the front of 2 to 4 feet (0.6 to 1.2 meters). 3 Aim the lens, then press to playback mode. The LED light provides additional lighting in low-light environments. appears on the LCD. LCD. NS-DV720P/NS-DV720PBL 720p HD Digital Camcorder...
User Manual (English)
Page 15
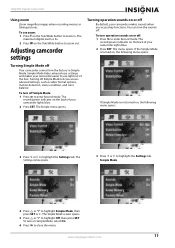
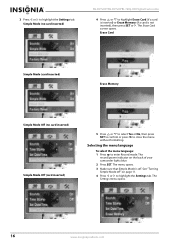
...settings and makes your camcorder makes sounds when you access advaced settings, such as video format options, motion detection, scene condition, and color balance. Turning operation sounds on the Tele/Wide button to zoom in Simple Mode. Simple Mode 4 Press or to highlight Off, then press SET. If the... Simple Mode is turned on, the following menu opens: If Simple Mode is 3x. 2 Press W on or off . The Simple Mode screen opens. 5 Press or to ...
...settings and makes your camcorder makes sounds when you access advaced settings, such as video format options, motion detection, scene condition, and color balance. Turning operation sounds on the Tele/Wide button to zoom in Simple Mode. Simple Mode 4 Press or to highlight Off, then press SET. If the... Simple Mode is turned on, the following menu opens: If Simple Mode is 3x. 2 Press W on or off . The Simple Mode screen opens. 5 Press or to ...
User Manual (English)
Page 17
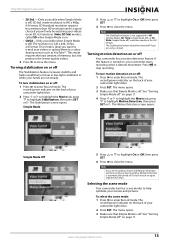
...it back on an SD, 4:3 television. The menu opens. 3 Make sure that Simple Mode is off ) SD Std. mode resolution is turned on, your videos on again, repeat these steps. The record/power indicator on or off The Stabilization feature increases stability and helps avoid blurry ...are using a tripod. This mode requires the least amount of your videos or upload them to highlight Stabilization, then press SET or . Turning motion detection on page 11. The Motion Detection screen opens. Selecting the scene mode Your camcorder has four scene modes to close the menu...
...it back on an SD, 4:3 television. The menu opens. 3 Make sure that Simple Mode is off ) SD Std. mode resolution is turned on, your videos on again, repeat these steps. The record/power indicator on or off The Stabilization feature increases stability and helps avoid blurry ...are using a tripod. This mode requires the least amount of your videos or upload them to highlight Stabilization, then press SET or . Turning motion detection on page 11. The Motion Detection screen opens. Selecting the scene mode Your camcorder has four scene modes to close the menu...
User Manual (English)
Page 18
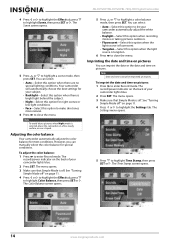
See "Turning Simple Mode off . The Color Balance screen opens. 5 Press or to highlight Time Stamp, then press SET or . The Settings menu opens. 5 ... press SET. The menu opens. 3 Make sure that Simple Mode is off " on the back of your camcorder lights blue. 2 Press SET. NS-DV720P/NS-DV720PBL 720p HD Digital Camcorder 4 Press or to highlight the Effect tab, press to enter Record mode. You can imprint the date or the date... page 11. 4 Press or to highlight a scene mode, then press SET. Note Date and time cannot be imprinted on pictures. See "Turning Simple Mode off .
See "Turning Simple Mode off . The Color Balance screen opens. 5 Press or to highlight Time Stamp, then press SET or . The Settings menu opens. 5 ... press SET. The menu opens. 3 Make sure that Simple Mode is off " on the back of your camcorder lights blue. 2 Press SET. NS-DV720P/NS-DV720PBL 720p HD Digital Camcorder 4 Press or to highlight the Effect tab, press to enter Record mode. You can imprint the date or the date... page 11. 4 Press or to highlight a scene mode, then press SET. Note Date and time cannot be imprinted on pictures. See "Turning Simple Mode off .
User Manual (English)
Page 19
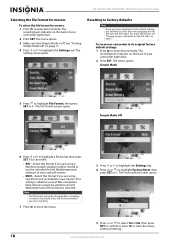
... to highlight the Settings tab. The formats are YEAR/MONTH/DAY and HOUR:MINUTES. 7 Press SET to change the values in the fields. See "Turning Simple Mode off . The Set Time/Date screen opens. To erase an SD/SDHC memory card or the internal memory: 1 Press to enter Record ... Simple Mode is inserted, the Erase feature erases the internal memory. If Simple Mode is inserted in internal memory are imprinted on pictures. • Off-Turns the time stamp feature off , the following menu opens: 5 Press to close the menu. You can select: • Date & Time-Imprints the date ...
... to highlight the Settings tab. The formats are YEAR/MONTH/DAY and HOUR:MINUTES. 7 Press SET to change the values in the fields. See "Turning Simple Mode off . The Set Time/Date screen opens. To erase an SD/SDHC memory card or the internal memory: 1 Press to enter Record ... Simple Mode is inserted, the Erase feature erases the internal memory. If Simple Mode is inserted in internal memory are imprinted on pictures. • Off-Turns the time stamp feature off , the following menu opens: 5 Press to close the menu. You can select: • Date & Time-Imprints the date ...
User Manual (English)
Page 20
...menu opens. 16 www.insigniaproducts.com The Erase Card screen opens. Erase Card Simple Mode (card inserted) Erase Memory Simple Mode Off (no card inserted) NS-DV720P/NS-DV720PBL 720p HD Digital Camcorder 4 Press or to highlight Erase Card (if a card is inserted) or Erase Memory (if a card is off ".... 4 Press or to highlight the Settings tab. The menu opens. 3 Make sure that Simple Mode is not inserted), then press SET or . See "Turning Simple Mode off . 3 Press or to highlight the Settings tab. Simple Mode (no card inserted) Simple Mode Off (card inserted) 5 Press or to ...
...menu opens. 16 www.insigniaproducts.com The Erase Card screen opens. Erase Card Simple Mode (card inserted) Erase Memory Simple Mode Off (no card inserted) NS-DV720P/NS-DV720PBL 720p HD Digital Camcorder 4 Press or to highlight Erase Card (if a card is inserted) or Erase Memory (if a card is off ".... 4 Press or to highlight the Settings tab. The menu opens. 3 Make sure that Simple Mode is not inserted), then press SET or . See "Turning Simple Mode off . 3 Press or to highlight the Settings tab. Simple Mode (no card inserted) Simple Mode Off (card inserted) 5 Press or to ...

User Manual (English)
Page 21
... on page 11. 4 Press or to highlight the Settings tab. See "Turning Simple Mode off" on or off Your camcorder can display scrolling help text on the back of your camcorder to make using your camcorder easier. ... . The record/power indicator on page 11. 4 Press or to the correct TV standard. www.insigniaproducts.com 17 See "Turning Simple Mode off . 720p HD Digital Camcorder 5 Press to enter Record mode. To turn help text to close the menu. The Settings menu opens. 6 Press SET. 7 Press or to highlight On or...
... on page 11. 4 Press or to highlight the Settings tab. See "Turning Simple Mode off" on or off Your camcorder can display scrolling help text on the back of your camcorder to make using your camcorder easier. ... . The record/power indicator on page 11. 4 Press or to the correct TV standard. www.insigniaproducts.com 17 See "Turning Simple Mode off . 720p HD Digital Camcorder 5 Press to enter Record mode. To turn help text to close the menu. The Settings menu opens. 6 Press SET. 7 Press or to highlight On or...
User Manual (English)
Page 22
... SET to confirm or press to enter Record mode. Simple Mode 5 Press to highlight a file format then press SET. For more information, see "Turning on your camcorder for the first time" on the back of Mac computers. The menu opens. 3 Make sure that Simple Mode is ideal for movies... and edit movies. • MOV-Select this format if you are using QuickTime (not included) to highlight Factory Reset, then press SET or . NS-DV720P/NS-DV720PBL 720p HD Digital Camcorder Selecting the file format for movies To select the file format for users of your camcorder to the default settings...
... SET to confirm or press to enter Record mode. Simple Mode 5 Press to highlight a file format then press SET. For more information, see "Turning on your camcorder for the first time" on the back of Mac computers. The menu opens. 3 Make sure that Simple Mode is ideal for movies... and edit movies. • MOV-Select this format if you are using QuickTime (not included) to highlight Factory Reset, then press SET or . NS-DV720P/NS-DV720PBL 720p HD Digital Camcorder Selecting the file format for movies To select the file format for users of your camcorder to the default settings...
User Manual (English)
Page 24
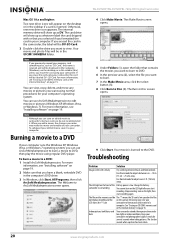
NS-DV720P/NS-DV720PBL 720p HD Digital Camcorder Mac OS 10.x and higher: Two new drive icons will appear on the desktop or in the sidebar if a card is not working You cannot turn on the memory card do not recommended it to your computer runs the Windows XP, Windows Vista, or Windows 7 operating..., and move any movies or pictures you erase the card using regular DVD player. The Welcome to Disc screen opens. 9 Click Start. Stop recording, turn on the LED light after you start recording again. The files on the light, then start recording. See "Erasing an SD/SDHC memory card or...
NS-DV720P/NS-DV720PBL 720p HD Digital Camcorder Mac OS 10.x and higher: Two new drive icons will appear on the desktop or in the sidebar if a card is not working You cannot turn on the memory card do not recommended it to your computer runs the Windows XP, Windows Vista, or Windows 7 operating..., and move any movies or pictures you erase the card using regular DVD player. The Welcome to Disc screen opens. 9 Click Start. Stop recording, turn on the LED light after you start recording again. The files on the light, then start recording. See "Erasing an SD/SDHC memory card or...


