
Quick Setup Guide (English)
Page 4
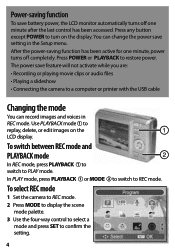
... turn on the LCD display. Power-saving function To save battery power, the LCD monitor automatically turns off completely. Press POWER or PLAYBACK to PLAY mode. To switch between REC mode and PLAYBACK mode In REC mode, press PLAYBACK to switch to restore power. to switch to replay, delete, or edit images on the display. The power save feature will not activate while you are: • Recording or playing movie clips or audio files • Playing a slideshow • Connecting the camera to a computer or printer with the USB cable Changing...
... turn on the LCD display. Power-saving function To save battery power, the LCD monitor automatically turns off completely. Press POWER or PLAYBACK to PLAY mode. To switch between REC mode and PLAYBACK mode In REC mode, press PLAYBACK to switch to restore power. to switch to replay, delete, or edit images on the display. The power save feature will not activate while you are: • Recording or playing movie clips or audio files • Playing a slideshow • Connecting the camera to a computer or printer with the USB cable Changing...
User Manual (English)
Page 3
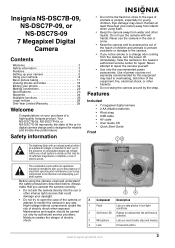
...; USB cable • AV cable • User Guide CD • Quick Start Guide Front The lightning flash with wet hands. Never attempt to the nearest authorized service center for reliable and trouble-free performance. Before using flash. • Keep the camera away from the camera, turn the power off immediately. Insignia NS-DSC7B-09, NS-DSC7P-09, or NS-DSC7S-09 7 Megapixel Digital Camera Contents Welcome 3 Safety information 3 Features 3 Setting up your camera 5 Using your camera 8 Basic picture taking 11 Viewing photos and video...
...; USB cable • AV cable • User Guide CD • Quick Start Guide Front The lightning flash with wet hands. Never attempt to the nearest authorized service center for reliable and trouble-free performance. Before using flash. • Keep the camera away from the camera, turn the power off immediately. Insignia NS-DSC7B-09, NS-DSC7P-09, or NS-DSC7S-09 7 Megapixel Digital Camera Contents Welcome 3 Safety information 3 Features 3 Setting up your camera 5 Using your camera 8 Basic picture taking 11 Viewing photos and video...

User Manual (English)
Page 4
... change camera settings. 4 Power indicator LED Lights green when the camera is on. 5 Flash button Press to cycle through the available flash options. 6 SET/DISP button In REC or PLAYBACK mode, press to change the LCD monitor view. Open to this ring. Attach the carrying strap (included) to install batteries and an optional memory card. Press to a tripod. 4 www.insignia-products.com Use to mount the camera to take a photo. Lets you connect the camera to a TV or computer. Back Insignia NS...
... change camera settings. 4 Power indicator LED Lights green when the camera is on. 5 Flash button Press to cycle through the available flash options. 6 SET/DISP button In REC or PLAYBACK mode, press to change the LCD monitor view. Open to this ring. Attach the carrying strap (included) to install batteries and an optional memory card. Press to a tripod. 4 www.insignia-products.com Use to mount the camera to take a photo. Lets you connect the camera to a TV or computer. Back Insignia NS...

User Manual (English)
Page 6
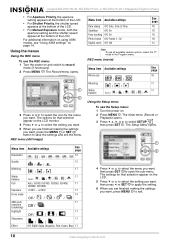
... LCD monitor. 3 Press , , , or to select Language, then press SET. To set the display language: 1 Turn the power on . 2 Press PLAY, then press MENU. The Language sub-menu opens. 5 Press or to select the language you choose a language and set the date and time before using the camera for longer than 48 hours, the date and time must be reset. 6 www.insignia-products.com The Setup Menu opens. Insignia NS-DSC7B-09, NS-DSC7P-09, or NS-DSC7S-09 7 Megapixel Digital Camera Making initial settings When using...
... LCD monitor. 3 Press , , , or to select Language, then press SET. To set the display language: 1 Turn the power on . 2 Press PLAY, then press MENU. The Language sub-menu opens. 5 Press or to select the language you choose a language and set the date and time before using the camera for longer than 48 hours, the date and time must be reset. 6 www.insignia-products.com The Setup Menu opens. Insignia NS-DSC7B-09, NS-DSC7P-09, or NS-DSC7S-09 7 Megapixel Digital Camera Making initial settings When using...
User Manual (English)
Page 7
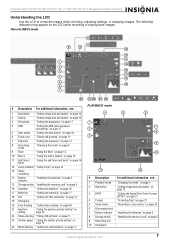
... 17 5 Date stamp "Setting the date stamp" on page 18 6 Focus area "Taking still pictures" on page 11 7 Exposure "Setting the exposure" on page 17 8 Recording mode "Changing the mode" on page 9 9 Flash "Using the flash" on page 13 10 Macro "Using the macro feature" on page 14 11 Self-timer/ Burst "Using the self-timer and burst" on page 14 12 Zoom indicator "Using Zoom" on page 13 13 Shots remaining 14 Battery indicator "Installing the batteries" on page 5 15 Storage media "Installing the memory card" on...
... 17 5 Date stamp "Setting the date stamp" on page 18 6 Focus area "Taking still pictures" on page 11 7 Exposure "Setting the exposure" on page 17 8 Recording mode "Changing the mode" on page 9 9 Flash "Using the flash" on page 13 10 Macro "Using the macro feature" on page 14 11 Self-timer/ Burst "Using the self-timer and burst" on page 14 12 Zoom indicator "Using Zoom" on page 13 13 Shots remaining 14 Battery indicator "Installing the batteries" on page 5 15 Storage media "Installing the memory card" on...
User Manual (English)
Page 8
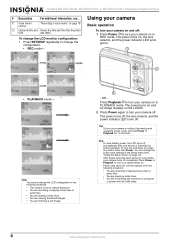
... power indicator LED turns green. • PLAYBACK mode- The power turns on and an image displays on the LCD . 2 Press Power again to turn your camera back on. Note To save does not turn your camera off in the following situations: • The camera is set to manual exposure. • You are recording or playing movie clips or audio files. • You are playing a slide show . • You are trimming a still image. - Press Power or Playback to turn the camera off . Power save battery power...
... power indicator LED turns green. • PLAYBACK mode- The power turns on and an image displays on the LCD . 2 Press Power again to turn your camera back on. Note To save does not turn your camera off in the following situations: • The camera is set to manual exposure. • You are recording or playing movie clips or audio files. • You are playing a slide show . • You are trimming a still image. - Press Power or Playback to turn the camera off . Power save battery power...

User Manual (English)
Page 9
... mode palette. Insignia NS-DSC7B-09, NS-DSC7P-09, or NS-DSC7S-09 7 Megapixel Digital Camera Changing the mode You can use a tripod for this. Icon Scene mode Description Portrait Blurs the background and focuses on your camera and set it to record mode. 2 Press the ASM button to enhance the edges of moving children. To switch between ASM modes. For recording movie clips. Kids Night scene Fireworks Snow Lets you use the playback mode to help...
... mode palette. Insignia NS-DSC7B-09, NS-DSC7P-09, or NS-DSC7S-09 7 Megapixel Digital Camera Changing the mode You can use a tripod for this. Icon Scene mode Description Portrait Blurs the background and focuses on your camera and set it to record mode. 2 Press the ASM button to enhance the edges of moving children. To switch between ASM modes. For recording movie clips. Kids Night scene Fireworks Snow Lets you use the playback mode to help...
User Manual (English)
Page 10
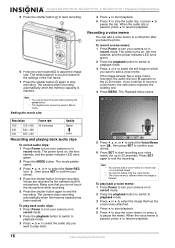
... Quality Metering White balance ISO Exposure Drive mode / / / / / / / / / / Auto, ISO50, ISO100, ISO200, ISO400, ISO800, ISO1600 -2.0EV ... +2.0EV See page 12 12 17 17 17 17 14 4 Press or to select the menu you want , press the MENU or SET button to select SETUP , then press SET . Menu item Available settings Date stamp Off, Date, Date & Time Stabilizer Off, On Face tracking Off, On Photo frame Off, Frame 1~10 Digital zoom Off, ON...
... Quality Metering White balance ISO Exposure Drive mode / / / / / / / / / / Auto, ISO50, ISO100, ISO200, ISO400, ISO800, ISO1600 -2.0EV ... +2.0EV See page 12 12 17 17 17 17 14 4 Press or to select the menu you want , press the MENU or SET button to select SETUP , then press SET . Menu item Available settings Date stamp Off, Date, Date & Time Stabilizer Off, On Face tracking Off, On Photo frame Off, Frame 1~10 Digital zoom Off, ON...

User Manual (English)
Page 11
... photos you set the date and time. Insignia NS-DSC7B-09, NS-DSC7P-09, or NS-DSC7S-09 7 Megapixel Digital Camera Setup menu Menu item Sounds Auto Review Power Save Date & Time Language File No. See the note on page 9.) Lets you view camera images on page 24). Resetting the file number is too slow, the image may be deleted, including protected files. Lets you set the time that situation the shake warning icon appears on page 18. A "BUSY...PLEASE WAIT" message displays when the format begins. If the shutter speed...
... photos you set the date and time. Insignia NS-DSC7B-09, NS-DSC7P-09, or NS-DSC7S-09 7 Megapixel Digital Camera Setup menu Menu item Sounds Auto Review Power Save Date & Time Language File No. See the note on page 9.) Lets you view camera images on page 24). Resetting the file number is too slow, the image may be deleted, including protected files. Lets you set the time that situation the shake warning icon appears on page 18. A "BUSY...PLEASE WAIT" message displays when the format begins. If the shutter speed...
User Manual (English)
Page 12
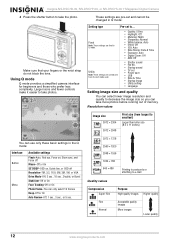
... • White balance: Auto • Effect: Off • ISO: Auto • Date Stamp: Date & Time • Exposure: Auto • Digital Zoom: Off • AEB: Off • Shutter sound • File No. • Startup sound • TV out • Power save • USB • Date & Time • Startup image • Utility setting • Language Setting image size and quality You can take the photo. These settings are fixed in the Q mode: Interface Button Menu Available settings Flash-Auto, Red eye, Force on, Slow sync, and Force off Macro-Off or On SET/DISP...
... • White balance: Auto • Effect: Off • ISO: Auto • Date Stamp: Date & Time • Exposure: Auto • Digital Zoom: Off • AEB: Off • Shutter sound • File No. • Startup sound • TV out • Power save • USB • Date & Time • Startup image • Utility setting • Language Setting image size and quality You can take the photo. These settings are fixed in the Q mode: Interface Button Menu Available settings Flash-Auto, Red eye, Force on, Slow sync, and Force off Macro-Off or On SET/DISP...
User Manual (English)
Page 13
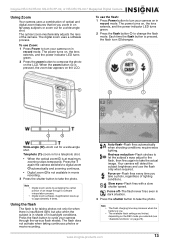
... flash: 1 Press Power button to turn your camera through a software interpolation process. Auto flash-Flash fires automatically when shooting conditions require extra lighting. To use the flash only when required. The available flash settings are limited, depending on in record mode. The power turns on, the lens extends, and the power indicator LED turns green. 2 Press the flash button to compose the photo on in record mode. Digital zoom achieves magnification levels up to take the photo. Press the flash button to take the actual image. Your camera...
... flash: 1 Press Power button to turn your camera through a software interpolation process. Auto flash-Flash fires automatically when shooting conditions require extra lighting. To use the flash only when required. The available flash settings are limited, depending on in record mode. The power turns on, the lens extends, and the power indicator LED turns green. 2 Press the flash button to compose the photo on in record mode. Digital zoom achieves magnification levels up to take the photo. Press the flash button to take the actual image. Your camera...

User Manual (English)
Page 14
... macro mode. 3 Press the shutter button to turn your camera on very close subjects. Note Distances referred to record a series of continuous still images. To use the aperture priority setting: 1 Press Power to take the photo. Release the shutter button to stop shooting. 5 Press the shutter button to enter macro mode. Note When using the self-timer, make sure that lets you can focus on , the lens extends, and the power indicator LED turns green. 2 Press the macro button to take the photo. Using ASM settings Using the aperture priority setting...
... macro mode. 3 Press the shutter button to turn your camera on very close subjects. Note Distances referred to record a series of continuous still images. To use the aperture priority setting: 1 Press Power to take the photo. Release the shutter button to stop shooting. 5 Press the shutter button to enter macro mode. Note When using the self-timer, make sure that lets you can focus on , the lens extends, and the power indicator LED turns green. 2 Press the macro button to take the photo. Using ASM settings Using the aperture priority setting...

User Manual (English)
Page 15
..., and the power indicator LED turns green. 2 Press the ASM button to turn your camera on , the lens extends, and the power indicator LED turns green. 2 Press the MODE button. To use the manual exposure setting: 1 Press Power to select the aperture setting you take the photo. Faster shutter speeds let you want . The shutter speed automatically adjusts itself for the best photo. 4 Press the shutter button to take movie clips: 1 Press Power to toggle between ASM modes. Using the manual exposure setting In this mode you shoot without a flash in red. The aperture...
..., and the power indicator LED turns green. 2 Press the ASM button to turn your camera on , the lens extends, and the power indicator LED turns green. 2 Press the MODE button. To use the manual exposure setting: 1 Press Power to select the aperture setting you take the photo. Faster shutter speeds let you want . The shutter speed automatically adjusts itself for the best photo. 4 Press the shutter button to take movie clips: 1 Press Power to toggle between ASM modes. Using the manual exposure setting In this mode you shoot without a flash in red. The aperture...
User Manual (English)
Page 16
... turn your camera on , the lens extends, and the power indicator LED turns green. 2 Press the MODE button. The white balance is set and locked to the settings of the first frame. 7 Press the shutter button again to a movie clip or a protected image. You cannot delete only the voice memo. To record a voice memo: 1 Press Power to turn your choice. 4 Press the shutter button to adjust the image size. Voices are recorded by the camera's built-in Movie mode. If you take the photo. Insignia NS...
... turn your camera on , the lens extends, and the power indicator LED turns green. 2 Press the MODE button. The white balance is set and locked to the settings of the first frame. 7 Press the shutter button again to a movie clip or a protected image. You cannot delete only the voice memo. To record a voice memo: 1 Press Power to turn your choice. 4 Press the shutter button to adjust the image size. Voices are recorded by the camera's built-in Movie mode. If you take the photo. Insignia NS...
User Manual (English)
Page 17
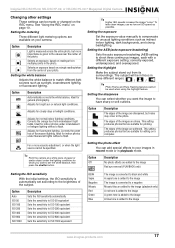
... set the white balance, then press the shutter button. This setting produces photos that are sharp. Option Off Description No photo effects are available on page 10. Insignia NS-DSC7B-09, NS-DSC7P-09, or NS-DSC7S-09 7 Megapixel Digital Camera Changing other settings These settings can select whether you want the image to shoot three continuous images, each with a different exposure setting: correctly exposed, underexposed, and overexposed. See "Using the REC menu" on your images in record mode...
... set the white balance, then press the shutter button. This setting produces photos that are sharp. Option Off Description No photo effects are available on page 10. Insignia NS-DSC7B-09, NS-DSC7P-09, or NS-DSC7S-09 7 Megapixel Digital Camera Changing other settings These settings can select whether you want the image to shoot three continuous images, each with a different exposure setting: correctly exposed, underexposed, and overexposed. See "Using the REC menu" on your images in record mode...
User Manual (English)
Page 18
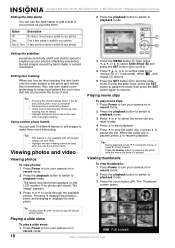
... the playback button to switch to playback mode. If the AF area shows green, focus is paused, press to resume playback. The latest recorded photo appears on in the photo and follows their movements. Under some environmental influences, face tracking may be used when using face tracking. Viewing photos and video Viewing photos To view photos: 1 Press Power to turn your camera on the LCD monitor. Insignia NS-DSC7B-09, NS-DSC7P-09, or NS-DSC7S-09 7 Megapixel Digital Camera Setting the date stamp...
... the playback button to switch to playback mode. If the AF area shows green, focus is paused, press to resume playback. The latest recorded photo appears on in the photo and follows their movements. Under some environmental influences, face tracking may be used when using face tracking. Viewing photos and video Viewing photos To view photos: 1 Press Power to turn your camera on the LCD monitor. Insignia NS-DSC7B-09, NS-DSC7P-09, or NS-DSC7S-09 7 Megapixel Digital Camera Setting the date stamp...

User Manual (English)
Page 19
... increase) the size of the photo is saved as a new file. Tip You can protect or delete multiple photos in record mode. 2 Press the playback button to switch to playback mode. 3 Press or to select the photo you want to magnify or trim. 4 Press the MENU button, then press , , , or to select Rotate and press SET to confirm. 5 Press SET to normal size. - Insignia NS-DSC7B-09, NS-DSC7P-09, or NS-DSC7S-09 7 Megapixel Digital Camera 4 Press...
... increase) the size of the photo is saved as a new file. Tip You can protect or delete multiple photos in record mode. 2 Press the playback button to switch to playback mode. 3 Press or to select the photo you want to magnify or trim. 4 Press the MENU button, then press , , , or to select Rotate and press SET to confirm. 5 Press SET to normal size. - Insignia NS-DSC7B-09, NS-DSC7P-09, or NS-DSC7S-09 7 Megapixel Digital Camera 4 Press...
User Manual (English)
Page 21
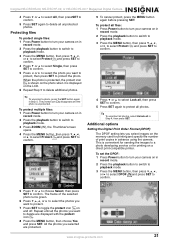
... select the photo you want to protect. 7 Press SET to toggle the protect icon on a direct print-compatible printer. All the photos you want to delete are protected. www.insignia-products.com 21 To protect multiple files: 1 Press Power button to turn your camera on in advance using the camera. Additional options Setting the Digital Print Order Format (DPOF) The DPOF setting lets you select images on in record mode. 2 Press the playback button to switch to playback mode. 3 Press ZOOM (W), the Thumbnail screen opens. 4 Press the MENU button, then...
... select the photo you want to protect. 7 Press SET to toggle the protect icon on a direct print-compatible printer. All the photos you want to delete are protected. www.insignia-products.com 21 To protect multiple files: 1 Press Power button to turn your camera on in advance using the camera. Additional options Setting the Digital Print Order Format (DPOF) The DPOF setting lets you select images on in record mode. 2 Press the playback button to switch to playback mode. 3 Press ZOOM (W), the Thumbnail screen opens. 4 Press the MENU button, then...

User Manual (English)
Page 22
... image is deleted or the memory formatted. 4 Set the TV input signal to 7 for more information. Making connections Connecting the camera to a TV Use this connection to display recorded images on a television with your TV for additional photos you specified in internal memory, so it again to turn off the date stamp. 8 Repeat Steps 5 to Video In. Refer to playback mode. Connecting the camera to a computer To connect the camera to a computer: 1 Connect the camera to the computer using (See "Setup menu...
... image is deleted or the memory formatted. 4 Set the TV input signal to 7 for more information. Making connections Connecting the camera to a TV Use this connection to display recorded images on a television with your TV for additional photos you specified in internal memory, so it again to turn off the date stamp. 8 Repeat Steps 5 to Video In. Refer to playback mode. Connecting the camera to a computer To connect the camera to a computer: 1 Connect the camera to the computer using (See "Setup menu...
User Manual (English)
Page 23
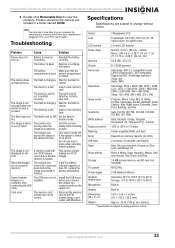
... digital zoom LCD monitor 2.5-inch LCD monitor Focus range Normal: 31.5 in. (80 cm) ~ infinity Macro: (W) 5.9 in.~3.28 ft. (15 cm ~1 m) (T) 15.75 in memory. a photo. This camera cannot display non-DCIF images. Reinstall the battery correctly. The battery is not installed. Install the USB driver before the image was turned off Photo effects Black & White, Sepia, Negative, Mosaic, Red eye removal, Red, Green, and Blue Storage 16 MB internal memory and SD card (not included) TV system NTSC/PAL Power...
... digital zoom LCD monitor 2.5-inch LCD monitor Focus range Normal: 31.5 in. (80 cm) ~ infinity Macro: (W) 5.9 in.~3.28 ft. (15 cm ~1 m) (T) 15.75 in memory. a photo. This camera cannot display non-DCIF images. Reinstall the battery correctly. The battery is not installed. Install the USB driver before the image was turned off Photo effects Black & White, Sepia, Negative, Mosaic, Red eye removal, Red, Green, and Blue Storage 16 MB internal memory and SD card (not included) TV system NTSC/PAL Power...


