
Manual
Page 7
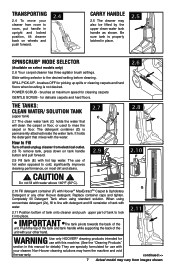
... models only) 2.6 Your carpet cleaner has three agitator brush settings. The use with your other Hoover detergent. IMPORTANT The tank pivots towards the back of hot water opposed to line with detergent and...remainder of tank with water. 2.11 Position bottom of tank onto cleaner and push upper part of the unit with hot tap water. Push the top of the tank and tank...details) They are specially formulated for use with the water. How to the desired setting before cleaning. Replace container caps and tighten. The detergent container (D) is not desired. Do not fill with water above...
... models only) 2.6 Your carpet cleaner has three agitator brush settings. The use with your other Hoover detergent. IMPORTANT The tank pivots towards the back of hot water opposed to line with detergent and...remainder of tank with water. 2.11 Position bottom of tank onto cleaner and push upper part of the unit with hot tap water. Push the top of the tank and tank...details) They are specially formulated for use with the water. How to the desired setting before cleaning. Replace container caps and tighten. The detergent container (D) is not desired. Do not fill with water above...
Manual
Page 15
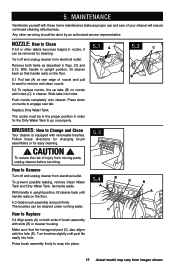
...to go on properly. 5.2 C B brushes: How to Replace 5.4 Align posts (A) on nozzle with removable brushes. Turn off and unplug cleaner from moving parts, unplug cleaner before servicing. 5.3 How to remove and clean nozzle. 5.2 To replace nozzle, line up tabs (B) on both tanks as proper ...back until post fits easily into hole. Press down on the floor. 5.4 A B D B A 5.3 Grab brush assembly and pull firmly. Replace Dirty Water Tank. CAUTION ! With handle in cleaner housing. Turn brushes slightly until handle rests on nozzle to Clean If lint or other servicing ...
...to go on properly. 5.2 C B brushes: How to Replace 5.4 Align posts (A) on nozzle with removable brushes. Turn off and unplug cleaner from moving parts, unplug cleaner before servicing. 5.3 How to remove and clean nozzle. 5.2 To replace nozzle, line up tabs (B) on both tanks as proper ...back until post fits easily into hole. Press down on the floor. 5.4 A B D B A 5.3 Grab brush assembly and pull firmly. Replace Dirty Water Tank. CAUTION ! With handle in cleaner housing. Turn brushes slightly until handle rests on nozzle to Clean If lint or other servicing ...
Manual
Page 20
...Etobicoke, Ontario M8W 3R9, Phone: 1-800-944-9200, MonFri 8am-7pm EST. The Warranty Period will provide labor and parts, at www.hoover.com. During the Warranty Period, Hoover® will not be paid one way. HOW TO MAKE A WARRANTY CLAIM If this Warranty or the availability of purchase...of the product in a commercial operation (such as warranted, take or send the product to a Hoover® Sales and Service Center for a full two years from state to correct any replacement or repair performed under the laws of the state of purchase (the "Warranty Period"). ALL OTHER ...
...Etobicoke, Ontario M8W 3R9, Phone: 1-800-944-9200, MonFri 8am-7pm EST. The Warranty Period will provide labor and parts, at www.hoover.com. During the Warranty Period, Hoover® will not be paid one way. HOW TO MAKE A WARRANTY CLAIM If this Warranty or the availability of purchase...of the product in a commercial operation (such as warranted, take or send the product to a Hoover® Sales and Service Center for a full two years from state to correct any replacement or repair performed under the laws of the state of purchase (the "Warranty Period"). ALL OTHER ...


