Manual
Page 11
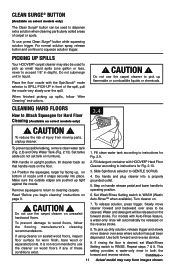
... 2.10. 3.4 Position the squeegee, larger lip facing up spills, follow the flooring manufacturer's cleaning recommendations. Place the floor nozzle with HOOVER® Hard Floor that handle rests on . ! Cleaner according to instructions for worn finish, bare wood or separated joints. Do not...return to WASH (Wash/ Auto-Rinse™ when available). Turn cleaner on the floor. CAUTION ! To prevent possible leaking, remove clean water tank (Fig. 2.8) and Dirty Water Tank (Fig. 2.13). To pick up small liquid spills (one gallon or less, never to exceed 1/8" in both ...
... 2.10. 3.4 Position the squeegee, larger lip facing up spills, follow the flooring manufacturer's cleaning recommendations. Place the floor nozzle with HOOVER® Hard Floor that handle rests on . ! Cleaner according to instructions for worn finish, bare wood or separated joints. Do not...return to WASH (Wash/ Auto-Rinse™ when available). Turn cleaner on the floor. CAUTION ! To prevent possible leaking, remove clean water tank (Fig. 2.8) and Dirty Water Tank (Fig. 2.13). To pick up small liquid spills (one gallon or less, never to exceed 1/8" in both ...
Manual
Page 15
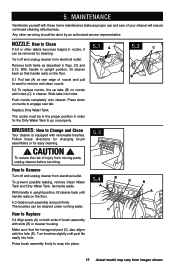
...replace nozzle, line up tabs (B) on nozzle with the hole (D). To prevent possible leaking, remove Clean Water Tank and Dirty Water Tank. Press brush assembly firmly to engage rear tab. Press down on both tanks as proper use and care of brush assembly with removable brushes. Replace Dirty Water... Turn off and unplug cleaner from electrical outlet. MAINTENANCE Familiarize yourself with these directions for changing brush assemblies or for the Dirty Water Tank to go on the floor. 5.1 Pull tab (A) at rear edge of injury from moving parts, unplug cleaner before servicing. 5.3 ...
...replace nozzle, line up tabs (B) on nozzle with the hole (D). To prevent possible leaking, remove Clean Water Tank and Dirty Water Tank. Press brush assembly firmly to engage rear tab. Press down on both tanks as proper use and care of brush assembly with removable brushes. Replace Dirty Water... Turn off and unplug cleaner from electrical outlet. MAINTENANCE Familiarize yourself with these directions for changing brush assemblies or for the Dirty Water Tank to go on the floor. 5.1 Pull tab (A) at rear edge of injury from moving parts, unplug cleaner before servicing. 5.3 ...
Manual
Page 18
...cleaner before use. • Empty Dirty Water Tank when full or when automatic shut-off engages. 7. Customers) or hoover.ca (Canadian customers). In Canada, contact Hoover® Canada, Toronto: 755 Progress Ave., Scarborough, ON M1H 2W7 OR Hoover® Canada, Edmonton: 18129-111 Ave., ...in water tank. others may foam too much, or cause leaking, or damage cleaner. • Use extra dry strokes to Hoover®, Inc., Company in delay. CAUTION ! Service To obtain approved Hoover® service and genuine Hoover® parts, locate the nearest Authorized Hoover® Warranty...
...cleaner before use. • Empty Dirty Water Tank when full or when automatic shut-off engages. 7. Customers) or hoover.ca (Canadian customers). In Canada, contact Hoover® Canada, Toronto: 755 Progress Ave., Scarborough, ON M1H 2W7 OR Hoover® Canada, Edmonton: 18129-111 Ave., ...in water tank. others may foam too much, or cause leaking, or damage cleaner. • Use extra dry strokes to Hoover®, Inc., Company in delay. CAUTION ! Service To obtain approved Hoover® service and genuine Hoover® parts, locate the nearest Authorized Hoover® Warranty...


