Manual
Page 2
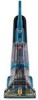
CODE Hint: Attach your HOOVER® product. Model MFG. Manufacturing code (Label located on lower handle of cleaner) Contents Important Safeguards 3 Cleaner Assembly...5 How To Use...6 Cleaner Description 6 The Tanks...7 How to Clean...9 Tools...12 Maintenance...15 Nozzle...15 Brushes...15 ...Storage...16 Lubrication...16 Troubleshooting...17 Helpful Reminders 17 Service...18 Cleaning Products...19 Warranty...20 If you need assistance: Visit our website at Hoover.com or call ...
CODE Hint: Attach your HOOVER® product. Model MFG. Manufacturing code (Label located on lower handle of cleaner) Contents Important Safeguards 3 Cleaner Assembly...5 How To Use...6 Cleaner Description 6 The Tanks...7 How to Clean...9 Tools...12 Maintenance...15 Nozzle...15 Brushes...15 ...Storage...16 Lubrication...16 Troubleshooting...17 Helpful Reminders 17 Service...18 Cleaning Products...19 Warranty...20 If you need assistance: Visit our website at Hoover.com or call ...
Manual
Page 4
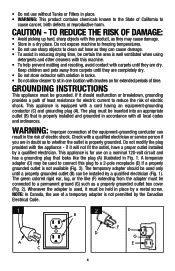
... is well ventilated when using detergents and other cleaners with this product, as they are completely dry. • Do not store extractor with solution in tanks. • Do not allow cleaner to clean out hose as to a 2-pole receptacle (E) if a properly grounded outlet is used, it must be installed by a qualified...
... is well ventilated when using detergents and other cleaners with this product, as they are completely dry. • Do not store extractor with solution in tanks. • Do not allow cleaner to clean out hose as to a 2-pole receptacle (E) if a properly grounded outlet is used, it must be installed by a qualified...
Manual
Page 5
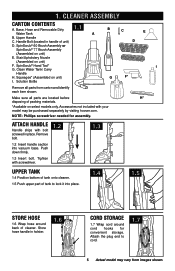
...before H* disposing of unit) D. Clean Water Tank/ Carry Handle H. Accessories not included with screwdriver. 1.2 1.3 upper tank 1.4 Position bottom of tank onto cleaner. 1.5 Push upper part of tank to cord. 1.7 5 Actual model may be purchased separately by visiting hoover.com. attaCh handle Handle ships with bolt ... hose handle in place. Attach the plug end to lock it into vacuum base. Base, Hose and Removable Dirty 1.1 Water Tank A B. Stair/Upholstery Nozzle (Assembled on unit) E. Make sure all parts from images shown. Upper Handle C. Tighten with...
...before H* disposing of unit) D. Clean Water Tank/ Carry Handle H. Accessories not included with screwdriver. 1.2 1.3 upper tank 1.4 Position bottom of tank onto cleaner. 1.5 Push upper part of tank to cord. 1.7 5 Actual model may be purchased separately by visiting hoover.com. attaCh handle Handle ships with bolt ... hose handle in place. Attach the plug end to lock it into vacuum base. Base, Hose and Removable Dirty 1.1 Water Tank A B. Stair/Upholstery Nozzle (Assembled on unit) E. Make sure all parts from images shown. Upper Handle C. Tighten with...
Manual
Page 6
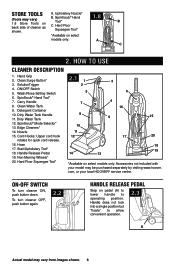
... on select models only. Clean Surge Button* 3. Detergent Container 10. Stair/Upholstery Tool* 18. Handle Release Pedal 19. Accessories not included with your local HOOVER® service center. To turn cleaner ON, push button down. Carry Handle 8. Hard Floor Squeegee Tool* 2.1 1 2 5 7 8 10 11 12...cleaner as shown. Upholstery Nozzle* B. HOW TO USE Cleaner Description 1. SolutionTrigger 4. SpinScrub® Hand Tool* 7. Nozzle 15. Clean Water Tank 9. com, or your model may vary from images shown. 6 Wash/Rinse Setting Switch 6. A. Store tools (Tools may vary) 1.8 ...
... on select models only. Clean Surge Button* 3. Detergent Container 10. Stair/Upholstery Tool* 18. Handle Release Pedal 19. Accessories not included with your local HOOVER® service center. To turn cleaner ON, push button down. Carry Handle 8. Hard Floor Squeegee Tool* 2.1 1 2 5 7 8 10 11 12...cleaner as shown. Upholstery Nozzle* B. HOW TO USE Cleaner Description 1. SolutionTrigger 4. SpinScrub® Hand Tool* 7. Nozzle 15. Clean Water Tank 9. com, or your model may vary from images shown. 6 Wash/Rinse Setting Switch 6. A. Store tools (Tools may vary) 1.8 ...
Manual
Page 7
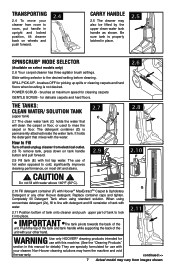
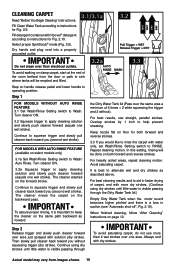
...models only) 2.6 Your carpet cleaner has three agitator brush settings. IMPORTANT The tank pivots towards the back of hot water opposed to rinse the carpet or floor. Non-Hoover cleaning solutions may vary from images shown. CAUTION ! When using standard solution....from electrical outlet. 2.8 To remove tank, press down on tank handle button and pull forward. 2.9 2.9 Fill tank (E) with your other Hoover detergent. SPILL PICK-UP - Be sure tank is permanently attached inside the water tank. Completely fill Detergent Tank when using concentrate detergent (2x), fill...
...models only) 2.6 Your carpet cleaner has three agitator brush settings. IMPORTANT The tank pivots towards the back of hot water opposed to rinse the carpet or floor. Non-Hoover cleaning solutions may vary from images shown. CAUTION ! When using standard solution....from electrical outlet. 2.8 To remove tank, press down on tank handle button and pull forward. 2.9 2.9 Fill tank (E) with your other Hoover detergent. SPILL PICK-UP - Be sure tank is permanently attached inside the water tank. Completely fill Detergent Tank when using concentrate detergent (2x), fill...
Manual
Page 8
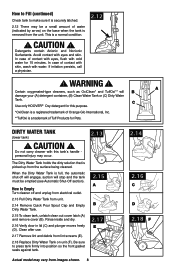
... up from unit. 2.14 Remove Quick Pour Spout Cap and Empty Dirty Water Tank. 2.15 To clean tank, unlatch clean out cover latch (A) and remove cover (B). C Use only HOOVER® Oxy detergent for this tank's handle personal injury may vary from the unit. Be sure to empty Turn ...cleaner off will engage, suction will B A damage your (A) detergent container, (B) Clean Water Tank or (C) Dirty Water Tank. In case of contact with eyes, ...
... up from unit. 2.14 Remove Quick Pour Spout Cap and Empty Dirty Water Tank. 2.15 To clean tank, unlatch clean out cover latch (A) and remove cover (B). C Use only HOOVER® Oxy detergent for this tank's handle personal injury may vary from the unit. Be sure to empty Turn ...cleaner off will engage, suction will B A damage your (A) detergent container, (B) Clean Water Tank or (C) Dirty Water Tank. In case of contact with eyes, ...
Manual
Page 9
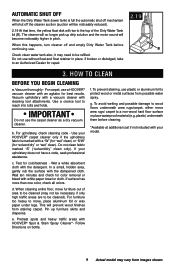
... from possible water spray. Test for best results. In a small, hidden area, gently rub the surface with HOOVER® Spot & Stain Spray Cleaner*- B Check clean water tank also; Do not use the carpet cleaner as a dry vacuum cleaner. For furniture too heavy to be refilled....To avoid wetting and possible damage to wood floors underneath area rugs/carpet, either move furniture out of the Dirty Water Tank lid (B). c. g. Automatic shut off When the Dirty Water Tank (lower tank) is marked with a "W" (for "wet" clean) or "S/W" (for color removal or bleed with your upholstery ...
... from possible water spray. Test for best results. In a small, hidden area, gently rub the surface with HOOVER® Spot & Stain Spray Cleaner*- B Check clean water tank also; Do not use the carpet cleaner as a dry vacuum cleaner. For furniture too heavy to be refilled....To avoid wetting and possible damage to wood floors underneath area rugs/carpet, either move furniture out of the Dirty Water Tank lid (B). c. g. Automatic shut off When the Dirty Water Tank (lower tank) is marked with a "W" (for "wet" clean) or "S/W" (for color removal or bleed with your upholstery ...
Manual
Page 10
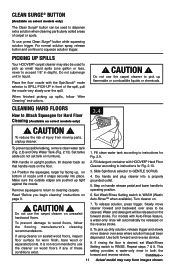
...In this setting, rinsing will be done on the forward stroke. Actual model may vary from the door or path to sink where tanks will be emptied and filled. 3.2a AUTO RINSE WASH 3.3 RINSE WASH Step on page 12. Turn cleaner ON. 3.2a Squeeze...strokes until little water is a loss in faster drying of carpet, end with Hoover® detergent according to instructions for Fig. 2.9. 8&5 8&5 %3: %3: Cleaning Carpet 3.1/3.1a Read "Before You Begin Cleaning" instructions. 3.2 Fill Clean Water Tank according to instructions for Fig. 2.10. IMPORTANT To assure proper rinsing, it...
...In this setting, rinsing will be done on the forward stroke. Actual model may vary from the door or path to sink where tanks will be emptied and filled. 3.2a AUTO RINSE WASH 3.3 RINSE WASH Step on page 12. Turn cleaner ON. 3.2a Squeeze...strokes until little water is a loss in faster drying of carpet, end with Hoover® detergent according to instructions for Fig. 2.9. 8&5 8&5 %3: %3: Cleaning Carpet 3.1/3.1a Read "Before You Begin Cleaning" instructions. 3.2 Fill Clean Water Tank according to instructions for Fig. 2.10. IMPORTANT To assure proper rinsing, it...
Manual
Page 11
...to dispense extra solution when cleaning particularly soiled areas of carpet or spots. Make sure the outside edges are pushed up spills Your HOOVER® carpet cleaner may vary from moving parts, unplug cleaner. Read "Before you begin cleaning" instructions on . ! Turn cleaner...it snaps securely into a properly grounded outlet. 5. Place the floor nozzle with HOOVER® Hard Floor that handle rests on bottom of injury from images shown. CAUTION ! Fill clean water tank according to cleaning carpets. Remove squeegee to return to instructions for Fig. 2.10...
...to dispense extra solution when cleaning particularly soiled areas of carpet or spots. Make sure the outside edges are pushed up spills Your HOOVER® carpet cleaner may vary from moving parts, unplug cleaner. Read "Before you begin cleaning" instructions on . ! Turn cleaner...it snaps securely into a properly grounded outlet. 5. Place the floor nozzle with HOOVER® Hard Floor that handle rests on bottom of injury from images shown. CAUTION ! Fill clean water tank according to cleaning carpets. Remove squeegee to return to instructions for Fig. 2.10...
Manual
Page 12
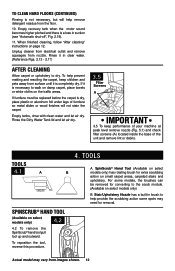
... on select models only) 4.2 4.2 To remove the SpinScrub® hand tool pull tool up and outward. If it is completely dry. Empty tanks, rinse with clean water and let air dry. If furniture must be removed for converting to dry. Actual model may need for extra scrubbing action... from images shown. 12 TOOLS A. To clean HARD floorS (Continued) Rinsing is not necessary, but will not stain the carpet. Rinse the Dirty Water Tank lid and let air dry. 3.5 Filter Screens A IMPORTANT 3.5 To keep children and pets away from the floor. 10. SpinScrub® Hand Tool (...
... on select models only) 4.2 4.2 To remove the SpinScrub® hand tool pull tool up and outward. If it is completely dry. Empty tanks, rinse with clean water and let air dry. If furniture must be removed for converting to dry. Actual model may need for extra scrubbing action... from images shown. 12 TOOLS A. To clean HARD floorS (Continued) Rinsing is not necessary, but will not stain the carpet. Rinse the Dirty Water Tank lid and let air dry. 3.5 Filter Screens A IMPORTANT 3.5 To keep children and pets away from the floor. 10. SpinScrub® Hand Tool (...
Manual
Page 13
... hose down to the floor and hold the trigger for up on floor. Pull tool slowly over the carpet (second wet stroke). Always end with HOOVER® detergent according to 1 min. 4.4 Pre-spray the carpeted stair by holding the tool (A) or (B) about one inch above . When finished cleaning... the carpet is necessary, wait until the tab (G) locks it may vary from moving parts, unplug cleaner before using the tool again. Empty Dirty Water Tank when the motor sound becomes higher pitched and there is in faster drying of stroke. 4.4 4.5 A B 4.5 Lift tool, and position it into a ...
... hose down to the floor and hold the trigger for up on floor. Pull tool slowly over the carpet (second wet stroke). Always end with HOOVER® detergent according to 1 min. 4.4 Pre-spray the carpeted stair by holding the tool (A) or (B) about one inch above . When finished cleaning... the carpet is necessary, wait until the tab (G) locks it may vary from moving parts, unplug cleaner before using the tool again. Empty Dirty Water Tank when the motor sound becomes higher pitched and there is in faster drying of stroke. 4.4 4.5 A B 4.5 Lift tool, and position it into a ...
Manual
Page 14
...pressing the trigger. 4.6 4.7 4.7 For heavily soiled areas, it may vary from the fabric and press the solution trigger. Fill Clean Water Tank according to fabric. Attach tool to WASH. Set Wash/Rinse Setting switch to end of hose. Press the trigger and slowly pull the nozzle ... and rinse dirty Water Tank and let air dry. Do not use hard floor cleaning solution when cleaning upholstery. Do not point tools toward people or pets. See "After Cleaning" section (Page. 12) for additional information. Vacuum up the solution with HOOVER® detergent according to remove more...
...pressing the trigger. 4.6 4.7 4.7 For heavily soiled areas, it may vary from the fabric and press the solution trigger. Fill Clean Water Tank according to fabric. Attach tool to WASH. Set Wash/Rinse Setting switch to end of hose. Press the trigger and slowly pull the nozzle ... and rinse dirty Water Tank and let air dry. Do not use hard floor cleaning solution when cleaning upholstery. Do not point tools toward people or pets. See "After Cleaning" section (Page. 12) for additional information. Vacuum up the solution with HOOVER® detergent according to remove more...
Manual
Page 15
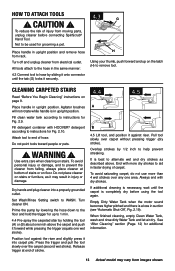
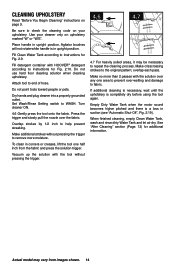
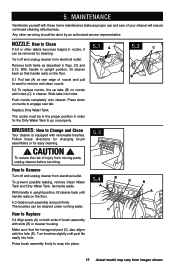
.... 5.1 Pull tab (A) at rear edge of brush assembly with holes (C) in cleaner housing. Turn brushes slightly until handle rests on both tanks as proper use and care of injury from electrical outlet. Turn off and unplug cleaner from moving parts, unplug cleaner before servicing. 5.3 How... in upright position, tilt cleaner back until post fits easily into place. 15 Actual model may vary from electrical outlet. Replace Dirty Water Tank. CAUTION ! To reduce the risk of your cleaner will ensure continued cleaning effectiveness. C How to Change and Clean Your cleaner is equipped...
.... 5.1 Pull tab (A) at rear edge of brush assembly with holes (C) in cleaner housing. Turn brushes slightly until handle rests on both tanks as proper use and care of injury from electrical outlet. Turn off and unplug cleaner from moving parts, unplug cleaner before servicing. 5.3 How... in upright position, tilt cleaner back until post fits easily into place. 15 Actual model may vary from electrical outlet. Replace Dirty Water Tank. CAUTION ! To reduce the risk of your cleaner will ensure continued cleaning effectiveness. C How to Change and Clean Your cleaner is equipped...
Manual
Page 16
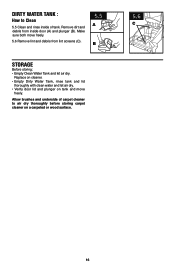
Remove dirt and debris from lint screens (C). 5.5 A B Storage Before storing: • Empty Clean Water Tank and let air dry. Replace on cleaner. • Empty Dirty Water Tank, rinse tank and lid thoroughly with clean water and let air dry. • Verify door lid and plunger on a carpeted or... wood surface. 5.6 C 16 Allow brushes and underside of tank. Make sure both move freely. Dirty Water Tank : How to air dry thoroughly before storing carpet cleaner on tank and move freely. 5.6 Remove lint and debris from inside of carpet cleaner to Clean ...
Remove dirt and debris from lint screens (C). 5.5 A B Storage Before storing: • Empty Clean Water Tank and let air dry. Replace on cleaner. • Empty Dirty Water Tank, rinse tank and lid thoroughly with clean water and let air dry. • Verify door lid and plunger on a carpeted or... wood surface. 5.6 C 16 Allow brushes and underside of tank. Make sure both move freely. Dirty Water Tank : How to air dry thoroughly before storing carpet cleaner on tank and move freely. 5.6 Remove lint and debris from inside of carpet cleaner to Clean ...
Manual
Page 17
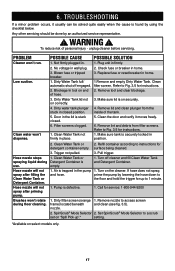
... lid and clean plunger from filter screens. Brushes won't rotate during use. SpinScrub® Mode Selector 2. Filter screens clogged. 1. Clean Water Tank or detergent container empty. 3. If hose does not spray, prime the pump by an authorized service representative. ! Remove nozzle to 1 minute.... and clean (see fig. 3.5). Replace fuse or reset breaker in place. 2. Hose nozzle will not spray after priming pump. Dirty Water Tank lid not on end of personal injury - WARNING ! Blockage In tool on correctly. 4. Blown fuse or tripped breaker. 1. Clean filter...
... lid and clean plunger from filter screens. Brushes won't rotate during use. SpinScrub® Mode Selector 2. Filter screens clogged. 1. Clean Water Tank or detergent container empty. 3. If hose does not spray, prime the pump by an authorized service representative. ! Remove nozzle to 1 minute.... and clean (see fig. 3.5). Replace fuse or reset breaker in place. 2. Hose nozzle will not spray after priming pump. Dirty Water Tank lid not on end of personal injury - WARNING ! Blockage In tool on correctly. 4. Blown fuse or tripped breaker. 1. Clean filter...
Manual
Page 18
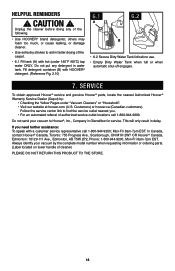
... located on lower handle of authorized service outlet locations call 1-800-944-9200; Customers) or hoover.ca (Canadian customers). Unplug the cleaner before use. • Empty Dirty Water Tank when full or when automatic shut-off engages. 7. Fill detergent container (B) with a customer ... extra dry strokes to find the service outlet nearest you need further assistance: To speak with HOOVER® detergent. (Reference Fig. 2.10) 6.1 6.2 A B • 6.2 Secure Dirty Water Tank lid before doing any detergent in delay. Follow the service center link to aid in Glenwillow ...
... located on lower handle of authorized service outlet locations call 1-800-944-9200; Customers) or hoover.ca (Canadian customers). Unplug the cleaner before use. • Empty Dirty Water Tank when full or when automatic shut-off engages. 7. Fill detergent container (B) with a customer ... extra dry strokes to find the service outlet nearest you need further assistance: To speak with HOOVER® detergent. (Reference Fig. 2.10) 6.1 6.2 A B • 6.2 Secure Dirty Water Tank lid before doing any detergent in delay. Follow the service center link to aid in Glenwillow ...


