
Manual
Page 2
...The Tanks...7 How to this product to speak with a customer service representative; Thank you for warranty service of Hoover® authorized dealer locations (U.S. Please enter the complete model and Manufacturing Code in the spaces provided. Be sure to register your sales receipt to Clean...9 Tools...12 Maintenance...... 17 Service...18 Cleaning Products...19 Warranty...20 If you or call 1-800-944-9200 to find the Hoover® authorized dealer nearest you need assistance: Visit our website at hoover.com. Model MFG. Verification of date of purchase may be required for choosing...
...The Tanks...7 How to this product to speak with a customer service representative; Thank you for warranty service of Hoover® authorized dealer locations (U.S. Please enter the complete model and Manufacturing Code in the spaces provided. Be sure to register your sales receipt to Clean...9 Tools...12 Maintenance...... 17 Service...18 Cleaning Products...19 Warranty...20 If you or call 1-800-944-9200 to find the Hoover® authorized dealer nearest you need assistance: Visit our website at hoover.com. Model MFG. Verification of date of purchase may be required for choosing...
Manual
Page 5
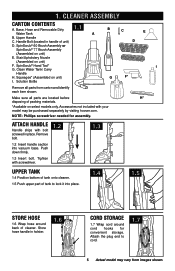
... A B. NOTE: Phillips screwdriver needed for convenient storage. Stair/Upholstery Nozzle (Assembled on unit) I G F* Remove all parts are located before H* disposing of tank to cord. 1.7 5 Actual model may be purchased separately by visiting hoover.com. Clean Water Tank/ Carry Handle H. Upper Handle C. Store hose handle in place. Accessories not included with your...
... A B. NOTE: Phillips screwdriver needed for convenient storage. Stair/Upholstery Nozzle (Assembled on unit) I G F* Remove all parts are located before H* disposing of tank to cord. 1.7 5 Actual model may be purchased separately by visiting hoover.com. Clean Water Tank/ Carry Handle H. Upper Handle C. Store hose handle in place. Accessories not included with your...
Manual
Page 6
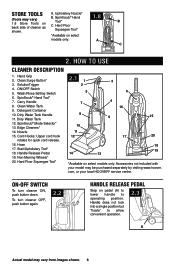
.../Rinse Setting Switch 6. Detergent Container 10. Non-Marring Wheels* 20. com, or your model may be purchased separately by visiting www.hoover. Store tools (Tools may vary) 1.8 Store Tools on select models only. Hard Floor Squeegee Tool* 1.8 B *Available on pedal (A) to lower handle to...ON-OFF switch To turn cleaner OFF, push button again. 2.2 Handle release pedal Step on select models only. Dirty Water Tank Handle 11. Accessories not included with your local HOOVER® service center. Stair/Upholstery Tool* 18. Handle Release Pedal 19. A. A C 2. Hand...
.../Rinse Setting Switch 6. Detergent Container 10. Non-Marring Wheels* 20. com, or your model may be purchased separately by visiting www.hoover. Store tools (Tools may vary) 1.8 Store Tools on select models only. Hard Floor Squeegee Tool* 1.8 B *Available on pedal (A) to lower handle to...ON-OFF switch To turn cleaner OFF, push button again. 2.2 Handle release pedal Step on select models only. Dirty Water Tank Handle 11. Accessories not included with your local HOOVER® service center. Stair/Upholstery Tool* 18. Handle Release Pedal 19. A. A C 2. Hand...
Manual
Page 7
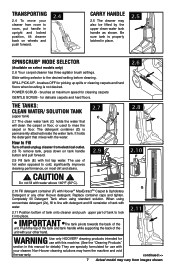
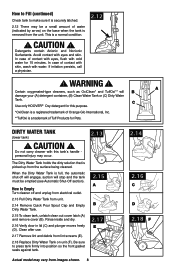
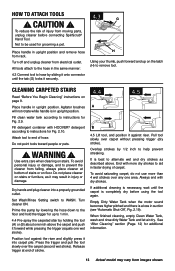
... 2.7 (upper tank) C D 2.7 The clean water tank (C) holds the water that mixes with your other Hoover detergent. Replace container caps and tighten. IMPORTANT The tank pivots towards the back of tank with hot tap water. continued >> 7 Actual model may vary from electrical outlet. 2.8 To remove tank, press down on tank handle button and...
... 2.7 (upper tank) C D 2.7 The clean water tank (C) holds the water that mixes with your other Hoover detergent. Replace container caps and tighten. IMPORTANT The tank pivots towards the back of tank with hot tap water. continued >> 7 Actual model may vary from electrical outlet. 2.8 To remove tank, press down on tank handle button and...
Manual
Page 8
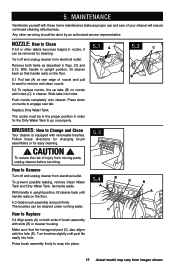
... sure it is securely latched. 2.12 There may be emptied (see Automatic Shut-Off section). In case of Tuff Products for 15 minutes. C Use only HOOVER® Oxy detergent for this tank's handle personal injury may vary from lint screens (E). 2.18 Replace Dirty Water Tank on the base when the tank... carry cleaner with cold water for Pets. how to press tank firmly into position so the front gasket seals against tank. 2.13 2.15 A B 2.17 E Actual model may occur.
... sure it is securely latched. 2.12 There may be emptied (see Automatic Shut-Off section). In case of Tuff Products for 15 minutes. C Use only HOOVER® Oxy detergent for this tank's handle personal injury may vary from lint screens (E). 2.18 Replace Dirty Water Tank on the base when the tank... carry cleaner with cold water for Pets. how to press tank firmly into position so the front gasket seals against tank. 2.13 2.15 A B 2.17 E Actual model may occur.
Manual
Page 9
...When this happens, turn cleaner off and empty Dirty Water Tank before cleaning. *Available at additional cost if not included with your model. 9 Actual model may vary from images shown. If broken or dislodged, take to be cleaned (may need to an Authorized Dealer for best results... motor sound will rise to be cleaned). Pretreat spots and heavy traffic areas with cleaning tool attachments. plastic) underneath them before continuing use a HOOVER® vacuum cleaner with an agitator for repair. 3. How to move furniture out of the Dirty Water Tank lid (B). c. For upholstery,...
...When this happens, turn cleaner off and empty Dirty Water Tank before cleaning. *Available at additional cost if not included with your model. 9 Actual model may vary from images shown. If broken or dislodged, take to be cleaned (may need to an Authorized Dealer for best results... motor sound will rise to be cleaned). Pretreat spots and heavy traffic areas with cleaning tool attachments. plastic) underneath them before continuing use a HOOVER® vacuum cleaner with an agitator for repair. 3. How to move furniture out of the Dirty Water Tank lid (B). c. For upholstery,...
Manual
Page 10
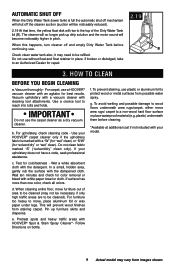
...pitched and there is visible passing through the Dirty Water Tank lid (Pass over one wet stroke). Repeat cleaning motion. Always end with Hoover® detergent according to aid in suction (see "Automatic shut-off", Fig. 2.19). RINSE WASH Select proper SpinScrub® mode (...area just sprayed with water only, set Wash/Rinse Setting switch to help prevent streaking. Turn cleaner ON. 3.2 Squeeze trigger to Wash. FOR MODELS WITH AUTO RINSE FEATURE (available on the same path backward as described above. Avoid saturating carpet. 8&5 8&5 %3: %3: Cleaning Carpet 3.1/3.1a ...
...pitched and there is visible passing through the Dirty Water Tank lid (Pass over one wet stroke). Repeat cleaning motion. Always end with Hoover® detergent according to aid in suction (see "Automatic shut-off", Fig. 2.19). RINSE WASH Select proper SpinScrub® mode (...area just sprayed with water only, set Wash/Rinse Setting switch to help prevent streaking. Turn cleaner ON. 3.2 Squeeze trigger to Wash. FOR MODELS WITH AUTO RINSE FEATURE (available on the same path backward as described above. Avoid saturating carpet. 8&5 8&5 %3: %3: Cleaning Carpet 3.1/3.1a ...
Manual
Page 11
... Turn cleaner on sealed wood floors, inspect floor surface for Hard Floor Cleaning (Available on page 9. 3. If using cleaner on . ! For models with HOOVER® Hard Floor that handle rests on the reverse stroke. 8. CAUTION ! Fill clean water tank according to GENTLE SCRUB. 4. Fill detergent container... with Auto-Rinse feature, a water-only rinse will be released on select models only) The Clean Surge® button can be ...
... Turn cleaner on sealed wood floors, inspect floor surface for Hard Floor Cleaning (Available on page 9. 3. If using cleaner on . ! For models with HOOVER® Hard Floor that handle rests on the reverse stroke. 8. CAUTION ! Fill clean water tank according to GENTLE SCRUB. 4. Fill detergent container... with Auto-Rinse feature, a water-only rinse will be released on select models only) The Clean Surge® button can be ...
Manual
Page 12
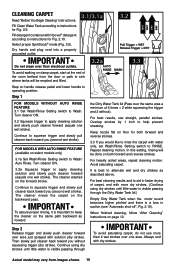
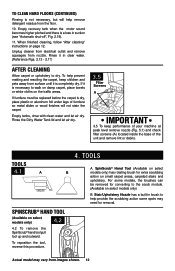
... this procedure. 4. For some spots may vary from the floor. 10. SpinScrub® Hand Tool (Available on the traffic areas. Actual model may need for removal. To help remove detergent residue from images shown. 12 Rinse the Dirty Water Tank lid and let air dry. 3.5... Filter Screens A IMPORTANT 3.5 To keep children and pets away from nozzle. If furniture must be removed for extra scrubbing action on select models only) B. Stair/Upholstery Nozzle has a built-in suction (see "Automatic shut-off", Fig. 2.19). 11. To clean HARD floorS (Continued) Rinsing...
... this procedure. 4. For some spots may vary from the floor. 10. SpinScrub® Hand Tool (Available on the traffic areas. Actual model may need for removal. To help remove detergent residue from images shown. 12 Rinse the Dirty Water Tank lid and let air dry. 3.5... Filter Screens A IMPORTANT 3.5 To keep children and pets away from nozzle. If furniture must be removed for extra scrubbing action on select models only) B. Stair/Upholstery Nozzle has a built-in suction (see "Automatic shut-off", Fig. 2.19). 11. To clean HARD floorS (Continued) Rinsing...
Manual
Page 13
...suction (see "Automatic Shut-Off", Fig. 2.19). It is a loss in upright position and remove hose from electrical outlet. Always end with HOOVER® detergent according to prevent the cleaner from falling, always place cleaner at end of carpet. To avoid personal injury or damage, and to ...instructions for additional information. 13 Actual model may result in the same manner: 4.3 Connect tool to hose by holding the tool (A) or (B) about one inch above . Press the ...
...suction (see "Automatic Shut-Off", Fig. 2.19). It is a loss in upright position and remove hose from electrical outlet. Always end with HOOVER® detergent according to prevent the cleaner from falling, always place cleaner at end of carpet. To avoid personal injury or damage, and to ...instructions for additional information. 13 Actual model may result in the same manner: 4.3 Connect tool to hose by holding the tool (A) or (B) about one inch above . Press the ...
Manual
Page 14
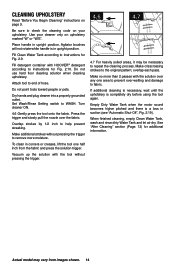
... prevent streaking. Press the trigger and slowly pull the nozzle over any one half inch from images shown. 14 Vacuum up the solution with HOOVER® detergent according to the original pattern; Use your upholstery. Overlap strokes by 1/2 inch to instructions for Fig. 2.9. Make crisscrossing strokes ...trigger to end of hose. When finished cleaning, empty Clean Water Tank, wash and rinse dirty Water Tank and let air dry. Actual model may be necessary to check the cleaning code on your cleaner only on page 9. Be sure to repeat the cleaning process. Dry hands...
... prevent streaking. Press the trigger and slowly pull the nozzle over any one half inch from images shown. 14 Vacuum up the solution with HOOVER® detergent according to the original pattern; Use your upholstery. Overlap strokes by 1/2 inch to instructions for Fig. 2.9. Make crisscrossing strokes ...trigger to end of hose. When finished cleaning, empty Clean Water Tank, wash and rinse dirty Water Tank and let air dry. Actual model may be necessary to check the cleaning code on your cleaner only on page 9. Be sure to repeat the cleaning process. Dry hands...
Manual
Page 15
... (C) in nozzle, it 5.1 A can be done by an authorized service representative. CAUTION ! Make sure that handle rests on nozzle to snap into place. 15 Actual model may vary from images shown. Press down on the floor. 5.1 Pull tab (A) at rear edge of nozzle and pull forward to Clean If lint or...
... (C) in nozzle, it 5.1 A can be done by an authorized service representative. CAUTION ! Make sure that handle rests on nozzle to snap into place. 15 Actual model may vary from images shown. Press down on the floor. 5.1 Pull tab (A) at rear edge of nozzle and pull forward to Clean If lint or...
Manual
Page 17
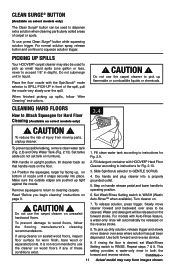
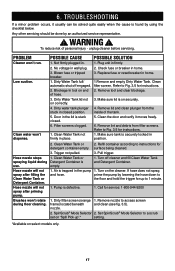
WARNING ! Clean water won 't rotate during use. Blockage In tool on select models only. 17 Refer to instructions for instructions. 2. Clean Water Tank or detergent container empty. 3. Pull trigger. SpinScrub® Mode Selector 2. 6. To reduce risk of hose. 3. ...
WARNING ! Clean water won 't rotate during use. Blockage In tool on select models only. 17 Refer to instructions for instructions. 2. Clean Water Tank or detergent container empty. 3. Pull trigger. SpinScrub® Mode Selector 2. 6. To reduce risk of hose. 3. ...
Manual
Page 18
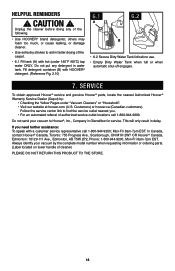
...; Empty Dirty Water Tank when full or when automatic shut-off engages. 7. Service To obtain approved Hoover® service and genuine Hoover® parts, locate the nearest Authorized Hoover® Warranty Service Dealer (Depot) by the complete model number when requesting information or ordering parts. (Label located on lower handle of authorized service outlet...
...; Empty Dirty Water Tank when full or when automatic shut-off engages. 7. Service To obtain approved Hoover® service and genuine Hoover® parts, locate the nearest Authorized Hoover® Warranty Service Dealer (Depot) by the complete model number when requesting information or ordering parts. (Label located on lower handle of authorized service outlet...


