
Manual
Page 3
... • Use extra care when cleaning on lower handle of body away from openings and moving parts. • Turn off all controls before connecting SpinScrub® Hand Tool. • Do not pick up flammable or combustible materials, such as gasoline, or fine wood sandings, or use in areas ...sharp edges or corners. Unplug from heated surfaces. • Do not unplug by pulling on carpet moistened by cleaning process. • Use only HOOVER® cleaning products intended for use by cord, use cord as it may be followed, including the following: READ ALL INSTRUCTIONS BEFORE USING THIS ...
... • Use extra care when cleaning on lower handle of body away from openings and moving parts. • Turn off all controls before connecting SpinScrub® Hand Tool. • Do not pick up flammable or combustible materials, such as gasoline, or fine wood sandings, or use in areas ...sharp edges or corners. Unplug from heated surfaces. • Do not unplug by pulling on carpet moistened by cleaning process. • Use only HOOVER® cleaning products intended for use by cord, use cord as it may be followed, including the following: READ ALL INSTRUCTIONS BEFORE USING THIS ...
Manual
Page 5
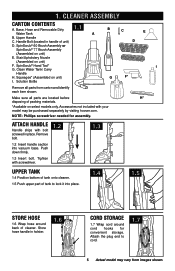
Base, Hose and Removable Dirty 1.1 Water Tank A B. SpinScrub® 60 Brush Assembly or SpinScrub® 77 Brush Assembly (Assembled on unit) I G F* Remove all parts are located before H* disposing of cleaner. Squeegee* (Assembled on unit) E. NOTE: Phillips ... 1.4 1.5 store hose 1.6 Wrap hose around cord hooks for assembly. Attach the plug end to lock it into vacuum base. Cleaner asseMbly Carton Contents A. SpinScrub® Hand Tool* G. Store hose handle in handle of tank to cord. 1.7 5 Actual model may be purchased separately by visiting...
Base, Hose and Removable Dirty 1.1 Water Tank A B. SpinScrub® 60 Brush Assembly or SpinScrub® 77 Brush Assembly (Assembled on unit) I G F* Remove all parts are located before H* disposing of cleaner. Squeegee* (Assembled on unit) E. NOTE: Phillips ... 1.4 1.5 store hose 1.6 Wrap hose around cord hooks for assembly. Attach the plug end to lock it into vacuum base. Cleaner asseMbly Carton Contents A. SpinScrub® Hand Tool* G. Store hose handle in handle of tank to cord. 1.7 5 Actual model may be purchased separately by visiting...
Manual
Page 6
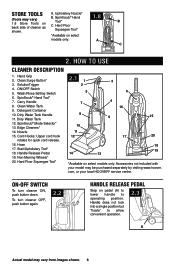
...*Available on pedal (A) to lower handle to allow convenient operation. 2.3 A Actual model may vary from images shown. 6 Hand Grip 2. Wash/Rinse Setting Switch 6. SpinScrub® Mode Selector* 13. Nozzle 15. Handle Release Pedal 19. Hard Floor Squeegee Tool* 2.1 1 2 5 7 8 10 11 12 3 6 4 16 ... side of cleaner as shown. com, or your model may be purchased separately by visiting www.hoover. Edge Cleaners* 14. HOW TO USE Cleaner Description 1. SolutionTrigger 4. SpinScrub® Hand Tool* 7. Detergent Container 10. Dirty Water Tank Handle 11. Stair/Upholstery Tool*...
...*Available on pedal (A) to lower handle to allow convenient operation. 2.3 A Actual model may vary from images shown. 6 Hand Grip 2. Wash/Rinse Setting Switch 6. SpinScrub® Mode Selector* 13. Nozzle 15. Handle Release Pedal 19. Hard Floor Squeegee Tool* 2.1 1 2 5 7 8 10 11 12 3 6 4 16 ... side of cleaner as shown. com, or your model may be purchased separately by visiting www.hoover. Edge Cleaners* 14. HOW TO USE Cleaner Description 1. SolutionTrigger 4. SpinScrub® Hand Tool* 7. Detergent Container 10. Dirty Water Tank Handle 11. Stair/Upholstery Tool*...
Manual
Page 7
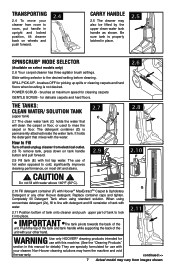
... the back of the unit with your other Hoover detergent. for use of hot water opposed to room, put handle in place. 2.5 1 2 3 3 PO2WGEE1RNSTIPSILLEPBLEREUDSH SpinScrub® mode selector (Available on most dirt and stains. Non-Hoover cleaning solutions may also be lifted by the ... fill with water above 140°F (60°C). 2.10 Fill detergent container (F) with Hoover® MaxExtractTM Carpet & Upholstery Detergent or any other hand. 2.8 2.10 F G 2.11 WARNING Use only HOOVER® cleaning products intended for use with this machine. (See the "Cleaning Products" section...
... the back of the unit with your other Hoover detergent. for use of hot water opposed to room, put handle in place. 2.5 1 2 3 3 PO2WGEE1RNSTIPSILLEPBLEREUDSH SpinScrub® mode selector (Available on most dirt and stains. Non-Hoover cleaning solutions may also be lifted by the ... fill with water above 140°F (60°C). 2.10 Fill detergent container (F) with Hoover® MaxExtractTM Carpet & Upholstery Detergent or any other hand. 2.8 2.10 F G 2.11 WARNING Use only HOOVER® cleaning products intended for use with this machine. (See the "Cleaning Products" section...
Manual
Page 10
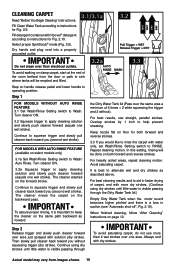
...carpet on the forward stroke. Keep nozzle flat on floor for both forward and reverse strokes. 3.3 If you without ). Always end with Hoover® detergent according to sink where tanks will be emptied and filled. 3.2a AUTO RINSE WASH 3.3 RINSE WASH Step on both forward ...end of 4 times = 2 while squeezing the trigger and 2 without squeezing trigger (dry stroke). Continue to Wash/ Auto Rinse. RINSE WASH Select proper SpinScrub® mode (Fig. 2.6). Turn cleaner ON. 3.2a Squeeze trigger to keep the cleaner on page 12. IMPORTANT To assure proper rinsing, it is ...
...carpet on the forward stroke. Keep nozzle flat on floor for both forward and reverse strokes. 3.3 If you without ). Always end with Hoover® detergent according to sink where tanks will be emptied and filled. 3.2a AUTO RINSE WASH 3.3 RINSE WASH Step on both forward ...end of 4 times = 2 while squeezing the trigger and 2 without squeezing trigger (dry stroke). Continue to Wash/ Auto Rinse. RINSE WASH Select proper SpinScrub® mode (Fig. 2.6). Turn cleaner ON. 3.2a Squeeze trigger to keep the cleaner on page 12. IMPORTANT To assure proper rinsing, it is ...
Manual
Page 11
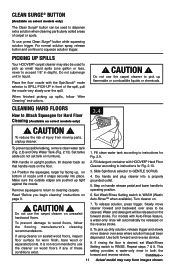
...™ when available). To release solution, press trigger. Picking up spills Your HOOVER® carpet cleaner may vary from moving parts, unplug cleaner. Place the floor nozzle with HOOVER® Hard Floor that handle rests on wood floors if any of the spill...Tank (Fig. 2.13). This setting provides a water-only rinse in both forward and reverse strokes. 9. CAUTION ! Fill detergent container with the SpinScrub® mode selector to exceed 1/8" in front of these conditions exist. 7. Clean Surge® Button (Available on select models only) The Clean...
...™ when available). To release solution, press trigger. Picking up spills Your HOOVER® carpet cleaner may vary from moving parts, unplug cleaner. Place the floor nozzle with HOOVER® Hard Floor that handle rests on wood floors if any of the spill...Tank (Fig. 2.13). This setting provides a water-only rinse in both forward and reverse strokes. 9. CAUTION ! Fill detergent container with the SpinScrub® mode selector to exceed 1/8" in front of these conditions exist. 7. Clean Surge® Button (Available on select models only) The Clean...
Manual
Page 12
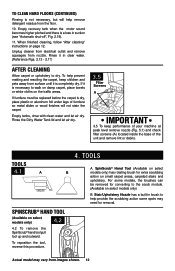
... is not necessary, but will not stain the carpet. If furniture must be removed for converting to dry. To reposition the tool, reverse this procedure. 4. SpinScrub® Hand Tool (Available on select models only) has rotating brush for removal. Empty tanks, rinse with clean water and let air dry. Rinse it... surface until it in clear water. (Reference Figs. 2.13 - 2.17) After cleaning Allow carpet or upholstery to the scrub module. (Available on page 12. tools 4.1 A B SpinScrub® hand tool (Available on select models only) 4.2 4.2 To remove the...
... is not necessary, but will not stain the carpet. If furniture must be removed for converting to dry. To reposition the tool, reverse this procedure. 4. SpinScrub® Hand Tool (Available on select models only) has rotating brush for removal. Empty tanks, rinse with clean water and let air dry. Rinse it... surface until it in clear water. (Reference Figs. 2.13 - 2.17) After cleaning Allow carpet or upholstery to the scrub module. (Available on page 12. tools 4.1 A B SpinScrub® hand tool (Available on select models only) 4.2 4.2 To remove the...
Manual
Page 13
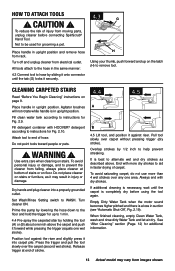
...do not use more dry strokes to aid in the same manner: 4.3 Connect tool to prevent the cleaner from electrical outlet. Always end with HOOVER® detergent according to the hose in faster drying of carpet. All tools attach to instructions for grooming a pet. Use extra care when...at end of hose. Fill detergent container with dry strokes. Attach tool to remove tool. Turn cleaner ON. It is completely dry before connecting SpinScrub® Hand Tool. Not to alternate wet and dry strokes as it into a properly grounded outlet. Do not place cleaner on floor. ...
...do not use more dry strokes to aid in the same manner: 4.3 Connect tool to prevent the cleaner from electrical outlet. Always end with HOOVER® detergent according to the hose in faster drying of carpet. All tools attach to instructions for grooming a pet. Use extra care when...at end of hose. Fill detergent container with dry strokes. Attach tool to remove tool. Turn cleaner ON. It is completely dry before connecting SpinScrub® Hand Tool. Not to alternate wet and dry strokes as it into a properly grounded outlet. Do not place cleaner on floor. ...
Manual
Page 17
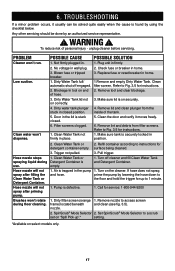
...and clear blockage. 3. Pull trigger. Hose nozzle will not spray after priming pump. Pump is securely locked in closed . 6. Set SpinScrub® Mode Selector to a scrub set on "Spill Pick-up to the floor and hold the trigger for up ".* setting. *... Clean Water Tank or detergent container empty. 3. Refill container according to access screen frame) located beneath and clean (see fig. 3.5). nozzle. 2. SpinScrub® Mode Selector 2. PROBLEM Cleaner won 't dispense. 2. POSSIBLE SOLUTION 1. Blown fuse or tripped breaker. 1. Brushes won't rotate during use. Clean...
...and clear blockage. 3. Pull trigger. Hose nozzle will not spray after priming pump. Pump is securely locked in closed . 6. Set SpinScrub® Mode Selector to a scrub set on "Spill Pick-up to the floor and hold the trigger for up ".* setting. *... Clean Water Tank or detergent container empty. 3. Refill container according to access screen frame) located beneath and clean (see fig. 3.5). nozzle. 2. SpinScrub® Mode Selector 2. PROBLEM Cleaner won 't dispense. 2. POSSIBLE SOLUTION 1. Blown fuse or tripped breaker. 1. Brushes won't rotate during use. Clean...


