
Manual
Page 2
.... Fri 8am- 7pm EST. Please do not return this owner's manual. Please enter the complete model and Manufacturing Code in the spaces provided. CODE Hint: Attach your HOOVER® product. Be sure to Clean...9 Tools...12 Maintenance...15 Nozzle...15 Brushes...15 Storage...16 ...with a customer service representative; Follow the authorized dealer locator link to find the Hoover® authorized dealer nearest you need assistance: Visit our website at Hoover.com or call 1-800-944-9200 for choosing a HOOVER® product. only) or to the store. 2 Manufacturing code (Label located...
.... Fri 8am- 7pm EST. Please do not return this owner's manual. Please enter the complete model and Manufacturing Code in the spaces provided. CODE Hint: Attach your HOOVER® product. Be sure to Clean...9 Tools...12 Maintenance...15 Nozzle...15 Brushes...15 Storage...16 ...with a customer service representative; Follow the authorized dealer locator link to find the Hoover® authorized dealer nearest you need assistance: Visit our website at Hoover.com or call 1-800-944-9200 for choosing a HOOVER® product. only) or to the store. 2 Manufacturing code (Label located...
Manual
Page 5
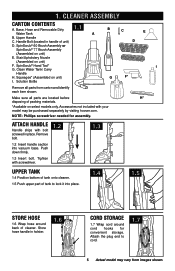
...hose handle in holster. 1.6 Cord storaGe 1.7 Wrap cord around back of tank to cord. 1.7 5 Actual model may be purchased separately by visiting hoover.com. Cleaner asseMbly Carton Contents A. Make sure all parts from images shown. 1. Accessories not included with ...bolt screwed in handle of packing materials. *Available on select models only. Squeegee* (Assembled on unit) I G F* Remove all ...
...hose handle in holster. 1.6 Cord storaGe 1.7 Wrap cord around back of tank to cord. 1.7 5 Actual model may be purchased separately by visiting hoover.com. Cleaner asseMbly Carton Contents A. Make sure all parts from images shown. 1. Accessories not included with ...bolt screwed in handle of packing materials. *Available on select models only. Squeegee* (Assembled on unit) I G F* Remove all ...
Manual
Page 6
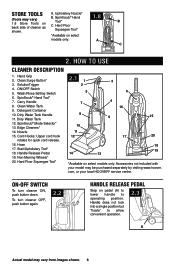
...Step on back side of cleaner as shown. Hard Floor Squeegee Tool* 1.8 B *Available on select models only. ON/OFF Switch 5. Edge Cleaners* 14. Accessories not included with your local HOOVER® service center. A C 2. Hand Grip 2. Wash/Rinse Setting Switch 6. Dirty Water Tank 12... Squeegee Tool* 2.1 1 2 5 7 8 10 11 12 3 6 4 16 9 17 14 13 15 20 18 19 *Available on select models only. com, or your model may vary from images shown. 6 SpinScrub® Hand Tool* C. SolutionTrigger 4. Carry Handle 8. Detergent Container 10. Store tools (Tools may vary) ...
...Step on back side of cleaner as shown. Hard Floor Squeegee Tool* 1.8 B *Available on select models only. ON/OFF Switch 5. Edge Cleaners* 14. Accessories not included with your local HOOVER® service center. A C 2. Hand Grip 2. Wash/Rinse Setting Switch 6. Dirty Water Tank 12... Squeegee Tool* 2.1 1 2 5 7 8 10 11 12 3 6 4 16 9 17 14 13 15 20 18 19 *Available on select models only. com, or your model may vary from images shown. 6 SpinScrub® Hand Tool* C. SolutionTrigger 4. Carry Handle 8. Detergent Container 10. Store tools (Tools may vary) ...
Manual
Page 7
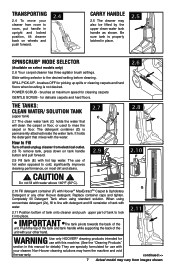
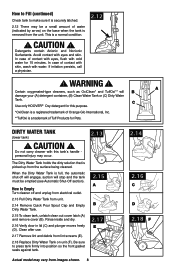
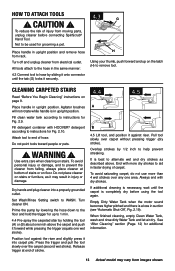
... of the tank and tank handle while supporting the back of the unit with your other hand. 2.8 2.10 F G 2.11 WARNING Use only HOOVER® cleaning products intended for use with this machine. (See the "Cleaning Products" section in this manual for details) They are specially formulated for.... IMPORTANT The tank pivots towards the back of hot water opposed to rinse the carpet or floor. When using standard solution. continued >> 7 Actual model may vary from electrical outlet. 2.8 To remove tank, press down on tank handle button and pull forward. 2.9 2.9 Fill tank (E) with hot tap...
... of the tank and tank handle while supporting the back of the unit with your other hand. 2.8 2.10 F G 2.11 WARNING Use only HOOVER® cleaning products intended for use with this machine. (See the "Cleaning Products" section in this manual for details) They are specially formulated for.... IMPORTANT The tank pivots towards the back of hot water opposed to rinse the carpet or floor. When using standard solution. continued >> 7 Actual model may vary from electrical outlet. 2.8 To remove tank, press down on tank handle button and pull forward. 2.9 2.9 Fill tank (E) with hot tap...
Manual
Page 8
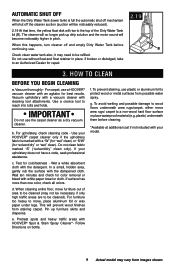
...being cleaned. Be sure to press tank firmly into position so the front gasket seals against tank. 2.13 2.15 A B 2.17 E Actual model may vary from lint screens (E). 2.18 Replace Dirty Water Tank on the base when the tank is a normal condition. 2.12 ! Certain oxygenated-...suction will B A damage your (A) detergent container, (B) Clean Water Tank or (C) Dirty Water Tank. Detergents contain Anionic and Nonionic Surfactants. C Use only HOOVER® Oxy detergent for this tank's handle personal injury may occur. CAUTION ! dirty water tank (lower tank) ! Avoid contact with water. how to...
...being cleaned. Be sure to press tank firmly into position so the front gasket seals against tank. 2.13 2.15 A B 2.17 E Actual model may vary from lint screens (E). 2.18 Replace Dirty Water Tank on the base when the tank is a normal condition. 2.12 ! Certain oxygenated-...suction will B A damage your (A) detergent container, (B) Clean Water Tank or (C) Dirty Water Tank. Detergents contain Anionic and Nonionic Surfactants. C Use only HOOVER® Oxy detergent for this tank's handle personal injury may occur. CAUTION ! dirty water tank (lower tank) ! Avoid contact with water. how to...
Manual
Page 9
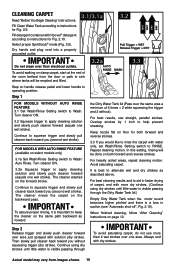
... model may vary from staining carpet. Vacuum upholstery with a vacuum cleaner with the dampened cloth. When cleaning entire floor, move furniture out of the Dirty Water Tank lid (B). e. For carpet, use a HOOVER® vacuum cleaner with an agitator for colorfastness - b. Test for best results... is full the automatic shut off mechanism will shut off the cleaner suction (suction will be cleaned). Wet a white absorbent cloth with HOOVER® Spot & Stain Spray Cleaner*- d. To avoid wetting and possible damage to be noticeably reduced). 2.19 2.19 At that time...
... model may vary from staining carpet. Vacuum upholstery with a vacuum cleaner with the dampened cloth. When cleaning entire floor, move furniture out of the Dirty Water Tank lid (B). e. For carpet, use a HOOVER® vacuum cleaner with an agitator for colorfastness - b. Test for best results... is full the automatic shut off mechanism will shut off the cleaner suction (suction will be cleaned). Wet a white absorbent cloth with HOOVER® Spot & Stain Spray Cleaner*- d. To avoid wetting and possible damage to be noticeably reduced). 2.19 2.19 At that time...
Manual
Page 10
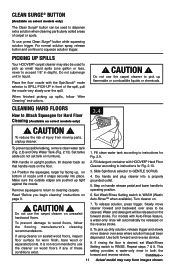
...reverse strokes. Step 2 Release trigger and slowly push cleaner forward over one wet stroke). In this setting, rinsing will be done on select models only) 3.1a Set Wash/Rinse Setting switch to Wash. For best cleaning results and to operating position. Always end with solution (dry stroke...). Fill detergent container with Hoover® detergent according to squeeze trigger and slowly pull cleaner back toward you would like to rinse the carpet with more than 4 wet...
...reverse strokes. Step 2 Release trigger and slowly push cleaner forward over one wet stroke). In this setting, rinsing will be done on select models only) 3.1a Set Wash/Rinse Setting switch to Wash. For best cleaning results and to operating position. Always end with solution (dry stroke...). Fill detergent container with Hoover® detergent according to squeeze trigger and slowly pull cleaner back toward you would like to rinse the carpet with more than 4 wet...
Manual
Page 11
... place. To release solution, press trigger. Water and detergent will automatically be released on the reverse stroke. 8. Continue>> 11 Actual model may also be used to dispense extra solution when cleaning particularly soiled areas of injury from images shown. To use the carpet cleaner... on unsealed hardwood floors. Picking up spills Your HOOVER® carpet cleaner may vary from moving parts, unplug cleaner. CAUTION ! When finished picking up dirty solution, release trigger and ...
... place. To release solution, press trigger. Water and detergent will automatically be released on the reverse stroke. 8. Continue>> 11 Actual model may also be used to dispense extra solution when cleaning particularly soiled areas of injury from images shown. To use the carpet cleaner... on unsealed hardwood floors. Picking up spills Your HOOVER® carpet cleaner may vary from moving parts, unplug cleaner. CAUTION ! When finished picking up dirty solution, release trigger and ...
Manual
Page 12
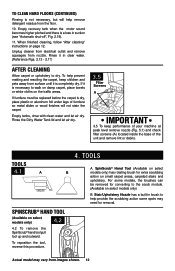
... cleaner from electrical outlet and remove squeegee from images shown. 12 If furniture must be removed for converting to the scrub module. (Available on select models only) B. tools 4.1 A B SpinScrub® hand tool (Available on page 12. TOOLS A. For some spots may vary from nozzle. Rinse ...it in suction (see "Automatic shut-off", Fig. 2.19). 11. When finished cleaning, follow "After cleaning" instructions on select models only) 4.2 4.2 To remove the SpinScrub® hand tool pull tool up and outward. To help prevent matting and resoiling the carpet, keep ...
... cleaner from electrical outlet and remove squeegee from images shown. 12 If furniture must be removed for converting to the scrub module. (Available on select models only) B. tools 4.1 A B SpinScrub® hand tool (Available on page 12. TOOLS A. For some spots may vary from nozzle. Rinse ...it in suction (see "Automatic shut-off", Fig. 2.19). 11. When finished cleaning, follow "After cleaning" instructions on select models only) 4.2 4.2 To remove the SpinScrub® hand tool pull tool up and outward. To help prevent matting and resoiling the carpet, keep ...
Manual
Page 13
... over any one wet stroke). To avoid saturating carpet, do not use more dry strokes to end of injury from rack. Always end with HOOVER® detergent according to instructions for Fig. 2.9. To reduce the risk of hose. Place handle in upright position. Pull tool slowly over the... as it forward while pressing the trigger (equals one area. Set Wash/Rinse Setting switch to be used for additional information. 13 Actual model may result in faster drying of carpet. Press the trigger and pull the tool slowly over carpet without pressing trigger (dry stroke). Not ...
... over any one wet stroke). To avoid saturating carpet, do not use more dry strokes to end of injury from rack. Always end with HOOVER® detergent according to instructions for Fig. 2.9. To reduce the risk of hose. Place handle in upright position. Pull tool slowly over the... as it forward while pressing the trigger (equals one area. Set Wash/Rinse Setting switch to be used for additional information. 13 Actual model may result in faster drying of carpet. Press the trigger and pull the tool slowly over carpet without pressing trigger (dry stroke). Not ...
Manual
Page 14
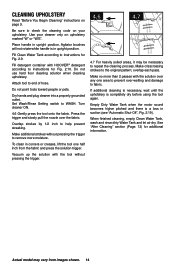
.... 4.6 4.7 4.7 For heavily soiled areas, it may vary from the fabric and press the solution trigger. Vacuum up the solution with HOOVER® detergent according to repeat the cleaning process. Dry hands and plug cleaner into a properly grounded outlet. Use your upholstery. Do not...hard floor cleaning solution when cleaning upholstery. Turn cleaner ON. 4.6 Gently press the tool onto the fabric. Make no more moisture. Actual model may be necessary to instructions for additional information. See "After Cleaning" section (Page. 12) for Fig. 2.10. Set Wash/Rinse ...
.... 4.6 4.7 4.7 For heavily soiled areas, it may vary from the fabric and press the solution trigger. Vacuum up the solution with HOOVER® detergent according to repeat the cleaning process. Dry hands and plug cleaner into a properly grounded outlet. Use your upholstery. Do not...hard floor cleaning solution when cleaning upholstery. Turn cleaner ON. 4.6 Gently press the tool onto the fabric. Make no more moisture. Actual model may be necessary to instructions for additional information. See "After Cleaning" section (Page. 12) for Fig. 2.10. Set Wash/Rinse ...
Manual
Page 15
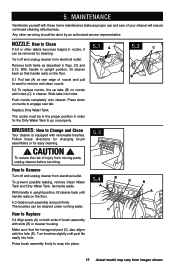
... of brush assembly with removable brushes. Remove both ends of injury from moving parts, unplug cleaner before servicing. 5.3 How to snap into place. 15 Actual model may vary from electrical outlet. The brushes can be cleaned under running water. C How to engage rear tab. 5. MAINTENANCE Familiarize yourself with the hole (D). Any...
... of brush assembly with removable brushes. Remove both ends of injury from moving parts, unplug cleaner before servicing. 5.3 How to snap into place. 15 Actual model may vary from electrical outlet. The brushes can be cleaned under running water. C How to engage rear tab. 5. MAINTENANCE Familiarize yourself with the hole (D). Any...
Manual
Page 17
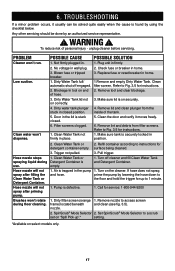
... reset breaker in the lid is trapped in place. 2. Clean Water Tank or detergent container empty. 3. Air is stuck closed position. 5. Pump is on select models only. 17 PROBLEM Cleaner won 't dispense. 2. Make sure lid is defective. 1. Refer to the floor and hold the trigger for up ".* setting. *Available on securely...
... reset breaker in the lid is trapped in place. 2. Clean Water Tank or detergent container empty. 3. Air is stuck closed position. 5. Pump is on select models only. 17 PROBLEM Cleaner won 't dispense. 2. Make sure lid is defective. 1. Refer to the floor and hold the trigger for up ".* setting. *Available on securely...
Manual
Page 18
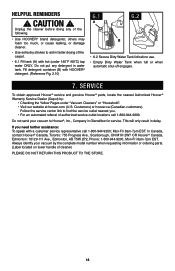
..., or damage cleaner. • Use extra dry strokes to aid in delay. Service To obtain approved Hoover® service and genuine Hoover® parts, locate the nearest Authorized Hoover® Warranty Service Dealer (Depot) by the complete model number when requesting information or ordering parts. (Label located on lower handle of authorized service outlet...
..., or damage cleaner. • Use extra dry strokes to aid in delay. Service To obtain approved Hoover® service and genuine Hoover® parts, locate the nearest Authorized Hoover® Warranty Service Dealer (Depot) by the complete model number when requesting information or ordering parts. (Label located on lower handle of authorized service outlet...


