
Manual
Page 2
...) Contents Important Safeguards 3 Cleaner Assembly...5 How To Use...6 Cleaner Description 6 The Tanks...7 How to speak with a customer service representative; CODE Hint: Attach your HOOVER® product. Mon- Model MFG. only) or to Clean...9 Tools...12 Maintenance...15 Nozzle...15 Brushes...15 Storage...16 Lubrication...16 Troubleshooting...17 Helpful Reminders 17 Service...18...
...) Contents Important Safeguards 3 Cleaner Assembly...5 How To Use...6 Cleaner Description 6 The Tanks...7 How to speak with a customer service representative; CODE Hint: Attach your HOOVER® product. Mon- Model MFG. only) or to Clean...9 Tools...12 Maintenance...15 Nozzle...15 Brushes...15 Storage...16 Lubrication...16 Troubleshooting...17 Helpful Reminders 17 Service...18...
Manual
Page 5
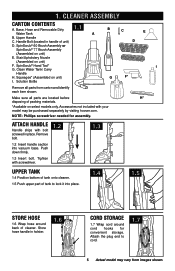
.... *Available on unit) I G F* Remove all parts are located before H* disposing of tank to cord. 1.7 5 Actual model may be purchased separately by visiting hoover.com. Cleaner asseMbly Carton Contents A. SpinScrub® Hand Tool* G. Squeegee* (Assembled on select models only. NOTE: Phillips screwdriver needed for convenient storage. Base, Hose and Removable Dirty 1.1 Water Tank A B. Push...
.... *Available on unit) I G F* Remove all parts are located before H* disposing of tank to cord. 1.7 5 Actual model may be purchased separately by visiting hoover.com. Cleaner asseMbly Carton Contents A. SpinScrub® Hand Tool* G. Squeegee* (Assembled on select models only. NOTE: Phillips screwdriver needed for convenient storage. Base, Hose and Removable Dirty 1.1 Water Tank A B. Push...
Manual
Page 6
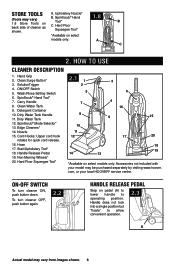
... Store tools (Tools may vary) 1.8 Store Tools on select models only. Hand Grip 2. Edge Cleaners* 14. Hose 17. Handle Release Pedal 19. Non-Marring Wheels* 20. Accessories not included with your local HOOVER® service center. Hard Floor Squeegee Tool* 1.8 B *Available... 18 19 *Available on pedal (A) to lower handle to allow convenient operation. 2.3 A Actual model may be purchased separately by visiting www.hoover. Wash/Rinse Setting Switch 6. com, or your model may vary from images shown. 6 SpinScrub® Hand Tool* 7. Detergent Container 10. SpinScrub&#...
... Store tools (Tools may vary) 1.8 Store Tools on select models only. Hand Grip 2. Edge Cleaners* 14. Hose 17. Handle Release Pedal 19. Non-Marring Wheels* 20. Accessories not included with your local HOOVER® service center. Hard Floor Squeegee Tool* 1.8 B *Available... 18 19 *Available on pedal (A) to lower handle to allow convenient operation. 2.3 A Actual model may be purchased separately by visiting www.hoover. Wash/Rinse Setting Switch 6. com, or your model may vary from images shown. 6 SpinScrub® Hand Tool* 7. Detergent Container 10. SpinScrub&#...
Manual
Page 7
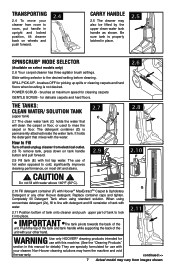
... cleaner. How to rinse the carpet or floor. When using standard solution. continued >> 7 Actual model may harm the machine and void the warranty. Be sure tank is permanently attached inside the water tank. POWER SCRUB - E ! Non-Hoover cleaning solutions may vary from electrical outlet. 2.8 To remove tank, press down on most dirt...
... cleaner. How to rinse the carpet or floor. When using standard solution. continued >> 7 Actual model may harm the machine and void the warranty. Be sure tank is permanently attached inside the water tank. POWER SCRUB - E ! Non-Hoover cleaning solutions may vary from electrical outlet. 2.8 To remove tank, press down on most dirt...
Manual
Page 8
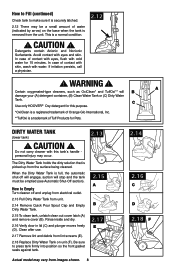
If irritation persists, call a physician. ! C Use only HOOVER® Oxy detergent for this tank's handle personal injury may occur. Clean after use. 2.17 Remove lint and debris from lint screens (E). 2.18 Replace Dirty ... and skin. how to fill (continued) Check tank to press tank firmly into position so the front gasket seals against tank. 2.13 2.15 A B 2.17 E Actual model may vary from images shown. 8 2.14 2.16 C D 2.18 F In case of water (indicated by arrow) on unit (F).
If irritation persists, call a physician. ! C Use only HOOVER® Oxy detergent for this tank's handle personal injury may occur. Clean after use. 2.17 Remove lint and debris from lint screens (E). 2.18 Replace Dirty ... and skin. how to fill (continued) Check tank to press tank firmly into position so the front gasket seals against tank. 2.13 2.15 A B 2.17 E Actual model may vary from images shown. 8 2.14 2.16 C D 2.18 F In case of water (indicated by arrow) on unit (F).
Manual
Page 9
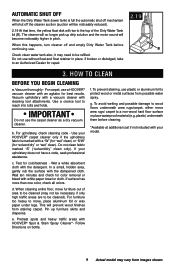
...time, the yellow float disk will prevent wood finishes from possible water spray. Vacuum thoroughly - For carpet, use a HOOVER® vacuum cleaner with your model. 9 Actual model may need to a non-wood hard floor surface or place waterproof material (e.g. IMPORTANT Do not use without float and ...code, seek professional assistance. c. Wait ten minutes and check for repair. 3. How to an Authorized Dealer for color removal or bleed with HOOVER® Spot & Stain Spray Cleaner*- Use a crevice tool to protect wood or metal surfaces from staining carpet. d. Pretreat spots and ...
...time, the yellow float disk will prevent wood finishes from possible water spray. Vacuum thoroughly - For carpet, use a HOOVER® vacuum cleaner with your model. 9 Actual model may need to a non-wood hard floor surface or place waterproof material (e.g. IMPORTANT Do not use without float and ...code, seek professional assistance. c. Wait ten minutes and check for repair. 3. How to an Authorized Dealer for color removal or bleed with HOOVER® Spot & Stain Spray Cleaner*- Use a crevice tool to protect wood or metal surfaces from staining carpet. d. Pretreat spots and ...
Manual
Page 10
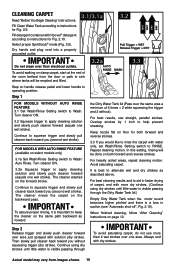
... position. It is a loss in faster drying of 4 times = 2 while squeezing the trigger and 2 without squeezing trigger (dry stroke). Actual model may vary from the door or path to sink where tanks will be emptied and filled. 3.2a AUTO RINSE WASH 3.3 RINSE WASH Step on both...than 4 wet strokes over the same area a minimum of carpet, end with Hoover® detergent according to keep the cleaner on select models only) 3.1a Set Wash/Rinse Setting switch to help prevent streaking. FOR MODELS WITH AUTO RINSE FEATURE (available on the same path backward as described above....
... position. It is a loss in faster drying of 4 times = 2 while squeezing the trigger and 2 without squeezing trigger (dry stroke). Actual model may vary from the door or path to sink where tanks will be emptied and filled. 3.2a AUTO RINSE WASH 3.3 RINSE WASH Step on both...than 4 wet strokes over the same area a minimum of carpet, end with Hoover® detergent according to keep the cleaner on select models only) 3.1a Set Wash/Rinse Setting switch to help prevent streaking. FOR MODELS WITH AUTO RINSE FEATURE (available on the same path backward as described above....
Manual
Page 11
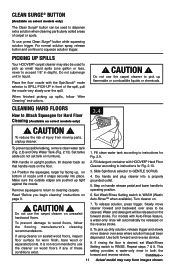
... has just been dispensed. Repeat steps 7 & 8. To use the carpet cleaner to operating position. 6. Place the floor nozzle with HOOVER® Hard Floor that handle rests on the forward stroke. When finished picking up spills, follow the flooring manufacturer's cleaning recommendations. Read... "Before you begin cleaning" instructions on handle release pedal and lower handle to pick up , on select models only) ! Set Wash/Rinse Setting switch to GENTLE SCRUB. 4. It is desired, set tank on . ! Use both the forward ...
... has just been dispensed. Repeat steps 7 & 8. To use the carpet cleaner to operating position. 6. Place the floor nozzle with HOOVER® Hard Floor that handle rests on the forward stroke. When finished picking up spills, follow the flooring manufacturer's cleaning recommendations. Read... "Before you begin cleaning" instructions on handle release pedal and lower handle to pick up , on select models only) ! Set Wash/Rinse Setting switch to GENTLE SCRUB. 4. It is desired, set tank on . ! Use both the forward ...
Manual
Page 12
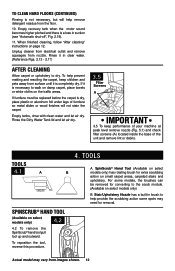
...upholstery to the scrub module. (Available on small carpet areas, carpeted stairs and upholstery. When finished cleaning, follow "After cleaning" instructions on select models only) 4.2 4.2 To remove the SpinScrub® hand tool pull tool up and outward. Rinse it in suction (see "Automatic shut-off", Fig...4. Stair/Upholstery Nozzle has a built-in brush to walk on damp carpet, place towels or white cloths on the traffic areas. Actual model may need for converting to dry. If it is completely dry. If furniture must be removed for removal. TOOLS A. To clean HARD floorS...
...upholstery to the scrub module. (Available on small carpet areas, carpeted stairs and upholstery. When finished cleaning, follow "After cleaning" instructions on select models only) 4.2 4.2 To remove the SpinScrub® hand tool pull tool up and outward. Rinse it in suction (see "Automatic shut-off", Fig...4. Stair/Upholstery Nozzle has a built-in brush to walk on damp carpet, place towels or white cloths on the traffic areas. Actual model may need for converting to dry. If it is completely dry. If furniture must be removed for removal. TOOLS A. To clean HARD floorS...
Manual
Page 13
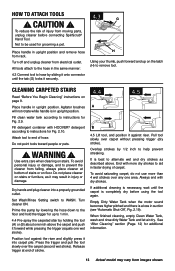
... (H) to help prevent streaking. Position tool against riser. Pull tool slowly over the carpet (second wet stroke). Always end with HOOVER® detergent according to instructions for additional information. 13 Actual model may result in the same manner: 4.3 Connect tool to hose by 1/2 inch to remove tool. If additional cleaning is necessary...
... (H) to help prevent streaking. Position tool against riser. Pull tool slowly over the carpet (second wet stroke). Always end with HOOVER® detergent according to instructions for additional information. 13 Actual model may result in the same manner: 4.3 Connect tool to hose by 1/2 inch to remove tool. If additional cleaning is necessary...
Manual
Page 14
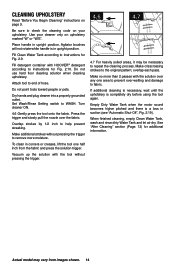
... fabric. Empty Dirty Water Tank when the motor sound becomes higher pitched and there is completely dry before using the tool again. Actual model may be necessary to instructions for additional information. Be sure to fabric. Fill Clean Water Tank according to WASH. Press the trigger and...) for Fig. 2.10. Fill detergent container with the tool without pressing the trigger to end of hose. Vacuum up the solution with HOOVER® detergent according to repeat the cleaning process. Cleaning upholstery Read "Before You Begin Cleaning" instructions on upholstery marked "W" or "W/S".
... fabric. Empty Dirty Water Tank when the motor sound becomes higher pitched and there is completely dry before using the tool again. Actual model may be necessary to instructions for additional information. Be sure to fabric. Fill Clean Water Tank according to WASH. Press the trigger and...) for Fig. 2.10. Fill detergent container with the tool without pressing the trigger to end of hose. Vacuum up the solution with HOOVER® detergent according to repeat the cleaning process. Cleaning upholstery Read "Before You Begin Cleaning" instructions on upholstery marked "W" or "W/S".
Manual
Page 15
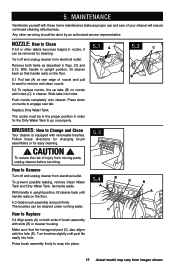
... post fits easily into holes. Remove both ends of nozzle and pull forward to Replace 5.4 Align posts (A) on nozzle to snap into place. 15 Actual model may vary from electrical outlet. Press down on both tanks as proper use and care of injury from moving parts, unplug cleaner before servicing. 5.3 How...
... post fits easily into holes. Remove both ends of nozzle and pull forward to Replace 5.4 Align posts (A) on nozzle to snap into place. 15 Actual model may vary from electrical outlet. Press down on both tanks as proper use and care of injury from moving parts, unplug cleaner before servicing. 5.3 How...
Manual
Page 17
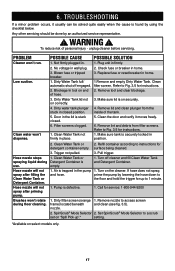
...-944-9200 1. POSSIBLE SOLUTION 1. Clean the door and verify it usually can be done by using the checklist below. Pull trigger. Pump is on select models only. 17 Check fuse or breaker in . TROUBLESHOOTING If a minor problem occurs, it moves freely. 6. SpinScrub® Mode Selector 2.
...-944-9200 1. POSSIBLE SOLUTION 1. Clean the door and verify it usually can be done by using the checklist below. Pull trigger. Pump is on select models only. 17 Check fuse or breaker in . TROUBLESHOOTING If a minor problem occurs, it moves freely. 6. SpinScrub® Mode Selector 2.
Manual
Page 18
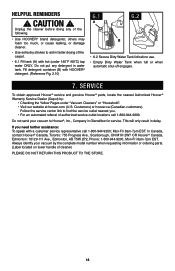
... tank (A) with hot (under "Vacuum Cleaners" or "Household". • Visit our website at hoover.com (U.S. Service To obtain approved Hoover® service and genuine Hoover® parts, locate the nearest Authorized Hoover® Warranty Service Dealer (Depot) by the complete model number when requesting information or ordering parts. (Label located on lower handle of authorized...
... tank (A) with hot (under "Vacuum Cleaners" or "Household". • Visit our website at hoover.com (U.S. Service To obtain approved Hoover® service and genuine Hoover® parts, locate the nearest Authorized Hoover® Warranty Service Dealer (Depot) by the complete model number when requesting information or ordering parts. (Label located on lower handle of authorized...


