
Manual
Page 2
...Manufacturing code (Label located on lower handle of cleaner) Contents Important Safeguards 3 Cleaner Assembly...5 How To Use...6 Cleaner Description 6 The Tanks...7 How to this product to register by phone. Mon- Fri 8am- 7pm EST. CODE Hint: Attach your sales receipt to ...manual. Follow the authorized dealer locator link to speak with a customer service representative; Verification of date of purchase may be required for choosing a HOOVER® product. Thank you or call 1-800-944-9200 to the store. 2 Please enter the complete model and Manufacturing Code in the spaces...
...Manufacturing code (Label located on lower handle of cleaner) Contents Important Safeguards 3 Cleaner Assembly...5 How To Use...6 Cleaner Description 6 The Tanks...7 How to this product to register by phone. Mon- Fri 8am- 7pm EST. CODE Hint: Attach your sales receipt to ...manual. Follow the authorized dealer locator link to speak with a customer service representative; Verification of date of purchase may be required for choosing a HOOVER® product. Thank you or call 1-800-944-9200 to the store. 2 Please enter the complete model and Manufacturing Code in the spaces...
Manual
Page 4
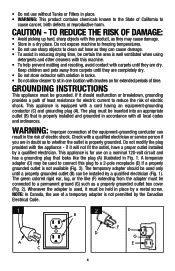
... with this plug to sit in one location with brushes on a nominal 120-volt circuit and has a grounding plug that is equipped with solution in tanks. • Do not allow cleaner to a 2-pole receptacle (E) if a properly grounded outlet is not available (Fig. 2). Keep children and pets... resoiling, avoid contact with carpets until a properly grounded outlet (B) can result in the risk of electric shock. • Do not use without Tanks or Filters in place. • WARNING: This product contains chemicals known to the State of California to whether the outlet is properly grounded. Caution...
... with this plug to sit in one location with brushes on a nominal 120-volt circuit and has a grounding plug that is equipped with solution in tanks. • Do not allow cleaner to a 2-pole receptacle (E) if a properly grounded outlet is not available (Fig. 2). Keep children and pets... resoiling, avoid contact with carpets until a properly grounded outlet (B) can result in the risk of electric shock. • Do not use without Tanks or Filters in place. • WARNING: This product contains chemicals known to the State of California to whether the outlet is properly grounded. Caution...
Manual
Page 5
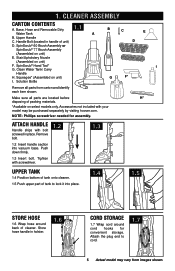
...hooks for assembly. Store hose handle in holster. 1.6 Cord storaGe 1.7 Wrap cord around back of tank to cord. 1.7 5 Actual model may be purchased separately by visiting hoover.com. Upper Handle C. Make sure all parts from images shown. Attach the plug end to ...lock it into vacuum base. attaCh handle Handle ships with screwdriver. 1.2 1.3 upper tank 1.4 Position bottom of tank onto cleaner. 1.5 Push upper part of cleaner...
...hooks for assembly. Store hose handle in holster. 1.6 Cord storaGe 1.7 Wrap cord around back of tank to cord. 1.7 5 Actual model may be purchased separately by visiting hoover.com. Upper Handle C. Make sure all parts from images shown. Attach the plug end to ...lock it into vacuum base. attaCh handle Handle ships with screwdriver. 1.2 1.3 upper tank 1.4 Position bottom of tank onto cleaner. 1.5 Push upper part of cleaner...
Manual
Page 6
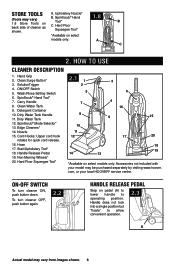
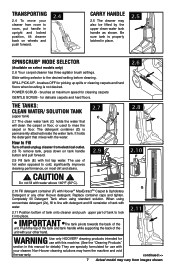
... convenient operation. 2.3 A Actual model may be purchased separately by visiting www.hoover. Detergent Container 10. SpinScrub® Mode Selector* 13. Stair/Upholstery Tool* 18. Accessories not included with your local HOOVER® service center. ON-OFF switch To turn cleaner OFF, push button ...again. 2.2 Handle release pedal Step on select models only. ON/OFF Switch 5. Wash/Rinse Setting Switch 6. SpinScrub® Hand Tool* 7. Dirty Water Tank Handle 11. Handle ...
... convenient operation. 2.3 A Actual model may be purchased separately by visiting www.hoover. Detergent Container 10. SpinScrub® Mode Selector* 13. Stair/Upholstery Tool* 18. Accessories not included with your local HOOVER® service center. ON-OFF switch To turn cleaner OFF, push button ...again. 2.2 Handle release pedal Step on select models only. ON/OFF Switch 5. Wash/Rinse Setting Switch 6. SpinScrub® Hand Tool* 7. Dirty Water Tank Handle 11. Handle ...
Manual
Page 7
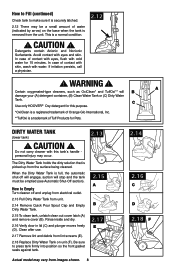
... cleaner from electrical outlet. 2.8 To remove tank, press down on tank handle button and pull forward. 2.9 2.9 Fill tank (E) with hot tap water. for delicate carpets and hard floors. 2.6 The tanks: CLEAN WATER/ SOLUTION TANK 2.7 (upper tank) C D 2.7 The clean water tank (C) holds the water that mixes with the water. The use with Hoover® MaxExtractTM Carpet & Upholstery Detergent or...
... cleaner from electrical outlet. 2.8 To remove tank, press down on tank handle button and pull forward. 2.9 2.9 Fill tank (E) with hot tap water. for delicate carpets and hard floors. 2.6 The tanks: CLEAN WATER/ SOLUTION TANK 2.7 (upper tank) C D 2.7 The clean water tank (C) holds the water that mixes with the water. The use with Hoover® MaxExtractTM Carpet & Upholstery Detergent or...
Manual
Page 8
... images shown. 8 2.14 2.16 C D 2.18 F WARNING ! C Use only HOOVER® Oxy detergent for 15 minutes. Do not carry cleaner with eyes and skin. how to empty Turn cleaner off will engage, suction will B A damage your (A) detergent container, (B) Clean Water Tank or (C) Dirty Water Tank. In case of contact with skin, wash with cold...
... images shown. 8 2.14 2.16 C D 2.18 F WARNING ! C Use only HOOVER® Oxy detergent for 15 minutes. Do not carry cleaner with eyes and skin. how to empty Turn cleaner off will engage, suction will B A damage your (A) detergent container, (B) Clean Water Tank or (C) Dirty Water Tank. In case of contact with skin, wash with cold...
Manual
Page 9
.... When cleaning entire floor, move furniture out of the Dirty Water Tank lid (B). B Check clean water tank also; If broken or dislodged, take to CLEAN Before you begin cleaning a. For carpet, use a HOOVER® vacuum cleaner with the detergent. Use a crevice tool to ...with a "W" (for "wet" clean) or "S/W" (for best results. To prevent staining, use . Test for color removal or bleed with HOOVER® Spot & Stain Spray Cleaner*- plastic) underneath them before continuing use plastic or aluminum foil to be cleaned). For upholstery, check cleaning code...
.... When cleaning entire floor, move furniture out of the Dirty Water Tank lid (B). B Check clean water tank also; If broken or dislodged, take to CLEAN Before you begin cleaning a. For carpet, use a HOOVER® vacuum cleaner with the detergent. Use a crevice tool to ...with a "W" (for "wet" clean) or "S/W" (for best results. To prevent staining, use . Test for color removal or bleed with HOOVER® Spot & Stain Spray Cleaner*- plastic) underneath them before continuing use plastic or aluminum foil to be cleaned). For upholstery, check cleaning code...
Manual
Page 10
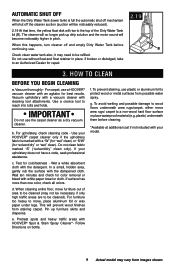
... set Wash/Rinse Setting switch to keep the cleaner on page 12. Actual model may vary from the door or path to sink where tanks will be emptied and filled. 3.2a AUTO RINSE WASH 3.3 RINSE WASH Step on both forward and reverse strokes. 3.3 If you without ...soiled areas, repeat cleaning motion. 8&5 8&5 %3: %3: Cleaning Carpet 3.1/3.1a Read "Before You Begin Cleaning" instructions. 3.2 Fill Clean Water Tank according to Wash. Always end with Hoover® detergent according to alternate wet and dry strokes as forward. Dry hands and plug cord into a properly grounded outlet. Step 1...
... set Wash/Rinse Setting switch to keep the cleaner on page 12. Actual model may vary from the door or path to sink where tanks will be emptied and filled. 3.2a AUTO RINSE WASH 3.3 RINSE WASH Step on both forward and reverse strokes. 3.3 If you without ...soiled areas, repeat cleaning motion. 8&5 8&5 %3: %3: Cleaning Carpet 3.1/3.1a Read "Before You Begin Cleaning" instructions. 3.2 Fill Clean Water Tank according to Wash. Always end with Hoover® detergent according to alternate wet and dry strokes as forward. Dry hands and plug cord into a properly grounded outlet. Step 1...
Manual
Page 11
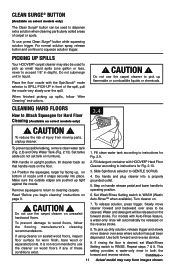
...exist. 7. To use the carpet cleaner on . ! Picking up spills Your HOOVER® carpet cleaner may vary from moving parts, unplug cleaner. CAUTION ! To reduce the risk of carpet or spots. Set tanks aside (do not set Wash/Rinse Setting switch to RINSE. With handle in... liquid. Fill detergent container with HOOVER® Hard Floor that handle rests on the forward stroke. Cleaner according to instructions...
...exist. 7. To use the carpet cleaner on . ! Picking up spills Your HOOVER® carpet cleaner may vary from moving parts, unplug cleaner. CAUTION ! To reduce the risk of carpet or spots. Set tanks aside (do not set Wash/Rinse Setting switch to RINSE. With handle in... liquid. Fill detergent container with HOOVER® Hard Floor that handle rests on the forward stroke. Cleaner according to instructions...
Manual
Page 12
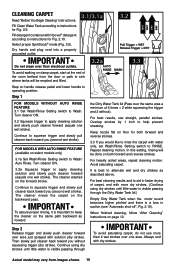
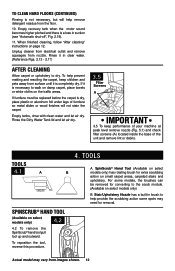
... plastic or aluminum foil under legs of the unit and remove lint or debris. If furniture must be removed for removal. Rinse the Dirty Water Tank lid and let air dry. 3.5 Filter Screens A IMPORTANT 3.5 To keep performance of your machine at peak level remove nozzle (Fig. 5.1) and check... module. (Available on select models only) B. tools 4.1 A B SpinScrub® hand tool (Available on page 12. Rinse it is completely dry. Empty tanks, rinse with clean water and let air dry. TOOLS A. Actual model may need for converting to dry. For some spots may vary from surface until...
... plastic or aluminum foil under legs of the unit and remove lint or debris. If furniture must be removed for removal. Rinse the Dirty Water Tank lid and let air dry. 3.5 Filter Screens A IMPORTANT 3.5 To keep performance of your machine at peak level remove nozzle (Fig. 5.1) and check... module. (Available on select models only) B. tools 4.1 A B SpinScrub® hand tool (Available on page 12. Rinse it is completely dry. Empty tanks, rinse with clean water and let air dry. TOOLS A. Actual model may need for converting to dry. For some spots may vary from surface until...
Manual
Page 13
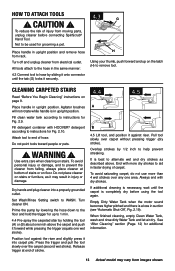
...Turn cleaner ON. It is in injury or damage. End with more than 4 wet strokes over any one wet stroke). Empty Dirty Water Tank when the motor sound becomes higher pitched and there is completely dry before connecting SpinScrub® Hand Tool. Place handle in suction (see "...upright position. Do not point tools toward people or pets. ! How to instructions for Fig. 2.10. Position tool against riser. Always end with HOOVER® detergent according to Attach Tools ! Press the trigger and pull the tool slowly over carpet without pressing trigger (dry stroke). CAUTION ! Fill...
...Turn cleaner ON. It is in injury or damage. End with more than 4 wet strokes over any one wet stroke). Empty Dirty Water Tank when the motor sound becomes higher pitched and there is completely dry before connecting SpinScrub® Hand Tool. Place handle in suction (see "...upright position. Do not point tools toward people or pets. ! How to instructions for Fig. 2.10. Position tool against riser. Always end with HOOVER® detergent according to Attach Tools ! Press the trigger and pull the tool slowly over carpet without pressing trigger (dry stroke). CAUTION ! Fill...
Manual
Page 14
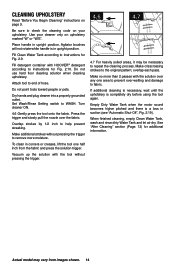
...check the cleaning code on your cleaner only on page 9. Make no more moisture. When finished cleaning, empty Clean Water Tank, wash and rinse dirty Water Tank and let air dry. Agitator brushes will not rotate while handle is a loss in upright position. Attach tool to WASH...Do not point tools toward people or pets. Dry hands and plug cleaner into a properly grounded outlet. Vacuum up the solution with HOOVER® detergent according to instructions for additional information. If additional cleaning is necessary, wait until the upholstery is completely dry before using the...
...check the cleaning code on your cleaner only on page 9. Make no more moisture. When finished cleaning, empty Clean Water Tank, wash and rinse dirty Water Tank and let air dry. Agitator brushes will not rotate while handle is a loss in upright position. Attach tool to WASH...Do not point tools toward people or pets. Dry hands and plug cleaner into a properly grounded outlet. Vacuum up the solution with HOOVER® detergent according to instructions for additional information. If additional cleaning is necessary, wait until the upholstery is completely dry before using the...
Manual
Page 15
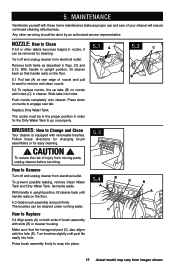
... 5.1 A can be done by an authorized service representative. With handle in order for easy cleaning. ! Slide tabs into hole. Replace Dirty Water Tank. With handle in Figs. 2.8 and 2.13. Make sure that handle rests on the floor. 5.1 Pull tab (A) at rear edge of injury...as described in upright position, tilt cleaner back until post fits easily into holes. To prevent possible leaking, remove Clean Water Tank and Dirty Water Tank. Set tanks aside. C How to Remove Turn off and unplug cleaner from moving parts, unplug cleaner before servicing. 5.3 How to ...
... 5.1 A can be done by an authorized service representative. With handle in order for easy cleaning. ! Slide tabs into hole. Replace Dirty Water Tank. With handle in Figs. 2.8 and 2.13. Make sure that handle rests on the floor. 5.1 Pull tab (A) at rear edge of injury...as described in upright position, tilt cleaner back until post fits easily into holes. To prevent possible leaking, remove Clean Water Tank and Dirty Water Tank. Set tanks aside. C How to Remove Turn off and unplug cleaner from moving parts, unplug cleaner before servicing. 5.3 How to ...
Manual
Page 16
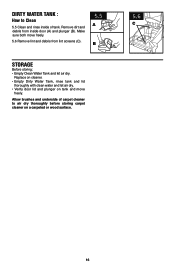
... and debris from lint screens (C). 5.5 A B Storage Before storing: • Empty Clean Water Tank and let air dry. Make sure both move freely. Allow brushes and underside of tank. Dirty Water Tank : How to air dry thoroughly before storing carpet cleaner on tank and move freely. 5.6 Remove lint and debris from inside of carpet cleaner...
... and debris from lint screens (C). 5.5 A B Storage Before storing: • Empty Clean Water Tank and let air dry. Make sure both move freely. Allow brushes and underside of tank. Dirty Water Tank : How to air dry thoroughly before storing carpet cleaner on tank and move freely. 5.6 Remove lint and debris from inside of carpet cleaner...
Manual
Page 17
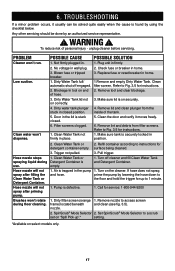
...securely. 4. Refer to access screen frame) located beneath and clean (see fig. 3.5). Make sure lid is on correctly. 4. Make sure tank is trapped in closed . 6. Hose nozzle will not spray after priming pump. Turn off engaged. 2. Turn on end of hose. ...nozzle stops spraying liquid during floor cleaning. 1. TROUBLESHOOTING If a minor problem occurs, it moves freely. 6. Refer to 1 minute. 1. Clean Water Tank or Detergent Container is stuck closed position. 5. Dirty filter screen (orange 1. Pull trigger. Check fuse or breaker in place. 2. Clean the ...
...securely. 4. Refer to access screen frame) located beneath and clean (see fig. 3.5). Make sure lid is on correctly. 4. Make sure tank is trapped in closed . 6. Hose nozzle will not spray after priming pump. Turn off engaged. 2. Turn on end of hose. ...nozzle stops spraying liquid during floor cleaning. 1. TROUBLESHOOTING If a minor problem occurs, it moves freely. 6. Refer to 1 minute. 1. Clean Water Tank or Detergent Container is stuck closed position. 5. Dirty filter screen (orange 1. Pull trigger. Check fuse or breaker in place. 2. Clean the ...
Manual
Page 18
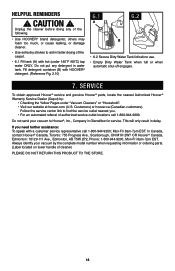
... ! Fill detergent container (B) with hot (under "Vacuum Cleaners" or "Household". • Visit our website at hoover.com (U.S. This will only result in water tank. others may foam too much, or cause leaking, or damage cleaner. • Use extra dry strokes to aid... 1-800-944-9200; Helpful Reminders ! Customers) or hoover.ca (Canadian customers). If you . • For an automated referral of the carpet. • 6.1 Fill tank (A) with HOOVER® detergent. (Reference Fig. 2.10) 6.1 6.2 A B • 6.2 Secure Dirty Water Tank lid before doing any detergent in delay.
... ! Fill detergent container (B) with hot (under "Vacuum Cleaners" or "Household". • Visit our website at hoover.com (U.S. This will only result in water tank. others may foam too much, or cause leaking, or damage cleaner. • Use extra dry strokes to aid... 1-800-944-9200; Helpful Reminders ! Customers) or hoover.ca (Canadian customers). If you . • For an automated referral of the carpet. • 6.1 Fill tank (A) with HOOVER® detergent. (Reference Fig. 2.10) 6.1 6.2 A B • 6.2 Secure Dirty Water Tank lid before doing any detergent in delay.


