Owners Guide
Page 10
... This cable is used to connect your Plasma Television when AV Net, IR Passthru or G-LINKTM feature are illustrations and names of the standard video cable to the TV's HDMI input. First time use 75-Ohm coaxial shielded wire. S-Video (Super Video) Cable This connector is used on the television's rear jack panel...
... This cable is used to connect your Plasma Television when AV Net, IR Passthru or G-LINKTM feature are illustrations and names of the standard video cable to the TV's HDMI input. First time use 75-Ohm coaxial shielded wire. S-Video (Super Video) Cable This connector is used on the television's rear jack panel...
Owners Guide
Page 12
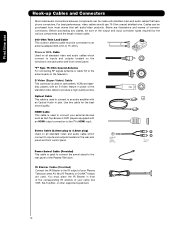
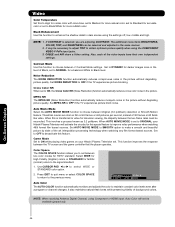
...TV screen. These buttons also serve as the cursor left (̇) and right (̈) buttons when in MENU mode. ቧ 12 VOLUME level Press these buttons until the desired channel appears in MENU mode. ቤ HDMI-FRONT Use the front HDMI...CONTROLS ቭ ቢ FRONT POWER button Press this button to access the INPUT menu. Hitachi will be turned ON/OFF by mode. ባ MENU/SELECT button This button allows you ...required for reference). ብ INPUT/EXIT button Press this button to turn the Plasma Television ON/OFF. The "MAIN POWER" button must be at stand-by ...
...TV screen. These buttons also serve as the cursor left (̇) and right (̈) buttons when in MENU mode. ቧ 12 VOLUME level Press these buttons until the desired channel appears in MENU mode. ቤ HDMI-FRONT Use the front HDMI...CONTROLS ቭ ቢ FRONT POWER button Press this button to access the INPUT menu. Hitachi will be turned ON/OFF by mode. ባ MENU/SELECT button This button allows you ...required for reference). ብ INPUT/EXIT button Press this button to turn the Plasma Television ON/OFF. The "MAIN POWER" button must be at stand-by ...

Owners Guide
Page 13
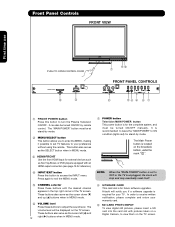
... ON/OFF operation. ቪ Indicating Lamp ቫ R/C, AV Net sensor Indicating Lamp Power Status Operating Off OFF. Your HITACHI Plasma TV will illuminate. Off TV MAIN POWER is turned off or in use Front Panel Controls ቪ POWER light indicator To turn ON/OFF the "MAIN...TV MAIN POWER is shown. Remote Control cannot turn the TV ON, press the main power switch located on the TV is selected. First time use . 2. The Plasma TV is now ready for connecting equipment with no signal input (Power Saving) except antenna (no video input when INPUT : 1, 2, 3, Front or HDMI...
... ON/OFF operation. ቪ Indicating Lamp ቫ R/C, AV Net sensor Indicating Lamp Power Status Operating Off OFF. Your HITACHI Plasma TV will illuminate. Off TV MAIN POWER is turned off or in use Front Panel Controls ቪ POWER light indicator To turn ON/OFF the "MAIN...TV MAIN POWER is shown. Remote Control cannot turn the TV ON, press the main power switch located on the TV is selected. First time use . 2. The Plasma TV is now ready for connecting equipment with no signal input (Power Saving) except antenna (no video input when INPUT : 1, 2, 3, Front or HDMI...
Owners Guide
Page 14
...such as Set-Top-Boxes or DVD players equipped with this case, connect the component CB output to the TV's PB input and the component CR output to the TV's PR input. 3. To ensure no copyright infringement, the MONITOR OUT output will be used at the ...) can select each video ቤ source. It may use with personal computers. 2. You may be used for your Plasma Television's remote control. (For reference see page 45). 5. NOTE: 1. HDMI is Dolby® Digital and PCM compatible, such as 1080p, 1080i, 720p, 480i and 480p are used for connecting equipment...
...such as Set-Top-Boxes or DVD players equipped with this case, connect the component CB output to the TV's PB input and the component CR output to the TV's PR input. 3. To ensure no copyright infringement, the MONITOR OUT output will be used at the ...) can select each video ቤ source. It may use with personal computers. 2. You may be used for your Plasma Television's remote control. (For reference see page 45). 5. NOTE: 1. HDMI is Dolby® Digital and PCM compatible, such as 1080p, 1080i, 720p, 480i and 480p are used for connecting equipment...

Owners Guide
Page 16
...in the following examples (When connecting DVI signal it will be according to the own device specifications. Note : Special device cables will need to HDMI Cable DIGITAL OUTPUT OUTPUT L R Note : Special device cables will be abnormal. 16 B) Connecting DVI signal. Back of HDTV Set-Top-Box...specifications. DVI DIGITAL OUTPUT CAPABILITY DVD , Set Top Box, Video Game Console. FRONT INPUT PANEL PHOTO INPUT PUSH EJECT First time use HDMI DIGITAL OUTPUT CAPABILITY DVD , Set Top Box, Video Game Console. FRONT INPUT PANEL PHOTO INPUT PUSH EJECT DVI to connect the audio ...
...in the following examples (When connecting DVI signal it will be according to the own device specifications. Note : Special device cables will need to HDMI Cable DIGITAL OUTPUT OUTPUT L R Note : Special device cables will be abnormal. 16 B) Connecting DVI signal. Back of HDTV Set-Top-Box...specifications. DVI DIGITAL OUTPUT CAPABILITY DVD , Set Top Box, Video Game Console. FRONT INPUT PANEL PHOTO INPUT PUSH EJECT First time use HDMI DIGITAL OUTPUT CAPABILITY DVD , Set Top Box, Video Game Console. FRONT INPUT PANEL PHOTO INPUT PUSH EJECT DVI to connect the audio ...

Owners Guide
Page 17
... and a VCR as a convenience to accommodate your particular assortment of components and features. Then press the SELECT button or the CURSOR PAD ̈ to your Plasma TV is dependent on the model and features of your choice (see page 29). Completely insert connection cord plugs when connecting to the own device specifications... Monoaural devices, please connect Audio signal cable into L/Mono input jack . For best performance, video and audio cables should be according to front panel jacks. HDMI-Front Photo Input Air /Cable Input 1 Input 2 Move SEL Sel. 17
... and a VCR as a convenience to accommodate your particular assortment of components and features. Then press the SELECT button or the CURSOR PAD ̈ to your Plasma TV is dependent on the model and features of your choice (see page 29). Completely insert connection cord plugs when connecting to the own device specifications... Monoaural devices, please connect Audio signal cable into L/Mono input jack . For best performance, video and audio cables should be according to front panel jacks. HDMI-Front Photo Input Air /Cable Input 1 Input 2 Move SEL Sel. 17

Owners Guide
Page 18
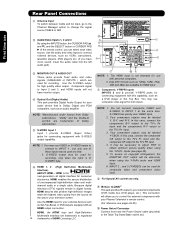
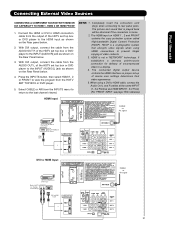
First time use Rear Panel Connections (IR BLASTER CABLE PROVIDED) CONNECT TO G-LINKTM/IR OUT Outside Antenna or Cable TV coaxial cable 2-Way signal splitter VCR #2 S-VIDEO V L R INPUT Optional VCR #1 ANT OUTPUT IN S-VIDEO V L R Optional HDMI to HDMI HDMI OUTPUT DVI to HDMI DIGITAL OUTPUT AUDIO OUT HDMI DIGITAL OUTPUT CAPABILITY DIGITAL OUTPUT CAPABILITY CONNECT TO IR OUT (IR BLASTER CABLE PROVIDED) NOTE: Cables are optional, except when specified. 18 OUTPUT Y PB/CB PR/CR L R Y PB PR L R OUTPUT DVD Player HDTV Set-Top Box
First time use Rear Panel Connections (IR BLASTER CABLE PROVIDED) CONNECT TO G-LINKTM/IR OUT Outside Antenna or Cable TV coaxial cable 2-Way signal splitter VCR #2 S-VIDEO V L R INPUT Optional VCR #1 ANT OUTPUT IN S-VIDEO V L R Optional HDMI to HDMI HDMI OUTPUT DVI to HDMI DIGITAL OUTPUT AUDIO OUT HDMI DIGITAL OUTPUT CAPABILITY DIGITAL OUTPUT CAPABILITY CONNECT TO IR OUT (IR BLASTER CABLE PROVIDED) NOTE: Cables are optional, except when specified. 18 OUTPUT Y PB/CB PR/CR L R Y PB PR L R OUTPUT DVD Player HDTV Set-Top Box

Owners Guide
Page 19
... page 45) • To ensure no copyright infringement, the MONITOR OUT output will be abnormal, when using the Y-PBPR and HDMI input jacks. • Input HDMI 1, HDMI 2 or HDMI FRONT can be used for recording only when the input is recommended to each input jack. • COMPONENT: Y-PBPR (Input ...TV's PR input. • It may be affected by copyright protection systems and the picture will assure a more information on line input-output connections. • Connect only 1 component (VCR, DVD player, camcorder, etc.) to use Tips on Rear Panel Connections • S-VIDEO, Y-PBPR, or HDMI...
... page 45) • To ensure no copyright infringement, the MONITOR OUT output will be abnormal, when using the Y-PBPR and HDMI input jacks. • Input HDMI 1, HDMI 2 or HDMI FRONT can be used for recording only when the input is recommended to each input jack. • COMPONENT: Y-PBPR (Input ...TV's PR input. • It may be affected by copyright protection systems and the picture will assure a more information on line input-output connections. • Connect only 1 component (VCR, DVD player, camcorder, etc.) to use Tips on Rear Panel Connections • S-VIDEO, Y-PBPR, or HDMI...
Owners Guide
Page 21
...the AUDIO OUT R of the HDTV set top box or DVD player to the INPUT (AUDIO/L) jack as your HDMI INPUT(1 , 2 or Front). (For FRONT INPUT see page 16 for delivery of uncompressed video to the INPUT... (AUDIO/R) jack as shown on the Rear Panel below. 4. When using HDMI connections to HDMI Cable or CABLE or Air signal or 21 With DVI output, connect the cable from the output of... the HDTV set -up of video contents. 3. Connect the HDMI or DVI to HDMI connection cable from the AUDIO OUT L of HDTV Set-Top-Box or DVD Player OUTPUT LR DIGITAL...
...the AUDIO OUT R of the HDTV set top box or DVD player to the INPUT (AUDIO/L) jack as your HDMI INPUT(1 , 2 or Front). (For FRONT INPUT see page 16 for delivery of uncompressed video to the INPUT... (AUDIO/R) jack as shown on the Rear Panel below. 4. When using HDMI connections to HDMI Cable or CABLE or Air signal or 21 With DVI output, connect the cable from the output of... the HDTV set -up of video contents. 3. Connect the HDMI or DVI to HDMI connection cable from the AUDIO OUT L of HDTV Set-Top-Box or DVD Player OUTPUT LR DIGITAL...

Owners Guide
Page 23
... laserdisc player to the Optical input of the VCR or the laserdisc player to the OUTPUT (AUDIO/L) jack on the TV Rear Panel. 3. It does not output component and HDMI video. 1. If both are connected, S-Video takes priority. 23 Connecting Video: Connect the cable from the Optical out... as shown on the Rear Panel on the right. Connect the cable from the Rear Panel is controlled by the amplifier, not by the Plasma Television. OPTICAL IN Stereo System Amplifier or DVD Player CABLE or Air signal Optional VCR or other external components R L V S-VIDEO INPUT NOTE...
... laserdisc player to the Optical input of the VCR or the laserdisc player to the OUTPUT (AUDIO/L) jack on the TV Rear Panel. 3. It does not output component and HDMI video. 1. If both are connected, S-Video takes priority. 23 Connecting Video: Connect the cable from the Optical out... as shown on the Rear Panel on the right. Connect the cable from the Rear Panel is controlled by the amplifier, not by the Plasma Television. OPTICAL IN Stereo System Amplifier or DVD Player CABLE or Air signal Optional VCR or other external components R L V S-VIDEO INPUT NOTE...
Owners Guide
Page 28
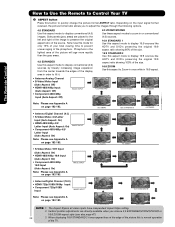
... HDTV and DVD's preserving the original 16:9 aspect ratio showing 100% of the phosphors. IMAGE INPUT • Antenna-Digital Channel (16:9) • HDMI-720p/1080i/1080p Input • Component-720p/1080i Input IMAGE INPUT 1 2 Note: Please see Appendix A on page 182-183. NOTE: 1. Vertical... size. 16:9 STANDARD 2 Use this aspect mode to display conventional (4:3) images. The Remote Control How to Use the Remote to Control Your TV ² ASPECT button Press this button to Zoom-in once while in 16:9 aspect. • Antenna-Analog Channel • S-Video/Video Input...
... HDTV and DVD's preserving the original 16:9 aspect ratio showing 100% of the phosphors. IMAGE INPUT • Antenna-Digital Channel (16:9) • HDMI-720p/1080i/1080p Input • Component-720p/1080i Input IMAGE INPUT 1 2 Note: Please see Appendix A on page 182-183. NOTE: 1. Vertical... size. 16:9 STANDARD 2 Use this aspect mode to display conventional (4:3) images. The Remote Control How to Use the Remote to Control Your TV ² ASPECT button Press this button to Zoom-in once while in 16:9 aspect. • Antenna-Analog Channel • S-Video/Video Input...
Owners Guide
Page 29
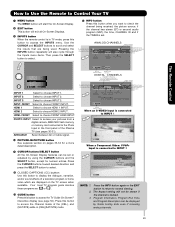
... be shown if the channel is connected to the Photo Input in the front panel of the Plasma TV (see page 52). The Remote Control How to Use the Remote to Control Your TV ¶ MENU button The MENU button will start the On-Screen Display. º EXIT button... Input is connected to INPUT 1 S-IN: 1 480i 3:17PM Auto When a Component Video: Y-PbPr Input is locked. 3. INPUT 2 Select to choose HDMI 1 INPUT. HDMI 1 Select to choose INPUT 2. FRONT Select to check the channel being used. Pressing the INPUTS button repeatedly will appear only when receiving a Digital Broadcast with...
... be shown if the channel is connected to the Photo Input in the front panel of the Plasma TV (see page 52). The Remote Control How to Use the Remote to Control Your TV ¶ MENU button The MENU button will start the On-Screen Display. º EXIT button... Input is connected to INPUT 1 S-IN: 1 480i 3:17PM Auto When a Component Video: Y-PbPr Input is locked. 3. INPUT 2 Select to choose HDMI 1 INPUT. HDMI 1 Select to choose INPUT 2. FRONT Select to check the channel being used. Pressing the INPUTS button repeatedly will appear only when receiving a Digital Broadcast with...
Owners Guide
Page 30
... the screen for viewing digital still pictures from picture to picture. How to Use the Remote to Control Your TV PHOTO INPUT This feature is 999. 3. Picture No. The maximum number of the TV. 1. HDMI 1 HDMI-Front Photo Input Air / Cable Input 1 Move SEL Sel. 2. Press the SELECT button to view Photo information. 7. Press...
... the screen for viewing digital still pictures from picture to picture. How to Use the Remote to Control Your TV PHOTO INPUT This feature is 999. 3. Picture No. The maximum number of the TV. 1. HDMI 1 HDMI-Front Photo Input Air / Cable Input 1 Move SEL Sel. 2. Press the SELECT button to view Photo information. 7. Press...

Owners Guide
Page 34
...Mode POP Main Digital (Air or Cable) Component Composite S-IN HDMI PIP 16x9 Digital (Air or Cable) Component Composite S-IN HDMI PIP Digital 4x3 (Air or Cable) Component Composite S-IN HDMI SPLIT Digital (Air or Cable) Component Composite S-IN HDMI Sub 1080i 720p 480p 480p 480i 480i 1080i/p 720p 480p 480p...16x9 4x3 16x9 16x9 16x9 4x3 16x9 4x3 Yes*1: Auto Aspect OFF Yes*2: Auto Aspect ON Digital (Air or Cable) Component/Composite/S-IN/HDMI 1080i 720p 480p 480p 480i 480i 1080i/p 720p 480p 480p 480i 480i 16x9 16x9 16x9 4x3 16x9 4x3 16x9 16x9 16x9 4x3 16x9 4x3...
...Mode POP Main Digital (Air or Cable) Component Composite S-IN HDMI PIP 16x9 Digital (Air or Cable) Component Composite S-IN HDMI PIP Digital 4x3 (Air or Cable) Component Composite S-IN HDMI SPLIT Digital (Air or Cable) Component Composite S-IN HDMI Sub 1080i 720p 480p 480p 480i 480i 1080i/p 720p 480p 480p...16x9 4x3 16x9 16x9 16x9 4x3 16x9 4x3 Yes*1: Auto Aspect OFF Yes*2: Auto Aspect ON Digital (Air or Cable) Component/Composite/S-IN/HDMI 1080i 720p 480p 480p 480i 480i 1080i/p 720p 480p 480p 480i 480i 16x9 16x9 16x9 4x3 16x9 4x3 16x9 16x9 16x9 4x3 16x9 4x3...

Owners Guide
Page 40
...instantly access the video input of your DVD on Input 1. 40 Release the SOURCE SELECT button. 5. FRONT 4 HDMI 1 5 HDMI 2 6 HDMI- The remote will now access the video input of the TV) ᕃ Select DVD mode by using your SOURCE SELECT button to position the LED indicator to DVD. ᕄ... the DVD, PVR/VCR and SAT/CBL modes. 1. Pressing the INPUTS button will now control the desired device. 7. NOTE: 1. SETUP EXAMPLE (Hitachi DVD with precode 0573 connected to INPUT 1 of the desired device. Select the desired device mode (DVD, PVR/VCR, SAT/CBL) by using ...
...instantly access the video input of your DVD on Input 1. 40 Release the SOURCE SELECT button. 5. FRONT 4 HDMI 1 5 HDMI 2 6 HDMI- The remote will now access the video input of the TV) ᕃ Select DVD mode by using your SOURCE SELECT button to position the LED indicator to DVD. ᕄ... the DVD, PVR/VCR and SAT/CBL modes. 1. Pressing the INPUTS button will now control the desired device. 7. NOTE: 1. SETUP EXAMPLE (Hitachi DVD with precode 0573 connected to INPUT 1 of the desired device. Select the desired device mode (DVD, PVR/VCR, SAT/CBL) by using ...
Owners Guide
Page 46
... Mode Use this special feature to video for HDTV standard. Theatrical movies are adjusting CONTRAST. Set to OFF to OFF if the TV experiences picture blocking. Also, each of background colors. MPEG NR The MPEG NR (Noise Reduction) function automatically reduces mosquito noise in...It may be necessary to adjust TINT to obtain optimum picture quality when using Component or HDMI input, Auto Color will activate the circuitry for this function to ORIGINAL your Hitachi Plasma Television set. Set NOISE REDUCTION to desactivate this function to choose between two color modes...
... Mode Use this special feature to video for HDTV standard. Theatrical movies are adjusting CONTRAST. Set to OFF to OFF if the TV experiences picture blocking. Also, each of background colors. MPEG NR The MPEG NR (Noise Reduction) function automatically reduces mosquito noise in...It may be necessary to adjust TINT to obtain optimum picture quality when using Component or HDMI input, Auto Color will activate the circuitry for this function to ORIGINAL your Hitachi Plasma Television set. Set NOISE REDUCTION to desactivate this function to choose between two color modes...
Owners Guide
Page 66
...screen displays such as video games, stock market quotations, computer generated graphics, and other fixed (non-moving) patterns can cause permanent damage to the Plasma Television. Option 2 The whole picture will shift every 20 minutes by one pixel. Screen Wipe If pattern mark occurs, use Screen Wipe (White ...Field Signal) for INPUT 1, 2, 3, Front and HDMI 1, 2, Front. Use the SCREEN SAVER feature to select shaded or solid. On-Screen Display 66 NOTE: This feature works only for at least 10...
...screen displays such as video games, stock market quotations, computer generated graphics, and other fixed (non-moving) patterns can cause permanent damage to the Plasma Television. Option 2 The whole picture will shift every 20 minutes by one pixel. Screen Wipe If pattern mark occurs, use Screen Wipe (White ...Field Signal) for INPUT 1, 2, 3, Front and HDMI 1, 2, Front. Use the SCREEN SAVER feature to select shaded or solid. On-Screen Display 66 NOTE: This feature works only for at least 10...

Owners Guide
Page 67
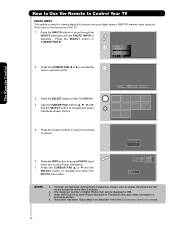
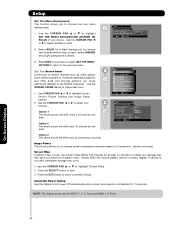
... **** Input2 : **** Input3 : **** Auto Link : Off Input-Front : **** HDMI1 : **** HDMI2 : **** HDMI-Front : **** Move SEL Return - Once the TV has been turned on and OR tune to INPUT 3 when it must be reset before AUTO LINK is convenient when you...772; to highlight SET AV NET feature. 5. Press the SELECT button to highlight SETUP feature. Video Audio TV Guide On Screen Channel Manager Locks Timers Setup Power Swivel Move SEL Select Setup Setup The Menu Options OR... and ̇ or ̈ to INPUT 3. 1. To do this, turn the TV on using your HITACHI Plasma TV Remote Control.
... **** Input2 : **** Input3 : **** Auto Link : Off Input-Front : **** HDMI1 : **** HDMI2 : **** HDMI-Front : **** Move SEL Return - Once the TV has been turned on and OR tune to INPUT 3 when it must be reset before AUTO LINK is convenient when you...772; to highlight SET AV NET feature. 5. Press the SELECT button to highlight SETUP feature. Video Audio TV Guide On Screen Channel Manager Locks Timers Setup Power Swivel Move SEL Select Setup Setup The Menu Options OR... and ̇ or ̈ to INPUT 3. 1. To do this, turn the TV on using your HITACHI Plasma TV Remote Control.
Owners Guide
Page 83
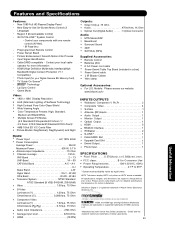
... 605 W, 5.7 A • Antenna input impedance 75 Ohm • Channel coverage 191ch. Please access www.hitachi.us /tv INPUTS/OUTPUTS • Wideband Component Y, Pb,Pr 2 • Composite Video 4 • S-Video 1 ...MTS Stereo/SAP • Bass Boost • Surround Sound • 20W • Soft Mute (50%) Supplied Accessories: • Remote Control • Batteries (AA) • 6' AC Power cord...1080 Full HD Plasma Display Panel • New Easy-to change without prior notice. Contact your local cable operator for mor e information • HDMI (High Definition Multimedia...
... 605 W, 5.7 A • Antenna input impedance 75 Ohm • Channel coverage 191ch. Please access www.hitachi.us /tv INPUTS/OUTPUTS • Wideband Component Y, Pb,Pr 2 • Composite Video 4 • S-Video 1 ...MTS Stereo/SAP • Bass Boost • Surround Sound • 20W • Soft Mute (50%) Supplied Accessories: • Remote Control • Batteries (AA) • 6' AC Power cord...1080 Full HD Plasma Display Panel • New Easy-to change without prior notice. Contact your local cable operator for mor e information • HDMI (High Definition Multimedia...

Owners Guide
Page 183
... Aspect Specifications (Continuation) Input S ignal Auto As pect As pect V ideo ID HDMI 1 (Input1 -DVI) HDMI (DVI) 1080p/ 1080i/720p 480p 480i Auto ON HDMI 2 (Input2 -DVI) HDMI (DVI) Auto OF F 1080p/ 1080i/720p 480p Auto ON 480i HDMI Front (InputFront -DVI) HDMI (DVI) Auto OF F 1080p/ 1080i/720p 480p Auto ON 480i Auto OF F Horizontal...
... Aspect Specifications (Continuation) Input S ignal Auto As pect As pect V ideo ID HDMI 1 (Input1 -DVI) HDMI (DVI) 1080p/ 1080i/720p 480p 480i Auto ON HDMI 2 (Input2 -DVI) HDMI (DVI) Auto OF F 1080p/ 1080i/720p 480p Auto ON 480i HDMI Front (InputFront -DVI) HDMI (DVI) Auto OF F 1080p/ 1080i/720p 480p Auto ON 480i Auto OF F Horizontal...

