
Owners Guide
Page 2
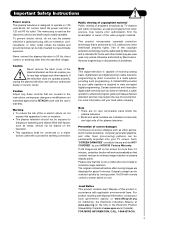
... not block any heat sources such as power-supply cord or plug is intended to alert the user to qualified service personnel. Install in your safety. Do not install near water. 6. A grounding entry as to the point of overhead power lines or other apparatus Article 820-44 of benefit to a person. 16.Follow instructions for (including amplifiers) that a safety problem should not be...
... not block any heat sources such as power-supply cord or plug is intended to alert the user to qualified service personnel. Install in your safety. Do not install near water. 6. A grounding entry as to the point of overhead power lines or other apparatus Article 820-44 of benefit to a person. 16.Follow instructions for (including amplifiers) that a safety problem should not be...
Owners Guide
Page 3
... other sources, may require the use the plasma television's (polarized) plug with an extension cord, receptacle, or other limited pay-per-view uses only unless otherwise authorized by turning power On/Off with remote control or power switch on unit. This product incorporates copyright protection technology that are NOT COVERED by direct connection to a cable system providing such programming. Certain advanced and interactive digital cable services such as video-on-demand, a cable...
... other sources, may require the use the plasma television's (polarized) plug with an extension cord, receptacle, or other limited pay-per-view uses only unless otherwise authorized by turning power On/Off with remote control or power switch on unit. This product incorporates copyright protection technology that are NOT COVERED by direct connection to a cable system providing such programming. Certain advanced and interactive digital cable services such as video-on-demand, a cable...

Owners Guide
Page 4
... for the 50" model is not recommended. The wall mount unit for a maximum tilting angle of the packing material. ³ Remote Control · Two "AA" size, 1.5V batteries » Power Swivel Table Top Stand (included) First time use only with '+' and '-' polarities reversed as this may cause the batteries to remove back cover. EW08433). ² Two IR Blaster cables (P# EY01641). » Power Swivel Table Top Stand (Part No...
... for the 50" model is not recommended. The wall mount unit for a maximum tilting angle of the packing material. ³ Remote Control · Two "AA" size, 1.5V batteries » Power Swivel Table Top Stand (included) First time use only with '+' and '-' polarities reversed as this may cause the batteries to remove back cover. EW08433). ² Two IR Blaster cables (P# EY01641). » Power Swivel Table Top Stand (Part No...
Owners Guide
Page 5
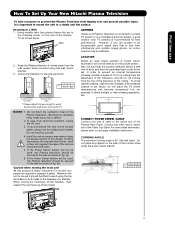
..., cabinet color changes, and increased chance of the Plasma TV as shown below . TURNING ANGLE The maximum turning angle is free from interference and multiple image ghosts, an indoor antenna may be sufficient. 2. Wire ANTENNA Unless your Plasma Television is connected to a cable TV system or to a centralized antenna system, a good outdoor color TV antenna is moved it should be lifted forward using the wall mount bracket. 3. However, if you purchased the wall mount bracket option...
..., cabinet color changes, and increased chance of the Plasma TV as shown below . TURNING ANGLE The maximum turning angle is free from interference and multiple image ghosts, an indoor antenna may be sufficient. 2. Wire ANTENNA Unless your Plasma Television is connected to a cable TV system or to a centralized antenna system, a good outdoor color TV antenna is moved it should be lifted forward using the wall mount bracket. 3. However, if you purchased the wall mount bracket option...

Owners Guide
Page 11
... Remote Control to control the chosen device. Cable Box SAT - Video Recorder/Player DVD - The TV's remote control sensor is located on the screen, such as channel information. The remote control must be programmed to control the device selected. INPUTS BUTTON (TV) Accesses the INPUTS menu system. GUIDE BUTTON (TV, SAT/CBL, PVR) Accesses the program guide of the TV. VOLUME BUTTONS (TV ) Increase up or down to adjust the audio level of the TV screen. NUMERIC BUTTONS (TV, DVD, SAT/CBL, PVR/VCR) Used to show and change the Picture-in Set...
... Remote Control to control the chosen device. Cable Box SAT - Video Recorder/Player DVD - The TV's remote control sensor is located on the screen, such as channel information. The remote control must be programmed to control the device selected. INPUTS BUTTON (TV) Accesses the INPUTS menu system. GUIDE BUTTON (TV, SAT/CBL, PVR) Accesses the program guide of the TV. VOLUME BUTTONS (TV ) Increase up or down to adjust the audio level of the TV screen. NUMERIC BUTTONS (TV, DVD, SAT/CBL, PVR/VCR) Used to show and change the Picture-in Set...
Owners Guide
Page 12
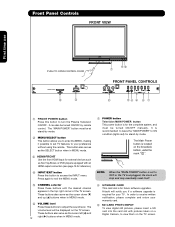
... card slot with an HDMI output connection (see page 16 for reference). ብ INPUT/EXIT button Press this button to receive written notification, please complete and return your preference without using the remote. NOTE: When the "MAIN POWER" button is recommended to leave the "MAIN POWER" to access the INPUT menu. The "MAIN POWER" button must be displayed on the TV screen. In order to turn the Plasma Television ON/OFF. Front Panel Controls FRONT VIEW...
... card slot with an HDMI output connection (see page 16 for reference). ብ INPUT/EXIT button Press this button to receive written notification, please complete and return your preference without using the remote. NOTE: When the "MAIN POWER" button is recommended to leave the "MAIN POWER" to access the INPUT menu. The "MAIN POWER" button must be displayed on the TV screen. In order to turn the Plasma Television ON/OFF. Front Panel Controls FRONT VIEW...

Owners Guide
Page 13
First time use . 2. Lights Red OFF. (Stand-by mode (lights red) when not in use Front Panel Controls ቪ POWER light indicator To turn ON/OFF the "MAIN POWER" of the TV. 13 Check the Power Light to Off. Lights Blue Lights Orange Blinking Blue On TV MAIN POWER is shown. On When TV receives the IR signal from R/C. ቫ REMOTE CONTROL sensor Point your remote at this area when selecting channels, adjusting volume, etc. ቫ LEARNING AV NET sensor Point your equipment's remote control at this...
First time use . 2. Lights Red OFF. (Stand-by mode (lights red) when not in use Front Panel Controls ቪ POWER light indicator To turn ON/OFF the "MAIN POWER" of the TV. 13 Check the Power Light to Off. Lights Blue Lights Orange Blinking Blue On TV MAIN POWER is shown. On When TV receives the IR signal from R/C. ቫ REMOTE CONTROL sensor Point your remote at this area when selecting channels, adjusting volume, etc. ቫ LEARNING AV NET sensor Point your equipment's remote control at this...
Owners Guide
Page 14
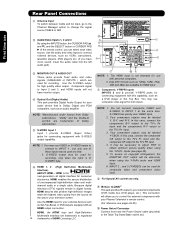
... your television screen. INPUT 2 , and 3 (Y/VIDEO) can select each video ቤ source. Because digital television (DTV) signals remain in a single cable. Rear Panel Connections First time use ቢ Antenna Input To switch between Cable and Air input, go to the Channel Manager option to change the signal source CABLE or AIR. ቭ ባ Audio/Video Inputs 1, 2 and 3 ቦ ቢ By using the INPUTS button, the CURSOR PAD (̆ ቩ and ̄), and the SELECT button or CURSOR PAD ቪ ̈ of the remote control...
... your television screen. INPUT 2 , and 3 (Y/VIDEO) can select each video ቤ source. Because digital television (DTV) signals remain in a single cable. Rear Panel Connections First time use ቢ Antenna Input To switch between Cable and Air input, go to the Channel Manager option to change the signal source CABLE or AIR. ቭ ባ Audio/Video Inputs 1, 2 and 3 ቦ ቢ By using the INPUTS button, the CURSOR PAD (̆ ቩ and ̄), and the SELECT button or CURSOR PAD ቪ ̈ of the remote control...
Owners Guide
Page 21
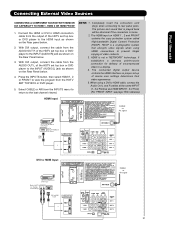
...-Box or DVD Player Back of uncompressed video to -point connection for reference). First time use Connecting External Video Sources CONNECTING A COMPONENT SOURCE WITH HDMI OR DVI CAPABILITY TO HDMI 1, HDMI 2 OR HDMI FRONT 1. NOTE: 1. HDCP is loose. 2. Completely insert the connection cord plugs when connecting to HDMI Cable or CABLE or Air signal or 21 The HDMI input on the Rear Panel below . 3. Press the INPUTS button, then select HDMI 1, 2 or FRONT to view the program from the output of the HDTV set top box or DVD player to the INPUT (AUDIO...
...-Box or DVD Player Back of uncompressed video to -point connection for reference). First time use Connecting External Video Sources CONNECTING A COMPONENT SOURCE WITH HDMI OR DVI CAPABILITY TO HDMI 1, HDMI 2 OR HDMI FRONT 1. NOTE: 1. HDCP is loose. 2. Completely insert the connection cord plugs when connecting to HDMI Cable or CABLE or Air signal or 21 The HDMI input on the Rear Panel below . 3. Press the INPUTS button, then select HDMI 1, 2 or FRONT to view the program from the output of the HDTV set top box or DVD player to the INPUT (AUDIO...

Owners Guide
Page 24
... AV Net to control your equipment using your external Audio/Video equipment (VCR, Set Top Box, DVD, etc.). Each IR Blaster cable can use Connecting External Video Sources Your HITACHI Plasma Television is setup, it allows your IR Blaster cable to work. Infrared Sensor IR Blaster V L R OUTPUT VCR Infrared Sensor OUTPUT Y PB/CB PR/CR R L DVD 4. Video Audio TV Guide On Screen Channel Manager Locks Timers Setup Power Swivel Move SEL Select Setup Set the Menu Options Set The Screen Saver Set The Inputs Set The AV NET Set The Closed Captions Set The IR...
... AV Net to control your equipment using your external Audio/Video equipment (VCR, Set Top Box, DVD, etc.). Each IR Blaster cable can use Connecting External Video Sources Your HITACHI Plasma Television is setup, it allows your IR Blaster cable to work. Infrared Sensor IR Blaster V L R OUTPUT VCR Infrared Sensor OUTPUT Y PB/CB PR/CR R L DVD 4. Video Audio TV Guide On Screen Channel Manager Locks Timers Setup Power Swivel Move SEL Select Setup Set the Menu Options Set The Screen Saver Set The Inputs Set The AV NET Set The Closed Captions Set The IR...
Owners Guide
Page 29
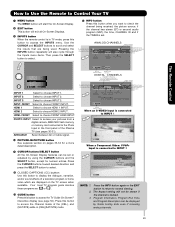
... to Use the Remote to Control Your TV ¶ MENU button The MENU button will start the On-Screen Display. º EXIT button This button will appear only when receiving a Digital Broadcast with Closed Captioning. AIR/CABLE Select between Air or Cable signal. µ PICTURE-IN-PICTURE button See separate section on the TV screen when available. Auto STEREO Closed Caption setting Audio Source Selection DIGITAL CHANNELS Digital Closed Caption This icon will exit all On-Screen Displays. ¾ INPUTS button When the remote control is in (CBL)(SAT/STB) mode. Digital channel Program...
... to Use the Remote to Control Your TV ¶ MENU button The MENU button will start the On-Screen Display. º EXIT button This button will appear only when receiving a Digital Broadcast with Closed Captioning. AIR/CABLE Select between Air or Cable signal. µ PICTURE-IN-PICTURE button See separate section on the TV screen when available. Auto STEREO Closed Caption setting Audio Source Selection DIGITAL CHANNELS Digital Closed Caption This icon will exit all On-Screen Displays. ¾ INPUTS button When the remote control is in (CBL)(SAT/STB) mode. Digital channel Program...

Owners Guide
Page 37
... indicator light will now control your set - In the unlikely event that matches your set -top-box/satellite codes : -Power -Cursor & Select -Number PAD -Menu -Info -Enter, Dash -Exit -Channel Up & Down -Guide -Last CH ባ EXCLUSIVE TV buttons These buttons are removed from the remote control. top-box/satellite systems (refer to pages 41-42 for the Set-TopBox/Satellite Receiver. 37 Turn ON your set -top-box/satellite receiver operating guide. 3. The remote will flash 3 times...
... indicator light will now control your set - In the unlikely event that matches your set -top-box/satellite codes : -Power -Cursor & Select -Number PAD -Menu -Info -Enter, Dash -Exit -Channel Up & Down -Guide -Last CH ባ EXCLUSIVE TV buttons These buttons are removed from the remote control. top-box/satellite systems (refer to pages 41-42 for the Set-TopBox/Satellite Receiver. 37 Turn ON your set -top-box/satellite receiver operating guide. 3. The remote will flash 3 times...
Owners Guide
Page 43
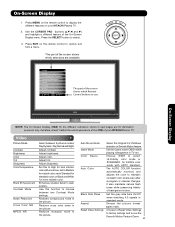
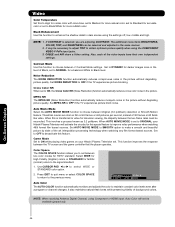
... of your HITACHI Plasma TV. 2. Reduces mosquito noise in dark scenes. Use the CURSOR PAD (buttons ̆,̄,̇ and ̈) and highlight a different feature of background colors. Video Audio TV Guide On Screen Channel Manager Locks Timers Setup Power Swivel Move SEL Select This part of the screen shows which Remote Control buttons to select. 3. Adjust tint. Use this to High for less intense color with HDTV standard. Auto Movie Mode Game Mode Color Space Auto Color Black Side Panel Aspect Reset Video Settings Select the...
... of your HITACHI Plasma TV. 2. Reduces mosquito noise in dark scenes. Use the CURSOR PAD (buttons ̆,̄,̇ and ̈) and highlight a different feature of background colors. Video Audio TV Guide On Screen Channel Manager Locks Timers Setup Power Swivel Move SEL Select This part of the screen shows which Remote Control buttons to select. 3. Adjust tint. Use this to High for less intense color with HDTV standard. Auto Movie Mode Game Mode Color Space Auto Color Black Side Panel Aspect Reset Video Settings Select the...
Owners Guide
Page 44
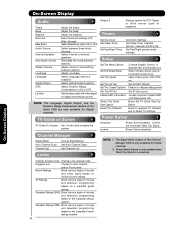
... Auto Channel Scan Channel List Access Signal Meter. Set The Menu Options Set The Screen Saver Set The Inputs Choose English, French, or Spanish text and Background. Control the motorized Table Top Stand. Change Access Code Change Lock access code. Digital Output DRC Lip Sync Select Optical Output options. Set The Closed Captions Feature to ON or OFF. Select The Quick Start Option Reset The Software Select the TV Quick Start Up Option. On-Screen Display On-Screen Display Audio Treble Bass Balance Adjust the treble. Set Sleep Timer...
... Auto Channel Scan Channel List Access Signal Meter. Set The Menu Options Set The Screen Saver Set The Inputs Choose English, French, or Spanish text and Background. Control the motorized Table Top Stand. Change Access Code Change Lock access code. Digital Output DRC Lip Sync Select Optical Output options. Set The Closed Captions Feature to ON or OFF. Select The Quick Start Option Reset The Software Select the TV Quick Start Up Option. On-Screen Display On-Screen Display Audio Treble Bass Balance Adjust the treble. Set Sleep Timer...
Owners Guide
Page 46
... level of Black, set to NORMAL for HDTV standard. The additional menu items BRIGHTNESS, COLOR, TINT, and SHARPNESS can be necessary to adjust TINT to obtain optimum picture quality when using Component or HDMI input, Auto Color will activate the circuitry for faithful (normal) colors to the signal standard. 1. CABLE and AIR share a Video setting. Set to DYNAMIC for darker images more in the picture. Game Mode Set to ON while playing video games on film...
... level of Black, set to NORMAL for HDTV standard. The additional menu items BRIGHTNESS, COLOR, TINT, and SHARPNESS can be necessary to adjust TINT to obtain optimum picture quality when using Component or HDMI input, Auto Color will activate the circuitry for faithful (normal) colors to the signal standard. 1. CABLE and AIR share a Video setting. Set to DYNAMIC for darker images more in the picture. Game Mode Set to ON while playing video games on film...

Owners Guide
Page 67
... the MENU button. 2. Video Audio TV Guide On Screen Channel Manager Locks Timers Setup Power Swivel Move SEL Select Setup Setup The Menu Options OR Set The Screen Saver Set The Inputs Set The AV Net Set The Closed Captions Set The IR Out CableCARD Information Select The Quick Start Option Reset The Software Move SEL Select On-Screen Display 67 Off Select OFF to previous menu. Setup Set The Inputs Use this feature to give a name to control your external Audio/Video equipment using the AUTO LINK feature...
... the MENU button. 2. Video Audio TV Guide On Screen Channel Manager Locks Timers Setup Power Swivel Move SEL Select Setup Setup The Menu Options OR Set The Screen Saver Set The Inputs Set The AV Net Set The Closed Captions Set The IR Out CableCARD Information Select The Quick Start Option Reset The Software Move SEL Select On-Screen Display 67 Off Select OFF to previous menu. Setup Set The Inputs Use this feature to give a name to control your external Audio/Video equipment using the AUTO LINK feature...
Owners Guide
Page 70
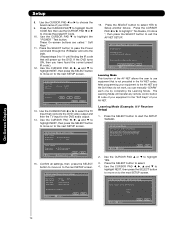
... button to the next SETUP screen. Learning Mode (Example: A/V Receiver Setup) 1. Inputs settings Video Input Audio Input Not Connected Not Connected Move Change Source Back SEL Select Next 15. Move SEL Select Back Next Move SEL Return Back Start 2. AV Net Setup Wizard : A/V Receiver Setup Do you like to the next SETUP screen. Use the CURSOR PAD ̄ to highlight YES. 3. Your DVD is not precoded in front of your AV network. The Learning Mode...
... button to the next SETUP screen. Learning Mode (Example: A/V Receiver Setup) 1. Inputs settings Video Input Audio Input Not Connected Not Connected Move Change Source Back SEL Select Next 15. Move SEL Select Back Next Move SEL Return Back Start 2. AV Net Setup Wizard : A/V Receiver Setup Do you like to the next SETUP screen. Use the CURSOR PAD ̄ to highlight YES. 3. Your DVD is not precoded in front of your AV network. The Learning Mode...
Owners Guide
Page 83
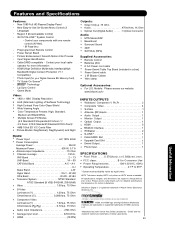
... and Specifications Features: • New 1080 Full HD Plasma Display Panel • New Easy-to 95°F. 1 Screen mode availability varies by input format HDTV Televisions display HDTV only when an HDTV source is a registered trademark of HDMI Licensing LLC. *Manufactured under license from Dolby Laboratories. Control your Digital Camera SD Memory Card) • TV Guide On ScreenTM • Technology • Lip Sync Control • Game Mode Video: • 1920 x 1080 Display Resolution • ALiS (Alternate Lighting of...
... and Specifications Features: • New 1080 Full HD Plasma Display Panel • New Easy-to 95°F. 1 Screen mode availability varies by input format HDTV Televisions display HDTV only when an HDTV source is a registered trademark of HDMI Licensing LLC. *Manufactured under license from Dolby Laboratories. Control your Digital Camera SD Memory Card) • TV Guide On ScreenTM • Technology • Lip Sync Control • Game Mode Video: • 1920 x 1080 Display Resolution • ALiS (Alternate Lighting of...

Owners Guide
Page 173
... parties for use of the Software shall belong to repair a defect, error or bug in U.S. The software is '' condition and any express or implied warranties, including but are hereby expressly disclaimed by hitachi to return such flash card or other intellectual property laws and treaties. GOVERNING LAW; By using the DTV or the digital television software installed on a "No Further Upgrades" list, which the U.S. HITACHI grants...
... parties for use of the Software shall belong to repair a defect, error or bug in U.S. The software is '' condition and any express or implied warranties, including but are hereby expressly disclaimed by hitachi to return such flash card or other intellectual property laws and treaties. GOVERNING LAW; By using the DTV or the digital television software installed on a "No Further Upgrades" list, which the U.S. HITACHI grants...

Owners Guide
Page 184
... Volume 51 Photo Input 30 Picture Mode 45 Picture-in-Pictur e (PIP 33-35 Power Swivel 5,6,79 R Remote Control Functions 26-32 Operation with other devices 36-39 Programming Codes 41-42 Installing Batteries 4 S Screen Saver 66 Setup 65 Sharpness 45 Smooth Motion Demonstration 48-49 Spanish Section 87-172 Speakers Connecting External Speakers 51 Internal 51 Specifications 83 Surround 50 T Timers 63 Tint 45 Treble 50 Troubleshooting 80 TV Guide On ScreenTM 52-54 V Video Settings 45...
... Volume 51 Photo Input 30 Picture Mode 45 Picture-in-Pictur e (PIP 33-35 Power Swivel 5,6,79 R Remote Control Functions 26-32 Operation with other devices 36-39 Programming Codes 41-42 Installing Batteries 4 S Screen Saver 66 Setup 65 Sharpness 45 Smooth Motion Demonstration 48-49 Spanish Section 87-172 Speakers Connecting External Speakers 51 Internal 51 Specifications 83 Surround 50 T Timers 63 Tint 45 Treble 50 Troubleshooting 80 TV Guide On ScreenTM 52-54 V Video Settings 45...


